Showing posts with label Nature's Harvest. Show all posts

Monday, October 11, 2021

A Tale of Two Cards

 Hi there!  Welcome back to my stamping room where ideas run amuck, or something like that...  It's been a little frustrating in my stamping room the last two days. I've got ideas galore, but when I start putting all the components together it's kind of a ho-hum deal.  Yesterday I had a great idea to make a blending brush sort of halo background and play around with the Nature's Harvest Bundle again.  I just love the way the stamps and dies play so nicely together, but can stand on their own just fine.  Ok, I did the Blending Brush background in the upper middle of a piece of Very Vanilla cardstock using Mango Melody for a gorgeous soft golden-orangey color.  Turned out great, and is perfect for fall.  Next up I stamped the coneflower bouquet on Very Vanilla using Memento Tuxedo Black ink.  Colored in the images with the Stampin' Blends alcohol markers.  That turned out nice too.  Putting it together?  Not so much.  Really pretty dog-gone boring at this point.  So I set that all aside overnight to come back to later.

Today, the idea of using the Artistically Inked stamp that looks like a cool alcohol ink background (or maybe just a long smudge) to color a fall background and add some of the really bold Love of Leaves images to make a really bold fall card.  Yes, I did the background and loved it.  Then stamped seven of the leaves with multiple fall colors and die-cut them.  Good so far.  When I tried putting it together, it was all so busy together it gave me a headache.  Set that aside too.  So now these two bunches of card parts were just sitting there.  And that's when inspiration struck - why not switch out the backgrounds and see what happens!  So here is one of them.  Tomorrow you'll get the second one.  Hope you like...

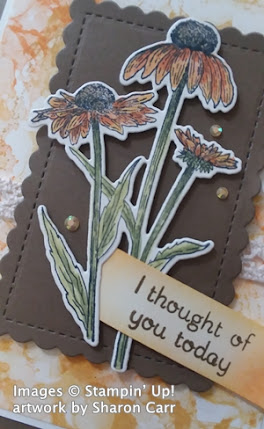
This shows the background using the Artistically Inked stamp.  Isn't is awesome?  The background piece of Very Vanilla has three different inks - Mango Melody, Daffodil Delight, and Bumblebee.  My Bumblebee ink pad is so juicy I had to off-stamp to get a decent color, likewise with the Mango Melody pad.  The inks were stamped to cover, but not really overlapping, the cardstock piece that is 5" x 3 3/4".   It's really fun to see how these stamps quickly make this alcohol-inked background.

After stamping, this was layered onto a piece of Very Vanilla cardstock that is 5 3/8" x 3 7/8".  It just needed a little sliver of Very Vanilla to go between the colors and the dark card base I wanted to use.  I chose Soft Suede for this which is cut to 8 1/2" x 5 1/2", scored and folded in half.  Each layer here was attached with the Multi Purpose Liquid Glue.


Like I mentioned earlier, the coneflowers were stamped with Memento Tuxedo Black ink and colored with Stampin' Blends.  The colors used were Mango Melody D, Pumpkin Pie L&D, Cajun Craze L, Old Olive L, Mossy Meadow L, and Crumb Cake D.  After coloring, it was die-cut using the coordinating die from the Harvest Dies.

To have these pretty flowers stand out from the background, I die-cut a piece of Soft Suede cardstock using the Stitched So Sweetly Dies.  It is a perfect foil for the flowers.  They are attached using Dimensionals and Mini Dimensionals where needed.

The sentiment comes from the Love of Leaves stamp set.  It was stamped on a strip of Very Vanilla cardstock using Soft Suede ink.  The one end was punched with the Banner Pick-a-punch.  One end was tucked under a flower stem and attached with adhesive.  The other end has a Dimensional popping it up.  

As I was putting the layers together, I noticed a piece of the Diamond Weave Ribbon that had been cut, but never used.  Hmmm...  I liked how it looked with the rest of the card, so why not?  I just used adhesive to attach it to the center of the card and then attached the focal piece to the card with Dimensionals.  Of course, I felt it needed just a little bling.  I used the 2021-2022 In Color Rhinestones that matched nicely.

The inside was finished simply with a little stamping with the same alcohol-ink stamp and some off-stamped Mango Melody ink and a little bit of the Daffodil Delight ink.  This is on the Very Vanilla layer and attached to the card base with the Liquid Glue.  

I figured this card would be used for one of my many notes I mail out to friends, so there are no sentiments stamped inside.  That's up to me to provide.

Well, that's it for the first installment on a Tale of Two Cards.  Hope you can see that the creative process doesn't always go smoothly, but you can usually do something with the unused parts and pieces.  It might not be exactly what you envisioned in your pretty little head.  But you never know, it might just be better!

Just a quick reminder that the current host code is on the top right corner of my blog post.  Thank you for your orders.  They are so appreciated, and so are you!  Enjoy your day, and don't get frustrated when your stamping projects don't turn out quite as planned.  You can always shuffle the pieces around and come up with something totally different.  There are no mistakes!  You can even pull the pieces of a card apart and start over.  And if there is absolutely no saving it?  Throw it away - it's only paper!  (OMG, did I say that?)  Start fresh and have fun!  That's what it's all about.

Blessings and many hugs,
Sharon

Sunday, September 19, 2021

Nature's Harvest with Blending Brushes

Hi there!  Happy Sunday to you.  Hope you've been able to spend time in worship today.  It's the perfect way to start off your week with your focus trained back on God's grace again.  Always need the reminder and always a blessing.      Today I want to share a card I made a couple of weeks ago to share with friends in Michigan.  It makes use of the awesome Blending Brushes that I really adore to do all the soft coloring!  So it's a win-win for me-pastel looks and so easy to make!

I can't get over how much I like the look of the colors softly blended on the die-cut images.  It always surprises me when I get something this wonderful just by blending ink onto cardstock and then die-cutting an image!  It's just like magic to me!

This card started with a strip of Very Vanilla cardstock, Bumblebee and Pumpkin Pie inks, and a Blending Brush.  I was just playing around with the colors adding in splotches all over, but not covering in totally.  I added in some Old Olive splotches to stay with sort of harvest-type colors, but it just wasn't right yet.  I added some Blackberry Bliss smudges in the last open areas to finish it.  I still wasn't sure what I would do with it.  

I had planned on using the Gorgeous Leaves stamps and Dies for making a card, but the colors just didn't seem bold enough for that. In fact, it looked pretty boring.  Then I remembered the Harvest Dies and thought I'd try die-cutting some of those shapes to see how they looked.  I had just read an article about putting packing tape (!) over the blended colors to make them shiny and brighter, so I had to try that too.  Oh my goodness!  It's so pretty!

Can you really see how gorgeous those blended colors are together?  Now that the 'pretties' were made, it was time to figure out a card that would showcase them.  I figured I'd use Blackberry Bliss cardstock to match the ink, but found that the Rich Razzleberry cardstock blended much nicer with the flowers.  So that's the card base, cut at 8 1/2" x 5 1/2" and scored at 4 1/4".  The next layer is Old Olive cut at 5 1/4" x 4".  This was die-cut in the center with the Stitched Rectangle Dies to make a 1" frame around the center opening.  At this point, it was embossed with the Subtle 3D Embossing Folder that is retired.  I liked the look of just a little extra texture it gives the finished card.

It needed a little more brightness to it, so a Stitched So Sweetly scalloped rectangle was cut from Very Vanilla cardstock, then a Stitched Rectangle Die slightly larger than the last one was used to cut a skinny frame of Vanilla to layer onto the card.  

Before putting the pieces together, I die-cut one of the long skinny stems from Early Espresso cardstock to give the flower bundle a little more fullness.  The look of them together was too dark, so I tried a branch from the same die set cut from the Sale-a-bration free Be Dazzling glitter paper.  This was the perfect bit to brighten the whole card up!  This glitter paper is made with larger pieces of glitter so you have an almost mirror effect going on.  Quite striking!

Working with the two frames that weren't attached yet, the pieces were put together in a pleasing look and attached behind the Very  Vanilla frame on the bottom, but overlapped on the top and sides.  After the pieces were all attached, the Very Vanilla frame was attached to the Old Olive frame using Multi Purpose Liquid Glue.  This was all attached to the card front using the Liquid Glue also. 

The inside of the card has a layer of Old Olive with another layer of Very Vanilla  on top of that.   At this time there are no sentiments either on the front or the inside of the card.  Since it looks quite generic,  I can add a sentiment to fit the occasion when I'm ready to use it.


Just wanted to add one more picture to show you the detain that is embossed in the image when you die-cut it.  It's very subtle, but just adds an extra touch of specialness when it's finished!  To me this card not only has visual appeal with the mix of fall colors and the stitching and die-cuts, but it has 'touch' appeal too.  I find myself touching the different textures, from the embossed Old Olive layer, to the embossing on the flower and the almost 'grittiness' of the glitter paper.  I love to pick up a card and not just see but feel all the different textures.  That makes it a real win in my estimation..

Ok, that's it for this post.  I added a few extra pictures this time around.  I hope they give you a real feel for this card.

If you're ordering yet in September, please use the Host Code shown here.  I really appreciate your order.  It's been a real blessing having you still order from me even though I've moved away.  I'm so grateful for the internet and phones so we can still be in touch.  

Reminder:  Sale-a-bration only runs through the end of September!  Time is running out for taking advantage of earning free items!

Hope you're enjoying this slightly cooler weather as we slide a little closer to fall.  I'm curious to find out how fall in South Carolina compares to the fabulous and colorful fall days in Michigan!

Make sure you find some time to relax and be creative.  It's really a good way to rejuvenate your spirit and make yourself happy.
Many Hugs,
Sharon