Hey there! I'm still sort of stuck in Valentine mode. There are more ideas out there to explore. Today, I've used the Country Bouquet Bundle again to come up with a slightly more traditional valentine for you. At least there are hearts on it this time! And it is a fun fold, so that's always a bonus. But wait! There's more! Just like those infomercials, I do have more for you today. There is a second card that starts with the same color and fun fold and then goes on from there. Hope you enjoy these cards and let me know what you think.
This card uses a very easy fun fold to get you started. You need a piece of cardstock that measures 11" x 4 1/4" that is scored at 5 1/2". For this card I used Balmy Blue. Then 2 3/4" is cut from the front flap. This piece is then placed sideways across the front of the card. Pretty quick and simple way to change the look of a card.
Let's start with the measurements on the DSP layers and get the base of the card finished before we move on. Two different DSP's are used here - the Country Floral Lane DSP on page 9 in the 2023 January-April Mini Catalog and the Dandy Designs DSP found on page 14 in the 2023 January-February Sale-a-bration catalog. They both have a base color of Balmy Blue to they work well together.
There are two pieces of the Country Floral Lane print. The larger one measures 3 5/8" x 2 1/8", and smaller one 4 1/4" x 1". If you're using this DSP, make sure you pay attention to the direction of the print. The Dandy Designs print measures 5" x 3 3/4".
There are three pieces of Basic White cardstock used here. The one for inside the card measures 4 1/8" x 2 5/8" to fit behind the cross piece on the front of the card. The next piece measures 3 3/4" x 2 1/4" and is for the left side of the card front. The last piece needs to be big enough to die-cut the square and stamp the two hearts - approximately 2 1/4" x 5 1/2".
First attach the left-hand DSP to the Basic White layer and attach to the card front. Next attach the striped DSP to the inside of the card. Last, attach the 1" strip across the front piece of the card. Use adhesive to attach all these layers flat to the card base.
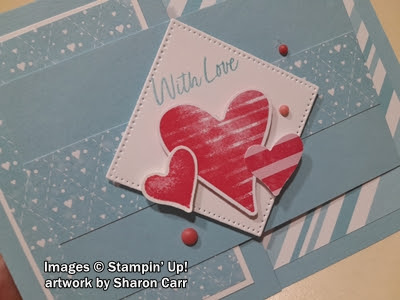
The square was cut using the Stylish Shapes Dies. It's the one that measures just less than 2" x 2". After cutting, the sentiment was stamped with Balmy Blue ink diagonally in the top corner. The sentiment comes from the Country Bouquet stamp set. This is one of the new sets that are available in the 2023 January-April Mini Catalog. On the left-over piece of Basic White cardstock, the large and small hearts were stamped with Sweet Sorbet ink and punched out with the coordinating punch. The two hearts are on one stamp and punch out together making it easy for you. Another small heart was punched from a scrap of the Country Floral Lane DSP. Overlapping each other, they were all attached to the square using Dimesionals.
Attach the cross-wise piece to the front of the card making sure you have adhesive only on the half that fits on the left side flap of the card! After adding this, line up the corners of the square and attach to it with Dimesionals.
Just one more picture showing the inside of the card. Before attaching the last Basic White piece, stamp the sentiment and the small heart accent using Sweet Sorbet ink.
Last touches on the card are the 2022-2024 In Color Matte Decorative Dots. They come in two sizes and different shades of the same colors - so cool! I used a large size in the 2nd darkest color and two tiny ones in the lightest and darkest colors. I like the extra contrast they give and really match the hearts on the front of the card perfectly.
OK, are you still with me? The next card is made exactly the same as the first, except for the stamp set and the DSP used. The measurements are all the same.
The stamp set and dies are called Playing in the Rain. The bunny is die-cut from a piece of the Rain or Shine DSP, which makes it so easy. I did fussy cut the two umbrellas used on this card. It didn't take but a couple of minutes.
I haven't decided on adding bling. I know I'll add something, just haven't decided on what yet. I have some retired "rain drops" from several years ago. They might be just what I need here.
Here's a quick picture of the inside of this card. Isn't it cute? Each of the animals has some glossy areas on their clothes and so do all the umbrellas. It really adds to the look. I hated covering up those darling umbrellas though!
Ok, that is definitely enough for today. Thanks for stopping in to see what's new today. I feel like I've been typing all afternoon. Hope you didn't think there was too much information to get through. It was fun creating these two cards - so similar, but yet so different looking.
Happy stamping and creating,
Sharon