Showing posts with label Winterly Tree Tops Bundle. Show all posts

Friday, November 22, 2024

Fun Fold Wintery Tree Tops Card

Hello friends!  I'm back with another fun fold card for you today.  I've been hoarding my stash of Designer Papers because they are so beautiful I can't bear to cut into them.  Yes, silly.  I know.  But that's been changing lately.  I've been making a concerted effort to start using all those fun and gorgeous prints I have.  Today's card uses 1/2 sheet, so I didn't want to make a mistake on the card made with my current paper.  So, I got out some retired prints I've been playing with for practice lately.  The card worked great, so on to the real project.  If you stick around until the end of the post, you'll see two other cards using different dsp to keep you thinking.  Just a fun extra.

Here's the final card I made.  I love the Nests in Winter DSP prints here.  They just work so well with this design.  Start with a print you like.  Cut it down to 12" x 5 1/2".  Make sure your print is either all-over with no up and down design, or make sure your print goes in the correct direction.  This is really imperative to the final design.

For scoring the DSP, I turned mine to the back side and scored at 4 1/4", 8 1/2", and 10 1/4".

The front piece has a circle cut from it.  You can cut this in different sizes or shapes from what I used depending on your design.  I used the largest circle in the Stylish Shapes Die set.  This card has the circle cut a little higher than center.  Make sure you open your card before cutting so only the front flap on the card is cut.  

Using the same circle die, a Gray Granite circle was cut to fit inside the front circle.  Using the next size down, a circle of Shaded Spruce cardstock was cut.  Then with the next smallest circle a bird was cut from another print of the same Nests in Winter DSP pack.

Okay, have all your circles cut?  It's time to move on then.  When you open the front flap, you have the right side that's been scored to fold in, then fold out again.  This makes a half fold inside flap to work with.  

Shut the front flap again.  You can see the half-folded flap through the circle you cut.  I added "green glue" just to the inner half circle of the flap that showed.  Keep this to a light amount of glue so it won't ooze out.  Attach the Gray Granite circle to this right through the cut-out circle on the card front to get the correct placement. 

Attach the bird circle to the center of the Shaded Spruce circle with adhesive.  Then attach these to the center of the Gray Granite circle using Dimensionals.  This is how it looks at this point.

A piece of Basic White cardstock was cut to fit inside the card.  This measured 5 1/4" x 4".  A sentiment from Perched in a Tree was used on this card.  It was stamped with Memento Tuxedo Black ink.  A small bird from the Winterly Tree Tops stamp was stamped right near the sentiment also using the same black ink.  A Real Red Stampin' Blends set added the color to the bird.  It was colored with the Light Real Red and then a little shading was added with the Dark.

The Basic White layer was attached inside the card with adhesive after the stamping and coloring.

The front sentiment on the card is from the Greetings of the Season stamp set.  This is an Online Exclusive set that also has a set of coordinating dies you can purchase.  So far, it seems like I'm using both the stamps and dies, just separately.  They are both great basic sets to have on hand.

For this card, the sentiment was stamped on a 1/2" strip of Basic White cardstock using Real Red ink.  A Shaded Spruce layer that measures 3/4" x 3 3/4" is added behind the sentiment to frame it.  This is added to the card front with Dimensionals.

At this point, there is no bling added to this design.  I tried several options, but nothing stood out to enhance the design.  Who knows, I might consider adding something later when inspiration hits.  (yes, it does once in a while)

Now on to the other cards I made to test out the fun fold...

Do you remember this DSP?  It's been at least 5 years since this retired gem was current.  I've only got little bits of this package left, but I was happy to find a full half sheet to work with here.

The same circle die was used for this card, only this time a Real Red circle of cardstock was cut with the largest die.  Then a Basic White circle and a piece of DSP as the last circle.

The sentiment is the same as the first card, just cut apart and attached at an angle with no layers this time.  The pieces are attached with Dimensionals.

This time a double white Baker's Twine bow was added to the design.  And it's a little hard to tell, but one Real Red & White Peppermint was added to the center of the door of the gingerbread house as an accent.

For this card, I didn't make my score lines on the inside, but on the front of the design.  When I made my folds, I noticed the inside design of 'frosting' was upside down from how I would have made it if I was paying attention.  You might also see an extra score line on the DSP because I measured wrong.  I know you never do that, but I just wanted to point out my mistakes.

You'd think I'd learn from my mistakes, but not so much.  Again, I scored on the outside of the DSP.  This green herringbone pattern was supposed to be the inside of the card.  Oh well.  Now it's the outside with all the prints on the inside.  Really, sometimes I don't know what happens to my brain when it just doesn't want to function properly.  

I think it still turned out cute.  I love the added pop of Shy Shamrock to the design.  I think this is really supposed to be the Emerald Envy color of several years ago.  But the Shy Shamrock seems to fill in just right.  The holly leaves were stamped and die-cut using the Hang an Ornament Bundle.  And another of those cute little peppermints was added as a berry.
The design is just a little 'busier' than I would prefer.  But all in all, I think my practice cards turned out cute.  

This is definitely a fun fold I need to bring out more often.  If you give this fun fold a try, let me know how yours turns out.  And try not to make the same silly mistakes I did!

Thank you for stopping by today so I could share another idea or two with you.  Leave a comment if you would.  It brightens my day to know you're spending some time with me.  And a big thanks for the lovely Thanksgiving cards that are gracing my dinner table!  I love seeing your wonderful creativity!!

Happy stamping and creating,
Sharon


Friday, November 8, 2024

Winter Birds Card

Hi all.  I've been planning ahead for all the cards I need to send out for Christmas, and I've been on a roll.  Today's card is a fun fold that's easy as pie (make mine pumpkin please!).  You can make three of these from one 12" x 12" piece of designer paper, so that's what I did.  Hope you love this idea!

Isn't this a wonderful card with a sweet country feel that's just right for Christmas?  Your first step to making these cards is deciding which piece of dsp that you're going to use.  For my cards, I chose one of the pretty prints from the Nests of Winter Designer Series Paper that you can find in the Mini Catalog.  I love the mix of stripes and the birds coordinating on the card to make it special.

On the 12" x 12" piece with the prints positioned properly, score at 2 3/4" and 6 5/8".  Then turn the paper 1/4 turn and cut at 4" and 8" to get 3 sections that measure 4" x 12".  This will be the main part of your card.

I used a 4 1/4" x 5 1/2" piece of Garden Green cardstock for the card base.   This is attached to the folded dsp.  I used "green glue", but you could use the adhesive of your choice.  

The tag on the card front is from the Nested Essentials Die set.  I liked that it slightly overlapped both sides of the turned back flap.  The sentiment is from the Perched in a Tree stamp set.  This was in the Online Exclusive section if you don't have it yet.  The bird is die-cut from another print of the Nests of Winter DSP pack.  I just love how easily you can die-cut a whole stack of these birds and another set of birds too with the coordinating die set.

The ribbon is the Wild Wheat Rustic Striped Ribbon.  This has such a nice golden tone to it.  In the catalog I thought it looked stiff, but it's a nice ribbon that's very pliable which makes it easy to use.  It's attached to the point of the label with a Mini Glue Dot.

For the inside of my card, I cut two different sizes of Basic White cardstock for the sentiments.  The one on the left is 3 1/2" x 3 1/2" square.  The right one is 3 1/2" x 3 3/4".  Both of these sentiments are ones I've owned for a good while.  I was looking for something with a religious tone to the sentiment and had a hard time finding what would work.  They are both stamped with Memento Tuxedo Black ink.  Then they're attached with adhesive.

After giving it much thought, I'm leaving these cards bare.  That's right, no bling!  Oh my, what is this world coming to?   Do you think that some bling is needed here?  If so, what would you use?

Thought I'd share the picture of all three cards together.  Since there's almost no stamping and no coloring at all, these cards can be made in a minimum of time.  But they still look special.  Maybe you'll add this idea to your Christmas card stash this year.  If you don't have this particular DSP, try something else that works.  Let me know what you made!

Happy stamping and creating,
Sharon

Thursday, September 5, 2024

Delicate Forest Autumn Card

 Hello friends!  It's been wonderful weather that I'm enjoying to the max.  But all those fall color changes will be coming soon, so I thought I would get a jump on it ahead of time.  On yesterday's card, I used a piece of the Country Woods Designer Series Paper that I had die-cut.  Today, the card uses the rest of the piece of DSP that framed the piece that was cut for yesterday.  Sometimes my extra pieces sit around for days (or weeks) before I get around to utilizing them.  I made sure to get this one used right away.

I started this card with the piece of 4 3/4" x 3 1/4" Country Woods Designer Series Paper.  The center was cut from this using the largest rectangle die in the Everyday Details die set.  I love how the frame has all the open-work dots all around the opening.  It just gives it a little more interest than a straight cut.

Next is the piece of Very Vanilla cardstock to layer the frame on.  This measures 4 7/8" x 3 3/8" which gives it just a skinny frame of vanilla around the wood grain piece.

The tree from the Delicate Forest Bundle was used for the main image.  I measured where the frame opening would be so I could place the tree.  The stamp was inked with Pumpkin Pie ink then dabbed on with Cajun Craze ink to meld the colors together.  There is another stamp in the set that is a bunch of scattered leaves.  I added just a few coming from the tree and just two tiny leaves up higher near the tree.

The wood grain frame was attached to the Very Vanilla layer after the stamping.  I used Tombow Liquid Glue for this so it could be carefully maneuvered into place.

The card base of Cajun Craze was cut to measure 8 1/2" x 5 1/2", scored and folded in half.  A layer of Early Espresso cardstock was cut at 5 1/4" x 4" to add next.  This is attached with adhesive.  The Very Vanilla layers are attached next using Dimensionals.

The sentiment is one of my current favorites and it's from the Winterly Tree Tops stamp set.  It is stamped on a 7/8" x 2 3/8" piece of Very Vanilla cardstock.  I used Cajun Craze ink for this.  This is layered onto a piece of Cajun craze cardstock that measures 1" x 2 1/2".  They are attached together with adhesive.  Then this is attached to the card front with Dimensionals.

The embellishments for this card are simply 2 golden birds from the Adhesive-backed Dragonflies & Birds bling.

Hope you've had a chance to peruse the new mini catalog and all the new items in the Online Exclusive and Kit section.  There's a wonderful selection right now.  If there's anything you're wanting that is back ordered, be patient.  The items will all get back in stock soon.

Thank you for sharing some of your precious time with me today.  I've got several more cards lined up ready to be posted.   Just need to find the time to do it all.

Happy stamping and creating,
Sharon


Friday, July 19, 2024

Another Winterly Tree Tops Card

Today I have a card for you that started out as one of the make & take projects Stampin' Up! had for this new stamp collection, Winterly Tree Tops.  It will be available in the new Mini Catalog that will be coming out soon.  I have to admit I really didn't care for the project - it just wasn't me.  Everyone has their own tastes in favorite color combos and design layouts, etc.  This project simply wasn't a favorite for me.  So, I took some of the components that I already had cut to make the project and made my own project instead.  This one might not be one of your favorites, but that doesn't mean you can't take parts of the card design and change them into something you prefer.  Here's my take on the project.  What will you make with this idea?

This project starts with the Mossy Meadow cardstock base.  For a previous project we made, we were told to keep the Basic Gray discard piece that was die-cut from the pine branch frame used for that card.  I didn't care for how the piece was used, so I did my own design with it.  The Basic White piece was cut to measure 5" x 3 5/8".  The Basic Gray discarded piece was attached onto this using Tombow Liquid Glue.  This makes it sort of a reverse design with the background in front and the white pine branches recessed into the design.

A 6 1/4" length of Black & White Checked Ribbon was attached around the layers a bit little below halfway and attached in the back.  All the design elements rest on this.  After adding the ribbon, the layers are added to the folded card base using the same Tombow Liquid Glue.

The bird comes from the coordinating Nests of Winter Designer Series Paper.  It's die-cut using the Winterly Tree Tops die set.  Isn't it wonderful when you can die-cut images right from the DSP, so everything matches up nicely?  It sure makes it easy on us!

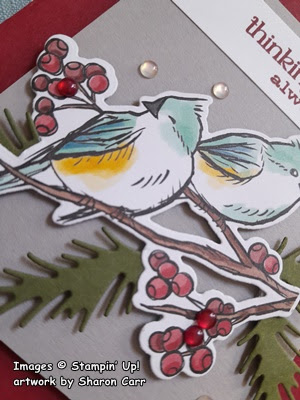
The die set also has a couple of small pine branches too.  I cut out several from Basic White cardstock, but it looked like I needed another color in the design.  I tried adding Mossy Meadow pine branches, but I didn't really like that.  Next, I tried some silver branches from the Silver Foil Sheets.  What a perfect addition.  The shine of the silver brightens up the whole card!  The branches are attached behind the bird using adhesive.  Then the cluster was attached to the card over the band of ribbon on the front using Dimensionals.

The sentiment is from the new Greetings of the Season Bundle.  It is stamped on a label cut from one of the label dies that are part of the bundle.  It's stamped using Cherry Cobbler ink, then trimmed down on the bottom edge.  This is tucked up right next to the ribbon going across the card.  A bow made from the same ribbon is attached to the ribbon using Mini Glue Dots to hold in place.  

The bling used for this card is from the Cherry Cobbler & Pearl Adhesive-backed Berries.  I thought they carried the design of the berries the bird is holding to the entire front of the card.

The inside of the card has a layer of Basic White cardstock that measures 5 1/4" x 4".  On this another sentiment from the Greetings of the Season stamp set was stamped with Cherry Cobbler ink.  The extra white and silver pine branches that I die-cut earlier are added in the corner to finish.

Just a reminder that there is just over a week left of Stampin' Up! Bonus Days!  You don't want to miss out on this sale.  For every $50 you spend on merchandise from the catalog or On-Line Exclusives, you will receive a code in your email that is worth $5 off to be redeemed in August.  That's a win for you.  Just don't lose the code(s) that are sent to your email.  No one else has access to them but you, so if you lose it you lose out on the savings.  Have fun shopping.  I know I have!

Happy stamping and creating,
Sharon

Wednesday, July 10, 2024

New Winterly Tree Tops Bundle is Gorgeous!

 Hello Friends!  I just have to give you a sneak peek to a lovely stamp and die bundle along with the gorgeous new DSP that coordinates with it!!  This will get you in the mood for Christmas, but that's not the only season it covers.  The images and sentiments are generic enough to work all year long.  This is a new collection that will be coming in the fall mini catalog soon.  Demonstrators were able to create with these this month to get a feel for them and come up with ideas.  The name of the bundle is called Winterly Tree Top, and the DSP is called Nests of Winter.  You can use all these items together, but they work just as well separately.  Stampin'Up! gave us instructions to make several projects and today I want to focus on one of them.  First, I'll share what my version of the first project was, then share the original project.  I think you'll love both versions!  On to the new Winterly Tree Tops!

Here is my version of the project.  This one has a Christmas feel to it with the Cherry Cobbler colors and the evergreen branches added to the design.  This layout is the same as the original project and is a good one to use anytime.  The dimensions are:
Cherry Cobbler - 8 1/2" x 5 1/2", folded in half
Gray Granite - 3 1/4" x 4"
Basic White - 3/4" x 3 3/4"

The main focal point of the birds come from one of the sheets of the Nests of Winter DSP that have birds that can be die-cut using the coordinating dies in the bundle.  Don't you love it when you've got these beautiful images you can use, and you don't even have to fussy cut them out!!  I know there are some of you that hate fussy cutting anything, so this is made for you.  How exciting, and it makes the creating so much faster.

After die-cutting the birds, I used another die from the set to cut four of the pine branches from Mossy Meadow cardstock as an accent for the card.

All of the design pieces would be built up of the Gray Granite cardstock piece, so I was using that to measure the placement of the pine branches.  They are attached behind the birds and attached with multiple Mini Glue Dots to hold in place.  When they were positioned how I liked, multiple Mini Dimensionals were added behind to hold everything in place and raise it up from the Gray Granite layer.

The sentiment is from the Winterly Tree Tops stamp set.  I love this sentiment and I've been using it on other projects already.  (Check back to one of the pear cards that it was used on.)  The sentiment is stamped with Cherry Cobbler to match.  Then the label is attached to the top of the Gray Granite layer overlapping on each end of the label.  It's attached with adhesive.

The Gray Granite layer is attached to the folded Cherry Cobbler card base using Dimensionals.  I was going to attach it flat, but it looks so much better with the Dimensionals.

The gems added to the design are from the Cherry Cobbler & Pearl Adhesive-backed Berries that are part of this collection.  Can you see the Cherry Cobbler dots are added to the berries?  The semi-clear dots are then added to the background.  The clear dots have just a hint of the Cherry Cobbler color to them which is a nice touch.

OK, that's my version of the original card that was part of the projects.  Let's see the differences.

The card base is Blackberry Bliss with the next layer of Crumb Cake.  Don't these changes already make a huge difference in the overall look?  This card makes me think more of fall with the warmer colors.

The birds and a few 'pussywillow' type branches are stamped with Memento Tuxedo Black ink onto Basic White cardstock.  The images are colored with Stampin' Blends.
Birds - Ivory Blends with Color Lifter to add highlights
Branches and beaks - Bronze Blends
Berries - Cherry Cobbler Blends with Color Lifter at the top of the berries

For this card, the sentiment is stamped with Mossy Meadow ink.  The strip of Basic White cardstock is about 5/8" wide.  

The card is put together the same with the sentiment on flat, the birds popped up with Dimensionals, and the whole Crumb Cake layer is popped up with Dimensionals also.

The gems were a surprise to me.  I know you can color rhinestones and pearls, but I never thought to color the Flat Adhesive-backed Pearls.  They have a lovely iridescent look to them that I never thought to try coloring.  These pearls are colored with the Bronze Blends and this gives the pearls a wonderful warm look to them.  Perfect for this card.  I'll have to remember this idea.

Well, there you have two ideas to get you started when you get the new Winterly Tree Tops Bundle in September.  It's definitely worth the wait and you're going to love the possibilities.

Thanks for checking in today.  Hope you like these two versions of basically the same card.  This is a great way plan your cardmaking when you're in a creative slump, and we all have them!  Find a layout you like and see how you can do your new version of it.  I've already got some ideas for this layout using the Cheerful Daisies and also the Magnolia Mood sets.  We'll have to see how they turn out.

Bonus Days are still going on through the end of July.  For every $50 you spend, Stampin' Up! will send you a coupon code for $5 off to use in August.  Don't you love those sales?!

Happy stamping and creating,
Sharon

Monday, June 24, 2024

Penciled Pears Again

Hello Friends!  I've got another card to share today that uses the interesting Penciled Pears again.  I wasn't sure this would be on my list of must-have stamps, but Connie proved me wrong.  I'm so happy I was able to give the set a trial run at her house.  It totally convinced me that it was a good idea to order it!  She had already made a card with the set when I got there that intrigued me, but it used several items that were not current SU! products.  I wanted to stay current with what I was using, so Connie and I made another set of cards basing them loosely on her original.  Let's look at them all and see what you think.

First, I'll share my version of her original card.  I seem to be on a kick of using the new Basic Beige cardstock and ink.  I just love this color that enhances any card with a neutral look.  It seems to be my new go-to color!  The card base measures 8 1/2" x 5 1/2" and is folded in half.  The strip of four Penciled Pears is stamped with Basic Beige ink.  I staggered them going across the card front so they look a little more random. 

The large pear is stamped using Basic Beige ink on Basic White cardstock.  A little extra color was added using Soft Seafoam Light & Dark Blends on the pear and leaf, Old Olive Light on the stem and light touches in the shading of the pear and leaf, and Gray Granite Light on the shadow under the pear.  This was die-cut using the Countryside Corners die set.  The pear was kept near the top of the die-cut area.  

A larger die from the set die-cut a piece of Soft Seafoam cardstock to frame the pear.

Sneak Peek Alert!!  I love the sentiment used here.  It's from a set called Winterly Tree Tops.  It won't be available for a few months, but it is coming!  All I can say is you'll love it!!  Anyway, the sentiment is stamped with Memento Tuxedo Black ink on the bottom area of the die-cut.  

After stamping, the Basic White layer is attached to the Soft Seafoam layer with adhesive.  Some Linen Thread was wrapped around three times and tied into a loose bow.

The die-cut layers are attached to the card front using Dimensionals.

Three Opal Rounds gems are added to the design.

Now on to Connie's version of this design...

The first change is the Basics Embossing Folder that was used for the background of her card base instead of the stamping.

The same Countryside Corners die set was used on the Basic White cardstock, but the layer is changed to Lemon Lime Twist.  This automatically gives the card a much greener look.  

The pear is stamped just about in the middle using Basic Beige ink.  Touches of color are added with Stampin' Blends:  Light Soft Seafoam, Light Crumb Cake, Light Old Olive, Light Gray Granite, and Light Granny Apple Green

After coloring, the two die-cuts are attached together with adhesive.  Then they are attached to the card front using Dimensionals with the top very close to the top of the card base.

The same sentiment is stamped on a strip of Basic White cardstock using Gray Granite ink.  Looks like the strip is about 3/4" x 4 1/4".  It's attached flat to the card front.

For an embellishment, three of the Tinsel Gems 4-pack are attached to the white die-cut under the pear.

This is a picture of the original card Connie made.  Looking at it you can see different elements we each picked out from it to focus on for our cards.

I'm not going to give you a list of items used, because I don't have it written down anywhere.  I'll just give you a quick summary instead.  

There is a light green foil used in the band across the card and to frame the sentiment.  

There is a yellow color added to parts of the pear for added interest.

There are three olive-toned gems added to the finished card for embellishment.


That's all I can give you today.  I hope you enjoy the three different versions using this interesting Penciled Pear stamp set.  Like I mentioned earlier, I didn't think I needed this set, but I've changed my mind after creating with the pears.  Hope you give this set a try and see what you create with it.

That's it for now.  I'm visiting the doctor tomorrow as this sneezing and coughing and congestion stuff is hanging on.  It's been almost two weeks now, and that's just too long!  Wish it didn't make me so exhausted all the time.  Maybe my doc has a miracle cure and I'll be back to myself soon.

Happy stamping and creating,
Sharon