Showing posts with label Golden Greenery Bundle. Show all posts

Thursday, September 26, 2024

Golden Greenery and Bells

Hello friends!  I hope you're staying dry if you live anywhere in the path of hurricane "Helene".  Oh boy, we've had enough rain for a while, but I don't think it's quitting any time soon.  They've even shut down the area schools because of high winds.  That just gives me a good reason to stay inside and get a blog post in.  Today's card is taking us forward to Christmas again.  It's a simple card with just stamps, ink, and paper.  I did have to add another layer or two just because I couldn't help myself.  Come play with me...

Have you gotten the Golden Greenery set yet?   I've had fun using the evergreen boughs on several different cards, but now I'm finally giving the bells a try.  I was worried about how they would look, but I love them!  And they're so simple to make with 2-step stamping!   You really should give this set a try.

I started with a piece of Very Vanilla cardstock that measures 5 1/8" x 3 7/8" that is used for all the stamping on this design.  The first thing I stamped was the sentiment so the design could be arranged around it.  The sentiment comes from the Perched in a Tree set and is stamped with Cherry Cobbler ink.  It's fairly low and about 1" from the left edge of the cardstock.

Next the evergreen boughs were stamped in.  The more solid branch was stamped three times with Granny Apple Green ink.  There is also a partial image stamped in the top right corner to fill in.  Over these branches, the finer needled image was stamped with Old Olive ink.  This 2-step aspect really fills out the look of the branches.

The bells were stamped next.  There are two sizes, and I used them both.  I practiced with a couple of ink combos to find one I liked.  For this card, I used Daffodil Delight on the solid layer.  Then Crushed Curry was over-stamped to add the details.

The berries were added next.  There are two stamps for the berry clusters - the outline and the solid.  For this card, I used only the solid stamp and didn't add the outline because I didn't think it was necessary this time.  They are stamped with Cherry Cobbler ink to match the sentiment.

I wanted to add to the colors of the card, so I spattered Old Olive ink from a marker over the design.  I love the speckled look this achieves, but you need to keep a light hand, so it isn't overdone.

Speaking of overdone, I think I got a little carried away with the berries and added a few too many.  Reminds me of Heather's first shirt painting class when we were painting watermelon slices on our shirts.  I was painting my own shirt, so I wasn't really paying attention.  She was having so much fun painting the seeds that it was totally overrun with them.  We still laugh about it, but she kept that shirt for years.  Anyway, the lesson is - don't go overboard with too many berries.

The stamped layer was attached to a Cherry Cobbler layer that measured 5 1/4" x 4".  This gave me a very skinny Cherry Cobbler frame around the stamped images.  Then this is attached to a folded Very Vanilla card base.  I used Dimensionals to adhere it together.

I debated about adding some bling, or a bow, or something and really didn't like anything I tried.  So, the only bling added to the card is a coating of Wink of Stella on each of the bells.  So pretty and subtle.

I said this was an easy card to make.  The 2-step stamping on the images really does all the work for you.  I love the finished look of this card and hope you do too.

Happy stamping and creating,
Sharon

Wednesday, September 18, 2024

Easy Layout Two Ways

Hello people!  Hope you're having a good week.  We're back to rainy weather and it's definitely cooler.  You can really feel the difference in the temperature.  That 10 - 20 degree difference from a week or so ago really changes things.  That means autumn is here as far as I'm concerned, so all the pumpkins need to come out and the summer displays need to be packed away for another year.  I really love autumn when you have the crispness in the air and all those wonderful colors displayed on the trees.  Definitely God's handiwork!

When I was wandering around Pinterest, I came across a card sketch that really appealed to me.  (Yes, I spend way too much time there!)  I sat down and made one card from the sketch.  Then couldn't help myself, I made another one just changing the colors.  Basically, I used the Golden Greenery suite for both cards, and I think both of them are simply gorgeous!  You can only find this suite of products in the Online Exclusive area of the Stampin'Up! shop.  Make sure you check it out.

Neither of them shows up as gorgeous and bold as they do in person.  You'll have to take my word for it, or else make these two cards yourself.  You can stamp right along with me.

I started with the green and gold card first.  All the main parts of this card are the different prints of this DSP.  They all look so perfect together on this card.  The base of the card is Old Olive that measures 8 1/2" x 5 1/2".  It's scored at 4 1/4" and folded in half.

Next is a beautiful layer of the Season of Green & Gold Designer Series Paper.  I love this green print with all the colors of green and sketched out with gold.  How elegant!

The green/gold print layer measures 5 1/4" x 4".  There are three strips of another green print with sketchy stripes next.  These are cut to measure 5 1/4" x 1/2".  These three strips are attached across the center of the card as shown using adhesive.   Then this layer is attached to the card front with adhesive.

A piece of Old Olive cardstock was cut next.  It measures 3" x 3".  To add to this layer, a piece of a 3rd print of the DSP was cut to measure 2 3/4" x 2 3/4" and is attached to the Old Olive layer with adhesive.  This print is a darker mottled two-tone green print that I thought worked well for the base of the "greenery".

Two greenery dies from the Golden Greenery Bundle were used here.  The larger round-leafed stem was cut from Gold Foil.  The smaller stem was cut from another print (4th) from the Season of Green & Gold DSP. There is a die that matches the print perfectly to make it easy. After cutting these, the gold stems were attached to the square layer using "green glue" on just the parts that will touch the square base.  The green stem was attached with several Mini Glue Dots under the leaves, but with "green glue" on the stem.
A small bow was made from the Gold & Silver Trim Combo in the Annual Catalog.  It was attached over the stems with a Mini Glue Dot.  Then the entire square was attached to the card front using Dimensionals.

The sentiment comes from Shepherd's Care stamp set.  It's stamped on a 1/2" strip of Basic White using Old Olive ink.  It's trimmed to fit under the leaves and attached with adhesive.  

There are three gold sequins scattered for some bling.  They are from the Neutrals Adhesive-backed Sequins.

That's the first card.  On to the elegant gold and vanilla card.

The first change is using Very Vanilla for the card base.  Next is a layer of another (5th) print from the Season of Green & Gold DSP.  This measures the same as the previous card.  There are the same three strips added across the card base this time in Gold Foil to accent.  

The Very Vanilla and Gold Foil squares are the same measurements as the first card.  The larger leafy stem is die-cut from Very Vanilla, and the smaller stem is cut from Gold Foil using a different die from the same set.  They are attached the same way.

The sentiment is from the Everyday Greetings set that is an Online Exclusive item.  The piece of Very Vanilla cardstock measures 7/8" x 2 3/4".  I used Pecan Pie to stamp the sentiment.

For this card I used three Adhesive-back Sparkle Gems as an accent.  The ribbon is a retired Vanilla & Gold Ribbon that I had on hand.  

This layout is really quite simple.  I have a notebook that I keep adding layouts that I like for future reference.  It comes in handy when I'm kind of stumped for an idea.  Hope this gives you some ideas and gets you stamping.

Happy stamping and creating,
Sharon 

Wednesday, July 31, 2024

Golden Greenery Christmas Card

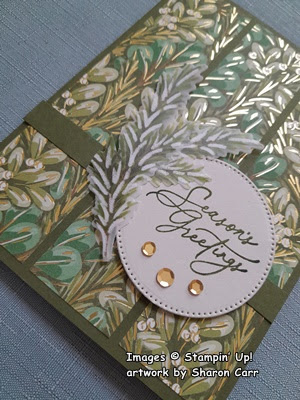
Hello friends!  Are you ready to jump into making those lovely Christmas cards?  I know we're still in July and are months ahead of schedule, but can you ever get those Christmas cards made to soon?  Hmmm, nope, I don't think so.  Today's card features the gorgeous new Online Exclusive Golden Greenery Bundle with the coordinating Season of Green and Gold DSP and the Graceful Greenery Vellum.  Oh my, so gorgeous!  Each one of the items are very nice on their own but put them together and you have sheer perfection.  At least, I think so.  Either green and gold or navy and silver are my go-to Christmas colors, so this collection which features different greens with touches of gold throughout really appeals to me.  Let's check out this first card made with these new products.

This card really showcases one of the beautiful Season of Green and Gold Designer Series Paper designs.  Isn't it really gorgeous?  The card base is Mossy Meadow which is one of the coordinating colors of this DSP.  The Mossy Meadow cardstock is cut at 8 1/2" x 5 1/2" then scored and folded in half.

This design of DSP was cut across the 12" x 12" paper at 5 1/4".  Then three strips of cardstock were cut from this at 1 1/4" wide.  I used Tombow MultiPurpose Glue to attach the strips in order of cutting to the card front.  To make it easier for even placement, I added a very small touch of adhesive to the center of each piece so they could be spaced apart correctly.  Then I carefully lifted one strip off and used the "green glue" to attach the strip properly.  Then picked up the next strip and continued on.  This tends to keep the pieces lined up while adding the "green glue" on each piece and attaching to the card front. 

Next, a 3/8" strip of Mossy Meadow cardstock is attached across the card front with "green glue".  I debated about using either Old Olive or Garden Green for a contrast color, but for this card I preferred sticking with the one color.  Usually when I am creating with this card sketch, I tend to use a slightly wider piece of cardstock - 1/2" to 3/4".  But this is what I chose to use this time. 

The sentiment label is die-cut from Basic Beige cardstock using the 3rd largest circle die from the Stylish Dies set.  The shape and size always work nicely for this card sketch.   The sentiment is from the Greetings of the Season stamp set.  This one fit on the label nicely and is stamped with Mossy Meadow ink.

The evergreen branches are actually the printed Vellum DSP.  Aren't they perfect?  Two pieces of the vellum were die cut with the coordinating die set.  The smaller piece was an edge cut so not all of the branches were there.  It is attached to the side of the circle with adhesive.  The branches just follow the angle of the sentiment.  The larger branches were attached right over this and covered the edge of branch that wasn't there.

This was turned over and a good number of Dimensionals and Mini Dimensionals were added to hold it all together and lift it from the card base.  It was attached to the card front about 1/2" or so from the right side.

A trio of the Neutrals Adhesive-backed Sequins in gold was attached to the bottom of the label.  I curved them to follow the lines of the label.

The inside of the card was finished to match the card front.  A piece of Basic Beige was cut to measure 5 1/4" x 4".  Another sentiment from the Greetings of the Season was chosen for the card.  It's stamped with Mossy Meadow ink.

I had another length of the 3/8" Mossy Meadow cardstock that would work.  I added it across the bottom using "green glue" and needed to trim just a smidgeon from one of the edges, so it fit.  Then I decided a 1/4" scrap strip of Basic Beige would fit right inside of that.  So, it was trimmed to fit and attached over the Mossy Meadow strip using "green glue".  I like the addition of these strips inside the card.  They just bring in a little more texture and interest.

Hope you enjoy this card idea.  I love the greens with the gold touches very much.  Seems so very elegant.  Of course you can use this card layout for many different reasons.  Just get out all that DSP you're hoarding and use this card sketch to make your next masterpiece.

Thanks for stopping in today.  Hope to see you again soon.

Happy stamping and creating,
Sharon