Showing posts with label Joy of Noel Bundle. Show all posts

Wednesday, December 6, 2023

Red and Gold NOEL

Hey friends!  Are you having a good day?  I started my cookie baking on Sunday.  Then I made a batch of peanut butter cookies this morning.  I hope if I do a little baking every day, maybe I'll get my usual plate of cookies made in time for sharing.  Why is it when I was at the grocery store with my list of things to make all these cookies, I either forgot to put things on the list or forgot to pick it up at the store.  Looks like another trip to the store is necessary for making more cookies.  I can never have enough different flavors of cookies!  They are my downfall.  Well, let's leave the cookies alone for a while and get on with the card making.  OK?  

Today's card comes with two versions again.  When I'm making my cards, so often I can't decide to make them one way or the other, so of course, I make two!  That's what happened with this card.  I had the idea in my head with general thoughts on DSP and ribbon accent, but then got bogged down trying to decide which color to feature and which to use as an accent.  Take a look and choose which one you prefer.

Both cards start with a Thick Basic White cardstock that measures 8 1/2" x 5 1/2".  No surprise there, just a basic card base.

Let's focus on this card first.  The first layer on the card is Cherry Cobbler that measures 5 1/4" x 4".  Do not attach to the base yet.   

Next is a layer of the gorgeous Joyful Specialty Design Series Paper.  This print is a delicate design of gold leaves, holly and evergreen branches accented with Cherry Cobbler berries.  So pretty.  I used a piece measuring 3 1/4" x 5".  This is attached with adhesive to the right side of the Cherry Cobbler layer framing the top, bottom, and right side to match.  Just a heads up - the dimensions on the width of the DSP might change with your choice of ribbon.  

The ribbon I used is retired from possibly last Christmas.  Some of you must still have some of this ribbon left.   It's a beautiful woven Cherry Cobbler and Gold ribbon that is 1/2" in width.  When you look at the ribbon it changes to show more of the Cherry Cobbler or the Gold depending on how the light hits it.  I thought it would be a great match with this lovely DSP.  A 6 1/2" strip was wrapped around the open area left from the DSP.  It's attached in back with adhesive.

This layer is then attached to the card base.  I used Dimensionals to attach it.

The ribbon looks so much more gold here because it's angled to catch the light.

On a piece of Basic White cardstock that measures about 2 1/2" square, the NOEL letters were stamped in the center with Cherry Cobbler ink.  It's die-cut using the Joy of Noel Bundle.  The square die fits the lettering perfectly.  After cutting, I added a 2 3/8" square of the Distressed Gold Specialty Paper behind it.  This beautiful paper can be found in the Annual Catalog.  They're attached together with adhesive.

The detailed die from the Joy of Noel Bundle cut a layer from Cherry Cobbler cardstock.   I did have to run it back and forth in the Big Shot several times to get the detail to cut nicely.  The NOEL lettering layers are attached to the detail die-cut using adhesive.  This is all added to the card front using adhesive.  

On this card I used the gold pearls from the Festive Pearls set as an accent.

Now we'll take a closer look at the opposite design.  This card starts out the same with the Thick Basic White card base, the Cherry Cobbler layer, the DSP layer, and the ribbon added to the side.  The NOEL lettering is still Cherry Cobbler ink on the Basic White and die-cut. 

The Cherry Cobbler layer was cut 2 1/2" x 2 1/2" square, so it's a little larger than the distressed gold layer on the other card.  The detail die cut the Distressed Gold Specialty paper to make the detailed layer.  Again, I ran it through several times just like the first time. 

The Distressed Gold layer is attached to the card base flat using adhesive.  The NOEL and Cherry Cobbler layer were attached over the gold layer using Dimensionals.

For an accent, the same Festive Pearls were added, but this time I chose the Cherry Cobbler pearls.

I hope you like these two NOEL cards.  Like I said, I really couldn't decide which one I preferred.  So, it's up to you to decide which one you like better.  Let me know which one you prefer.  I'd really like to know what you think.

Make sure you shop in the Last Chance areas to see what's retiring.  These items will only be available until January 3rd unless they sell out before that.  Some of the Designer Series Paper packs are already gone.   And don't forget to visit the Clearance section to get some really great bargains.  Please consider using the Host Code at the top of this blog.  I really appreciate it when you do.

Thanks for stopping by to see what I've been creating.  Hope you're inspired by something you see and get out your stamps to create something beautiful yourself.

Happy stamping and creating,
Sharon

Wednesday, November 29, 2023

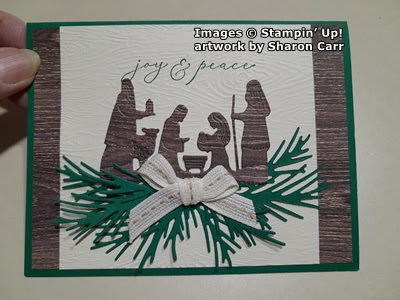
Night Divine Nativity Card

Hello, hello!  Are you staying warm?  Oh my goodness, it's cold here.  It's been getting below freezing the last two days, and I'm so not prepared for that!  This isn't why we moved to the south.  We thought we'd get away from the cold.  I know, most of you are already dealing with that kind of weather and maybe some snow too.   So, I shouldn't complain.  Well, maybe just a little now and then.  😄  I'm still working on making my cards for Christmas.  I keep planning to use the Night Divine Bundle, but then I end up grabbing some different stamp set.  Well, today is the day.  I saw a similar card using this set that I thought was on Pinterest.  It totally intrigued me.  I went back to get the person's name that made it to give her credit, but I couldn't find it anywhere.  I must have seen it somewhere else.  If you've seen this idea, please let me know so I can credit her here.

The major idea that I copied was using wood-grain paper for the layering.  I love the realistic grained look for this die-cut!  I'll be honest and tell you I rummaged through all my wood-grained paper, and I have a lot.  I was looking for the heaviest graining I could find.  Needless to say, this is a retired DSP.  But you can use any wood-grained paper you have that you like.  Also, this card uses 4 different stamp bundles to get the look I wanted.  That doesn't mean you need to go out and buy everything I used.  I'm sure you have stamps that fit the look just fine.  The big item that's really necessary is the Night Divine Bundle.

My card starts with a card base of Shaded Spruce cardstock that measures 8 1/2" x 5 1/2".  It's scored and folded in half.  Next is a layer of my wood-grained DSP.  It measures 5 1/4" x 4".  Before attaching this to the card base, die-cut the image using the Night Divine dies and set aside.  Attach the layer to the card base using adhesive.  What was die-cut from the middle will not show once the card is put together.

The next layer is Very Vanilla that measures 4 1/4" x 4".  This has a sentiment from the Night Divine set.  It's stamped with Shaded Spruce ink about 3/4" from the top of the layer.  This was embossed with the Timber 3D Embossing Folder (page 169).  I like how this look matches with the wood-grained layer and looks a little rustic.  After embossing, attach this to the card front using adhesive.  The top and bottom should fit right over the wood-grained DSP with it showing only on the sides.

At this time, attach the die-cut piece with adhesive.  Place the bottom edge of the die-cut about 1 3/8" from the bottom edge of the layer. This makes it a little higher than middle of the card.  

Next a double evergreen die from the Joy Of Noel Bundle was used to cut five branch sets from Shaded Spruce cardstock.  Two of them are attached to the left side overlapping them.  Then two of them were turned over to the backside and attached to the right side to match.  The last double branch was cut off at the stem to make it fit on the card.  This picture shows how everything is layered together.

The bow I made uses the Pecan Pie Center Stripe ribbon that's in the Mini Catalog.  I tried the Gold and Vanilla Satin Edge ribbon in the Annual Catalog, but it didn't fit as nicely with the rustic look of the card.  After making the ribbon, it's attached over the evergreen branches with two Mini Glue Dots to hold in place.

The inside of the card is finished with a layer of Very Vanilla.  It measures 4 7/8" x 3 5/8".  I wanted more of the Shaded Spruce showing on the edges so it's cut smaller than usual.

The sentiment is from the Wishes All Around stamp set.  It's stamped in Shaded Spruce.  This has turned out to be one of my go-to sentiments this Christmas season.

The evergreen branches on the left are from the Christmas Classics set.  They are stamped multiple times to give it a fuller look.  These are also stamped with Shaded Spruce ink.

Now I need a little help here.  I've been debating about adding a few of the tiny gold Festive Pearls in the Annual Catalog.  Or maybe one of the gold Star Trinkets in the Mini Catalog?  Does the gold accent work on this?  Does it even need anything else, or should I leave it as is?  Help!  A little input would be appreciated.

Ready for some big information?  The retiring list for the Mini Catalog is available now.  Yes, it's that time already.  So, if there are any items in the Mini Catalog that you were debating about getting, time is running out.  You know how fast some items sell out!   So, make your choices now.  Click on the label to take you directly to the retired list.


If you are ordering, please consider using the Host Code at the top of this blog post.  It would be very appreciated.  Thanks for sharing some time with me today.   It's always pleasant to hear back from you and find out whether you like what I've made each day.  You make me want to create and share with you!

Happy stamping and creating,
Sharon

Monday, November 13, 2023

Blue NOEL Card

Happy Monday to you, my friend!  I can't believe that another week has quickly passed.  It's almost Thanksgiving time and I'm not ready yet.  How about you?  Have you mailed out any cards to family and friends?  Have you got that dinner menu planned?  And the house decorated with turkeys and pumpkins?  I'm not there yet, but I'm working on it.  I'm so excited that seven ladies are joining me on Tuesday to put together the Thanksgiving cards for the shut-in members from church.  It will be fun to introduce them to the glories of stamping and card making.  Hope this works out well and is just the beginning of this group effort to send cards out each month.  I've been doing this on my own, but you know it's always more fun with friends!

Here's what I made several days ago to share with you.  I've looked at it for 4 days and just wasn't really happy with it.  Don't you think it needed something?  It just wasn't great - rather boring.  After fretting about it for days, I figured if I wasn't happy with it, I needed to take the card apart and make some adjustments to it.   And that's exactly what I did!  

The NOEL was really bothering me, so that's what was peeled off first.   I die-cut another set of letters in Blueberry Bushel and started to play around with the card by using only the blue, or the blue over the silver sparkle, or....  Here's what I came up with.

I love the look so much better with that small bit of framing of Blueberry Bushel cardstock underneath the More Dazzle die-cut letters.  It just makes the whole card better, more cohesive.  So, let's talk about how to make the card.

It starts with a Blueberry Bushel card base that measures 11" x 4 1/4", scored at 5 1/2" and folded in half.  Next a layer of the beautiful Winter Meadow Designer Series Paper was cut to measure 3 7/8" x 5 1/8".  Isn't this snowy forest-looking paper just perfect?  I love it!  A small frame of Basic White is cut to go under it.  That measures 5 1/4" x 4".  This leaves just a bitty frame of white to set the paper apart from the Blueberry Bushel cardstock base.  

Before attaching them together, the NOEL die was used to cut the letters out of the DSP.  This would allow me to get the letters spaced nicely when putting the card together.  The same die was used to cut the More Dazzle Specialty paper also.  At this point, I should have also cut the letters from the Blueberry Bushel cardstock that I added later.

Attach the DSP to the Basic White layer with adhesive.  Using adhesive, tuck the Blueberry Bushel letters into the die-cut space on the DSP.  Layer the More Dazzle letters over the blue letters with adhesive.  I off-set these to the right and down when attaching them.

The tree dies from the Forever Forest Bundle were used to cut three different sized trees from the Blueberry Bushel paper.  These were lined up on the bottom left of the card front and attached with adhesive.  A 1/2" strip of the More Dazzle Paper was added across the card and covered the bottom of the trees.

This card front was attached to the card base using Dimensionals.


The inside of the card has a layer of Basic White measuring 5 1/4" x 4".  The sentiment on it comes from the Wishes All Around stamp set.  It was stamped with Blueberry Bushel ink.  The trio of snowflakes are from the same set.  These are also stamped with Blueberry Bushel ink but were off-stamped before stamping to get a lighter color on the snowflakes.

There was a 1" strip of the same DSP that was left over, so it was attached to the white layer using adhesive.  The finished white layer was then attached to the inside of the card with adhesive.

The final touch on this snowy card is the addition of some clear Rhinestone Basic Jewels.  They sparkle just right to blend in with the More Dazzle design elements without competing with them.

Isn't this version better?  I think it was well worth the effort to do a remake on this card.  So now you've gotten a look into the card making process when things don't look quite as nice in person as they do in my mind.  Sometimes some tweaking is needed.  Don't be afraid to finagle your cards if they don't turn out quite right.  Try moving around the elements of the card or consider adding something different instead.   You never know what will work until you try it!  

Thanks for sharing some of your day with me.  I love hearing what you think about my ideas, so leave me a comment if you would.

If you'd like to order, I want to tell you that Stampin'Up! is having a Seasonal Sale on November 14 - 16.  You can save up to 20% on select items.  Make sure you check the online store to see all the items available.  Have fun stocking up on some of your favorite inks (pads, markers, refills), ribbon & trims, and papers.  These items are all from the Annual Catalog.  Thank you in advance for your patronage.  I always appreciate your business!
Happy stamping and creating,
Sharon

Saturday, September 9, 2023

Joy of Noel Version 3

Hello friends!  I'm a day late here.  Thought I'd get this card posted on Friday.  But as you can see, that just didn't happen.  For not working at a full-time job, I certainly seem to be extra busy some days.  But not to fear, the post is finally getting done so you'll have the next installment using the Joy of Noel Bundle.  I knew as soon as I saw it in the new Mini Catalog this was a set I absolutely needed.  Well, to be honest, I didn't really need it, but I wanted it pretty badly!  😄 I've always liked the word noel and love the Christmas songs that use the word.  So why not cards too?

Today's card featured the lovely Joy of Christmas Designer Series Paper.  Isn't is just gorgeous?!  I love the different greens 'water-colored' onto this print.  I wish I could do painting like this.  But I can't, so I'm thrilled to have some lovely paper like this to use.  This card is also a new fun fold card for me.  I've made cards very similar, but this card has an extra score line that changes it a bit.

To start making this card, use a piece of Real Red cardstock that measures 8 1/2" x 5 1/2".  Cut off 1" from the end of the piece so it measures 7 1/2".  Score is at 3 1/4" and 6 1/2".  Fold in at the 3 1/4" line with the other score line on the right side of the card.

Cut your DSP at 5 1/4" x 3" and another piece at 5 1/4" x 3/4".  Attach the larger piece to the left side of your card front using adhesive.  The thin piece is attached near the right edge on the inside of the card, so it shows nicely lined up when the card is closed as shown here.

Next comes making the focal part of the card.  Stamp the noel onto Basic White cardstock using Real Red ink.  It was punched out with the 2 3/8" Circle Punch.  Next is a skinny framing layer of Real Red cardstock that was die-cut with the Deckled Circles Dies.  The next largest die cut a layer of the More Dazzle Specialty Paper for some sparkle and shine.  

The white layer is attached to the red circle layer with adhesive.  Then both are attached to the glittery layer with Dimensionals so it stays attached.

To attach this to the card front, I used Tear and Tape under the very right-hand side by the right edge underneath the O and L.  This is attached to the skinny layer of DSP only on the right of the card.  The other 3/4 of the circle just close over the card front without being attached.
To open the card, just fold back on the right-hand score line and it pops the focal piece upright to open the left flap and reveal the inside of the card.  Here's how the card looks when opened.

The inner piece of Basic White cardstock measures 5 1/4" x 3".  One of the sentiments from the Brightest Glow stamp set was used on the card.  It's stamped with Real Red ink.  Several holly leaves from the Joy of Noel set were stamped with Old Olive ink in two of the corners.  Berries from the same set were added with Real Red ink.  The holly leaves were colored with Old Olive Light and Dark Blends.

Closing the card, the Noel sentiment has three rhinestones added.  These are clear rhinestones that were colored with the Old Olive Dark Blends to match the card.  A double bow was made from two lengths of Parakeet Party Metallic Woven Ribbon.  It's attached with a Mini Glue Dot under the letters.  This gives it a little bit of subtle sheen.

I thought this picture from the top would give you a good idea of the fold and where the score lines go.  This back fold is a little bit different than anything I've done before, but it gives the card just a slightly different twist.

Thanks for visiting again and seeing the latest version of the Joy of Noel cards.  They've been fun to make and just given me more ideas to try with other cards too.   

If you ever have any questions about how my cards are made, feel free to call and ask.  I truly love helping others enjoy the art of stamping.  You can get more involved with your card designs than I do, or you can keep your them very simple and straight forward.  Either way, the idea is to have fun with your creating.  Then share them with someone else and spread the joy!

Happy stamping and creating,
Sharon 
Thursday, September 7, 2023

Joy of Noel Take 2

Ok my stamping friends, are you ready for the second in the series of Joy of Noel card ideas?  This one is more of the clean, crisp look I tend to prefer.  It's an idea that hit me as soon as I saw this stamp set and I couldn't wait to try it.  Tell me what you think...

Isn't it great?  I love how simple it is, but it's not boring at all in my humble opinion.  There's the layering, the texture, and the embellishments that all come together to make this crisp, holiday card.  To make the card, start with a card base of Shaded Spruce cardstock that measures 8 1/2" x 5 1/2".  It's scored and folded to make the basic card shape.  The next layer is Night of Navy.  I love these two colors together!  The layer measures 5 1/4" x 4".  Don't attach this just yet.

The Basic White layer is next and measures 5" x 3 3/4".  This is embossed with the new Snowflake Sky Embossing Folder found in the new Mini Catalog.  This is so cute with tiny snowflakes intermixed with random dots that are heavier on one side than the other.  This layer is attached to the Night of Navy layer using "green glue".  After that, the two layers are attached to the card base using a good number of Dimenisonals.

The Joy of Noel Bundle has the lettering for both stamping and die-cutting these letters.  I stamped it once on Basic White cardstock using Shaded Spruce ink then die-cut them.  Then I added a 2 1/2" square of the Adhesive Sheets to the back of a 2 1/2" square of Night of Navy cardstock before die-cutting.

After all the letters were cut, adhesive was added to the back of the stamped letters.  These were added off-set to the right and top of the solid letters.  This gives them a shadow look underneath and to the left side.  After spacing them onto the card, the backing was removed from each of the letters, and they were attached to the right side of the card front.  They are about 3/4" from the right edge of the white layer.

The 'joyous' sentiment used here is also from the Joy of Noel stamp set.  This was stamped with Shaded Spruce ink onto a Basic White strip.  After stamping, the sentiment was fussy cut.  Then it was attached to the card front with "green glue" off to the left side.

The last little finishing touch is the Loose Holly Gems and Sequins added near each of the letters.  One of the large red rhinestones was placed by each letter using a Mini Glue Dot to attach it.  Then two of the holly sequins were added by each red rhinestone.  A rolled Mini Glue Dot was added under each sequin to hold it to the card front.  The colors are a little different than the Shaded Spruce cardstock and ink that were used, but I think they make a great accent for the card.

A layer of Basic White is attached inside the card with a sentiment stamped with Night of Navy ink.  A couple of holly leaves from the same set were stamped in a corner or two using Shaded Spruce ink.  Then Shaded Spruce Light and Dark Blends were used to add some color to the holly.

Hope you enjoyed this second idea using the Joy of Noel Bundle.  Like I said earlier, I really love this new stamp bundle and all the little touches that make this card special.  When you try out some of these new products, hope you love them as much as I do.

Make sure you check out the Kits section, the Clearance Rack, and especially the Online Exclusives section when you visit the website.  There's just so many wonderful new things to try.  Have fun letting your creative energies have a go at it.  You never know what wonderful creation you'll come up with next!

Happy stamping and creating,
Sharon

Wednesday, September 6, 2023

Joy of Noel

Hey friends!  Are you ready to get a serious start on those Christmas cards?  I feel like I've been on an exciting and exhausting card marathon the last few days.  Whew boy!  Was it ever fun!  I've got so many new things to share with you.  Today is the start of a series of cards made with the new Joy of Noel stamp and die set.  This first one is a pretty straight forward card made in shades of red and green.  Just what you'd expect at Christmas time.  We'll see where we go from there.  Come on, let's create!

See, pretty basic but it does have a few extras to make it special.  There are a few layers, and as I look at it now, there are many variations that are already floating about in my brain.  This card starts with a Shaded Spruce base that's 8 1/2" x 5 1/2", then scored and folded in half.  

Next is a layer of the Joy of Christmas Designer Paper.  This print is a mottled mix of Real Red and Cherry Cobbler that's cut to measure 5 1/4" x 4".  It's not attached to the card base just yet. 

Another one of the prints in the DSP is this lovely water-color-y look of leaves.  I just fell in love with this print along with several other water-color prints in this paper pack.  You have to see them!  They almost look like painted vellum layers that are so sheer.  Just gorgeous!  This print was cut to measure 2" x 5 1/4".

There are a couple other layers also cut at this time.  A Basic White layer that measures 5 1/4" x 2 1/2".  And a strip of the silver More Dazzle 6" x 6" Specialty Paper.  It measures 5 1/4" x 3/4".  This may be just a small strip, but it really packs a wallop of glitz!  

These three layers were attached together with adhesive.  Then they were attached to the red DSP with adhesive.  If there are any uneven edges, now is the time to trim them straight.   Afterwards, attach them to the Shaded Spruce card base.  Everything is layered flat on the card.

Now on to making the NOEL.  I backed a piece of Shaded Spruce with Foam Adhesive Sheets found on page 138 in the Annual Catalog.  Both pieces measured 2 1/4" square.  After attaching together, the piece was die-cut with the Joy of Noel Dies.  Can you see the wonderful texture the die leaves on each letter?  It's almost like another layer of green cardstock there.  The backing was simply peeled from each letter, and they were placed on the More Dazzle strip in the center.  Easy Peasy.

Several Loose Holly Gems and Sequins were added to finish the design.  The top left and bottom right corners each have two holly leaves and a larger red gem.  There are a few of the smaller red gems tucked in around the design to finish.   These shiny leaves and gems make the perfect accent.

There you have it.  It's a pretty traditional style of Christmas card with the usual red and green colors, but I love the little extras that make it stand out like the awesome Joy of Christmas DSP, the More Dazzle Specialty Paper, the die-cut letters, and lastly the little sequins and gems to finish.  I don't know about you, but I love Christmas time whether you go traditional or more modern or even eclectic.  It just makes me happy.

Now, for something else that really makes me happy - the new September -December Mini Catalog is live and ready for business!  Woo Hoo!  I'm sure you've been waiting for the time to order and it's here now.  Let's go shopping.  I have to admit, I added another order for myself this morning.  I just couldn't resist!  And make sure you check out the Online Exclusives, the new Kit that's available, 5 new Designer Paper packs, and the Clearance Rack too.  Lots of new and old items available right now!  If you do order, I'd appreciate it if you would use the Host Code shown at the top of the blog post.  Thank you so much.  Come back to see the next installment using the Joy of Noel Bundle.  I think you'll like it.

Happy stamping and creating,
Sharon