Showing posts with label Night Divine Bundle. Show all posts

Monday, December 18, 2023

Night Divine Nativity Card

 Happy Monday to you.  Things are getting busier as Christmas approaches.  There's always so much to do and get finished before the big day approaches.  In all the hustle and bustle of the holidays, so often we lose sight of what the season is all about.  This is a gentle reminder that Jesus is the reason for the season.  I've made several versions of this card and decided to share this one as it's my favorite of them all.  Hope you like it too.

Stamps:  Stars at Night
Dies:  Stars at Night and Night Divine
Cardstock:  Crumb Cake and Very Vanilla
Ink:  Pecan Pie
Extras:  Shining Brightly DSP, Distressed Gold Specialty Paper, Dimensionals

The nativity set is die-cut from Crumb Cake cardstock.  It's attached low on the DSP with the bottoms of the side beams shortened to fit the landscape style card.  

Two die-cut stars are attached to the roof of the stable.  Merry Christmas is fussy cut then attached to the left by using Dimensionals.

This is a very quick card to put together.  For some reason, I keep using die-cut stars instead of the Adhesive-backed Star Trinkets which I bought to use with these cards.  On one of these cards, those Star Trinkets will finally show up.  I really did use them, I promise.  

Enjoy your cardmaking!

Happy stamping and creating,
Sharon


Thursday, December 14, 2023

Glory to God Christmas Card

 Hi!  I woke up this morning with this idea in my head.  I finally got downstairs today to make it and thought I'd share it right away.  If you're still looking for super quick cards to make, this one (or two) truly fit the bill.  Enjoy!

Stamps:  Night Divine
Cardstock:  Very Vanilla, Shaded Spruce, More Dazzle Specialty Paper, Silver Foil
Ink:  Shaded Spruce
Extras:  Deckled Circle Dies, Stars At Night Hybrid Die with Embossing Folder, and Dimensionals

Just a closer up look if you're interested.

Couldn't decide on the orientation of the card, so I did it both ways.  I like how both of them turned out.  

The stars are a little different on the two cards, but those are the only changes.  This card is so quick and easy to make.  Just get everything die-cut, then put it all together.

Just a reminder that you have a few more hours to take advantage of the free shipping on December 14.  Orders must total $75 or more.  Have fun shopping!!

Happy stamping and creating,
Sharon


Monday, December 4, 2023

Back with More Stars at Night

Hi all.  Seems like there's been a little flu bug going around in the area and it made a visit to our family members.  Wasn't that nice?  Can you hear the sarcasm?  Seems like something is always happening to throw me off track lately.  But we pick ourselves up and carry on.  The card for today was made before things got bogged down.  But it's still a lovely card and, it's time to share this with you.  I love the Stars At Night set!  The stars are beautiful, and I love that the set has a hybrid embossing folder/die set that work together to die-cut stars with incredible embossed detail.  When it's used with the Silver or Gold Foil Papers, oh my!  Let's get started and you can see what I mean.

See?  Gorgeous, right?  I love all the bits of detail on this card that look like a lot of work, but it's quite easy to get done.  The card starts with a card base of Night of Navy.  Yes, I'm stuck on my navy and silver Christmas look.  The base measures 8 1/2" x 5 1/2" that's scored at 4 1/4" and folded in half to make a regular card.  

The front of the card base is embossed with the Snowflake Sky Embossing Folder found in the Mini Catalog.  Because the front of the card is embossed, there is extra texture without adding any extra bulk on the card.  But it adds another layer of appeal to the design.

The strip of a starry sky comes from the Oh Holy Night Designer Series Paper.  I had a strip of this paper that was only 1 1/2" wide.  What can you do with that?  I think it packs a big wow on this card carrying through with the starry night feel of the card.  I cut it at 5 1/4" long and attached it to a strip of Silver Foil Specialty Paper that measures 1 3/4" x 5 1/2".  They are layered together with adhesive. Then this is attached to the card front using adhesive about 1/2" from the left side.

A piece of Silver Foil was cut a little larger than the largest star in the Hybrid Embossing Folder.  The matching die was added in the folder over the stars before embossing and cutting at the same time.  Awesome.  I'm amazed at how detailed the embossed images are on this star!  I thought it would need some other stars layered here, but it already looks like it has layers on it.  I had to touch it several times to make sure I hadn't layered a star on it already.  So, why mess with it?  I left it as is and only used a single layered star here.  The star is attached to the card front using Dimensionals for mounting.  It is not layered symmetrically on the strips, but over to the right onto the snowflake sky.

The sentiment used is from the Night Divine set.  I've mentioned before how much I love these sentiments and have used them often.  The sentiment is stamped on a Basic White cardstock piece using Night of Navy ink.  Then it is fussy cut around it.  It's attached to the card front to the right side using Mini Dimensionals.

The inside of the card is stamped on a Basic White cardstock layer that measures 5 1/4" x 4".  The sentiment used here is from the Brightest Glow stamp set found in the Annual Catalog.  It's stamped in Night of Navy ink to match the rest of the card.

There is a star cluster stamped in the bottom right corner of the card.  This comes from the Stars at Night set.  It is inked in Night of Navy ink then off-stamped before stamping on the card to give it a slightly softer look.  The layer is attached inside the card using adhesive.

Now, for the embellishments.  I tried several different gems and sequins on the card for the crisp, clear night sky look.  I finally chose the Rhinestone Basic Jewels that are clear.  That gave me the best look of stars in the night sky.

The center of the large star needed something a little more impressive than the clear rhinestones.  I chose the Tinsel Gems 3 Pack with this lovely blue gem.  The catalog says it's Misty Moonlight, but I thought it worked perfectly here.

Of course, you could easily turn this card into a landscape look by just changing the orientation of the star and sentiment.  Maybe I'll do one that way too and see which way I like it better.

Thanks for stopping in to see what is being created around here.  It's funny how often I go down to my stamp room planning on working with a certain set.  Then before I know it, I've got something totally different in front of me that I'm working on.  There are still some ideas floating around in my head that use the Night Divine dies that I haven't gotten around to yet.  I'd like to say I'll get going on that tomorrow, but who knows what the day will bring.  I might not even be working on Christmas things tomorrow.  We'll see what happens.

Have you had a chance to check out all the items being retired from the 2023 September - December Mini Catalog?  Some of my favorites won't be coming back again.  Such a shame.  But that means there will be more new goodies in the future.  If there is anything you've had your eye on in that Mini Catalog, please don't hesitate to order before it's sold-out.  Feel free to get in touch with me if you need help ordering.  I'd be happy to help.

Happy stamping and creating,
Sharon

Wednesday, November 29, 2023

Night Divine Nativity Card

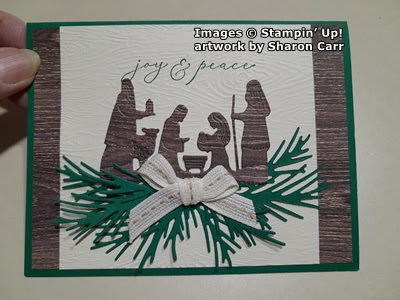
Hello, hello!  Are you staying warm?  Oh my goodness, it's cold here.  It's been getting below freezing the last two days, and I'm so not prepared for that!  This isn't why we moved to the south.  We thought we'd get away from the cold.  I know, most of you are already dealing with that kind of weather and maybe some snow too.   So, I shouldn't complain.  Well, maybe just a little now and then.  😄  I'm still working on making my cards for Christmas.  I keep planning to use the Night Divine Bundle, but then I end up grabbing some different stamp set.  Well, today is the day.  I saw a similar card using this set that I thought was on Pinterest.  It totally intrigued me.  I went back to get the person's name that made it to give her credit, but I couldn't find it anywhere.  I must have seen it somewhere else.  If you've seen this idea, please let me know so I can credit her here.

The major idea that I copied was using wood-grain paper for the layering.  I love the realistic grained look for this die-cut!  I'll be honest and tell you I rummaged through all my wood-grained paper, and I have a lot.  I was looking for the heaviest graining I could find.  Needless to say, this is a retired DSP.  But you can use any wood-grained paper you have that you like.  Also, this card uses 4 different stamp bundles to get the look I wanted.  That doesn't mean you need to go out and buy everything I used.  I'm sure you have stamps that fit the look just fine.  The big item that's really necessary is the Night Divine Bundle.

My card starts with a card base of Shaded Spruce cardstock that measures 8 1/2" x 5 1/2".  It's scored and folded in half.  Next is a layer of my wood-grained DSP.  It measures 5 1/4" x 4".  Before attaching this to the card base, die-cut the image using the Night Divine dies and set aside.  Attach the layer to the card base using adhesive.  What was die-cut from the middle will not show once the card is put together.

The next layer is Very Vanilla that measures 4 1/4" x 4".  This has a sentiment from the Night Divine set.  It's stamped with Shaded Spruce ink about 3/4" from the top of the layer.  This was embossed with the Timber 3D Embossing Folder (page 169).  I like how this look matches with the wood-grained layer and looks a little rustic.  After embossing, attach this to the card front using adhesive.  The top and bottom should fit right over the wood-grained DSP with it showing only on the sides.

At this time, attach the die-cut piece with adhesive.  Place the bottom edge of the die-cut about 1 3/8" from the bottom edge of the layer. This makes it a little higher than middle of the card.  

Next a double evergreen die from the Joy Of Noel Bundle was used to cut five branch sets from Shaded Spruce cardstock.  Two of them are attached to the left side overlapping them.  Then two of them were turned over to the backside and attached to the right side to match.  The last double branch was cut off at the stem to make it fit on the card.  This picture shows how everything is layered together.

The bow I made uses the Pecan Pie Center Stripe ribbon that's in the Mini Catalog.  I tried the Gold and Vanilla Satin Edge ribbon in the Annual Catalog, but it didn't fit as nicely with the rustic look of the card.  After making the ribbon, it's attached over the evergreen branches with two Mini Glue Dots to hold in place.

The inside of the card is finished with a layer of Very Vanilla.  It measures 4 7/8" x 3 5/8".  I wanted more of the Shaded Spruce showing on the edges so it's cut smaller than usual.

The sentiment is from the Wishes All Around stamp set.  It's stamped in Shaded Spruce.  This has turned out to be one of my go-to sentiments this Christmas season.

The evergreen branches on the left are from the Christmas Classics set.  They are stamped multiple times to give it a fuller look.  These are also stamped with Shaded Spruce ink.

Now I need a little help here.  I've been debating about adding a few of the tiny gold Festive Pearls in the Annual Catalog.  Or maybe one of the gold Star Trinkets in the Mini Catalog?  Does the gold accent work on this?  Does it even need anything else, or should I leave it as is?  Help!  A little input would be appreciated.

Ready for some big information?  The retiring list for the Mini Catalog is available now.  Yes, it's that time already.  So, if there are any items in the Mini Catalog that you were debating about getting, time is running out.  You know how fast some items sell out!   So, make your choices now.  Click on the label to take you directly to the retired list.


If you are ordering, please consider using the Host Code at the top of this blog post.  It would be very appreciated.  Thanks for sharing some time with me today.   It's always pleasant to hear back from you and find out whether you like what I've made each day.  You make me want to create and share with you!

Happy stamping and creating,
Sharon

Thursday, November 9, 2023

Shining Brightly Truly Shines

 Hello my friend!  Hope you're having a blessed and productive day.  A couple days ago, I finally got around to creating with the Shining Brightly Specialty Designer Paper that is in the Mini Catalog.  This paper is so gorgeous that I didn't want to cut into it until I had a good idea of what I wanted to make with it.  Do you get that way?  Almost frozen with indecision?  I finally decided to cut a 3" wide section from the 12" x 12" paper and just work with that.  That turned out to be a perfect solution for the first cut into that paper.  I've only used just one the navy and gold designs, but I'm so happy with the two cards that I'll be using it again soon!  Hope you like these ideas too.  They're similar but still different enough that I'll share them both.

Here's the first card I made.  The card base is Night of Navy measuring 8 1/2" x 5 1/2".  It's scored and folded in half.  The 3" wide strip of DSP was trimmed up to 5 1/2" to fit top to bottom.  Next a strip of Gold Foil (found in the Annual Catalog) was cut to 3 1/4" x 5 1/2".  This gives a pretty frame to the DSP without being too overpowering.  The layering pieces were all attached with adhesive. 

Next, I decided on the sentiment to use.  This one is from the Night Divine Bundle on page 16 of the Mini Catalog.  I love both the words and the font of these sentiment stamps.  For this card, the Nested Essentials Die set was used.  I thought the rounded edges and stitching line made it a little more elegant than a plain square piece.  The sentiment is stamped on Very Vanilla cardstock a little higher and to the left of center.  Night of Navy ink was used for this.

To add some interest to the side, two of the dies from the Magical Meadow Bundle were used.  I love all the different bits of greenery that can be added wherever it's needed.  The leaf and berry stem is cut from the same Gold Foil, and the evergreen stem is cut from Night of Navy cardstock.  First the gold foil and then the navy pieces were attached to the sentiment label to the bottom right.  They were attached with a little 'green glue' down the center of the stems. 

A double strand of the gold Simply Elegant Trim was used to make the small bow.  This is attached over the stems with a Mini Glue Dot that's rolled to fit under the bow.  Even though the bow is small, it adds a touch of elegance.

The sentiment label was then attached to the card front using Dimensionals to raise it up and give it some definition.

After debating with myself, I didn't add any extra bling to the card.  With the gold accents on the framing layer, the DSP and the leafy stem, I thought any extra bling would either get lost on the card or would detract from the elegance of the card.  So, no extra bling on this one.

This is the 2nd version with several changes.  The first change is the Gold Foil layer was cut wider so more would show on each side.  It's cut to 3 1/2" x 5 1/2".  They're attached together with adhesive and then added to the card front with adhesive too.

The sentiment label is Very Vanilla cardstock cut with the Scalloped Contours Dies.  I used another one of the lovely sentiments from the Night Divine Bundle and it's stamped with Night of Navy ink.  It's attached to the card front using Dimensionals.

Because this label was bigger than the last card, I felt there was room for a bow.  The ribbon used is the retired Shimmery Gold Ribbon.  After the bow was made, it was attached to the label with a Mini Glue Dot.  

I liked the idea of adding just a little more gold bling on this card.  There was that whole open corner that was just calling for something pretty.  The gold Neutrals Adhesive-backed Sequins were the perfect touch.  I usually add embellishments in groups of three or five, but it seemed like only two were needed for that corner, so that's what I used.

Hopefully you enjoyed these two versions of card using many of the same products.  With a few changes, each of them has their own distinct look.  Can you come up with more ideas using just these same products?  I'd love to see what you make!  Thanks for stopping by and sharing your time with me.  Come back again soon to see what I get into next.

Happy stamping and creating,

Sharon

Monday, November 6, 2023

Sneak Peek Times Two

Hello there!  Today I've got two cards that were made at the same time using one piece of 6" x 6" One Horse Open Sleigh Designer Series Paper.  But that's not all.  These two cards are also using the new Meandering Meadow Dies.  What are those you ask?  The Meandering Meadow Suite of products will be added to Online Exclusive lineup on the Stampin'Up!' website.  This is an awesome grouping of stamps, dies, DSP, and embellishments that you're gonna love!  And you can purchase any or all of this suite starting November 7th.  Woo Hoo!  That's why I figured today would be the perfect day to share this idea with all of you.
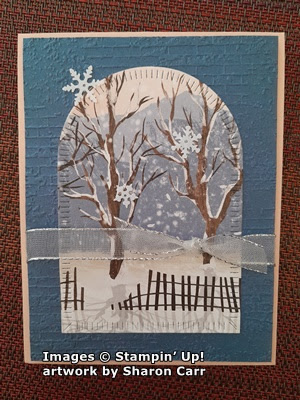
The first thing I noticed about this cool arched die is that it takes 3" of paper to cover the opening.  Instead of cutting a full 6"x 6" sheet, I cut it in half to get my first piece to use.  This is from the One Horse Open Sleigh DSP which is also one of those Online Exclusives.  And it's simply gorgeous!  I've already used most of my pack of this paper, so I was grateful to have a piece that looked perfect on this archway.  Did you notice the radiating hash marks around the archway?  This shows on both the inside (shown) and the outside of the die.  This will show up on the other project.

For this card, I started with a card base of Petal Pink that measures 11" x 4 1/4" scored and folded in half.  Next is a layer of Misty Moonlight cardstock that measures 5 1/4" x 4".  For some texture on this piece, I used the Exposed Brick Embossing Folder.  The die-cut DSP is attached to the center of this with 'green glue'.  

The next step was wrapping a length of Silver & White Sheer Ribbon around the two layers and tying into a knot in the front.  I like the sheerness of the ribbon, so the DSP print still shows through.  At this point, the layers are attached to the folded card front using Dimensionals.  I used six of them to hold the card layers up evenly.

As an accent, I liked the Adhesive-backed Snowflake Assortment for this.  The white snowflakes showed up nicely on both the DSP and the Misty Moonlight.

The inside of the card is a layer of Basic White that measures 5 1/4" x 4".  A sentiment is stamped with Misty Moonlight ink.  Some snowflakes from the Wishes All Around set were stamped in the corner with Petal Pink ink to coordinate with the card front.

Now on to the 2nd half of that piece of One Horse Open Sleigh DSP that is left over from this card.

Since I really liked the Petal Pink with this DSP print on the last card, I decided to stick with the same color palette.  

This time Misty Moonlight was used for the card base.  It measures 8 1/2" x 5 1/2".  It's scored then folded in half.  For the next layer, I reverted back to the Petal Pink cardstock.  This measures 5 1/4" x 4".  That same arched opening was die-cut close to the top of the piece, so I'd have enough room for a sentiment.  Can you see the tiny hash marks surrounding the archway?  Such a cute accent!

The sentiment is from the Night Divine stamp set.  It's one of the few sentiments I had that really fit into that skinny space.  It's stamped with Misty Moonlight ink.

The leftover 3" x 6" piece was positioned behind the die-cut the opening to my liking.  Then it was trimmed top and bottom to fit without showing.  It's attached with adhesive to the back of the opening.  

The ribbon that ties around these layers is from the Copper & Natural Ribbon Combo.  It looks a little harsh on the card here because you really don't see the metallic shine in the picture.  That shine really changes the look in person.

The layers are attached to the Misty Moonlight card base using Dimensionals to give it some depth.  The other accent on this card is also from the Adhesive-backed Snowflake Assortment.  I thought the copper color went really nicely with the soft pink and dusty blue in the DSP.

The inside on this card was finished off in the same manner as the first card.   Why mess with a good thing?

There you have it.  Two cards that are similar, yet almost opposites that totally focus on the arched die and the lovely print from the One Horse Open Sleigh DSP.  The Meandering Meadow Bundle has a coordinating Designer Paper pack, but I'd been looking for another way to use this paper.  So why not mix & match?

Remember I mentioned that the Meandering Meadow is available on November 7th for everybody.  It's going to be one of my favorites because there are stamps and dies that can be used year-round, not just for a single holiday.  You can find it at the Stampin'Up! Online Exclusive section.  Click HERE to go directly to that page.  Happy shopping.  Look around and see what's new.  You might just find the perfect gift for a family member or friend.  Thanks for shopping with me.  I appreciate all orders!

Happy stamping and creating,

Sharon 

Friday, October 20, 2023

Magical Meadow Christmas

Hey there!  Boy, I can sure tell that autumn is here along with wet and cloudy days.  Brrr.  I know you probably don't think that 62 degrees isn't too cold but add in the rain and it's pretty chilly.  Sue and I started talking about soup this morning, so I thought I'd get some started in the crockpot - Chicken Tortellini.  Yummm.  Today is the perfect day for soup.  Anyway, I miss the bright sunshine we had yesterday afternoon.  It was a perfect day for my grandsons' cross-country meet yesterday.  The girls' team won top honors for the Regional Meet, but the boys' team only placed fourth.  Too bad, but everyone ran their heart out and did their very best.  That's all you can ask for, right?  What's that?  You didn't come here to talk about soup and cross-country races?  Where's the card???  Ok, let's buckle down and get to business here.

Here is today's card for you.  I love the different die-cuts in the Magical Meadow Bundle, and several of them are used on this card along with bits and pieces from some other sets.  Let's get on with the creating.

Start with a card base of Basic White Thick that measures 11" x 4 1/4".  It's scored at 5 1/2" and folded in half.  The first layer is Pretty Peacock that's cut to 5 1/4" x 4".  Next comes a layer of the new Tartan Foil Specialty Designer Paper that is 12" x 12".  I love this tone-on-tone Lost Lagoon plaid.  If you're looking at this on an angle, it's a very subtle plaid.  But with the light shining on it and looking straight on, it's so pretty!  Isn't it? This Specialty Paper is an Online Exclusive item and well worth getting.  The one side has a solid color diagonal plaid, while the other side is a straight-on plaid on a white background.  Either side is nice and of course you can use them together too.  For this card I used a piece that measures 5" x 3 3/4".  This is attached to the Pretty Peacock layer with adhesive.

A length of Silver & White Sheer Ribbon is wrapped around this and tied in a loose knot to the left side.  These layers are then attached to the folded card base using adhesive.

On to the good stuff - all the die-cuts!  First two images were die-cut from Pretty Peacock cardstock using the evergreen and berry die from the Magical Meadown Bundle.   Then the berry stem (?) die cuts the Lost Lagoon cardstock piece.  This one I cut into two pieces to fit them where I wanted.

I envisioned some snowflakes on the card and thought white would work.  Three of them were cut from the Wishes All Around Die set.  Love the look of those snowflakes, but I didn't like the color.  So, three more were cut from Silver Foil Specialty Paper.  Oh yes!  So pretty!

Next came the sentiment.  I wanted to use the sentiment from Night Divine.  Each of these sentiments are wonderful, but I wanted to use the "Glory to God in the highest".  After trying several different dies and punches, I decided on the Deckled Circles Dies.  I think this left enough room not to crowd the sentiment.  And the deckle edge added just a little sweetness to the look.

One of the sentiments from the Wishes All Around set was used for the inside of the card.  It's stamped with Pretty Peacock ink.  A small strip of the Tartan Foil plaid paper was attached to the bottom of the inside to carry the design inside the card.

Putting the card together, figuring the positioning of everything was first.  The two evergreen & berry die-cuts were attached with some adhesive just down the middle of each so the pieces were fairly loose. 


The berry stem needed something to make it stand out.  I had some white frost liquid from several years ago.  I added this to the sides of the berries.  It needed to be set aside to dry.  When dry, the bottom ends of the stems were attached behind the sentiment with adhesive.  Then the sentiment was added to the card front using multiple Dimensionals to hold all the pieces in place.

With everything else in place, the snowflakes were added to the design.  Each snowflake was attached with a Mini Glue Dot in the center of it.  That just left any extra bling that was needed.  The Adhesive-backed Glitter Sequins seemed to be the perfect little bit of bling.  The glitteriness (is that a word?) just made the card frostier and more wintery looking.

That's it today.  I've got to admit, I'm really loving the Pretty Peacock and Lost Lagoon used as Christmas colors.  It's surprising how much I love this since it is rather untraditional!  Normally I go either red and green, or navy and white for my own Christmas cards, but I'm giving these colors some serious thought.

Thanks for sharing some time with me.  If you're thinking of ordering, I'd appreciate it if you'd use the Host Code at the top of this blog page.  Each order helps so much to keep me going.  Love you all so very much!!

Remember to check out the Online Exclusives for the Tartan Foil DSP.  It's truly gorgeous in person.  Plus, there's many wonderful items that you can only find online including stamps & dies and Designer Paper that you won't find anywhere else.  Also check out the Clearance Rack.  There are new items added quite often.  You never know what treasures you'll find that you've been wishing you had ordered earlier.  Now's your chance!

Happy stamping and creating,
Sharon

Tuesday, October 10, 2023

Moody Mauve Christmas

Hello everyone!  Hope you're having some lovely weather like we are here in Boiling Springs.  It's crisp and sunny with gorgeous blue skies.  I just love autumn!  But today we're sticking with some Christmas card ideas.  I made one of these in blues, then another.  Then I decided I really needed to use some different colors for Christmas and get out of my comfort zone.  There's just a serenity about blue and white that it seems to fit for this holiday.  But there are so many other options out there and today I'm sharing something different.  If you hang around to the end though, I will share the two blue and white cards that I made first.  And for those of you loyal Hostess Club members, you're getting this packet in the mail this month so you can make it too.

Aren't these colors just gorgeous?  Instead of a playful card, this time it's definitely more elegant.  But the fun fold is still so easy to do that you'll want to make this type of card often.

Start with a piece of Moody Mauve cardstock that measures 5 1/2" x 5 1/2" square.  On one side, score at 4 1/4" to make a regular size card when folded.  

There is a piece of the awesome Winter Meadow Designer Series Paper.  I just love the watercolor look of the prints - just my style!  I started with a piece that measures 6" x 5 1/4".  Then two strips of 1" each are cut from this to leave a piece that measures 5 1/4" x 4".  Just right for a card front.

One of the DSP strips is attached to the front flap using adhesive.  Remember this is the backside of the entire piece of DSP.  Open the flap and add adhesive to the inside of the flap.  This will hold the DSP in place for the card front.  Line up the edges nicely with the right edge of the card.

The Basic White sentiment piece is die-cut using the Deckled Circle Dies.  This is the 5th smallest die.  Use the next largest die to cut a Moody Mauve circle to frame it.  Stamp the sentiment that is from the Night Divine stamp set with Pretty Peacock ink.
Set these aside while the bits are all die-cut.

The branches are all from the Magical Meadow die set.  The larger evergreen die cuts both the Pretty Peacock and the Lost Lagoon branches.  The berry (?) is cut from Moody Mauve.  I debated about adding something in white and/or silver but decided to keep it understated.

Put adhesive on the back of the right side of the Lost Lagoon branch.  Curve this around the front of the sentiment circle and attach.   Add adhesive to the backside of the sentiment in that area and add the Pretty Peacock branch behind.  Angle the branch to be seen.

Attach the Moody Mauve die-cut circle behind this to frame it nicely.  I used adhesive for this.  Use Dimensionals to attach this to the card front close to the center of the card.  At this time, I added the Moody Mauve berry branch over the others using adhesive on the center stem and some of the right berries to attach it.

A bow is made from the Silver & White Sheer 1/2" Ribbon.  I used about 8" or so to make the bow.  It's attached to the card front using Mini Glue Dots.  With a bow this size and so sheer, I usually use 2-3 Mini Glue Dots to attach it securely.

The inside of the card is rather plain at the moment.  I couldn't decide on which sentiment to use for this card.  I'll come back to that later and use Pretty Peacock ink to finish.  If you'll notice, the second 1" strip that was cut from the DSP in the beginning is used here on the right side of the Basic White layer.  It coordinates nicely with the back of the DSP that shows from the card front.

Well, if you've stuck it out this long, I have a few more pictures to share with you.  Not too much dialog on them, but the dimensions and info are pretty much the same.

This uses a print from the same Winter Meadow DSP pack.  The cardstock on this is Misty Moonlight.  The circle die-cuts are the same as the first card.  

The holly and snowflakes are die-cut from the Snowflake Magic Specialty DSP in the Mini Catalog.  This paper is just beautiful!  There are also Misty Moonlight holly leaves tucked in for some contrast.  The holly die comes from the Magical Meadow dies and the snowflakes come from the Wishes All Around die set found in the Mini Catalog.

Ok, next one.  There are a few more changes on this one.  The biggest change was using Blueberry Bushel for the card base.  It's amazing how much this changes the feel of the card in person - much brighter and cheerful, I think.   

The die-cuts are still from the Magical Meadow die set.  One stem is cut from Basic White and the other is from More Dazzle Specialty Paper.  What a pop that gives this card.  There's also an evergreen stem from the same set cut from Basic White cardstock.

The bow is made from double strands of the Simply Elegant Trim in the silver color.  

Lastly, the gems come from the Adhesive-backed Sparkle Gems.  They are such a glittery addition that helps to make this card really sparkle.

Ok, I've given you several ideas for using this fun fold card.  It's funny I started out with the idea of making a fall card using this fun fold and you can see I went a bit off the rails here.  Hope you enjoy these ideas and make a card with your own choice of materials.  I think this fun fold is so perfect when you don't want to cover up the back of your DSP.  Some of these prints are so gorgeous I have trouble cutting into them!  

In case you didn't know, Stampin'Up! is have a 3-day free shipping fest on all orders of $75 or more.  It's only October 9-11th.  Hope you can take advantage of this!  Happy shopping!  Get a head start on your Christmas card making or get some of those special gifts for friends.

Happy stamping and creating,
Sharon