Showing posts with label Halloween. Show all posts

Saturday, September 24, 2022

Bewitching Fun

Good morning all!  Hope you're doing great today and getting much accomplished.  I know I've mentioned more than once that I totally love autumn, but I'm not so much a fan of Halloween.  That said, I just had to try another card with the Bewitching stamp set on page 57 of the 2022 July - December Mini Catalog.  It would be a shame to only make one card with a set and then give up on it.  Of course, my card isn't ghoulish or gory, none of that stuff.  Just kind of cute and innocuous.   But I hope it makes you smile anyway.

I started out with the idea of using Parakeet Party and Pumpkin Pie together with large amount of Basic Black to make the card.  Then it was a matter of trying to figure out how I wanted the colors used.  I remembered the brick-like die in the Brilliant Wings die set that would be a good background for my little witch.  This die set is found in the 2022-2023 Annual Catalog on page 169.  The bricks were die-cut into the Basic Black layer four times - twice on the top and twice at the bottom.  The contrast between the Basic Black and either color was too strong for me, so I die-cut a number of bricks from Basic Gray cardstock and inlaid random pieces into the black layer.  At this point, I decided to make the card base Pumpkin Pie and not Parakeet Party.  That left my witch to be Parakeet Party instead.

I laid down a piece of Parakeet Party on the Stamparatus and then attached both the hat and legs to stamp on the cardstock at the same time.  It's a good thing I did!  Using Memento Tuxedo Black ink, I stamped them onto the cardstock.  Tip:  You're never going to get a true coverage when stamping on a color of cardstock versus white or vanilla.  There isn't the same smoothness on the color cardstock and the ink doesn't lay on the surface the same as with Basic White and Very Vanilla.  Looking at this image, you'd never guess I inked and stamped it seven times! It certainly doesn't look like it at all.  I figured if I hadn't gotten solid coverage after seven times, it simply wasn't going to happen.  And it's amazing how much more the 'speckling' stands out in a photo than real life.  Oh well, live and learn!  If I was starting over again (which maybe I should have), I would have stamped on Basic White and colored in the areas with a Parakeet Party marker.  I just didn't want any white on the front of the card.

Before cutting out, I used Wink of Stella to color the polka dots on the hat, the hatband, and the stripes on the stockings.  I have a Gold Wink of Stella that I used on the buckles.  After stamping and coloring the hat and legs, they were cut out with my Paper Snips.  I didn't care for them placed directly on the brickwork, so I used a Stitched Rectangle die and cut a piece of Vellum to go between.  I liked this much better because the brightness of the brick was still bothering me a little.

A small bit of the Parakeet Party 1/8" Metallic Woven Ribbon is wrapped around the middle of the hatband.  Then a small bow is made for an accent.  It's stretched out a little on the bow and at the tail ends.  The bow is attached to the hatband with a Mini Glue Dot.

The hat and legs were attached to the Vellum layer with Dimensionals.  The vellum has adhesive on the back only underneath the hat and legs and that's how it's attached to the card front.  This way none of the adhesive shows through the vellum to the front of the card.  

It's too bad the Wink of Stella isn't showing off its glimmer on the photo.  It really does add a little bit of extra pizzazz to the card.  Tell me, do you think the card needs more bling?  And if you think it does, what would you suggest using to step it up another notch??  Help me out here ladies.  I'm sure you have some excellent ideas!

Lastly, I want to share the inside of the card.  It's quite simple looking.  I started out with a piece of Basic White that measures 2 1/2" x 3 3/4".  I stamped a spider from the Bewitching set on the left side with Memento Tuxedo Black ink.  Then I stamped another on the right side, but down lower.  I used a Black Stampin' Write Marker to add enough dots to reach the top of the card.  Then I used it to write Boo!  between them.  Nothing says you can't add your own sentiment if you don't have a stamp that says just what you want!

The Basic White layer was attached to a Basic Black layer that measures 2 3/4" x 3".  Then both of these were attached inside the card with adhesive.  There's plenty of room left to write a little note to the recipient of the card underneath the dangling spiders.

Well, that's it for today's edition of the blog.  Hope you enjoyed it and maybe learned something new from my misadventures.  Many times you just don't know how something is going to work out until after you try it.  Thank goodness it's only paper!  There have been a few card ideas that never made it past my work table, but hit the trash can fairly quickly.  Or I've pried pieces apart and used them on different card projects.  Yes, I've made my fair share of duds too.  So give your ideas a try.  If you don't like them, repurpose, reuse, or recycle.  It's only paper!  But if you create a masterpiece along the way, make sure you share it!!

Thanks for stopping by today.  Remember that the Perfect Partners sale is going on right now until the end of September.  Don't wait too long in case any of the new die sets sell out before then.  If you have questions, I'd be happy to help you out.

Did you know that October 1st is designated as World Cardmaking Day?  Stampin' Up! has some festivities planned and you can sign up for the card making fun.  I'll probably be doing some creating that day myself so come join me.

Happy stamping and creating,
Sharon 

Sunday, August 14, 2022

Cottage Wreath Double Header

Wishing you all a wonderful Sunday today.  I had made a card a few days ago and didn't get around to posting it.  Since then, I've made another card using the same stamps, dies, and Designer Paper.  So today I figured I'd get them both posted so you can compare and contrast.  It always surprises me when I can use the same products and change the colors and layout and two (or more) cards end up looking nothing at all alike.  That's the idea I'd like to share with you today.  Since both cards are pretty straight forward, instead of lots of info, I'll just give you the basic information.  OK?

The stamps used on both cards are the Country Wreath set with the Country Wreaths Dies set.

1st card starts with a base of Crushed Curry that measures 8 1/2" x 5 1/2", scored and folded in half.  The first layer is Mossy Meadow at 5 1/4" x 4".  A layer of Gingham Cottage DSP that measures 5" x 3 3/4" is added to the Mossy Meadow using adhesive.  A color for the DSP print is not llisted, but I believe it's So Saffron.

A layer of Very Vanilla cardstock is cut to 3 1/4" x 2 3/4".  This piece is used portrait style with the longer part up and down.  The leafy wreath is stamped on this using Soft Suede ink that has been off-stamped first to keep it a fairly soft color tone.

This is layered onto a piece of 3" x 3 1/2" Kraft cardstock using adhesive.  After layering, you can add it to the card front with Dimensionals.

The cluster of oak leaves in the set were stamped with Old Olive, Pumpkin Pie, Crushed Curry, and Cajun Craze ink to give me an assortment of fall leaves.  The bow was stamped with Mossy Meadow ink.  The acorns were inked with Cajun Craze and Crumb Cake.  After everything was stamped, they were die-cut using the coordinating dies.   

The sentiment was stamped with Mossy Meadow ink onto a 1/2" strip of Very Vanilla.  It has an end punched with the Banner Pick a Punch.  A piece of the Kraft cardstock backs it and is also punched with the Banner Pick a Punch.    It's attached flat to the card front with adhesive.

The leaves are layered up with Mini Glue Dots and/or adhesive onto the wreath with the bow added on also.  Acorns are added both to the bow and the sentiment.  Extra leaves are scattered on the bottom corner of the card.

I don't always show you the inside of my cards, but I really love how this one turned out.  Partial wreaths are stamped both on top and bottom diagonal corners.  I kept it light just like the front.  Instead of layering leaves onto them, I just stamped some leaves with the same colors on each of them.  Really like how this adds to the card!

No extra bling was added to this card.  I liked it just as is!


This is the second version of the Cottage Wreath with Gingham Cottage DSP.  Totally different look.

This starts with a base of Basic White Thick cardstock cut at 8 1/2" x 5 1/2", scored and folded in half.  There is a 4" x 5 1/4" layer of Basic White that's embossed with the Timber 3D embossing folder.  A 2" x 5 1/4" layer of the Gingham Cottage DSP gray plaid is attached to this with adhesive.  The layer is then attached to the card base with Dimensionals.

Instead of stamping a wreath this time, the larger open wreath is cut from Basic Gray cardstock, and the smaller wreath is cut from Smoky Slate.  They are layered together using Multi Purpose Liquid Glue, then attached to the card front also using the same Liquid Glue.  

There are several leaf sprays each cut from Basic Black and Basic Gray cardstocks.  These are attached to the left side of the wreath and attached with adhesive.  

A bow is die-cut from Silver Foil Specialty Paper.  This one I chose to use is almost a semi-matte silver look.  It's attached over the leaves with a Mini Dimensional.

A spider was stamped on Smoky Slate with Memento Tuxedo Black ink and die-cut with matching die from the set.  A Basic Black marker drew in the web line that the spider is hanging from.  A large Matte Black Dot is centered on the spider body.  Smaller Matte Black Dots are used on the wreath.

Boo was stamped on a skinny Basic White strip.  It was trimmed close and the backed with a Basic Black strip.  It's carefully tucked in under the plaid paper near the bottom.  

There were some extra leaves and a second spider that seem to have ended up inside the card.  I just couldn't let them go to waste, now could I?

There you have it - a twosome of cards using the Cottage Wreath stamp set and Country Wreaths Dies.  The first card is mostly stamping, the second is mostly die-cuts.  And both use the Gingham Cottage Designer Series Paper.  I wasn't too sure about using some of these bold plaids, but so far, I'm having fun with them.  Give them a try and see what you can make with them!


Wednesday, July 27, 2022

A Bewitching Card

Hello friends!  Back again with another card idea for you to try.  You know how much I love autumn.  I think I might have mentioned that once or twice.  Today I thought I'd go with a Halloween card.  I know lots of people go all out for the holiday, but that's not really my thing.  I do have to make several cards every year, so here goes with the first one.  I bought the new Bewitching stamp set found on page 57 of the July - December 2022 Mini Catalog for this year's cards.  For some reason I like just the witches' feet and hats.  How weird is that?  Please don't tell me I have some weird fetish.  I'm sure I don't.  At least I don't think so!

Here's my version of the wicked witch of the west kind of melting down to her shoes.  Well, maybe not that exactly.  My idea started with Smoky Slate cardstock as the base.  I wanted just gray and black tones with Fresh Freesia as an accent.  I think it worked out pretty well.  At least in real life.  I've taken 27 pictures with different backgrounds and different lighting, and nothing worked very well to show the cool Fresh Freesia accents against the gray.  I love the subtle differences between the Smoky Slate and Fresh Freesia colors on the card.  Well, I better explain what I did in case you really can't tell from the pics.

There is a 3" x 5 1/2" layer of Basic Black cardstock that is attached to a 3 1/4" x 5 1/2" layer of Fresh Freesia cardstock.  A 7" strip of the Metallic Mesh Ribbon is wrapped around this and attached in the back.  The mesh ribbon reminds me a little of spider webs, so I thought it would be a great addition here.  This is all attached to the folded Smoky Slate card base using adhesive.

The witch's hat was stamped onto Smoky Slate cardstock using Memento Tuxedo Black ink.  After punching this out with the Witch Hat Builder Punch, I used Smoky Slate Light Blends to shade the spider web on the hat, and Smoky Slate Dark Blends to shade the left and bottom sides of the hat.  Using Wink of Stella, the web was lightly traced for just a bit of shine. 

The legs and shoes were stamped with Memento Tuxedo Black ink onto another piece of Smoky Slate cardstock.  Fresh Freesia Dark Blends was used to color the stocking stripes. Wink of Stella was colored onto the shoe buckles.   I actually colored three layers of this so it would show more, but the pics don't show it at all.  Bummer.

Since there's no punch for the legs and shoes, these were fussy cut.  I left them attached at the top for ease in placing them, but maybe I should have cut them out separately.  Something to think about for next time.

When the hat was punched, it also punched out the gray hat band and three stars.  I knew I didn't want the hat band to be Smoky Slate, so I punched just the hat band from a skinny strip of Fresh Freesia.  Then I thought I'd also prefer the stars in that color, so punched them also.  The hat band has some 'wrinkles' colored in with Fresh Freesia Blends.  The hat and legs were attached to the card front using Dimensionals.

Now I ran into a problem.  I didn't own any current stamps that have a Halloween sentiment.  Okaaay, time to go checking into my retired stash.  The first set I found was the Banner Year set from last year.  I liked the 'Happy Haunting' and 'Boo!' stamps and decided to look no further.  The sentiment for the card front was stamped onto Fresh Freesia with Tuxedo black.  Then was trimmed a little closer to the sentiment.  It was attached with Dimensionals over the ribbon at the bottom.

To stay with the layering on the front a little, I cut a 3" x 5 1/4" strip of Basic White.  There are two skinny strips of Fresh Freesia added to top and bottom this time instead of along the sides.  I placed it on the middle of the Stamparatus for my next step.  The spider from Bewitching was stamped to the left side.  It required two stampings to get the face of the spider to show nicely.  Then Boo! was attached to the Stamparatus.  It was stamped once with Tuxedo Black ink.  Then the cardstock was moved 1/2 grid square up and to the left.  Boo! was then stamped with Smoky Slate ink.  The cardstock was moved 1/2 grid square up and to the left again.  Then Boo! was stamped with Fresh Freesia ink.  I really liked how the wording turned out!  It sort of reminds me of a spooky echo. 

Last look at the card and you can see the addition of a knot of Mesh Ribbon added with Mini Glue Dots to the top of the card.  And multiple Fresh Freesia and Smoky Slate punched stars added to both the card front and inside to finish it off.  They were also attached with Mini Glue Dots to make it quick and easy.

So that's my first Halloween card for the year.  It's amazing what can be done with just a hat and some shoes.  I'll have to give this one a whirl again.  So sorry I had to use retired sentiments on the card.  I try to stick with current items, but every once in a while, that just doesn't work as planned.

Thanks for stopping by again.  Let me know what you think of the card.  I always appreciate your comments!

If you're placing an order soon, please use the Host Code shown at the top of the blog post.  I really appreciate it!  I've already got some goodies planned for sending out to all of you that order.  I think you'll like them!!

Happy spooky stamping and creating,
Sharon   

Thursday, October 7, 2021

Cute Halloween Card

 Hi!  It's me again with my favorite cat - Mr. Sassy Cat (or Clever Cat if you're looking in the catalog for him).  He's been after me to make another card with him, so that's what we're doing today.  For those of you that know me well, you know I'm not a huge Halloween fan.  So since this is the only Halloween set I bought this year, I feel I might as well get him out to play every once in a while.  If it was up to him, it'd be more often.  But who's in charge here anyway?  Yup, don't answer that!

Since the card is really quite straight forward, there won't be tons of instructions today.  Just quick and easy I hope.

The card starts out with a base of Pumpkin Pie cardstock cut at 8 1/2" x 5 1/2", scored and folded in half.  First layer is Basic Black cut at 5 1/4" x 4" attached to base with adhesive.  Next layer is a lovely tweedy print from the In Good Taste Designer Series Paper. This is such a great masculine print, but I think it's a fun contrast to the Halloween theme going on here.   It's cut at 5" x 3 3/4" and also attached with adhesive.

The main layer is Basic White cut at 3 1/2" x 2 1/4".  This has the outside edges lightly colored with the Blending Brushes and Balmy Blue ink to relieve the harsh white expanse, and maybe give a hint of evening time.  Besides I like the contrast of blue and orange, so why not.  The outline pumpkin and hiding cat were both stamped with Memento Tuxedo Black ink.  The spider webby line was stamped in Smoky Slate ink and the spider is also black.  The solid pumpkin was stamped using Pumpkin Pie ink.  This was layered onto a Pumpkin Pie cardstock piece cut 3 3/4" x 2 1/2".

Mr. Sassy Cat said it needed something added before he was added to the card.  The Black Glitter Paper in the Halloween section of the July-Dec Mini Catalog was the perfect addition.  The piece was cut at 3/4" x 4 1/4" and laid across the left side of the card front.  It goes edge to edge, so it shows nicely on the orange card base too.  The stamped layer goes on next with Dimensionals, right in the middle of the card.  The sentiment was stamped on a 1/2" skinny Pumpkin Pie strip using Memento Tuxedo Black ink.  The right end was trimmed with the Triple Banner Punch.  It was attached with Mini Dimensionals with the left edge overlapping onto the Black Glitter Paper.

The inside has a layer of Basic White cardstock that was cut to 5" x 3 3/4".  This was also colored on the edges with the Blending Brushes and Balmy Blue ink.  The sentiment was stamped in the Tuxedo Black ink, along with the two spiders.  The webby strings for the spiders was stamped with Smoky Slate ink.  I added a 1/4" skinny strip of Basic Black cardstock to the left side of the white to kind of mimic the card front.

After looking at the front of the card when it was finished, Mr. Sassy Cat said it still wasn't quite right and just needed something else.  I tried several different embellishments to give it some bling, even some retired purple and/or orange stars.  Not quite right yet, and he wasn't happy.  Then I remembered the retired star border punch with lots of itty-bitty stars in several sizes.  I punched some from a scrap of the Black Glitter Paper.  Oh yeah!  Just right to finish off the card front and add some very subtle glitter too!  I love it when a plan comes together, and Mr. Sassy Cat was happy too!

Thank you ladies that have been ordering.  I truly appreciate you so much.  If you're looking, the current host code is in the top right corner on the blog page.  I hope you use it when you place an order.

I hope you enjoyed today's post and maybe got a smile on your face.  I know I needed to do something a little fun today to cheer me up.  It's been doing lots of raining here for the last couple of days and has been so gray all day.  That means I'm having a real hard time staying dry when I have to go out.  Unfortunately there's lots more rain coming in the next week too.  But of course, the plants and flowers are loving it, so I can't complain.  Just looking for that rainbow and counting my blessings instead.

Happy creating and stamping!

Sharon

Sunday, September 5, 2021

Mr. Sassy Cat is Back!

Hi!  For some reason, this very sassy cat keeps telling me it's time to play with him.  So here we are back again with another Halloween card.  Some of you might remember that I totally loved the Arrange A Wreath bundle that we had before.  I miss using it so much!  When I saw the Seasonal Swirls Dies in the July-December 2021 Mini Catalog, I knew this would be one I had to have.  Now that I have it in my hot little hands, it's time to get it out and use it again.  So this is a mix of Clever Cats stamps, Seasonal Swirls Die, and the Playful Alphabet Dies (haven't used those in awhile) to make this fun card.

Isn't this guy just the coolest cat around?  He's hanging around hiding among the leaves on this wreath so he can jump out and say boo!

I started with a card base of Cinnamon Cider because it's such a nice, warm fall color.  Then I wanted the look of a wood door to hang the wreath on, and this wood print from the In Good Taste Designer Series Paper worked nicely.  It is cut at 5 1/4" x 4" and attached to the Cinnamon Cider card base using Multi Purpose Liquid Glue.

Then it was time to play with Mr. Sassy Cat.  He was stamped with Memento Tuxedo Black ink onto Very Vanilla cardstock.  I used the Stamparatus for this to make sure his fur was nice and black.  After stamping, I fussy cut him out.  Then he sat at the table with me and helped me decide on the colors of the leaves for his hiding place in the wreath.

We cut two wreaths - one from Cinnamon Cider cardstock to match the card base and the second one from Pear Pizzazz to give it more green.  Then he wanted leaves cut from Pear Pizzazz, Old Olive, Bumblebee, and Cajun Craze cardstock.  Mr. Sassy Cat said it needed more pop so I tried some leaves cut from the Be Dazzling paper that's one of the free items offered during Sale-a-bration.  I liked it, but he said he didn't.   He wanted the Black Glitter Paper instead.  Guess I was out-voted on this one.  He says these have a more subtle look and are more spooky too.  Hmmm.

The wreaths were attached with Multi Purpose Liquid Glue, first the Pear Pizzazz wreath and then the Cinnamon Cider one turned a bit and layered on over it.   Then I had to tuck Mr. Sassy Cat in the wreath so I knew where to place all the leaves.  They were mostly attached with Mini Glue Dots for ease.  After the wreath looked about right to me, I had a few leaves left over and thought they might be used inside the card.   But I decided I liked the look of them falling down from the wreath into a little pile at the bottom of the card.

The BOO! was cut from the same Black Glitter Paper in the Mini Catalog using the Playful Alphabet Dies.  Before cutting, I added some of the Adhesive Paper to the back of the Glitter Paper so it was very easy to die-cut, peel off the backing, and stick those little letters down.

The last part to the card was the inside.  I wanted to use the broom, but Mr. Sassy Cat said cats don't ride brooms.  I talked him into it anyway.  I had a piece of Very Vanilla cardstock already cut to size and the little divots punched out the corners (have no idea what I originally used to do that!).  I stamped the sentiment and broom with Memento Tuxedo Black ink.  It just wasn't enough, so I added some color to the edges with the Blending Brushes and Bumblebee and a little Pumpkin Pie ink.  Still needed a little something more.  Hmmm.   Mr. Sassy Cat suggested that I stamp his little friend, Kitty, peeking up from the edge of the card.  And that was juuust right.  So that's how Mr. Sassy Cat and I made this card.  Hope you like it!  If not, blame it all on him!  It was all his fault.  Now that I've played with him again, maybe he'll give me a little peace and quiet and I can go on to create with other stamps too.  We'll see how soon he insists on playing again!

Hope you're enjoying the Labor Day holiday.  Don't forget to get your order in before Sale-a-bration is over at the end of September.  Time's flying!  Please use the host code shown to the left here.  I truly appreciate your business!  Don't these warm and vibrant leaf colors inspire you?  I'll have to try incorporating this idea somehow in a future card idea.

Thanks for sharing some of your precious time with me.  I love to hear from you so leave me a comment, or just text me.  Or of course, you can always call too!!!  Miss you! 

Happy stamping with many hugs,
Sharon

Friday, August 20, 2021

Sassy Clever Cat Card

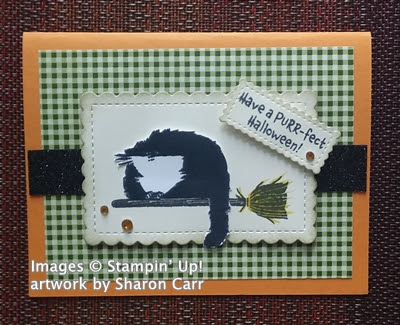
 I keep forgetting that Halloween and all the other fall activities and holidays are creeping up on me.  I've been so focused on Christmas lately, that I've totally ignored all the rest of fall.  But that is going to be remedied right now.  There is a little stamp set in the July-December Mini Catalog that is easy to overlook.  It isn't flashy, have Designer Paper that goes with it, or dies that coordinate.  Just a funky little stand-alone stamp set.  But the cats in the Clever Cats set are just the funniest and sassiest around.  I just couldn't resist getting this!

See, isn't this guy just the funkiest and coolest cat around?  He just made me laugh when I saw him.  And yes, I've decided this cat is a guy that just knows it all and is too cool for words!  

The card starts out with a base of Pumpkin Pie cardstock cut to 5 1/2" x 8 1/2", folded in half.  I knew I wanted to have a green plaid or check for fall, but everything was looking too Christmas-y.  To compensate for that, I took a Heartwarming Hugs Designer Series Paper cut at 5" x 3 3/4".  Next I got out my Blending Brush and some Crumb Cake ink and changed the Garden Green and White check to a softer, more muted coloring.  As I kept blending the color on, the background changed and now looks pretty much like Very Vanilla instead of white.  What a neat trick when you don't have quite the color you need.  Just blend on some extra color until you get just what you want.

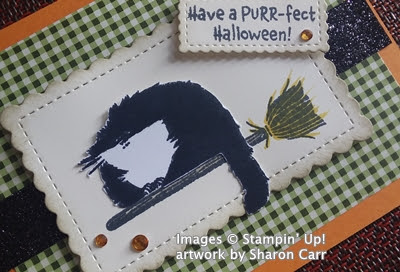
Next the Very Vanilla cardstock was cut with the Scalloped Contours dies.  The broom was stamped on this with Memento Tuxedo Black ink.  I added some Crumb Cake marker to the handle and Crushed Curry to the straw areas.  I decided that the edges needed to have Crumb Cake ink sponged on to define those edges.  This time a Sponge Dauber was used.  

There are several really cute sentiments in the stamp set, and I chose to use the "purr-fect Halloween" one for this card.  Thought that would be just what this cool cat would say.  This was stamped with the Tuxedo Black ink on a Very Vanilla cardstock piece that was then die-cut with the Stitched So Sweetly die to fit.  This also has the Crumb Cake sponged on the edges to define them.

The cool cat was stamped with Tuxedo Black, but on Basic White cardstock so his chest would be contrasted against the background.  Then he was fussy-cut with Paper Snips.  He is attached to the broom with both Dimensionals along his upper back and adhesive by his belly and feet.  This helps him to pop off the card just a little bit, but stay connected to his broom.  Wouldn't want him to fall off!

Before I attached the cat to the card front, I thought just a little strip of the Black Glitter Paper (a little less than an inch wide) would enhance the card.  It was attached to the green checked DSP with adhesive.  The cat layer was popped up with Dimensionals.  The sentiment rectangle also has Dimensionals behind it and was placed at an angle on the card.

Lastly, the cool cat said he needed some bling to draw attention to how wonderful he is.  So I added some of the Holiday Rhinestones in a golden-orange color to enhance him.  Isn't he too cool?  Say yes, otherwise he might get his feelings hurt.   *grins*

Hope you had fun with this cool cat today.  If you'd like to order him and his Clever Cat friends, please use the Host Code shown here.  You can use the code even if you don't want these adorable cats!!  I really appreciate all your orders ladies.  You are all awesome and totally cool too!

Thanks so much for stopping by and spending a little time with me today.  Feel free to leave a comment and let me know what you think of my Clever Cat friend.  I'd love hearing from you.  It's nice to get some feedback so I know what you're thinking.

Happy stamping and creating!
Sharon