Showing posts with label Hello Harvest. Show all posts

Tuesday, October 4, 2022

Hello Harvest in Black & White

Hello ladies!  Hope you're doing well today.  I've been having problems with my new phone 'talking' with my laptop.  Did I mention I hate technology?  Oops, maybe I shouldn't say that out loud in front of both my phone and laptop.  LOL  But I don't think it can get any worse.  I can't get my pictures to download from my phone to my computer.  And if I don't have pictures, it's kind of hard to make a blog post.  Anyway, after much muttering and backtracking, and convoluted thinking, my son got a few pictures for me to work with.  Not what I planned to use right away, but it'll have to do.

This card uses much the same layout as the last post.  There are several changes that I'd like to point out.  Last card I shared, I used the Mossy Meadow and white print from the Rustic Harvest Designer Series Paper.  This diagonal plaid in black and white is the reverse side of that print.  It changes the look of the card dramatically, doesn't it?

Because of using the black and white plaid, I chose black to be the color of the card base also.  The DSP print is attached to the card base with adhesive to lay flat.  

Next came building up the middle layers.  The DSP measures 2 1/2" x 3 3/4".  The Cajun Craze layer behind that measures in at 2 3/4"x 4".  They are attached together with adhesive.  The Basic Black layer behind these measures 3" x 4 1/4".  These are also attached together with adhesive.  Then it's all finally attached to the center of the card front with five Dimensionals - one in each corner and one in the middle.

Yes, I know the blessings die isn't from Stampin' Up!  Sorry!!  I've had the blessings die for quite a while and don't remember when or where I got it.  It's just one of those little treasures that's there and I can pull it out every once in a while, when needed.  This time, I die-cut the sentiment from Cajun Craze cardstock.  I tried just having the sentiment layered onto the DSP print, but it really got lost in the print.  After trying a few possibilities, I thought of a vellum layer.  Voila!  It was the perfect buffer between the print and sentiment, but it didn't hide a lot of that gorgeous print that I wanted to be the focal point.  I love it when ideas just fall into place!

I used some Multi Purpose Liquid Glue to attach is to the center of the vellum piece that measures 1 1/2" x 4 3/4".  After the glue set up, I used it again on the back of the vellum following the wording to attach it to the card.  

I really debated about the bling or no bling issue on this card.  I wasn't happy with anything I tried, so this card has ended up being "bling-free".  Hope you like this variation of the last post.  It's different enough to give you some ideas.  I hope we can somehow get the pictures off my phone and onto the laptop so I can get more posts going.  Like I said earlier - I hate technology!!  It's almost impossible to live with it, but definitely needed anyway.

Quick reminder - free shipping today only (October 4th) on orders of $75 or over.  Have fun shopping.  And please use the Host Code shown at the top of the post.  Thanks!

Happy stamping and creating,
Sharon


Tuesday, September 27, 2022

More Hello Harvest

Hello again!  Hope you're doing well today.  The weather has been a little cooler and it's been great having the doors and windows open.  Love this time of the year!  Since I've been enjoying it so much, I've reverted back to an autumn idea.  Today's card uses the Hello Harvest Bundle and the coordinating Rustic Harvest Designer Series Paper.  These are found on pages 48-50 in the July-December 2022 Mini Catalog and are truly wonderful!  With those components, you just can't lose!

Doesn't this card just scream fall to you?  I love the two Designer Series Paper prints used here to complement each other.  And then adding the stamped and die-cut leaves that are "scrunched" for texture - oh my!  It just makes me happy.  Let's dive into the dimensions so you can make this too.

This starts with Mossy Meadow cardstock that measures 8 1/2" x 5 1/2".  It's scored at 4 1/4" and folded in half.  The first layer is the Mossy Meadow print from the Rustic Harvest DSP found on page 49. Don't the swirls remind you of the curlicues on the pumpkins? So cute.  It measures 5 1/4" x 4" and is attached flat with adhesive.  

The focal point on the card started out with a small piece of DSP that was only 1 3/8" x 4".  I went ahead and cut a piece of Basic White the same size.  I figured these could lay side by side onto another piece of Mossy Meadow cardstock.  I cut the Mossy Meadow to 4 1/4" x 3" to fit both of them.  It needed a layer of Cajun Craze behind that to delineate between the Mossy Meadow cardstock layer and the same color DSP print.  I cut the Cajun Craze at 4 3/8" x 3 1/8".

The Basic White layer of cardstock has the "...blessing" sentiment stamped on the right half using Mossy Meadow ink.  (I stamped it in the middle, but upon reflection, I think it would have been better if it had been stamped a little higher to leave more room for the rhinestones.)  

The pumpkin print was attached to the bottom half of the Mossy Meadow cardstock with adhesive. Then the Basic White layer was attached leaving a gap between the two and being sure to keep both the sides even.  This was attached to the card front using Dimensionals to give it some lift.

There is an oak leaf that is part of the Hello Harvest stamp set.  I inked this with Mossy Meadow ink, then stamped it three times (without reinking at all) on some Basic White cardstock.  I like the different hues of the leaves which I thought looked more natural than having all of them the exact same color.  They were each die-cut with the coordinating die.  

When placing them on the card, they looked flat, so I "scrunched" them up in my hands and then only partially flattened them to attach to the card front.  They are attached with a Mini Glue Dot at the base of each leaf.  For an accent, I thought the Black & White 1/4" Gingham Ribbon found on page 146 of the Annual Catalog was perfect.  I tied a smaller bow and trimmed the ends neatly.  Then attached with a Mini Glue Dot right over the base of the leaves.

Lastly, I grabbed the Leaf Label and Amber Gems Combo Pack.  These are found on page 49 in the July-December 2022 Mini Catalog.  Three gems were placed under the wording to accent it and draw your eye there.  

That's it for today's card.  Hope you like the lovely layers of DSP and the warm fall colors.  On this card, it's really all about the Rustic Harvest DSP.  That's the real star of this card.

Just a reminder that the Perfect Partners sale is starting to wind down.  It finishes up on the last day of September, so there aren't many days left if you need to get a last-minute order in.  And a big "thank you" to those of you that did order the stamps and dies you wanted already.  It's greatly appreciated.

Happy stamping and creating,
Sharon


Saturday, August 6, 2022

Rustic Pumpkin in Neutral Colors

 Hi Friends, can you hear me laughing?  I'm just about rolling on the floor here.  I'm laughing at myself, or maybe I'm just groaning and rolling my eyes in amazement at how out of touch I am.  Not sure - could be both.  Think back the last year or maybe two to all the advertisements during the fall at the craft decorating stores.  Remember all the ivory and crumb cake, with a touch of teal decor ideas out there?  I always loved the look and this year I thought I'd jump on this look early for a Thanksgiving card.  Love how it turned out and couldn't wait to share it with you.  I got this bright idea to show some 'advertised items' from websites to go with my card.  But lo and behold!  That color combo isn't shown on any of the websites I checked out.  So the laugh is on me.  A day late and a dollar short here, but what else is new.  After giving my dilemma some thought, I'm going to share it with you anyway.  I still think it's a pretty card idea, and hope you like it too.  I might try to revisit the idea with more of an updated twist to it.  We'll see.   If not, hang on, I'll probably be sharing something else tomorrow.

To make this card, start out with a sheet of Very Vanilla cardstock cut to measure 8 1/2" x 5 1/2", scored at 4 1/4" and folded in half.  The 1st layer is Bermuda Bay and measures 5 1/4" x 4".  This is attached to the Very Vanilla card base with adhesive.

The next layer is Crumb Cake cardstock that measures 5" x 3 3/4".  This is run through the Stampin' Cut & Emboss Machine using the new Leaf Fall 3D Embossing Folder.  You might have missed this in the July-December Mini Catalog, but it's a great embossing folder with lots of leafy details which you can see here.  You can find it on page 81.  After embossing, the Crumb Cake layer was lightly brushed with the Blending Brush and Crumb Cake ink to define the leafy detail more.  It's attached flat to the Bermuda Bay layer using adhesive.

The next step was die cutting the pumpkin pieces.  The Rustic Pumpkin Dies was used for this.  Two sections of pumpkin were die cut from Very Vanilla, the stem is cut from Crumb Cake, and the vine from Bermuda Bay.  Can you see all the cool detail on these pieces?  To make them stand out even more, a very slight brushing of Crumb Cake was added to each of the pieces before putting them together.  The middle section of the pumpkin has Dimensionals behind it to make it stand up from the back.  The stem is tucked under it.   And the Bermuda Bay vine is tucked in between.  Then the whole piece is added to the card front using Dimensionals.

The sentiment is from the Hello Harvest stamp set.  This is definitely turning into one of my favorite sets!  It's stamped with Bermuda Bay ink onto a Very Vanilla cardstock piece.  The banner used to die-cut the sentiment is from the Stylish Shapes Dies.  I think the sentiment fit inside perfectly and like the added detail of the pierced edging.  This piece also has just a slight brushing of Crumb Cake on the edges.  Then it's attached to the card front using Dimensionals also.

The last thing to add is the bling of course.  For this card, I used the Leaf Label and Amber Gem Combo found on page 83 in the July-December Catalog.  As you can see, the Leaf part of this wasn't used, but I liked the amber gems with this card.  They made a nice contrast with the Bermuda Bay accents.

That's it for today.  Hope you like this simple card.  I think it has an elegant feel to it.  It's a good Thanksgiving card (or anytime card really!) that's quick to make, but still classy.  

Just a quick Sale-a-Bration update.  As more items have sold out, Stampin' Up! has added new freebies to the Sale-a-Bration line-up.  Check for the updated list at the right of the blog page under "More to Sale-a-Brate".  Any changes will be posted there.  

Thanks for stopping in to see what's new today.  It's time for me to get back to my stamping table and move on to something else.  Hmmm, wonder what I should create next.  Any suggestions???

Happy stamping and creating,
Sharon

Wednesday, July 20, 2022

Hello Harvest

Good day to you!  After a long night of lightening and rain, the sun is shining brightly again.  I thought it would be another gray day.  But was I ever wrong, and it's a good thing too!  We're planning to go to a peach festival later on today.  I'm so looking forward to all the wonderful 'peachy' things we'll be able to eat and buy.  Doesn't it almost make your mouth water just thinking about it?  I considered the idea of making a peach themed card to share today, but instead I'm sticking with my fall theme that I've been going with.  Since I simply love anything to do with fall, whether it's pumpkins, sunflowers, colorful leaves, bright blue skies, apples and cider, etc, that's what I'm going with. So here's the card I made to share with you today.

This card is made with the Hello Harvest Bundle found on page 50 in the current mini catalog.  This whole look just embodies fall to me with the pumpkin and sunflowers, fall colors, and of course the sentiment too.

I've got to admit that the big bunch of Stampin' Blends on my worktable are still sitting there since last week when I started in on the fall cards.  As you can see on this card, I'm still using all those fabulous fall colors.

To make this card, start with a half sheet of Old Olive cardstock that's scored and folded in half.  The cute, checked designer paper is from the Gingham Cottage DSP pack.  These are a collection of checks - some are tone-on-tone and others have black added to them.  This is one of the smaller check prints in Pumpkin Pie.  It measures 5 1/2" x 2" and is attached to the front of the Old Olive card base. 

Both the pumpkin and the flower bunch images were stamped with Memento Tuxedo Black ink onto a piece of Very Vanilla cardstock.  The pumpkin was colored with Pumpkin Pie Light & Dark Blends, along with a little Daffodil Delight Dark for some highlights and a touch of Poppy Parade Light and Crumb Cake Dark for a bit of shading.  On this piece, I went over the separate colors quite a bit with the Pumpkin Pie Blends to get the colors very blended so you can't see the individual colors at all.

On the sunflower bunch, Daffodil Delight Light & Dark, Old Olive Light & Dark, and Granny Apple Green were used to color it.  

Did you notice the oak leaves tucked behind the pumpkin?  They're part of the set also.  To get those colors, one was inked with Crushed Curry then rock'n'rolled in Cajun Craze ink then stamped.  The other started out with Crushed Curry then rolled in Old Olive ink.  I made several when doing this because I wasn't sure of the placement on the card.  It never hurts to have some extra fall leaves ready to use when needed, you know. 

 After the coloring and stamping was finished, all the pieces were die-cut using the Rustic Pumpkin Dies. There were several little curly vines cut from Old Olive cardstock too.   

The sentiment here is one of four from the Hello Harvest set.  It was stamped on Very Vanilla cardstock with Memento Tuxedo Black ink.  Under the sentiment a little dot and dash design from the set was stamped in Pumpkin Pie ink.   Then it was punched out with the Rectangle Postage Stamp Punch.

All the pieces were assembled and arranged on the card.  The pumpkin and sunflowers were attached with Dimensionals.  The sentiment and oak leaves were attached with adhesive so they're flat on the card.  The little viny curlicues are tucked under and around the images. 

Lastly, two Champagne Rhinestones were added to the sentiment label, and three more were snuggled in around the focal images.  I'm so happy with how the card turned out.  Hope you are enjoying all these fall card ideas.  It's one way to beat the heat that most of us are dealing with now.  Just keep thinking of autumn weather with gorgeous blue skies and crisp cool temps.  And don't forget the cider and doughnuts, pumpkins, and sunflowers.  Here's to cooler weather!

If you're planning on ordering any time soon, please use the Host Code shown at the top right of the blog page.  Your orders are always appreciated!   And so are any of your comments!  Please come back again soon to see what is happening in my stamping world.  You never know just what you'll find.

Happy stamping and creating!
Sharon

Saturday, July 16, 2022

Another Fond of Autumn Design

 Hello Ladies!  Back again with another card using the Fond of Autumn stamp set and the coordinating die set.  Yes, I love these images and the coloring too!  I find it very relaxing to play around with my Stampin' Blends and color some images.  And it's even more wonderful when those images can be die cut and I don't have to fussy cut them!!  lol

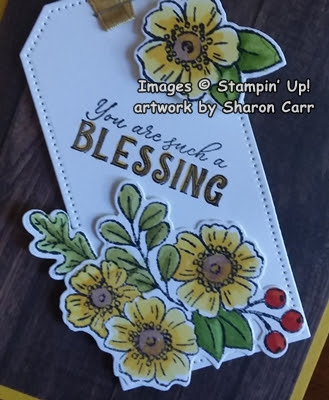
Isn't this a beautiful card for autumn with all those gorgeous and rich fall colors?  It uses another one of the sections of the main image from the Fond of Autumn set.  The extra flower at the top of the tag and an extra oak leaf are from the same set too.  So versatile!  If I hadn't used the fall color palette for this card, it definitely could be used all year long.
  
To make the card, start with a card base of Crushed Curry that measures 8 1/2" x 5 1/2", that's scored and folded in half.  On this card, I wanted a designer paper that has woodgraining for that fall touch.  This paper is from the In Good Taste DSP again, but this time I went with a really dark color to off-set the rest of the design.  It's cut to 5 1/4" x 4" and is attached with adhesive.

The images from Fond of Autumn were stamped with Memento Tuxedo Black ink and colored with Stampin' Blends.  The colors used on this card are:
Old Olive, Daffodil Delight, Granny Apple Green, Pumpkin Pie, Real Red, and Bronze.  All of the coloring used both the Light and Dark versions of  each of these Stampin' Blends. 

I liked the idea of the images nestled on a tag for the focal point on this card.  The Tailor Made Tag Dies were the perfect match.  This is the largest die that was used.  Did you notice the pierced edge all around?  Nice touch.  It also cuts a hole for ribbon to go through. Instead, I used a 3" piece of Gold Shimmer Ribbon, folded it in half, and stapled it over the hole for a different look.

The sentiment is from the new set called Hello Harvest.  I love this one and will be working up some ideas with this soon.  But the words were used on this card because I love them.  I haven't used the rest of the set yet, but this sentiment has been used on a couple of my cards already.  This time they were stamped with Memento Tuxedo Black ink.  On the double lettering part, a Mango Melody marker was used to draw your eye to it.


The flower cluster on the bottom was attached flat to the tag with adhesive.  An extra oak leaf was tucked in on the left edge.  The flower and leaves on the top were attached with Dimensionals.  Then the entire tag was attached to the card front using Dimensionals too.

I've spent so much time looking at this card while making it, taking pictures, and writing about it, and it just struck me that it still needs something.  I had already checked the different pearls and rhinestones and didn't really care for the look.  But I think I've still got a ladybug trinket or two set aside because they're just so darn cute I couldn't get rid of them.  Wouldn't that be a perfect accent?  What do you think??

For more info on the stamps, dies, and coloring used here, please refer back to the previous post which has much more information about coloring and die-cutting on this set.

Thanks for checking in with me today to see what I've been creating.  I've got to tell you, now that all those fall colored Stampin' Blends are still out on my worktable, I just might keep on playing with this fall theme and see what else appears.  It is one of my favorite times of the year, so I guess you'll just have to deal with me making fall cards for a little while.  Hope they get you inspired, and you get your coloring tools out, whichever ones you prefer.  Have fun coloring and let your inner child come out.  Remember how much fun it was to color in your coloring books?  Yes, I loved it too!  Have fun!!  And don't forget about Sale-a-Bration going on right now.  For every $50 or $100 you spend, you can choose one of Stampin' Up!'s exclusive freebies.  And they've got some truly fabulous choices for you.  Please use the Host Code shown at the top right of the blog page when you order.  Thank you!!

Happy stamping and creating!
Sharon