Showing posts with label 2023 September - December Mini Catalog. Show all posts

Friday, January 12, 2024

Lots of Beary Cute Cards

 Happy Friday to you.  What a week it's been with the heavy rains, high winds, and flooding going on around here.  Today it's supposed to start in on more of the same.  Wish we would have gotten a bit of this rain in the summer when it was so hot and dry.  Is there some way to gather up some of the rain and save it for future reference?  Hmm.  Something to think about.  Before the rains started today, I made a quick trip to the Post Office.  I had a stack of cards to mail to the shut-ins from church.  It was a large stack, so I figured I'd be better off taking them there rather than waiting for our mailman to take them all.  Even though the cards were designed in December and some of the items are now retired, I figured you might like to see the cards that were mailed for January.

I love the wintry look of the card.  It's a good  fit for January cards, right?  Let's walk through the steps to make this card.

I started with a card base of Gray Granite that measures 8 1/2" x 5 1/2".  It's scored and folded in half as usual.  The layer with the Aspen Trees is Basic White Thick cardstock.  It measures 4 1/8" x 5 3/8".  The die was laid in the center of this and run through my Big Shot.  I went through and back again to get a good cut on all the tree limbs.

The Balmy Blue print paper behind this is from A Walk in the Forest Designer Series Paper that was in the Winter Mini Catalog.  I liked how both this print and another snowflake print looked peeking through the trees.  This paper was cut at 4" x 5 1/4" so it's just a tiny bit smaller than the die-cut layer.  It's attached with adhesive at the edges and a few strategic places in the center of the die-cut.  Then it's attached to the card base with Dimensionals.

The bear is from the Beary Cute Bundle that wasn't carried over from the Winter Mini which is too bad in my opinion.  It was stamped with Basic Gray ink to give him a nice dark outline.  The scarf is from the same stamp set and was stamped with Balmy Blue ink.  It was punched out with the Bear Punch.

The sentiment is also from the set.  I love both the wording and the font used on this set.  (I'm hanging on to the set especially because of this sentiment.)  It's stamped in Gray Granite ink on a 1 1/2" x 1" strip of Basic White cardstock.

The bear is attached near the bottom with Dimensionals.  The sentiment is attached about the middle and on the left.  It's attached with Dimensionals also.

The added bling for these cards were three clear Rhinestone Basic Jewels.  I thought that they went well with the frosty feel of the card.

One last look at the stack of cards mailed out today.  It took a bit of time to assemble all of them.  I was thinking of you, Sue, when I was cleaning out all the bitty pieces in the trees.  I know you love your die-cuts, and so do I!

Sorry that most of today's card is using retired products.  But if you have the Beary Cute stamp set and punch, this gives you another idea on how to use it.  Thanks for stopping by to see what's being stamped today.  I need to get back to my new stamps and papers and get crafty!

Happy stamping and creating,
Sharon


Friday, December 22, 2023

Musical Christmas Classics

Hello again.  Just 3 more days until Christmas.  Woo Hoo!!   Boy has it ever crept up on me this year.  Today I have one last Christmas card to share with you.   I couldn't resist one last card that's beautiful and so easy to make.  Just in case you're going to visit, one of these cards and a plate of goodies would be a lovely hostess gift.

Stamps:  Christmas Classics

Cardstock:  Very Vanilla, Pecan Pie

Ink:  Pecan Pie

Dies:  Stylish Shapes Dies

Embossing Folder:  Merry Melody

Extras:  Festive Pearls in gold, Adhesive-backed Star Trinkets, Gold and Vanilla ribbon that is from several years ago, Mini Glue Dots, and Dimensionals

The embossed music staff really shows up nicely to go with the words of the song "God Rest Ye Merry Gentlemen".  Seems like this song has been playing in my head for the last few days.  It's a good thing I like the song.

Just another picture for you because I think the card deserves a 2nd look.  

Hope you have all your cards finished and in the mail.  For some reason I always leave one or two cards until the end that need a long letter included.  One of these years I'll learn to do those cards first and get it out of the way, so I don't need to stress over it.

My daughter has been here making cookies with me today.  A couple of the recipes need to chill overnight, so we'll get those two finished up tomorrow.  Whew!  We did get a batch of pimento cheese spread made today too.  I was never a fan of this until a new 'southern' friend shared her recipe with me.  It's so yummy, but it makes a huge batch.  So, Heather took some with her to a party tonight.  Hope they love it as much as we do!

Christmas Blessings to you and your family,
Sharon


Thursday, December 21, 2023

A Little One Horse Open Sleigh Idea

Hello friends!   I have some pieces of the lovely One Horse Open Sleigh DSP left over and couldn't resist making another card from it.  I know the time is running out, but I've gotten a few unexpected cards in the last few days and needed to make some to send.  Hope you like this one.  The colors are so not what I expect at Christmas, but I love how it turned out.

Stamps:  Merriest Trees

Cardstock:  Early Expresso, Petal Pink, Basic White, One Horse Open Sleigh DSP

Ink:  Early Expresso, Petal Pink

Dies/Punches:  Stylish Shapes Dies, Banner Pick a Punch

Extras:  Frosted Lace Gel (retired), Adhesive-backed Snowflake Assortment


The bottom layers of the card are strips of Basic White that are ripped to get that wonderful texture.  The Frosted Lace Gel stuff was added randomly along the torn edges.

Wishing you God's blessings as we worship His Son this Christmas!

Happy stamping and creating,

Sharon    

Wednesday, December 20, 2023

The 2nd Meandering Meadow Card

Hi!  Ready for the second half of the Meandering meadow piece of DSP?  It was used to make the focal point on this card tucked between two pieces of "lace" on either side.  This idea was the entire reason I bought this paper.  I love the look of this, and it really can't get too much easier to make.  

Stamps:  I honestly don't know what stamp set this hello comes from.  Anything the right size will do.

Cardstock:  Night of Navy, Basic White, Vellum, and Meandering Meadow Designer Series Paper

Ink:  Night of Navy

Dies:  Darling Details Dies

Extras:  Double Oval Punch, pink 3/8" Sheer Ribbon Combo Pack, Adhesive-backed Glitter Sequins (retiring soon), Mini Glue Dots, and Dimensionals

Just die-cut two 2" strips of Basic White and tuck under the pretty DSP.  Make sure the top and bottom edges are trimmed straight.  Add your sentiment and ribbon.  Finish up with the glitter sequins.  What could be quicker than that?

Enjoy using this DSP - it's another fabulous scenery print DSP that is as wonderful as the last several they have had.  Are you ready to get back to the Christmas cards?  Come back tomorrow for the next installment.

Happy stamping and creating,
Sharon


Monday, December 18, 2023

Night Divine Nativity Card

 Happy Monday to you.  Things are getting busier as Christmas approaches.  There's always so much to do and get finished before the big day approaches.  In all the hustle and bustle of the holidays, so often we lose sight of what the season is all about.  This is a gentle reminder that Jesus is the reason for the season.  I've made several versions of this card and decided to share this one as it's my favorite of them all.  Hope you like it too.

Stamps:  Stars at Night
Dies:  Stars at Night and Night Divine
Cardstock:  Crumb Cake and Very Vanilla
Ink:  Pecan Pie
Extras:  Shining Brightly DSP, Distressed Gold Specialty Paper, Dimensionals

The nativity set is die-cut from Crumb Cake cardstock.  It's attached low on the DSP with the bottoms of the side beams shortened to fit the landscape style card.  

Two die-cut stars are attached to the roof of the stable.  Merry Christmas is fussy cut then attached to the left by using Dimensionals.

This is a very quick card to put together.  For some reason, I keep using die-cut stars instead of the Adhesive-backed Star Trinkets which I bought to use with these cards.  On one of these cards, those Star Trinkets will finally show up.  I really did use them, I promise.  

Enjoy your cardmaking!

Happy stamping and creating,
Sharon


Friday, December 15, 2023

Trucking Along in the Woods

Hello there.  Ready for another quick card?  This one was inspired by my daughter who loved her grandpa's old red truck.  It's fairly quick to make because you have dies and punches to do all the work for you.

Stamps:  Trucking Along, sentiment (?)
Cardstock:  Balmy Blue and Basic White
Ink:  Real Red, Garden Green, Basic Gray, Night of Navy
Extras:  Walk in the Woods Designer Series Paper, Truck Punch, Aspen Tree Die, Banner Pick A Punch, White Frost Glitter (retired), Basic Jewels Rhinestones in clear

Just another shot to get a better look at some of the details.

Die-cut trees layer.  Add DSP behind it only on the edges.  Layer onto card base.  Stamp truck and punch out.  Stamp tree and fussy cut.  Attach to card front.  Add sentiment.  Rip a strip of Basic White for snow area and attach.  Add glitter and let set up.

 Hope you're enjoying this card blitz and something peaks your curiosity.  Give these ideas a try!  

Happy stamping and creating,
Sharon


Thursday, December 14, 2023

Glory to God Christmas Card

 Hi!  I woke up this morning with this idea in my head.  I finally got downstairs today to make it and thought I'd share it right away.  If you're still looking for super quick cards to make, this one (or two) truly fit the bill.  Enjoy!

Stamps:  Night Divine
Cardstock:  Very Vanilla, Shaded Spruce, More Dazzle Specialty Paper, Silver Foil
Ink:  Shaded Spruce
Extras:  Deckled Circle Dies, Stars At Night Hybrid Die with Embossing Folder, and Dimensionals

Just a closer up look if you're interested.

Couldn't decide on the orientation of the card, so I did it both ways.  I like how both of them turned out.  

The stars are a little different on the two cards, but those are the only changes.  This card is so quick and easy to make.  Just get everything die-cut, then put it all together.

Just a reminder that you have a few more hours to take advantage of the free shipping on December 14.  Orders must total $75 or more.  Have fun shopping!!

Happy stamping and creating,
Sharon


Tuesday, December 12, 2023

Merry Tree Card

Hi there!  Today is the first "quickie" card post.  Let's see how this works...

Stamps - Merriest Trees, Cottage Wreaths
Cardstock - Cherry Cobbler, Garden Green, and Basic White
Ink - Garden Green
Extras - Merriest Trees Dies, A Walk in the Woods DSP, More Dazzle Specialty Paper, Red Glitter Paper (retired), Double Oval Punch, Adhesive Sheets, and Dimensionals

Any questions, just ask!  And let me know what you think of the format.  Is this enough info for you to duplicate if desired?


**************************************
Quick Note - There is FREE SHIPPING on December 14th only.  Plan what you need to order to take advantage of this promotion!  Please use the Host Code shown at the top of the blog page.  Thanks so much!
***************************************

Happy stamping and creating (and cookie baking!),
Sharon


Monday, December 11, 2023

Merriest Trees Card

 Hey there!  Have you been dealing with lots of rain lately?  We sure have.  There were 1 3/4 inches that fell just yesterday alone.  So glad we don't have to worry about flooding anymore!  And after two days of rain, I woke up to sunshine and blue skies this morning.  What a pleasant surprise.  It's gotten me invigorated to get on with the card sending.  All the cards for the shut-ins from church down here have been made.  This morning was time for adding the inserts, getting them in the envelopes, adding postage, and mailing them.  I'm finished except for going to the Post Office to mail them.  Seems like the mailman doesn't like picking up 26 cards all at once.  Oh well, at least it's a nice day for running errands!  Now that those are all taken care of, it's back to making my own cards.  Today I have a card to share made with the Merriest Trees die set.  I didn't stamp the tree at all (just sentiments), but I did die-cut the different elements to make this one.

I keep looking at the finished card and wondering if it's too busy.  It's got a lot more going on than what I normally make.  What do you think?  The card starts with a half sheet of Lost Lagoon measuring 8 1/2" x 5 1/2".  It's scored and folded in half.   
 
The first layer is Basic White that measures 4 1/8" x 5 3/8".  This is a very skinny layer behind the next layer which is the Tartan Foil Specialty Paper that is an Online Exclusive only.  This paper is so pretty, and I thought it would make a great focal point for the card.  The layer is cut at 5 1/4" x 4".  It's wrapped with a piece of Silver and White Sheer Ribbon that is attached to the back.  After adding the ribbon, attach the DSP to the Basic White layer with adhesive.  These get attached to the card base with adhesive also.  

 
The love and joy are a stamp in the Merriest Trees set.  They were stamped with Lost Lagoon ink and fussy-cut apart to place on either side of the tree.  They are attached with segments of Mini Dimensionals.

The Merry Christmas comes from the Stars At Night set.  It's also stamped with Lost Lagoon ink and fussy-cut.

The silver trim on the tree is part of the same set we've been focusing on.  It's cut from Silver Foil.  It was backed a section of Adhesive Sheet before die-cutting.  This made it so easy to just peel and stick the trim where I wanted it to be.  After the trim was added, the sentiment was placed over this with Dimensionals.  

One of the star dies from the Stars At Night Bundle was die-cut from the More Dazzle Specialty Paper.  I thought it was a nice sparkly addition to the design.

This is where I might have gone a little overboard on the additions.  Three little clear Rhinestone Basic Jewels were added to the tree for decoration.  Too much?  Tell me what you think.  

I was making changes to my design all along the way.  The tree was going to be the backside of the DSP which has a white background with  different plaid.  It looked too white against the white layer, so it turned into the darker side of the paper.  With the darkness of the tree, I struggled to figure out how to brighten it.  That's how I think I over did it.  Ah yes, another work in progress.

Thanks for stopping in to see what's new.  I've been stamping up a storm of Christmas cards and I'm running out of time to share them all.  I might do the blog posts a little different for the next week or two.  If I just share a card or two using the same set or DSP without all the directions it would go much quicker.  Besides, most of these cards are pretty straightforward and don't need lots of details.  What do you think?  More cards and less talk for the next two weeks?  Or stay as it is and post every 2-3 days?  I can do it either way.  Or maybe a mix of the two plans?  Give me some input here.  I'm running out of time.

Be sure to shop the Online Exclusives and the Clearance Rack for interesting gift ideas for your crafty friends.  If you'd like to get a gift certificate from me for a friend, give me a call and I'll make one up special for you and put it in the mail.  Hope to hear from you soon.

Happy stamping and creating,
Sharon

Saturday, December 9, 2023

Cottage Wreath Christmas

Hey there!  I need a break!  I've been in cookie-making mode the last couple of days, and I'm exhausted.  It's time to do a sit-down-and-get-off-my-feet project.  I forgot just how crazy it is to stand all day and rush around to get cookies on and off the baking sheet and in and out of the oven.  I know you probably have no sympathy for me because I'll be enjoying all those cookies, but I'm tired!  So instead of getting back to baking this morning, I'm sitting down to write a blog post.  Sitting, aaahhh!  Today I wanted to share a card using the versatile Cottage Wreath stamp set.  It's been around since last year, and I love it.  The set is so versatile with all the little Halloween, fall, and Christmas bitty accents that are part of the set. That means you can use it over and over and still make it look new depending on what you put with it.  To me, that is a great investment in a stamp bundle that I love to use.

First of all, I love this layout with something along the left side to make the card look asymmetrical.  That is a pleasing look to me.  Secondly, I love the wreaths.  So, this card makes me doubly happy when I look at it.  If you like it too, come create along with me.  Start with a Thick Basic White cardstock base of 8 1/2" x 5 1/2", scored and folded in half. 

The first layer is Pretty Peacock cardstock that measures 5 1/4" x 4".  Then a layer of Basic White is cut to measure 5" x 3 3/4".  This piece is embossed with the Distressed Tile Embossing Folder.  Don't you love all the detail this makes?  And it shows off so nicely.   Attach the white layer onto the Pretty Peacock layer with adhesive.  

A strip of Joy of Christmas Designer Series Paper is attached near the left edge of the white paper with just a small white edge peeking around it.  This one is a rather dark print, so I added only a 1" strip to the card.  At this point, I attached these layers to the card base using Dimensionals.

The leafy wreath was stamped on Basic White cardstock using Garden Green ink.  I tried Old Olive first, and it didn't look right to me, so I made another in the Garden Green.  This is not one of the coordinating colors listed on the DSP package, but it seemed to look better to me.

After stamping, the wreath was die-cut using the coordinating die.  It was centered and then attached to the card front using Dimenisonals.

The accent bow is die-cut from the Pretty Peacock color choice from the Soft Shimmer Specialty Paper in the Annual Catalog.  This paper has such a pretty, soft shimmer in real life.  It seemed to be the perfect choice here.  It's been attached to the wreath with a Mini Glue Dot in the center.

The sentiment is from the Brightest Glow stamp set.  It is stamped with Pretty Peacock ink on a strip about 1" wide.  The sentiment is die-cut using the coordinating die from the Labels Aglow die set.  Don't you love the pretty detail on this die?

After stamping and die-cutting the sentiment, it was attached over the wreath using Dimensionals just where it layers over the wreath.

The inside of the card has a sentiment from the Brightest Glow stamp set.  It's stamped with Pretty Peacock ink.

There are two leafy branches that match the branches in the wreath stamped as an accent.  A few tiny evergreen sprigs are tucked in.  They are stamped with Pretty Peacock ink.

There is a sprinkling of retired tiny Real Red Rhinestones added to the front of the card.  I think they added just the right touch, even though they are retired.  (Why do they keep retiring some of my favorite accent pieces???)

Hope you like this simple Christmas card.  I tend to like the more clean and simple style so that's what you usually see here.  Every once in a while, I get a little crazy with the design and you get something over the top.  But basically, you get basic straight forward card ideas from me.  Hope you like this style of card too and are looking forward to more posts.

The new Mini Catalogs will be mailing out soon.  If you'd like one sent to you, please let me know, so I can do that for you.  And Sale-a-bration is coming back in January for two months.  Definitely something to look forward to.  I've seen the freebies, and there's some really cool items in there you'll want to get.  Remember to let me know if you need a catalog or anything else that I can help you with.  That's what I'm here to do - help you with your stamping questions.  Thanks for your loyalty over the years.  I appreciate you and all you do.

Happy stamping and creating,
Sharon

Wednesday, December 6, 2023

Red and Gold NOEL

Hey friends!  Are you having a good day?  I started my cookie baking on Sunday.  Then I made a batch of peanut butter cookies this morning.  I hope if I do a little baking every day, maybe I'll get my usual plate of cookies made in time for sharing.  Why is it when I was at the grocery store with my list of things to make all these cookies, I either forgot to put things on the list or forgot to pick it up at the store.  Looks like another trip to the store is necessary for making more cookies.  I can never have enough different flavors of cookies!  They are my downfall.  Well, let's leave the cookies alone for a while and get on with the card making.  OK?  

Today's card comes with two versions again.  When I'm making my cards, so often I can't decide to make them one way or the other, so of course, I make two!  That's what happened with this card.  I had the idea in my head with general thoughts on DSP and ribbon accent, but then got bogged down trying to decide which color to feature and which to use as an accent.  Take a look and choose which one you prefer.

Both cards start with a Thick Basic White cardstock that measures 8 1/2" x 5 1/2".  No surprise there, just a basic card base.

Let's focus on this card first.  The first layer on the card is Cherry Cobbler that measures 5 1/4" x 4".  Do not attach to the base yet.   

Next is a layer of the gorgeous Joyful Specialty Design Series Paper.  This print is a delicate design of gold leaves, holly and evergreen branches accented with Cherry Cobbler berries.  So pretty.  I used a piece measuring 3 1/4" x 5".  This is attached with adhesive to the right side of the Cherry Cobbler layer framing the top, bottom, and right side to match.  Just a heads up - the dimensions on the width of the DSP might change with your choice of ribbon.  

The ribbon I used is retired from possibly last Christmas.  Some of you must still have some of this ribbon left.   It's a beautiful woven Cherry Cobbler and Gold ribbon that is 1/2" in width.  When you look at the ribbon it changes to show more of the Cherry Cobbler or the Gold depending on how the light hits it.  I thought it would be a great match with this lovely DSP.  A 6 1/2" strip was wrapped around the open area left from the DSP.  It's attached in back with adhesive.

This layer is then attached to the card base.  I used Dimensionals to attach it.

The ribbon looks so much more gold here because it's angled to catch the light.

On a piece of Basic White cardstock that measures about 2 1/2" square, the NOEL letters were stamped in the center with Cherry Cobbler ink.  It's die-cut using the Joy of Noel Bundle.  The square die fits the lettering perfectly.  After cutting, I added a 2 3/8" square of the Distressed Gold Specialty Paper behind it.  This beautiful paper can be found in the Annual Catalog.  They're attached together with adhesive.

The detailed die from the Joy of Noel Bundle cut a layer from Cherry Cobbler cardstock.   I did have to run it back and forth in the Big Shot several times to get the detail to cut nicely.  The NOEL lettering layers are attached to the detail die-cut using adhesive.  This is all added to the card front using adhesive.  

On this card I used the gold pearls from the Festive Pearls set as an accent.

Now we'll take a closer look at the opposite design.  This card starts out the same with the Thick Basic White card base, the Cherry Cobbler layer, the DSP layer, and the ribbon added to the side.  The NOEL lettering is still Cherry Cobbler ink on the Basic White and die-cut. 

The Cherry Cobbler layer was cut 2 1/2" x 2 1/2" square, so it's a little larger than the distressed gold layer on the other card.  The detail die cut the Distressed Gold Specialty paper to make the detailed layer.  Again, I ran it through several times just like the first time. 

The Distressed Gold layer is attached to the card base flat using adhesive.  The NOEL and Cherry Cobbler layer were attached over the gold layer using Dimensionals.

For an accent, the same Festive Pearls were added, but this time I chose the Cherry Cobbler pearls.

I hope you like these two NOEL cards.  Like I said, I really couldn't decide which one I preferred.  So, it's up to you to decide which one you like better.  Let me know which one you prefer.  I'd really like to know what you think.

Make sure you shop in the Last Chance areas to see what's retiring.  These items will only be available until January 3rd unless they sell out before that.  Some of the Designer Series Paper packs are already gone.   And don't forget to visit the Clearance section to get some really great bargains.  Please consider using the Host Code at the top of this blog.  I really appreciate it when you do.

Thanks for stopping by to see what I've been creating.  Hope you're inspired by something you see and get out your stamps to create something beautiful yourself.

Happy stamping and creating,
Sharon

Wednesday, November 29, 2023

Night Divine Nativity Card

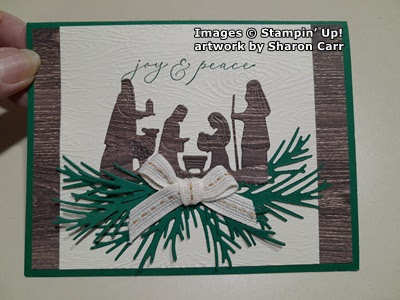
Hello, hello!  Are you staying warm?  Oh my goodness, it's cold here.  It's been getting below freezing the last two days, and I'm so not prepared for that!  This isn't why we moved to the south.  We thought we'd get away from the cold.  I know, most of you are already dealing with that kind of weather and maybe some snow too.   So, I shouldn't complain.  Well, maybe just a little now and then.  😄  I'm still working on making my cards for Christmas.  I keep planning to use the Night Divine Bundle, but then I end up grabbing some different stamp set.  Well, today is the day.  I saw a similar card using this set that I thought was on Pinterest.  It totally intrigued me.  I went back to get the person's name that made it to give her credit, but I couldn't find it anywhere.  I must have seen it somewhere else.  If you've seen this idea, please let me know so I can credit her here.

The major idea that I copied was using wood-grain paper for the layering.  I love the realistic grained look for this die-cut!  I'll be honest and tell you I rummaged through all my wood-grained paper, and I have a lot.  I was looking for the heaviest graining I could find.  Needless to say, this is a retired DSP.  But you can use any wood-grained paper you have that you like.  Also, this card uses 4 different stamp bundles to get the look I wanted.  That doesn't mean you need to go out and buy everything I used.  I'm sure you have stamps that fit the look just fine.  The big item that's really necessary is the Night Divine Bundle.

My card starts with a card base of Shaded Spruce cardstock that measures 8 1/2" x 5 1/2".  It's scored and folded in half.  Next is a layer of my wood-grained DSP.  It measures 5 1/4" x 4".  Before attaching this to the card base, die-cut the image using the Night Divine dies and set aside.  Attach the layer to the card base using adhesive.  What was die-cut from the middle will not show once the card is put together.

The next layer is Very Vanilla that measures 4 1/4" x 4".  This has a sentiment from the Night Divine set.  It's stamped with Shaded Spruce ink about 3/4" from the top of the layer.  This was embossed with the Timber 3D Embossing Folder (page 169).  I like how this look matches with the wood-grained layer and looks a little rustic.  After embossing, attach this to the card front using adhesive.  The top and bottom should fit right over the wood-grained DSP with it showing only on the sides.

At this time, attach the die-cut piece with adhesive.  Place the bottom edge of the die-cut about 1 3/8" from the bottom edge of the layer. This makes it a little higher than middle of the card.  

Next a double evergreen die from the Joy Of Noel Bundle was used to cut five branch sets from Shaded Spruce cardstock.  Two of them are attached to the left side overlapping them.  Then two of them were turned over to the backside and attached to the right side to match.  The last double branch was cut off at the stem to make it fit on the card.  This picture shows how everything is layered together.

The bow I made uses the Pecan Pie Center Stripe ribbon that's in the Mini Catalog.  I tried the Gold and Vanilla Satin Edge ribbon in the Annual Catalog, but it didn't fit as nicely with the rustic look of the card.  After making the ribbon, it's attached over the evergreen branches with two Mini Glue Dots to hold in place.

The inside of the card is finished with a layer of Very Vanilla.  It measures 4 7/8" x 3 5/8".  I wanted more of the Shaded Spruce showing on the edges so it's cut smaller than usual.

The sentiment is from the Wishes All Around stamp set.  It's stamped in Shaded Spruce.  This has turned out to be one of my go-to sentiments this Christmas season.

The evergreen branches on the left are from the Christmas Classics set.  They are stamped multiple times to give it a fuller look.  These are also stamped with Shaded Spruce ink.

Now I need a little help here.  I've been debating about adding a few of the tiny gold Festive Pearls in the Annual Catalog.  Or maybe one of the gold Star Trinkets in the Mini Catalog?  Does the gold accent work on this?  Does it even need anything else, or should I leave it as is?  Help!  A little input would be appreciated.

Ready for some big information?  The retiring list for the Mini Catalog is available now.  Yes, it's that time already.  So, if there are any items in the Mini Catalog that you were debating about getting, time is running out.  You know how fast some items sell out!   So, make your choices now.  Click on the label to take you directly to the retired list.


If you are ordering, please consider using the Host Code at the top of this blog post.  It would be very appreciated.  Thanks for sharing some time with me today.   It's always pleasant to hear back from you and find out whether you like what I've made each day.  You make me want to create and share with you!

Happy stamping and creating,
Sharon

Monday, November 27, 2023

Blue Tree Card

Hello!  It's been so cold here the last few days.  The temps have been in the low 30's and quite breezy, but at least there is sunshine today.  The wind is doing a good job of knocking down the leaves.  We have so many trees that my hubby is out there blowing them every day.  We started getting all the outdoor decorations placed.  They are all coming along nicely, so we're taking a break.  At least I get to stay inside for a while where it's toasty warm and cozy.  All the cold was making me think about cards in blues and silvers.  You know I like my blue cards, so let's share another one today.

It was so funny trying to take the pictures of this card.  The silver layer is so shiny that all the pics were showing a reflection of my arm.  Didn't think you wanted to see my blue arm in the photo.  At least my sweater matched the card!

The card base is Blueberry Bushel.  It measures 11" x 4 1/4", scored at 5 1/2" and folded in half. The first layer is the shiny Silver Foil.  It's cut to 5 1/4" x 4".  Before attaching this to the card base, cut a rectangle from the center with the Scalloped Contours Dies.  No one will see the hole in the layer because it will be hidden.  Attach with adhesive to keep it flat so far.

The next layer is from the Winter Meadow DSP, and it measures 5" x 3 3/4".  This is the third time I've used this lovely print on the cards I've shared.  There is just something about it that draws me to it, and I keep reaching for this print all the time.  Looks like it needs to go on my shopping list because I've just about used it all except for some scraps.  Anyway, this layer is attached over the silver layer using adhesive.

A tree was cut from Blueberry Bushel cardstock using the Forever Forest Dies.  This is mounted onto the die-cut silver rectangle that was already cut.  It's attached with adhesive along the left edge of the silver with part of the branches hanging over the edge.  A piece of the Silver and White 1/2" Sheer Ribbon was wrapped around near the bottom and tied into a knot.  Trim the ends with snips.  I like the added ribbon here, because it looks so shivery cold.  This layer is added to the card front using Dimensionals.

The sentiment is from the Stars At Night Bundle.  I love the font on this Merry Christmas greeting.  It is stamped with Blueberry Bushel ink onto a Basic White piece.   A favorite retired punch from Stampin'Up! was used because it fit nicely.  It's attached to the card front using Dimensionals.

The inside of the card starts with a layer of Basic White cardstock cut to measure 5 1/4" x 4".  It features another of the die-cut Blueberry Bushel trees from the Forever Forest set.  There is also a 1" strip of the same DSP print that I had leftover.  I made use of it attached near the bottom of the Basic White layer.

The sentiment is from the Wishes All Around stamp set.  It's stamped in Blueberry Bushel ink.  The layer is attached inside the card, as usual, with adhesive.

There are a few other embellishments to finish the card.  One of the stars in the Stars At Night Bundle was die-cut from the More Dazzle Specialty Paper.  I liked the glittery-ness of the star because it contrasted nicely with the shiny silver.  It's attached with a Mini Glue Dot. It's also partially off the silver layer to help it stand out.

There are also some Blueberry Bushel gems added to the card.  They're from the Tinsel Gems Four-Pack.  Instead of snowflakes or clear gems, I thought the blue ones were the perfect accent.

That's it for today's card share.  If you've got the items used, this card goes together so quickly!  If you're wanting to make multiples of these cards, just do everything in stages and put together when all the pieces are ready.  Easy peasy.  

PS, did you notice the blue sleeve reflection at the bottom of this photo?  You should have seen the contortions I went through to get these pictures without a reflection.  You would have been laughing at me like crazy.  

Thanks for stopping by to see what's new.  Hope this card inspires you to get going on your Christmas card making.  It's always a pleasure to send your own hand-made cards to let family and friends know you care about them, and they are very special to you.  Come by again for another card idea.  I love sharing them with you.

Happy stamping and creating,
Sharon

Sunday, November 26, 2023

Wishes All Around Wreath Card

Hello friends!  Hope your Thanksgiving was wonderful, and you truly enjoyed yourself.  Did you get enough turkey and stuffing to last you awhile?  Did you have enough time to spend with your family and friends, or is there never enough time to spend with those you love?  The week went by so quickly and here we are at the tail end of November.  Are you ready for Christmas and getting all the cards mailed, cookies made, and presents purchased and wrapped?  Yup, it's that time of year again when we all get frazzled from too many commitments.  But who wants to give up any of those parties and time spent together?  Not me.  So, I suggest you find a quick and easy way to make your cards and get them out of the way first.  Today I have an easy card idea that was shared by my friend Ruth.  This is a perfect card to make in stages and then put together a whole stack of them. This way they're finished quickly and get popped in the mail.  Then on to the cookies!!

If you're looking for a slightly modern look to your red and green cards, this card fits the bill.  There are clean lines and lots of white space with a modern take on those Christmas trees.  Plus, it goes together quick as can be.  I started with a base of Shaded Spruce cardstock that measures 11" x 4 1/4".  It's scored at 5 1/2" and folded in half.  Next there is a layer of Real Red that measures 5 1/4" x 4".  It's attached flat to the card base with adhesive.

A layer of Basic White cardstock is cut at 3 3/4" x 3 3/4" square.  After cutting, it is embossed with the Snowflake Sky Embossing Folder.  (I've been using this folder often 'cause it's so cute!)  After embossing, it's attached flat to the red layer with adhesive, leaving room at the bottom for the green plaid strip of DSP.

The green plaid strip is from the Joy of Christmas DSP.  I think even that 1" strip packs a lot of wow to perk up the card.  It's also attached flat with adhesive.

The tree wreath is from the Wishes All Around Bundle.  First, it's stamped with Shaded Spruce ink, and then die-cut with the coordinating die.  When stamping, stamp an extra tree on a scrap of Shaded Spruce cardstock also.  Die-cut the extra tree with the matching die.  Also cut two of the berry branches from Read Red cardstock to add to the wreath.

Using "green glue", attach the tree wreath in the center of the embossed white layer.  I only added the glue on the outer edges of the wreath.  Add the two red branches to the bottom right area of the wreath.  Then add the green tree using one Dimensional under it to give it some extra height.

The sentiment is also from the Wishes All Around Bundle.  It's stamped with Shaded Spruce ink on a strip of Basic White that is just under 3/4" wide to fit all the letters.  The ends are just angle cut to finish.  It's attached over the green plaid DSP using Dimensionals to hold in place.  Did you notice how the tips of the sentiment just peek over the edge of the layer.  I like it when things are just a little different from lining up just so.  I think it adds just a little bit of added interest.

The finishing touch to the card are the three Real Red Rhinestone Basic Jewels.  After the card was finished, I realized that the red rhinestones are actually retired.  Oops!  How can we not have red rhinestones?  It seems impossible to me.  Especially at this time of year.  Oh well, if you have them, use them!  If not, use the clear rhinestones that we do have and color them with the Real Red Blends in the Dark color.  It will do in a pinch.

The inside of the card is finished with a layer of Basic White that measures 5 1/4" x 4".   The sentiment I used is from the same Wishes All Around Bundle, and it's stamped with Shaded Spruce ink.  There is a 1/4" strip of Real Red cardstock added near the bottom of the white layer.  Another one of those modern trees from the set is stamped with Shaded Spruce ink on the right side for a little accent inside the card.

That's it for this card.  It really is easy and each of the components can be finished and ready to put together all at once.  I think it's a really cute card and would be fun to receive in the mail for Christmas.  Thanks, Ruth, for another adorable card idea.  And thank you for checking in to see what's been happening around here.  Thanksgiving was a lot crazier than normal, but in the end the dinner was delicious and more than enough!  We almost didn't have a turkey, but it all turned out well.  I'm still munching on turkey and pies, and cheesy hors d'oeuvres.  That means I'm almost in heaven!!  Yum!

Happy stamping and creating,
Sharon

Thursday, November 16, 2023

One Horse Sleigh in Blues

Hello ladies!  Here it is, Thursday already!  I don't know where all the days and time go.  I think I've got the whole week ahead of me and whoosh.  I'm staring at the weekend.  I want to savor every single day, but they start running into each other and then I forget what day it is.  Do you have that problem too?  Does it have anything to do with getter old(er)?  Talking to my grandsons it seems that they're always pining for the weekend and all the plans they have.  For them, time moves way too slowly.  Guess it must be just a matter of perspective.  No matter how I look at it though, Christmas is just around the corner.  So of course, I have another Christmas idea for you.  This idea was shared by a friend of mine, Ruth Snyder.  She gave me permission to copy and share this idea with you, so here goes.

Isn't this card cool?  I love the look of a wintry ride in a sleigh.  Have you ever done that?  I have and it was a wonderful experience.  If you get a chance, try it!  Did you notice it's another blue and white card for Christmas?  I can't see to break out of that cycle.

To make the card, start with a base of Basic White Thick cardstock measuring 8 1/2" x 5 1/2".  It's scored at 4 1/4" and folded in half.  Next cut a piece of Basic White that measures 5 1/4" x 4" to build your design on. 


The pretty print behind the sleigh is from the Winter Meadow Designer Series Paper.  It measures 2" x 5 1/4" and is attached to the top edge of your white layer.  The sentiment was stamped next onto the bottom of this white layer using Night of Navy ink.  The sentiment is part of the Horse & Sleigh set I'm using on this card.  The Horse & Sleigh Bundle are one of the interesting Online Exclusives in the Stampin'Up! store.  (I've done so much with the coordinating DSP and thought it was time to use the set.)

The horse and sleigh stamp was stamped on Night of Navy cardstock with matching ink.  This gives a nice subtle tone-on-tone look to the design.  It's easily cut with the dies from the bundle.  The two snowbanks in the set are die-cut from Basic White cardstock.  

To assemble the card, I attached the horse and sleigh with adhesive to the front.  The two snowbanks were tucked in between the sleigh and the sentiment.  They're attached with Dimensionals to give the card a little added interest.

The whole card layer was attached to the base with Dimensionals also.  For some sparkly bling, three Rhinestone Basic Jewels were added near the sentiment.  

I think this card is just gorgeous and I thank Ruth Snyder for sharing the idea with me.  For all the things going on with this card, it's surprising how quick it actually came together.  I will definitely be making more of these cards in the future.  Hope you give this one a try too.  I think you'll really like the finished card.

Today, November 16th, is the last day of the Stampin'Up! Annual Sale.  It's the perfect time to stock up on cardstock and envelopes, ribbons and trims, and all sorts of inks.  Remember all the sale items are found in the Annual Catalog.  Take the time to shop.  It will be worth the savings.  Please consider using the Host Code shown at the top of this blog post.  It's greatly appreciated!

Happy stamping and creating,
Sharon

Wednesday, November 15, 2023

Another Autumn Leaves Card

Hello!  What a lovely fall day we have going on here.  I'm not sure why we had no trees turn brilliant red last fall, mostly just yellow and brown.  But this year we are graced with wonderful color.  We have four of the most gloriously red trees to enjoy.  Talk about beautiful!  To honor this display of color, I decided to share one more card using the Autumn Leaves set.  I've truly enjoyed creating with this set and the lovely All About Autumn DSP that coordinates with it.  The designs almost create themselves.  So, here's the last one these (until I break down and make another one!)

Don't you love these lovely rich colors together for fall?  I sure do.  Let me tell you how it's made.  Start with a card base of Copper Clay that's cut to 8 1/2" x 5 1/2", scored and folded in half.  Next there is a layer of Crumb Cake cut to 5 1/4" x 4".  I built on this layer before putting it on the card.

Next comes the layer of the Tartan Foil Specialty Paper.  This is an Online Exclusive product and is absolutely gorgeous!  The prints I used on this card are two sides of the same Copper Clay paper.  There are also Lost Lagoon and Pebbled Path coordinating colors and they're all lovely.  A piece was cut 5" x 3 3/4".  Then 1 1/2" were cut from the bottom and flipped to show the white side.  These pieces are attached with adhesive to the Crumb Cake layer.  

A 4 1/4" length of the Natural Wavy Trim was attached where they come together.  Just run adhesive along the seam and adhere the trim.  I was worried that the stickiness of the adhesive would come through the pattern of the trim, but there was no problem.  Trim off the excess from the ends after attaching.

Using the Autumn Leaves Bundle, I stamped the oak leaf in Pretty Peacock and another in Pecan Pie ink.  The leaves that are together were stamped twice (without re-inking) using Copper Clay ink.  All leaves were die-cut using the coordinating dies.   

Using the small single leaf die, cut 3 leaves from Pretty Peacock cardstock and 1 from the Oxidized Copper Specialty Paper.  Two of the veining die were cut from the Oxidized Copper paper and 1 from Pretty Peacock cardstock.  I used these pieces as branches instead of veins.

The sentiment comes from the Autumn Leaves stamp set.  It's stamped with Copper Clay ink onto a Basic White cardstock piece.  It's then die-cut using the coordinating die from the set.  I love the notched corners and stitching on this die for extra interest.

All the leaves and branches (veining pieces) were layered up in a pleasing fashion.  Since there were so many pieces, I didn't use any Dimensionals under them.  The sentiment was placed over these pieces with Dimensionals on the ends to keep it flat.  

This whole layer was attached to the folded Copper Clay card base using Dimensionals.  The Neutrals Adhesive-backed Sequins were added to the card for a little extra bling.  I've been using these sequins on so many cards lately.  They are such a nice addition, especially because they're so flat and don't cause problems when mailing your cards.

The final touch was the double bow of Linen Thread that matches the Wavy Trim.  The bow is attached with a Mini Glue Dot.

I just had to share another photo of this pretty Thanksgiving card.  This photo shows the lovely tone-on-tone look of the Tartan Foil Paper off perfectly.  It truly is very pretty in real life.  You know these photos never do the specialty papers justice!

Don't forget Stampin'Up! has the Annual Sale going on right now.  Trims and ribbons, papers and envelopes, and all sorts of inks and pads are on sale November 14 - 16.  All of the sale items are from the Annual Catalog.  Plus, there are many clearance items to choose from too.  Time to stock up on cardstock and envelopes for sure!

Thanks for shopping with me when you can.  I always appreciate it.  Please use the Host Code at the top of this blog when your order is less than $150.  If it's $150 or more, you receive host rewards instead.  Thank you so much!

Happy stamping and creating,
Sharon

Monday, November 13, 2023

Blue NOEL Card

Happy Monday to you, my friend!  I can't believe that another week has quickly passed.  It's almost Thanksgiving time and I'm not ready yet.  How about you?  Have you mailed out any cards to family and friends?  Have you got that dinner menu planned?  And the house decorated with turkeys and pumpkins?  I'm not there yet, but I'm working on it.  I'm so excited that seven ladies are joining me on Tuesday to put together the Thanksgiving cards for the shut-in members from church.  It will be fun to introduce them to the glories of stamping and card making.  Hope this works out well and is just the beginning of this group effort to send cards out each month.  I've been doing this on my own, but you know it's always more fun with friends!

Here's what I made several days ago to share with you.  I've looked at it for 4 days and just wasn't really happy with it.  Don't you think it needed something?  It just wasn't great - rather boring.  After fretting about it for days, I figured if I wasn't happy with it, I needed to take the card apart and make some adjustments to it.   And that's exactly what I did!  

The NOEL was really bothering me, so that's what was peeled off first.   I die-cut another set of letters in Blueberry Bushel and started to play around with the card by using only the blue, or the blue over the silver sparkle, or....  Here's what I came up with.

I love the look so much better with that small bit of framing of Blueberry Bushel cardstock underneath the More Dazzle die-cut letters.  It just makes the whole card better, more cohesive.  So, let's talk about how to make the card.

It starts with a Blueberry Bushel card base that measures 11" x 4 1/4", scored at 5 1/2" and folded in half.  Next a layer of the beautiful Winter Meadow Designer Series Paper was cut to measure 3 7/8" x 5 1/8".  Isn't this snowy forest-looking paper just perfect?  I love it!  A small frame of Basic White is cut to go under it.  That measures 5 1/4" x 4".  This leaves just a bitty frame of white to set the paper apart from the Blueberry Bushel cardstock base.  

Before attaching them together, the NOEL die was used to cut the letters out of the DSP.  This would allow me to get the letters spaced nicely when putting the card together.  The same die was used to cut the More Dazzle Specialty paper also.  At this point, I should have also cut the letters from the Blueberry Bushel cardstock that I added later.

Attach the DSP to the Basic White layer with adhesive.  Using adhesive, tuck the Blueberry Bushel letters into the die-cut space on the DSP.  Layer the More Dazzle letters over the blue letters with adhesive.  I off-set these to the right and down when attaching them.

The tree dies from the Forever Forest Bundle were used to cut three different sized trees from the Blueberry Bushel paper.  These were lined up on the bottom left of the card front and attached with adhesive.  A 1/2" strip of the More Dazzle Paper was added across the card and covered the bottom of the trees.

This card front was attached to the card base using Dimensionals.


The inside of the card has a layer of Basic White measuring 5 1/4" x 4".  The sentiment on it comes from the Wishes All Around stamp set.  It was stamped with Blueberry Bushel ink.  The trio of snowflakes are from the same set.  These are also stamped with Blueberry Bushel ink but were off-stamped before stamping to get a lighter color on the snowflakes.

There was a 1" strip of the same DSP that was left over, so it was attached to the white layer using adhesive.  The finished white layer was then attached to the inside of the card with adhesive.

The final touch on this snowy card is the addition of some clear Rhinestone Basic Jewels.  They sparkle just right to blend in with the More Dazzle design elements without competing with them.

Isn't this version better?  I think it was well worth the effort to do a remake on this card.  So now you've gotten a look into the card making process when things don't look quite as nice in person as they do in my mind.  Sometimes some tweaking is needed.  Don't be afraid to finagle your cards if they don't turn out quite right.  Try moving around the elements of the card or consider adding something different instead.   You never know what will work until you try it!  

Thanks for sharing some of your day with me.  I love hearing what you think about my ideas, so leave me a comment if you would.

If you'd like to order, I want to tell you that Stampin'Up! is having a Seasonal Sale on November 14 - 16.  You can save up to 20% on select items.  Make sure you check the online store to see all the items available.  Have fun stocking up on some of your favorite inks (pads, markers, refills), ribbon & trims, and papers.  These items are all from the Annual Catalog.  Thank you in advance for your patronage.  I always appreciate your business!
Happy stamping and creating,
Sharon