Showing posts with label Perched in a Tree. Show all posts

Saturday, November 9, 2024

More Nests in Winter Cards

Hi again!  Since I was playing with the Nests in Winter DSP yesterday, the paper was still sitting out on my desk.  Yes, I know.  I should have put it all away.  But then I wouldn't have been inspired to make some more cards with those cool die-cut birds.  I can't believe how easy it is to make a card using those birds instead of having to do all the stamping and coloring myself.  Yes, I still like to do all the coloring.  But sometimes I'm just looking for quick and simple.  Don't you have those days too?  Anyway, that's my excuse for today!

Like I said, all this stuff was still sitting on my desk, the DSP, the stamps, the dies.  Oh my, what a mess!  But I saw the die-cut birds and the Pool Party printed DSP and it got my creativity going full speed.   This time I wanted to make a light and airy card with the birds, but still do a quick fun fold.  Let's get creating!

I started with a 4" x 4" square piece of this Pool Party print.  It resembled a snowy sky, so that was the starting point.  With only a 4" x 4" piece to work with, I had to get creative with the rest of the card to accommodate that piece.

The card base is Basic White Thick cardstock that measures 11" x 4 1/4".  It's scored at 5 1/2" then 1" is cut from the front edge.  The Nested in Winter DSP print was attached to the front flap using adhesive.

Inside the card, a 1 1/4" strip of Pool Party cardstock has been added. Prior to attaching it, the strip was embossed using the Snowflake Sky Embossing Folder.  This gives it a subtle snowy appearance that complements the DSP print.

The Nested Essentials Dies were used on this card too.  A different sentiment from the Perched in a Tree stamp set was used this time.  It's stamped near the top with Memento Tuxedo Black ink.  I thought the sentiment about singing would coordinate well with the birds.

These birds are from the Nests in Winter DSP that was used on the previous card.  Both styles of birds are die-cut with the coordinating dies.  This makes it so easy to have the birds, branches, and berries all cut and ready to use.  

The birds are attached just below the sentiment using adhesive.  Then the entire tag is attached to the card front using adhesive.  I let part of the tag set below the edge of the layer.  

To add a little subtle bling to the design, a knot was made in a 5" strip of Glittered White Organdy Ribbon.  This gives just a tiny bit of sparkle.  It's attached at the top of the label tag using a Mini Glue Dot to finish the card.

Final look at this pretty snowy looking card for Christmas.  I've just about run out of this snowy DSP print, so I need to get more before I'm ready to sit down and make my own Christmas cards.  That's not a good time to run out of one of the main pieces of my design, now is it?

Off to do a little more creating!  I can't wait to finish a series of cards using the Peaceful Evergreens set I've been working on.  I'm sort of in the middle of those and need to figure out how I want to finish them.  Come on back for the next Christmas installment.  Or maybe I'll have another Thanksgiving card or two up my sleeve.  You never know!


Happy stamping and creating,
Sharon  


Friday, November 8, 2024

Winter Birds Card

Hi all.  I've been planning ahead for all the cards I need to send out for Christmas, and I've been on a roll.  Today's card is a fun fold that's easy as pie (make mine pumpkin please!).  You can make three of these from one 12" x 12" piece of designer paper, so that's what I did.  Hope you love this idea!

Isn't this a wonderful card with a sweet country feel that's just right for Christmas?  Your first step to making these cards is deciding which piece of dsp that you're going to use.  For my cards, I chose one of the pretty prints from the Nests of Winter Designer Series Paper that you can find in the Mini Catalog.  I love the mix of stripes and the birds coordinating on the card to make it special.

On the 12" x 12" piece with the prints positioned properly, score at 2 3/4" and 6 5/8".  Then turn the paper 1/4 turn and cut at 4" and 8" to get 3 sections that measure 4" x 12".  This will be the main part of your card.

I used a 4 1/4" x 5 1/2" piece of Garden Green cardstock for the card base.   This is attached to the folded dsp.  I used "green glue", but you could use the adhesive of your choice.  

The tag on the card front is from the Nested Essentials Die set.  I liked that it slightly overlapped both sides of the turned back flap.  The sentiment is from the Perched in a Tree stamp set.  This was in the Online Exclusive section if you don't have it yet.  The bird is die-cut from another print of the Nests of Winter DSP pack.  I just love how easily you can die-cut a whole stack of these birds and another set of birds too with the coordinating die set.

The ribbon is the Wild Wheat Rustic Striped Ribbon.  This has such a nice golden tone to it.  In the catalog I thought it looked stiff, but it's a nice ribbon that's very pliable which makes it easy to use.  It's attached to the point of the label with a Mini Glue Dot.

For the inside of my card, I cut two different sizes of Basic White cardstock for the sentiments.  The one on the left is 3 1/2" x 3 1/2" square.  The right one is 3 1/2" x 3 3/4".  Both of these sentiments are ones I've owned for a good while.  I was looking for something with a religious tone to the sentiment and had a hard time finding what would work.  They are both stamped with Memento Tuxedo Black ink.  Then they're attached with adhesive.

After giving it much thought, I'm leaving these cards bare.  That's right, no bling!  Oh my, what is this world coming to?   Do you think that some bling is needed here?  If so, what would you use?

Thought I'd share the picture of all three cards together.  Since there's almost no stamping and no coloring at all, these cards can be made in a minimum of time.  But they still look special.  Maybe you'll add this idea to your Christmas card stash this year.  If you don't have this particular DSP, try something else that works.  Let me know what you made!

Happy stamping and creating,
Sharon

Thursday, September 26, 2024

Golden Greenery and Bells

Hello friends!  I hope you're staying dry if you live anywhere in the path of hurricane "Helene".  Oh boy, we've had enough rain for a while, but I don't think it's quitting any time soon.  They've even shut down the area schools because of high winds.  That just gives me a good reason to stay inside and get a blog post in.  Today's card is taking us forward to Christmas again.  It's a simple card with just stamps, ink, and paper.  I did have to add another layer or two just because I couldn't help myself.  Come play with me...

Have you gotten the Golden Greenery set yet?   I've had fun using the evergreen boughs on several different cards, but now I'm finally giving the bells a try.  I was worried about how they would look, but I love them!  And they're so simple to make with 2-step stamping!   You really should give this set a try.

I started with a piece of Very Vanilla cardstock that measures 5 1/8" x 3 7/8" that is used for all the stamping on this design.  The first thing I stamped was the sentiment so the design could be arranged around it.  The sentiment comes from the Perched in a Tree set and is stamped with Cherry Cobbler ink.  It's fairly low and about 1" from the left edge of the cardstock.

Next the evergreen boughs were stamped in.  The more solid branch was stamped three times with Granny Apple Green ink.  There is also a partial image stamped in the top right corner to fill in.  Over these branches, the finer needled image was stamped with Old Olive ink.  This 2-step aspect really fills out the look of the branches.

The bells were stamped next.  There are two sizes, and I used them both.  I practiced with a couple of ink combos to find one I liked.  For this card, I used Daffodil Delight on the solid layer.  Then Crushed Curry was over-stamped to add the details.

The berries were added next.  There are two stamps for the berry clusters - the outline and the solid.  For this card, I used only the solid stamp and didn't add the outline because I didn't think it was necessary this time.  They are stamped with Cherry Cobbler ink to match the sentiment.

I wanted to add to the colors of the card, so I spattered Old Olive ink from a marker over the design.  I love the speckled look this achieves, but you need to keep a light hand, so it isn't overdone.

Speaking of overdone, I think I got a little carried away with the berries and added a few too many.  Reminds me of Heather's first shirt painting class when we were painting watermelon slices on our shirts.  I was painting my own shirt, so I wasn't really paying attention.  She was having so much fun painting the seeds that it was totally overrun with them.  We still laugh about it, but she kept that shirt for years.  Anyway, the lesson is - don't go overboard with too many berries.

The stamped layer was attached to a Cherry Cobbler layer that measured 5 1/4" x 4".  This gave me a very skinny Cherry Cobbler frame around the stamped images.  Then this is attached to a folded Very Vanilla card base.  I used Dimensionals to adhere it together.

I debated about adding some bling, or a bow, or something and really didn't like anything I tried.  So, the only bling added to the card is a coating of Wink of Stella on each of the bells.  So pretty and subtle.

I said this was an easy card to make.  The 2-step stamping on the images really does all the work for you.  I love the finished look of this card and hope you do too.

Happy stamping and creating,
Sharon

Thursday, July 6, 2023

One Horse Open Sleigh

Hello my friends!  Hope you've had a chance to check out the new Online Exclusives that are available on the Stampin'Up! website starting July 6th.  There are so many new things it's like Christmas in July!  I was able to order the One Horse Open Sleigh Suite early as a demonstrator.  It just came a few days ago, and I've been obsessed with it!  Especially the 6" x 6" DSP called One Horse Open Sleigh.  On my goodness!  Every once in a while, Stampin'Up! creates a designer paper that just blows me away.  This is truly one of those very special designer papers that I'm getting hooked on.  I love the watercolor-style winter scenery on each of them.  I can't believe I've worked with this for three days and haven't even gone beyond the DSP to really explore the stamps.  But it's been incredibly fun!  So, today's post will not be focusing on one card that I created, but a collage of Christmas cards using the One Horse Open Sleigh DSP.  Hope you get a little bit inspired and start seeing the possibilities.  Before I start sharing them, I must admit that a couple of them aren't quite finished.  Some might need a sentiment added, but I'm waiting for the Brightest Glow set (page 42).  I could have sworn I owned it, but I really can't find it.  Botheration!!  So, it is ordered and on its way.  Then I can finish these cards up.  Just use your imagination when looking at some of the cards.  😉😂

Stamps - Perched in a Tree (sentiment)

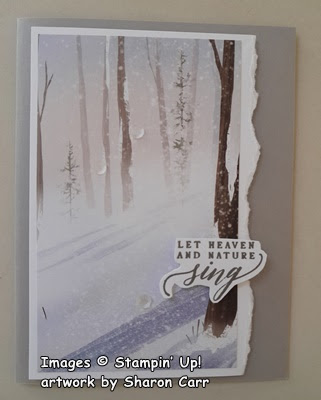
Cardstock - Misty Moonlight, Gray Granite and Basic White

Ink - Misty Moonlight

Extras - Adhesive-back Snowflake Assortment in white (new) and Dimensionals

This used 1/2 sheet of DSP (3" wide)

Stamps - Horse and Sleigh (new)

Cardstock - Misty Moonlight, Basic White

Ink - Misty Moonlight

Dies - Radiating Stitches Dies (Online Exclusives)

Extras - White Glitter Ribbon (Online Exclusives), Dimensionals, not sure what kind of bling to add to this one

Stamps - Horse and Sleigh (Online Exclusives)

Cardstock - Crumb Cake, Copper Clay, and Basic White

Ink - Copper Clay

Extras - Adhesive-back Snowflake Assortment in copper, gold/linen ribbon (retired), Dimensionals

Stamps - Horse and Sleigh

Cardstock - Pool Party, Basic White

Ink - Pebbled Path

Extras - Adhesive-backed Snowflake Assortment in White, Dimensionals

Stamps - Horse and Sleigh

Cardstock - Lost Lagoon, Pebbled Path, Basic White

Ink - Pebbled Path

Extras - Banner Pick a Punch, Sparkle Gems in silver, Dimensionals

Stamps - Perched in a Tree

Cardstock - Gray Granite, Basic White

Ink - Gray Granite

Extras - Sequins Trio in white, Dimensionals

This uses the other half of the DSP piece used in the first card shown.

Stamps - none yet 

Cardstock - Pool Party, Basic Black, Basic White

Ink - none yet

Extras - Pool Party Grosgrain Ribbon, Adhesive-back Snowflake Assortment in white


Each of these cards is finished inside.  The white layer is embellished with some of the trimmed off DSP to match the card.  I didn't think you wanted to see the inside of each of these cards.  You get the idea of adding a strip of DSP to either the side or bottom of the white layer because I do it all the time.

I love each and every one of these cards.  And I looove the One Horse Open Sleigh Designer Series Paper.  Even with all these designs, there are still DSP prints that I haven't used yet!  Did I mention I love this paper??  The 6" x 6" paper comes in a pack of 48 sheets so there's four of every design.  Now if you use one piece per card, that'll give you 48 cards.  If some are using only half a sheet, that just increases the number.  I think this is an awesome bargain for anyone who wants to make lots of cards quickly, because there is only minimal stamping and die-cutting.  Easy Peasy Christmas coming your way!

Remember to check out the Online Exclusives that Stampin'Up! is offering.  You'll find lots of treasures.

Don't forget that Bonus Days are here right now.  You'll receive a $5 Bonus Coupon for every $50 you spend during the rest of July.  Then you can redeem them all in August.  Have fun shopping!

Keep on stamping and creating,
Sharon