Showing posts with label So Sincere. Show all posts

Friday, October 11, 2024

Thoughtful Journey Cards X 4

 Hello my friends!  What a beautiful fall day we have today.  But I can still hear the chain saws outside cutting down trees that came down during Hurricane Helene.  Just drove up our block and counted eight homes that had trees down.  Thankfully most of them didn't land on the houses, just in the yards.  But that's still a lot.  Concerning trees, I like the looks of bare trees in the winter - the silhouettes against the sky.  So that was the starting point on the cards, but I branched out from there.  Let's look at the different cards made with the Thoughtful Journey Designer Series Paper.

This is the first card I made.  I decided on the print first and chose colors of cardstock to match it.  This is a little darker style than I usually do, but I love the finished card.

The card base is Lost Lagoon that measures 11" x 4 1/4" and is scored at 5 1/2".  The Basic Black layer measures 5 1/4" x 4".   This addition really makes the other colors pop.  The black layer is attached to the card base with "green glue".

The next layer is Wild Wheat.  It measures 5" x 3 3/4".  This isn't one of my favorite colors, but I found it is a wonderful accent color for many of these Thoughtful Journey prints.  It's attached to the Basic Black layer with "green glue".

The print layer measures 4 7/8" x 3 3/4".  Before attaching to the card base, I die-cut the silhouette trees from Basic Black cardstock.  They are attached to the bottom of the DSP layer using adhesive.  The ends are trimmed on the sides to fit nicely.  The print layer was then attached to the card base using "green glue".

The sentiment is from the So Sincere stamp set.  It's stamped with Memento Tuxedo Black ink onto a piece of Wild Wheat that measures 1 5/8" x 1".  After stamping, it's attached to the card front with Dimensionals.

The embellishment accent on this card is from the Blooming Pearls in the Annual Catalog.  These are the blue tones gems that I used to enhance the design.

This is the second card in the series.  The card base is Wild Wheat cardstock because it matches so well.  It measures 8 1/2" x 5 1/2" and is scored at 4 1/4".

The layers were added a little differently on this card.  The Lost Lagoon cardstock layer is first and measures 5 1/2" x 2 7/8".  Next a layer of Basic Black cardstock measures 5 1/2" x 2". It's attached down the center of the Lost Lagoon layer using "green glue".  Then the layers are attached to the front of the card using "green glue".  It's attached closer to the left side.

The DSP layer is the leftover piece from the first card.  This is the back side of the print.  It is trimmed to measure 5" x 2 1/4".  "Green glue" was added down the center and then attached to the card front.

The sentiment on this card is also from the So Sincere stamp set.  It is stamped with Lost Lagoon ink onto a piece of Basic White cardstock.  After stamping, it was trimmed close to the wording with my Paper Snips.  It's attached to the card front with Mini Dimensionals.

I tried several different types of bling to accent this card.  As you can see, I ended up using the Brushed Brass Butterflies on the design.  They are small and understated.  Just the right accent for my card.

Let's continue on to the third card made with the Thoughtful Journey Designer Series Paper.

I still wanted to make another card using the tree silhouettes from the Frosted Forest dies, so I found another print that would make a lovely sky background.

To match the print, I chose a Cajun Craze card base that measures 8 1/2" x 5 1/2".  It's scored at 4 1/4" and folded in half.

The Misty Moonlight layer was cut next.  It measures 5" x 3 3/4".  To add a small frame to this piece, a layer of Basic Black was cut to measure 5 1/8" x 3 7/8".  They're attached together with "green glue".  Then they're attached to the card base with the "green glue" also.

The DSP print was trimmed to 4 3/4" x 3 1/2".  Then another silhouette tree cluster was die-cut from a 5" x 3" strip of Basic Black cardstock.  It was attached to the bottom edge of the DSP and trimmed on the two sides to fit. 

The sentiment is from the Simply Said stamp set.  It's stamped with Misty Moonlight ink directly onto the DSP.  After this, the DSP was attached to the card front using "green glue".

The bling on this card is the coral-colored dots from the Opaque Faceted Dots.  Guess these are retired already.  I'm sure you can find a different embellishment for your card if desired.

The last card in the series was designed around a piece of left over print from a previous endeavor.  The Wild Wheat worked with this print too, so it was used for the card base.  The first layer is Lost Lagoon that measures 5 1/2" x 2 7/8".  It's attached to the card base about 1/2" from the bottom edge of the card front.

The layer of DSP measures 5 1/8" x 2 3/8".  To get the skinny frame of black, I measured a piece 5 1/4" x 2 1/2".  These two layers were attached together with "green glue".  Then attached to the Lost Lagoon layer with the same adhesive.

The silhouette piece used here is from the Painted Lavender die set.  It's die-cut from Basic Black cardstock.  

The sentiment is from the Frosted Forest stamp set.  It's stamped with Memento Tuxedo Black ink onto a 2 5/8" x 3/4" strip of Basic White cardstock.  This is attached with adhesive to the card front as shown.  The black die-cut piece is attached to the card front with adhesive slightly overlapping the sentiment piece.  

The embellishment on this card is also from the Opaque Faceted Gems in the Lost Lagoon color tone to match.

Here's a last look at the four cards in this collection.  I love the focal point being on the Designer Paper prints with the black accents.  Each one is a little different in composition.  Hopefully these will give you some ideas to CASE that are simple but still beautiful.  Just think of the possibilities with different prints and coordinating colors of cardstock.  I wanted to make cards that had an autumn feel to them.  But with the lovely prints of the Thoughtful Journey DSP pack, you could easily make a set of cards for each season!  Have fun coming up with your own combinations.

Thank you for sharing some of your precious time with me.  If you're looking for a demonstrator to help you out, I'd love that job!  Feel free to use the Host Code at the top of this blog.   I'll send you a card with my sincere appreciation for any orders.  Thank you so much for considering me.  If you have questions or need help, please contact me. 

Happy stamping and creating,
Sharon
sharoncarr50@gmail.com

Thursday, May 2, 2024

Fun Fold with Designer Paper

Hello, hello!  Here we are into May already.  A full quarter of this year has already slipped by.  Whew!  And we're really gearing up for Travel Baseball season where we're on the road a lot of weekends.  This weekend isn't too bad - a little less than an hour to get there.  This isn't a time to forget things you might need because you can't run home quick to get it!  So, every time we go it consists of packing a cooler with water or pop, lawn chairs, sunscreen for me, snacks, etc.  Sounds like we're packing for a trip!  Enough of that.  On to stamping.  It's that time of month for me to get the cards made to send to the shut-ins.  I made an easy fun fold card that shows off both side of the Designer Series Paper.  Liked it so much, I made multiples.  Then I tried it with different DSPs to see how different they would look.  Oh my, with each change of DSP, the rest of the card ended up going through a make-over too.  Let me share what I did.

I wanted to try out the new Unbounded Beauty DSP, so that is what I started with.  This print looked like it needed a good dose of white to off-set the color, so I started with a base of Basic White cardstock that measures 8 1/2" x 5 1/2".  The length of this was trimmed to 6" long, scored at 4 1/4" and folded.

I cut the DSP in half across the 12" width.  Pay attention to the design of the paper.  You want your design going up and down.  And make sure the back side of the print compliments the front.  The DSP is cut 3" wide.  You need to cut the extra 1/2" from the bottom of this, so it measures 5 1/2".  Keep this to use later on the design.

I added adhesive to the very right edge of the Basic White folded over front of the card.  Line up the DSP along the open right side of the card and have both top and bottom edges even then attach to the area that is taped.  This gives you a full-size card and when opened shows the other DSP print.

The next step is cutting a 5 1/4" x 1" strip of cardstock that will fit in the open area on the left.  I used the new Eyelet 3D Embossing Folder to add interest to this piece.  Then it's attached to the card front.  I used "green glue" for this because I find it works very well holding an embossed design to my card.  

The sentiment on my card is from the So Sincere stamp set.  It's stamped on a 2 1/2" x 1" piece of Basic White using the new Petunia Pop ink.  Such a fun, plummy color!  It reminds me of Sweet Sugarplum that was a few years back, but has a richer look to it.

There is a 6" piece of the new Petunia Pop 3/8" Bordered Ribbon from the new Annual Catalog.  It is loosely folded in half and added behind the sentiment.  The sentiment layer is attached with Dimensionals.

The inside of the card is finished off to bring the design on the front inside.  A Basic White layer is cut 3" x 5".  The 1/2" strip left over from the card front is attached to the bottom area of the white. This is all attached to a Petunia Pop layer that measures 3 1/4" x 5 1/4".  Then they are attached to the center of the inside of the card.  Isn't it a pretty addition that coordinates with the DSP on the left?

After finishing the card, I felt it needed something else added.  I took the spiky leaf die from the Painted Lavender set and die-cut a piece of the new Summer Splash cardstock.  I added adhesive partially to the back of it and tucked it in under the ribbon area.  I liked it so much better.  Then I added a pinkish sequin from the Adhesive-backed Shiny Sequins to the sentiment label.  I loved how this turned out.  I was able to make 4 of these cards with 1/2 sheet of DSP. 

Since I liked this look, I thought I'd try the idea with a piece of Simply Zinnia DSP.   So pretty!  I used the embossing folder that coordinates on the side of this.  The sentiment is from Simply Zinnias and stamped with Melon Mambo ink.  The cardstock piece measures about 5/8" x 4".  The frosted dots are from a few years back, but I liked the pink and yellow colors.

Inside is a layer of Lemon Lime Twist because I like how it goes with the backside of the DSP.  Easy peasy, another 4 cards were finished.

Spoiler alert!  The next card uses some current products, but a lot of retired items are thrown in because they worked!  Don't look if you only want new!!

Next, I tried the Painted Lavender suite of products.  I thought the Crumb Cake cardstock worked well with this DSP print.  An old, retired Meadows Embossing Folder was used for the 1" strip.

For some reason, I just love the spiky leaf stem and die-cut both Gorgeous Grape and Highland Heather pieces.  Then I switched to the floral stem and cut one from the Soft Shimmer Paper Combo Pack.  I also die-cut a few tiny butterflies from this paper.

The label is from the Meadows dies.  It's cut from the new Basic Beige cardstock and stamped with Gorgeous Grape ink using a sentiment from the Quiet Meadow stamp set.  Dimensionals were used to attach it to the card front.

A double bow using Linen Thread is attached to the sentiment with a Mini Glue Dot.  Three Purple Fine Shimmer Gems are attached to finish the card.

There you have a slew of ideas using this easy Fun Fold card idea.  I just tried to find an all-over print that had an interesting and coordinating back side to make these.  Really, the ideas are endless if you have double-sided designer paper like Stampin' Up! has.  Have fun coming up with your own combos with the stash you have at home, or you can always order new DSP through me!!

Happy stamping and creating,
Sharon

Tuesday, February 27, 2024

Stippled Roses

Hello friends.  We're in the middle of a string of rainy days again.  So what can you do when it's raining?  Stamp, of course!  The card I'm sharing today was actually made three days ago, but I just wasn't happy with it.  I've been looking at it since then trying to figure out what I don't like about it.  After making three different changes on the card, I think it's worthy to share with you.  Do you ever get that way?  The card just isn't right, but you're just not sure what you don't like about it.  Change this, add that, and change some more!  I'm thinking I should have just ripped the whole thing apart and started over.  Give me a comment on what you think of the final card, so I know if it finally hit the mark or needs a complete do-over. 

My plan was to use the colors and textures in the Softly Stippled DSP that is one of the Sale-a-bration items.  I really hope you were able to get this Designer Paper - it's gorgeous!  The fabric-looking piece of DSP on this card is from that paper pack and is in the Pebbled Path color.  The card base is Pebbled Path cardstock measuring 8 1/2" x 5 1/2".  The layer on this is Lost Lagoon that measures 4 1/8" x 5 3/8".  I wanted just a tiny bit of the Pebbled Path to show behind this.

The Softly Stippled DSP piece measures 3 5/8" x 4 7/8".  I started larger and kept trimming down an eighth of an inch at a time to get the size I liked.  I wanted the Lost Lagoon to be a bolder frame around this and really show up.

Next, the Stippled Roses were stamped with Pebbled Path ink onto Basic White cardstock.  I wanted to see how this worked with the colors instead of the Memento Tuxedo Black ink.  This would be a little softer looking.

For coloring the roses, I used Stampin' Blends to play around with the colors.  The first layer on the roses was Pool Party Light.  Then I layered on shading of Pool Party Dark and then Lost Lagoon Light to darken some of the shadows. 

The leaves were colored in with Wild Wheat Light, then shaded with the Wild Wheat Dark.  To add extra deep shadows in places, Lost Lagoon Dark was added sparingly.  The leaves still looked too flat, so the Color Lifter was used in some areas to create highlights.  This really does a wonderful job of giving you an even lighter color when it is lightly stroked on just where a highlight is wanted.  When everything was colored to my liking, the roses were die-cut with the coordinating Stippled Roses dies.

I've been using a lot of Get Well type cards lately.  So that's what this one was going to be.  The sentiment comes from the So Sincere stamp set.  It is stamped on Basic White using Pebbled Path ink.  Then it is fussy cut with Paper Snips to get the shape.

When I laid the roses and sentiment on the card base, it looked quite unfinished.  It needed some extra greenery to fill out the design some.  At first, I only cut two of the leafy spray die that is part of the Stippled Roses dies using Wild Wheat cardstock.  The stem was cut apart into four sections to scatter the smaller pieces around the design.  I thought this would work well with all the Wild Wheat leaves that were already part of the design.  For this version of the card, you can see a couple of the leafy sprays were cut in Lost Lagoon also.  And some of the little flowers in the set were cut from Pool Party cardstock.

The roses are attached with Dimensionals, but all the leafy pieces have adhesive on the stems and are tucked in around the roses.  The little flowers have their centers colored with Pool Party Dark Blends just to give it a little color.  They are attached with a Mini Glue Dot holding each one.  The sentiment is tucked near the bottom of the card and is attached with Mini Dimensionals.

For this card, I used the gold color sequins from the Neutrals Adhesive-backed Sequins.  I think they blend nicely with the Wild Wheat tones on the card.

The inside of the card has a layer of Lost Lagoon that measures 5 1/4" x 4".  On top of this is a layer of Basic White that measures 5" x 3 3/4".  The sentiment is another one from the So Sincere stamp set.  It's stamped with Lost Lagoon ink.  In the bottom right corner, the extra Wild Wheat leafy spray that was die-cut has been attached to carry the design inside the card.

 
Just wanted to give you a peek at the way the card was put together originally.  No matter how I fussed with it, I just wasn't happy with it.  Let me give you a run-down of the changes I made.
- The leafy stems are all from Wild Wheat cardstock.  This just gave the card too much of this color.
- The gems used really didn't enhance the card.  I thought the Pool Party color would balance the card better, but it didn't work.  They were switched out for the gold sequins.
- The sentiment was stamped with Lost Lagoon ink.  It was too light and got lost on the design.

I hope you enjoyed this post.  Did this card give you ideas on layout and color balance?  Just because a card is finished doesn't mean "the card is finished"!  You can always dismantle sections and remake into a design you're happier with when it really is finished!

Only two more days for Sale-a-bration deals!  But don't worry.  There will be some new Online Exclusives coming out a little later in March.  So much good stuff looking forward.  Keep checking in to see what's new and what I'm creating with it!

Happy stamping and creating,
Sharon
sharoncarr50@gmail.com  

Wednesday, January 31, 2024

Another Flight and Airy Card

Hello friends.  What a gorgeous day we are blessed with today!  The sun is shining brightly even though it's rather cold outside.  I'm sitting here in front of the window with the sun's warmth on my shoulders.  What a perfectly wonderful day!  Since I had so much fun playing with the Flight & Airy DSP a while back, I thought I'd use some of that lovely Sale-a-bration paper again.  Let me know what you think of this one.

I chose two of the colors on the DSP to make this card.  Boho Blue is the 8 1/2" x 5 1/2" card base on this one.  There is a layer of Flirty Flamingo cut next.  This measures 5 1/8" x 3 7/8".  It is embossed with the Timeworn Type Embossing Folder for texture.

A piece of the Flight & Airy DSP was cut to measure 5 1/8" x 3 7/8".  I put a pencil mark on the left side at 1 3/4".   Then cut from that mark to the opposite bottom corner to cut a triangle piece off the DSP.  The left-over part was attached to the Flirty Flamingo layer using the "green" glue.  Make sure it goes right to the top and side edges.  If it overhangs any, just trim off with your Paper Snips.

With the corner of the paper you cut off, find a bird or two with flowers and fussy cut around them.  You can also cut extra flowers to add to the design if desired.  Set aside for now.

Wrap Linen Thread two or three times around the layers as shown.  Then finish off with a nice size bow.  This is then attached to the Boho Blue card base using Dimensionals.

The sentiment is from the So Sincere stamp set that can be found in the Online Store.  This set has 11 sentiment stamps that cover all your general stamping needs except for holidays.  I love it.  This has been one of my favorite sets for sentiments lately.  This sentiment is stamped on Basic White cardstock with Boho Blue ink.  It's punched out with the Heartfelt Hexagon Punch found in the 2024 Jan - April mini catalog.  

To fill in around the sentiment, several branches were punched with the Bough Punch (pg 148 in A. C.)  This punch has two different branches of leaves. I used a mix of greens for this - Garden Green, Old Olive, Soft Sea Foam.  These different green colors mimic the mix of greens on the DSP.

The green branches were tucked on top of the sentiment and attached with adhesive where they overlapped.  The fussy cut bird and flowers were the last thing to be added to the sentiment label.  This was also attached with adhesive to keep it a little flatter with all those layers of leaves.

The sentiment was finally attached to the card front using four Dimensionals.  This lifts up the whole sentiment layer and makes it stand out nicely.

The final touch for the card front is some Iridescent Rhinestone Basic Jewels.  I love how these tend to pick up the colors they are attached to and match mostly everything.

The inside of the card is Basic White with a skinny strip of the same DSP print attached to the right edge to finish it.  It will give me lots of room to write my own note.  This is one of the cards I'll be sending out right away because I've been needing lots of get-well cards lately.  Need to make even more or else people need to quit getting sick.  I think I'd prefer it that way.

Ok, the first month of Sale-a-bration will be over in a few hours.  That leaves only one more month to go.  Make sure you get what you want before the items are gone.   Just a reminder that the Flight & Airy DSP I used on this card is one of the free items with a $50 purchase.  I think every single print from this paper pack is wonderful and a need-to-have item.  

I've heard a rumor that there's a surprise coming next month concerning Sale-a-bration.  Make sure you check back here for the info after the 1st of February.  

Happy stamping and creating,
Sharon

Friday, September 22, 2023

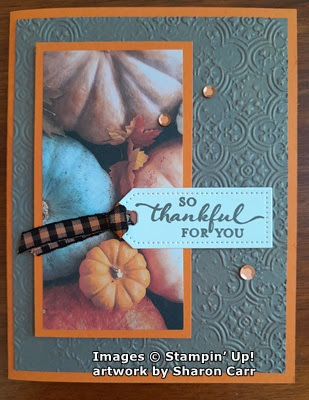
All About Autumn Simple Card

 Good morning on this beautiful, sunshiny, fall morning!  Oh my goodness.  The weather has been so wonderful I hate to stay inside!  The squirrels around here have been very busy collecting the tiny acorns falling from our trees.  It's been so much fun watching their antics.  They are definitely great entertainment while drinking my coffee this morning!  I had planned on posting another Stars At Night card, but I've been overwhelmed with good feelings about autumn because it's been so gorgeous around here.  So I changed my mind at the very last minute to post these cards instead.  I made them a couple of weeks ago, but since the products were on backorder decided not to post them just yet.  You need to keep checking the site for availability.  I guess all of you liked this collection as much as I did, because it's been backordered for a while.  Let's get to the cards.

I said cards, because I took one sheet of the 6" x 6" DSP and made three cards with a 2" strip left over to make another card.  Isn't this paper design just gorgeous?  I've taken my grandsons to several different pumpkin patches through the years, and this brings back those special memories perfectly.  You know what I mean.  The sunshine and blue skies, the cooler air, the piles of all sizes and shapes and colors of pumpkins.  I always gravitated towards the odd colors and shapes myself.  The boys always thought I was kind of weird in that respect, but they would happily help me find the oddest pumpkins around!  It got to be a contest of who could find the weirdest pumpkins for me!  Ahh, those wonderful memories.  But I digress here.  Let's get back to making our own pumpkin patch.

I started with a card base of what else?  Pumpkin Pie cardstock, of course.  It measures 8 1/2" x 5 1/2" and is scored and folded at 4 1/4".

The layer here is Pebbled Path cardstock.  It is cut to 5 1/4" x 4".  It's run through the embossing machine with the new Distressed Tile 3D Embossing Folder.  Doesn't it have wonderful texture?  It's attached to the Pumpkin Pie card base with "green glue".  I have to mention here, the lighting around here is making the Pebbled Path cardstock look much grayer than it is.  The color is really more of a brown than gray to me.  Anyway, it's a beautiful color and perfect for this card.

Next, the pumpkin print from the All About Autumn DSP is cut.  There is a 2" strip cut from the bottom.  Then the remaining DSP is cut into 2" strips also.   This gives you three strips of 2" x 4" and one strip of 2" x 6" for later.  To frame the DSP, I cut a piece of Pumpkin Pie to measure 2 1/4" x 4 1/4".  These are attached together with adhesive then attached to the left side of the card front using Dimensionals.

The sentiment tag was die-cut from Basic White cardstock using the smallest Tailored Tag die.  The wording comes from the new So Sincere stamp set found on page 47 in the Mini Catalog.  Each of the sentiments in this set have different fonts and they cover most of your stamping needs.  The sentiment here is stamped with Pebbled Path ink.

The ribbon is the Black & Very Vanilla ribbon in the Mini Catalog.  I didn't like the vanilla color, but I did like the plaid.  So I used the Pumpkin Pie Dark Blends to color it to match.  About 4" of ribbon was used on each card.  The labels are attached with adhesive on the left side and Dimensionals on the right side to keep it flat.

The inside of the card has a layer of Basic White cardstock.  Two of the Autumn Leaves were stamped in the bottom corner.  Pumpkin Pie ink was used after off-stamping it to get a softer color.  The veins were stamped in with Pebbled Path ink.   I have not decided on a sentiment for inside this card yet.  But when I do, it'll be stamped with Pebbled Path ink to match.

The final touch on the card front were the sequins.  The Neutrals Adhesive-backed Sequins from the main catalog were used.  I chose the orangey-copper color to use here.  I love how they work with the Pumpkin Pie color used on the card.  They have a subtle shine that seemed to enhance the fall colors used here.

Thank you for joining me on this trip to the pumpkin patch.  I hope you enjoyed yourself and consider giving this card a try.  It's very straightforward and almost sleek in design, but the colors and pumpkins give it the warmth of the fall season.  Kick back with a delicious cup of cider and start creating your own pumpkin patch.  Have fun!

Happy stamping and creating,
Sharon