Showing posts with label Season of Chic. Show all posts

Friday, December 9, 2022

More Snowflakes

 Hello again.  Just can't seem to get enough of that flocked and/or iridescent snowflake vellum.  It sure is gorgeous and I've got another card idea for you using this paper.  This time around the card is a fun fold so it's even better yet!  Come along and see what else we can make using this fabulous vellum paper.

I love adding blue tones when using this snowflake vellum to make you think of icy temperatures.  It just gives me the brrrrr-y chills thinking of freezing temps and snow crystals blowing in your face when you're outside.  This time I chose to use Tahitian Tide cardstock for my blue tone.  Yeah, the name sure doesn't fit the cold weather, does it?  But I think the color worked out nicely here.  

Start with an 8 1/2" x 5 1/2" piece of cardstock.  Score this at 2 1/8" and 4 1/4".  Fold the center over like a regular card and then fold the left-hand side back to the front to make a Z-Fold card.

Then I cut the Snowflake Vellum Specialty Paper.  The flocked dotted vellum is cut to 2" x 5 1/4".  The flocked snowflake vellum is cut at 4" x 5 1/4".  I added the dotted vellum to the front section of the card.  There is adhesive only underneath the area with the focal piece.  It's brought right to the folded edge.  Next the snowflake vellum was added to the inside back layer.  Make sure the adhesive is added only to the underside of the flocking, so it doesn't show when the card is finished.

The focal point on the card is made from using one of the Fabulous Frames Dies.  These are found on page 171 of the Annual Catalog.  This frame is the perfect size to showcase the Wonderful Snowflakes I wanted to use in the center.  If you don't have this die set, you could always use something similar.  I cut this twice - once in Basic White and once in Tahitian Tide so I would have the outer and inner frame pieces.

One of the Wonderful Snowflakes found on pg 45 of the July - December Mini Catalog was attached to the center of the Tahitian Tide rectangle using a Mini Glue Dot.  This was positioned inside the white frame and Tombow Multi Purpose Liquid Glue was placed on only one half of it, then it was attached to the folded front panel of the card.  I made sure it was dry and secure before going any further with it.

A small banner was die-cut from Basic White cardstock using the Stylish Shapes Dies.  The sentiment was stamped on this using Tahitian Tide ink.  It was attached over the middle of the snowflake using three Dimensionals.  A bow was made using the White Glittered Organdy Ribbon.  It was attached to the card front with Mini Glue Dots.  Three of the white iridescent Seasonal Sequins were attached to continue with the dotted look.

A piece of Basic White cardstock was cut to measure 1 7/8" x 5 1/4".  The sentiment used is from the Decorated with Happiness stamp set.  It's stamped with Tahitian Tide ink.  A snowflake from the Season of Chic set was inked with Tahitian Tide ink, off-stamped, then stamped on this panel for added interest.  I added 3 partial snowflakes.  The panel was attached to the inside left of the card as shown.  And the card is complete.

These were all made when my sister was visiting.

The Orchid Oasis card uses a sentiment from the Hope & Peace stamp set.  The snowflake was raised higher, so it wasn't covered over so much with the sentiment. The vellum used wasn't the flocked, but the iridescent pieces in the same set.  Lovely!  The middle card has the vellum switched, so the snowflakes are on the left and the dots are inside.  Also, the ribbon used is the retired dotted and flocked ribbon to carry the dotted vellum look even further.

Hope these ideas inspire you to play with this lovely vellum specialty paper.  It really does make beautiful cards.  Thanks for stopping by to see what's been happening here.  A quick medical update - it looks like the Cardioversion is working.  Praise God!  Hope my energy will start increasing quickly.  Yes, I do get impatient at times.  Anyway, for those of you praying about this, thank you!!!

Happy stamping and creating,
Sharon

Monday, August 29, 2022

Season of Chic First Try

 Good morning, friends!  Have you ever seen a picture of a card in the catalog or on Pinterest and just know you have to own that set so you can create gorgeous cards like that too?  Well, that's what I felt like when I saw the samples using the Season of Chic Bundle in the Annual Catalog.  I loved the stamps, the matching dies, and the Texture Chic Designer Paper - oh my!!!  I just loved it all.  Fast forward, I order it and it's in my hands - and I kind of freeze not knowing where to start.  There's just so much gorgeousness and I didn't want to mess it up.  Once I laid out the lovely DSP prints and decided which of the prints I wanted to start with, it was surprising how easily the elements all fell into place.

I love the print with the flower outlines scattered about in white with smudges of pink mixed in with the Pool Party on the woodgraining.  (Actually, I love them all, but this is the first one I'll use!!)  So first thing was the matter of cardstock colors to coordinate with this.  I chose to use Soft Suede cardstock for the base that's cut to 8 1/2" x 5 1/2", scored and folded in half.  To give a good contrast between the Soft Suede and the DSP print, Pool Party was cut at 5 1/4" x 4".  Then the DSP print was cut at 5" x 3 3/4".  Before the two layers were put together, I used my fingernails and Paper Snips to rough up the edges of both of them to give a more 'shabby chic' look to them.  After distressing the layers, they were attached with Multi Purpose Liquid Glue.  Then layered onto the Soft Suede card base with Dimenisonals.


My next step was making flowers that would coordinate with the DSP print.  I stamped three of the solid flowers with Petal Pink ink onto Basic White cardstock.  Before going further, the color was softened with a Blending Brush and Crumb Cake ink.  Then the detail flower was stamped over the first flowers using VersaMark ink.  I used a pearlized white embossing powder to emboss with and heat set all three of the flowers.  Then they were die-cut using the coordinating dies in the Chic Dies set.  

For added interest, three different open-work flowers were die-cut from Pool Party cardstock as accents.  The net-looking piece was die-cut from the Brushed Metallic Cardstock in copper.  What a fabulous base to build the focal point of the card!

The sentiment also comes from the Season of Chic stamp set.  There are seven sentiments with fun fonts to go with all the lovely images in the set.  This one was stamped with Soft Suede ink onto a 3/4" strip of Basic White cardstock.  One of the flowers was partially stamped over the sentiment using Petal Pink to tie it in with the card.  There is a speckly image stamp in the set that was used to stamp a few speckles of Pool Party and Crumb Cake over the sentiment tag.  The left edge of the tag was punched with the Banner Pick a Punch to finish it.

It was time to put it all together and see what it looked like.  First the copper net was layered onto the card front using touches of Tombow Multi Purpose Liquid Glue.  There was a tiny 1/8" strip of the DSP left over after trimming.  I turned it to the back-side and glued it over the copper net near the left edge.  It was just the right amount of Petal Pink accent.  Next two of the die-cut solid flowers were attached to the netting with Dimenisonals.  Then the open-work Pool Party flowers were tucked in around the flowers and attached with Mini Glue Dots.  The sentiment layer was attached near the bottom with adhesive.

The inside had some extra attention too.  First I cut a layer of Basic White cardstock 5 1/4" x 4".  To follow the 'shabby chic' look going here, the edges were softened with Crumb Cake added with a Blending Brush.   A 3/4" strip of Pool Party would make a nice bottom border.  After attaching it, I added some of the same speckles to match the front in Pool Party and Crumb Cake and added a few speckles in Petal Pink too both on the Pool Party strip and the right edge of the Basic White layer.  

Since I had made three flowers, but only used two, that left a flower that I couldn't throw out.  So it was added here with adhesive.  It looked bare by itself, so a leaf from the die set was cut in the copper and added to the flower.

The last addition for the card was the bling.  The Brushed Metallic Dots in copper were the perfect touch.  A large one was added to the larger open-work flower, a smaller one added to a smaller flower, and another small one tucked down near the bottom corner. 

All in all, I love how this turned out.  I wish I had shared it with you all right away when I made it at the beginning of the month.  But life seemed to have other plans for me.  I'm still struggling with the fatigue on an hourly basis.  That means I'm getting very little accomplished each day.  But I'm still alive and kicking so I have tons to be thankful for - and I am!

Just a quick reminder that Sale-a-Bration ends at the end of August.  So if there's anything you've been putting off getting, you're running out of time.

September 1 - 30 is the time to get your Perfect Partners dies that Stampin'Up! is offering.  Six stamp sets in the Annual Catalog that do not have coordinating die have those dies available for one month only!  I know I'm excited to get the Apple Blossoms Die to go with the Apple Harvest set.  Anytime I can die-cut versus fussy cut, I'm on it!!  Check out the info at the top right of the blog page.

If you do order from me, please consider using the Host Code shown on the blog page also.  It's much appreciated!  Thank you so much!

Happy stamping and creating,
Sharon  

Thursday, July 21, 2022

Hues of Happiness in Blues

Hi there!  Glad you're back for another installment.  Just in case you're wondering about that peach festival we were going to, well...  We only saw about a third of it and got totally poured on.  There was lightening, thunder and just buckets of rain.  Good thing we don't melt, because we got back to the car and just sat there dripping.  At one point, I wiped a drip off my face and wiped it on my jeans which proved to be useless.  My jeans were even wetter than my hand, so there was no wiping it dry!  How crazy!  I looked and felt just like a drowned rat.  So much for that outing! LOL It sure gave us something to laugh about though.  Ok, enough of that, let's get stamping!  Today's card is quite simple to make, but it has lots of goodies going on to make it fabulous.  At least, I think so! 

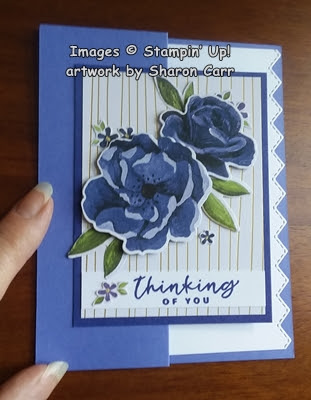
Isn't it pretty?  And it's even a quick and easy fun fold card!  It all starts with a half sheet of Orchid Oasis cardstock that measures 8 1/2" x 5 1/2".  Then it's scored at 2 1/8" and again at 4 1/4" to make a z-fold.  Fold it in half as usual, but then fold the top flap back on itself so it lines up with the side fold.

The gold striped layer is one of the free items from Sale-a-Bration.  It's 6" x 6".  I cut 2" from the bottom to make it 4".  Then cut it in half to get two 3" x 4" pieces.  I cut a piece of Starry Sky cardstock to 3 1/4" x 4 1/4" to layer the gold striped paper on with adhesive.

Now the fun starts.  There is a design in the Hues of Happiness Designer Series Paper that matches up with the Blossoming Happiness Dies which are part of the Happiness Abounds Bundle on page 108-109 of the Annual Catalog.  I kind of went a little crazy and die cut two full sheets of these gorgeous roses and leaves.  I've been grabbing out flowers whenever needed, but I still have a good size stash left.  I saved some of the scraps from around the roses that have these tiny 5-petal flowers and sometimes leaves too.  Now I know what it means to 'fussy-cut' something!  Woo Boy!  It sure was hard to hang onto those tiny flowers, but they really add so much to the finished look.

Now I have the roses, leaves, tiny flowers all set to go, but I needed a sentiment to go with the card.  The sentiments in the set are lovely, but not what I wanted to use this time around.  The sentiments in the Season of Chic set located on page 99 of the Annual Catalog were just what I was looking for.  I stamped the one I chose onto a 1/2" trip of Basic White cardstock using Starry Night ink.  It was trimmed to 3" to fit across the gold-lined paper.

It was time to build the focal layer of the card.  First the sentiment was added not quite to the bottom edge using adhesive.  Next the roses were arranged and attached using Dimensionals.  The leaves were tucked in around the roses and attached with adhesive.  Then the tiny flowers and leaves were added here and there.  They were attached with Mini Glue Dots to make it quick and easy. 


This layer was added to the folded card front using adhesive on the left side only.  When you lay the card out flat, you can see how the front is attached only on the left half that folds back.  

Now comes the cool inside of the card.  I was only going to use a quarter sheet of Basic White cardstock and keep it plain.  But after thinking about it, I decided to use one of the Basic Borders Dies (page 169 Annual Catalog) to dress up the edge since it showed when the card was closed.  I used the stitched zig-zag edge for this.  Doesn't it add to the finished look?

The sentiment inside the card is also from the Season of Chic stamp set.  It's stamped with Starry Sky ink to match.  Because of the little flowers tucked in and around the card, I decided not to use any other bling on the card.  The tiny flowers and the gold stripes seemed to be just enough.  No point in going overboard on the bling.  Unless you just can't help yourself.  But that's your choice then, right?

I hope you give this quick and easy fun fold card a try if you haven't made one of these in a while.  It's just a little different and a whole lot of fun.  Thanks for stopping in again to see what's happening.  You never know what you might see and or read!  Please use the Host Code shown on the top of my blog page if you're ordering soon.  Remember Sale-a-Bration is going on now and that lovely Gold/Silver DSP is one of the freebies.  That is one of the most versatile items in Sale-a-Bration brochure.  Who can't use more white paper with gold or silver stripes or dots printed on it?   Time to start thinking of those Christmas cards which would work so nicely with this paper. 

Happy stamping and creating!
Sharon