Showing posts with label Country Bouquet Bundle. Show all posts

Tuesday, August 20, 2024

Country Birdhouse

Hello, hello!  Hope you're doing well today.  I was asked to make a welcome back card for a lady in my Sunday School class.  She had moved away a couple years ago and has just moved back in town.  We're having a lunch on Thursday to welcome her back.  So, they wanted a card to let her know how happy they are that she's back in town.  Since I've never met the lady, I was having trouble coming up with an idea and colors to make a special card for her.  After much rummaging around through my stamps, I thought the Country Birdhouse set with a bird coming home would be fine.  Here's what I made for her...

I hope she likes this and will feel welcomed back with love.  The first thing I chose were colors for the birdhouse.  There are two patterns of paper used on the house.  I chose the light woodgrain for the body of the house from a print in the Nests in Winter DSP that is an Online Exclusive item.  The blue woodgrain for both the roof and the base are from the Country Woods DSP.   These pieces are all die-cut using the Country Birdhouse dies.  A scallop trim was also cut from Basic White cardstock to go under the edge of the roof.  A circle was cut for the opening in the birdhouse.  A piece of Basic Black cardstock about 1 1/2" square was attached behind the opening and the roof and base were attached to the house with adhesive.

A Gray Granite Light Blend was used to add a little shadow under the scalloped trim to give it some depth.  There was a little added along the side edges for some definition.

At this time, I decided on a card base of Misty Moonlight.  It measures 8 1/2" x 5 1/2" and is scored and folded in half. 

The layer on this is a print from the Country Lace DSP pack.  If has a light twill-style design on it.  It looked bland by itself, so I embossed it with the Eyelet 3D Embossing Folder.  That added so much texture and character to the piece.  It's attached to the card base using Tombow Liquid Glue then set aside for now.

The flowers and leaves are made with dies from Country Birdhouse Bundle.  The flowers and leaves are all cut from scraps I had left over from other projects using the Meandering Meadow DSP pack.  It's amazing all the different variations of the colors that are available on just two of the scraps.  I cut only two of the larger flowers in blue tones along with several of the smallest flowers.  The pointy petal flowers are all cut from peachy-pinky sky colors.

Next up, the bird from the set was stamped with Misty Moonlight ink onto a piece of Basic White.  The bird was colored first with Pool Party Light Blends on it's belly and lower wing.  Some Misty Moonlight Light Blends was added to the tail area, upper wing, and top of its head.  The Pool Party Light Blends was used to blend the colors on the wing and head.  Daffodil Delight Dark Blends was used to color the feet and beak.  Then it was die-cut with the matching die.

When playing around with all the pieces, I realized it needed some tall greenery behind the birdhouse.  There are a couple of pieces in the Thoughtful Wishes set that seemed to work.  The leafy stalks were stamped with Granny Apple Green ink and color was blended on the leaves using a Blender Pen.  After coloring it was die-cut.  It was then cut into two pieces and the larger one was attached behind the birdhouse.  It still needed more, so the plain stem from the set was die-cut from Pecan Pie cardstock.  This was cut in half and spread along the back behind the greenery and attached with adhesive.

After attaching the greenery behind the birdhouse, it was attached flat to the card front with adhesive.  The flowers and leaves were attached on the left side with Mini Glue Dots and two of the flowers have Mini Dimensionals behind them.  The extra greenery piece was added to the right side.  Then the flowers and leaves were attached with adhesive, except the large flower which was attached with Mini Dimensionals.

The bird was attached to the front of the card with Mini Dimensionals also.

The sentiment is from the Country Bouquet set.  It's stamped on Basic White with Misty Moonlight and trimmed to fit.  It's attached with adhesive.  The inside of the card has a quarter sheet of computer paper printed with the words Welcome Back with plenty of room for everyone to sign it.  Think that should fit the bill, don't you?

There is a drop of retired Shimmery Crystal Effects in the center of the flowers to give some added texture and interest.  If you use the Crystal Effects, don't forget to give it several hours to thoroughly dry.  And that's it for this card.  I hope everyone likes what I made to celebrate her return.  Now all they need to do is sign it.

Don't forget about the 15% off sale on the Designer Series Papers in the Annual Catalog for the month of August.  It's a good bargain.  And it ties right in with my 50th Anniversary sale.  When you purchase $50 from me this month only, I'll send you a card and a package of embellishments so you can celebrate with me!  Thanks for stopping in to see what's going on.  Hope you're inspired to play along with me and get creative.

Happy stamping and creating,
Sharon

Wednesday, February 15, 2023

Beautifully Happy Cards

Hello Ladies!!  Hope you're enjoying your week so far.  Have you been having crazy weather too?  It's gone from freezing to the high 60's in just a couple of days.  There seems to be no rhyme or reason to what's going on here.  If I need to go out, I have to actually go outside to see just how cold it is, and then check how cold it will be when I plan on getting back.  The other day the temps showed 37 degrees, but I was going out to a Bible Study where I'd be gone 2 hours.  By then, the temps were in the low 60's.  Just how are you supposed to dress for that?  I feel kind of a "weather schizophrenic" at times.  Is there such a thing?  Oh well, enough of this craziness.  

What I want to share with you today, was actually made over two weeks ago and I never got around to sharing it with you.  So sorry it's taken me so long to do this!  These cards use the Beautifully Happy stamp set that is part of Sale-a-bration.  It's a gorgeous, two-step stamp set that has lovely line art that you can use alone, or stamp with the 2-step images that fill in the lines perfectly.  Either way, it's just gorgeous!  I've made a handful of them and no matter the combo, I love them!

Each one of these cards has the same layout and the same stamps used.  In fact, the only differences are which of the Fancy Flora Designer Series Paper prints were used on the card.  I was only going to use one of the prints.  But as I put the finished image layer on each print, I couldn't decide which one to use.  Hence, we have a whole cluster of them to choose from.  Another weird thing about them, I used Flirty Flamingo and Mint Macaron inks to fill in the images.  Neither of those colors are listed as coordinating colors for the DSP.  So obviously, the Fancy Flora DSP is fabulous to use for many different reasons - not the least being that it's just plain beautiful!
So let's get started making these simple, but gorgeous cards.  This is the first combo I tried.  I love these colors together.  They just make me feel so happy!  Each of these cards were made in the same way.  Start with some Basic White Thick cardstock for the base.  I made them 8 1/2" x 5 1/2", scored and folded in half.

Next the white layer was die-cut from Basic White cardstock using the Rectangle Stitched Dies. The 4th largest die was used for this.  The 3rd largest die was used to cut a Mint Macaron layer for it.  

I've found for using the fill-in stamps, the Stamparatus is invaluable.  After you get it lined up just right, it's so easy to just keep stamping! Place a scrap of paper where you will place your die-cut.  On one of the Stamparatus's hinged flaps, place the outline image where you want it.  On the other hinged flap, line up the floral part correctly.  Then pull the flap out, flip it around to the other side, and line up the greenery part of the image.  Then you can place your die-cut piece, stamp with the outline image, then stamp the two fill-in stamps in whichever order you prefer.   In other words, line up all the stamps correctly, then stamp away.  I used Basic Gray for the outline, Flirty Flamingo for the flowers, and Mint Macaron for the greenery.  You can make as many of these as you want in very short order.  In fact, they were stamping so nicely, I wish I'd have cleaned the ink off the stamps and tried several other color combinations.  Oh well, hindsight is always smarter.

See how nicely they stamped?  The white layer was then attached with adhesive to the Mint Macaron layer you die-cut already.  I chose to use a sentiment from the Country Bouquet stamp in the January-April Mini Catalog.  This sentiment allows for just about any other kind of sentiment inside the card.  Very versatile.  I wanted to stay with the stitching on the sentiment, so I used the smallest thin Rectangle Stitched Die to cut this out.  The sentiment was stamped with Basic Gray ink to give it a less harsh look. 

The pretty Designer Papers were cut at 5 1/2" long and 3" wide, so they go top to bottom on the card front.  They are attached to the folded Basic White Thick card base using Tombow MultiPurpose Liquid Glue.  I found this worked well for easy positioning of the DSP.  The two layers for the focal image were attached using Dimensionals.  The sentiment layer was attached with adhesive on the right side and a Dimensional on the left side to keep it level.

For an accent for these cards, I used the pink Polished Dots.  Sorry!  Yes, I know they are retired, but I liked the very soft pink toned color with these cards.  Sometimes you just need to use what you like, whether it's current or not.  

Now let's take a look at cards made with some of the other gorgeous prints in the Fancy Flora DSP.


As you can see, I was having so much fun making these cards.  There's even more that I made, but I thought this might be enough to get you thinking about this idea.

If you don't have this Beautifully Happy Sale-a-bration stamp set yet, you're sadly running out of time.   It's only available until the end of this month or it's sold out, whichever is first.  But happily, this gorgeous DSP is in the Mini Catalog so you have a little more time to stock up on this.  You won't be sorry you did!

Thanks for hanging out with me today.  Hope you enjoyed this gorgeous handful of cards.  It was so much fun making them, I had trouble stopping!  

Happy stamping and creating,
Sharon


Thursday, February 2, 2023

Valentine Cards Anyone?

Hello Friend!  Glad you stopped by today.  I have been busy making cards for the shut-ins here from church.  I think I've found my little niche again.  There are 29 shut-ins this month, so I've been busy with Valentine cards for everyone.  It's interesting to try not to make the cards too mushy and sweet, because honestly I've never met these people.  Usually, I make special cards for family and friends that I try to fit to each person.  Not so much this time around.  I figured it wouldn't make any difference whether I used current or retired products, so the cards are a mixture of both.  It was great even using up some of my stash of DSP that tends to get out of hand.  Of course, you have no idea what I'm talking about, do you?  I mostly used one layout for the cards, then when that DSP ran out, I switched to a different DSP and a different layout for the card.  Hope these cards spark your imagination and you try out the layouts for many different cards.  These are very basic, go-to layouts that work for many different occasions.  Just change up the DSP and stamping and away you go.

Here's an overview of most of the cards that were made.  There were a couple odds and ends from figuring out the DSP I wanted to use, or just playing around with different stamps that ended up being way too time consuming or too frilly for making 29 cards.  Some of these cards are being sent to men, so you know - no flowers and ribbons and lace, etc.

It was interesting trying to find all the different DSP's and stamps that I used.  I wasn't really going to post these cards, so each one of the items was put away after using.  Hence having to find them all again!  Silly me, I really should know better!

This is the idea I planned to use for all 29 cards.  After cutting all the pink Butterfly Bijou DSP into strips that measured 2" x 5 1/2", there wasn't enough of the DSP to make all of the cards. I decided to work with what I had and go on from there.  The circles were cut with the largest Stylish Shapes circle die.  I stamped this Adorable Owls (Sale-a-bration freebie!) stamp on the center of each of them using Memento Tuxedo Black ink.  I also used strips of Basic White cardstock to stamp the sentiment which comes from the new set - Country Bouquet found on pages 9-10 in the January - April Mini Catalog.  The sentiments were die-cut using the new Something Fancy Bundle found on pages 15 & 17 in the same Mini Catalog.  I love the words, fonts, dies, everything about this bundle! 

The owls were all colored with Stampin'Blends in Crumb Cake Light & Dark, Mango Melody Dark, and Old Olive Light for the eyes.  A heart was punched from Polished Pink cardstock to match the layer behind the DSP.  The card base was Blushing Bride.

After coloring nine of those little owls, I needed a break.  They didn't take very long to color, but I was getting bored doing the same thing over and over. So, I decided to just stamp and punch hearts to go on some of the card fronts.  I used the Country Bouquet set for this.  The hearts were stamped with Polished Pink and punched out with the coordinating Country Bouquet punch.  It needed another heart, so I added one that was punched directly from Polished Pink cardstock for some contrast.  The hearts and sentiment were all attached with Mini Dimensionals.

Ok, more done, but this is where I ran out of my DSP that I wanted to use.  On to something else...

Look what I found when I was going through my stamps and DSP stash!  Don't you love it?  There are two different DSP packs used here - the background pieces are from the Ice Cream Corner DSP and the heart is punched from a piece of the Pleased As Punch DSP.  I think these are both from last year, but they could be older.  

I love the heart used with the sentiment from the Sweet Ice Cream set.  And I even dug out my remaining TerraCotta Tile cardstock for the base of the card.  I totally love and miss using this color.  It was one of my forever favorites.  The ink I used for the sentiment is Cinnamon Cider because it goes so well with the "sugar cone" background.  It was punched using the Double Oval Punch that is in the current Annual Catalog.

That's about it for most of the cards that were made.  How did you like the "blast from the past"?  Do you still own some these items?  Or do you purge all the leftovers that you haven't used for awhile?  I'm glad I held onto my things.  It's fun to go through your stash and find just the right item for making the idea that's dancing around in your imagination.  It was also fun planning out these cards for the shut-ins.  This reminds me so much of making the cards to send to the military.  I loved getting together with all you wonderful ladies and doing a lot of visiting while putting the cards together.  My goodness, did we ever make a lot of cards over those ten years!!

Well, thanks for coming back to see what I've been doing lately.  Don't forget there is still one month of Sale-a-bration to take advantage of those freebies.  I know you are a savvy shopper and want to make those dollars spread as far as possible.  Sale-a-bration is a great time to make your purchases to get the added benefits.  Thanks for all you do!  I love hearing from you when you call or write.  You are so special to me!

Happy stamping and creating,
Sharon

Thursday, January 19, 2023

More Traditional Valentine for You

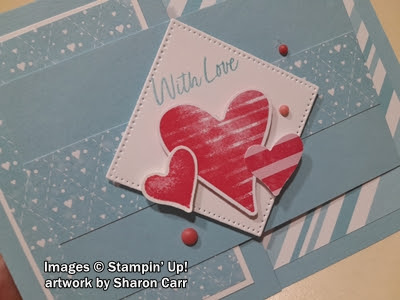
Hey there!  I'm still sort of stuck in Valentine mode.  There are more ideas out there to explore.  Today, I've used the Country Bouquet Bundle again to come up with a slightly more traditional valentine for you.  At least there are hearts on it this time!  And it is a fun fold, so that's always a bonus.  But wait!  There's more!  Just like those infomercials, I do have more for you today.  There is a second card that starts with the same color and fun fold and then goes on from there.  Hope you enjoy these cards and let me know what you think.

This card uses a very easy fun fold to get you started.  You need a piece of cardstock that measures 11" x 4 1/4" that is scored at 5 1/2".  For this card I used Balmy Blue. Then 2 3/4" is cut from the front flap.  This piece is then placed sideways across the front of the card.  Pretty quick and simple way to change the look of a card.

Let's start with the measurements on the DSP layers and get the base of the card finished before we move on.  Two different DSP's are used here - the Country Floral Lane DSP on page 9 in the 2023 January-April Mini Catalog and the Dandy Designs DSP found on page 14 in the 2023 January-February Sale-a-bration catalog.  They both have a base color of Balmy Blue to they work well together.

There are two pieces of the Country Floral Lane print.  The larger one measures 3 5/8" x 2 1/8", and smaller one 4 1/4" x 1".  If you're using this DSP, make sure you pay attention to the direction of the print.  The Dandy Designs print measures 5" x 3 3/4".

There are three pieces of Basic White cardstock used here.  The one for inside the card measures 4 1/8" x 2 5/8" to fit behind the cross piece on the front of the card. The next piece measures 3 3/4" x 2 1/4" and is for the left side of the card front.  The last piece needs to be big enough to die-cut the square and stamp the two hearts - approximately 2 1/4" x 5 1/2".

First attach the left-hand DSP to the Basic White layer and attach to the card front.  Next attach the striped DSP to the inside of the card.  Last, attach the 1" strip across the front piece of the card.  Use adhesive to attach all these layers flat to the card base.

The square was cut using the Stylish Shapes Dies.  It's the one that measures just less than 2" x 2".  After cutting, the sentiment was stamped with Balmy Blue ink diagonally in the top corner.  The sentiment comes from the Country Bouquet stamp set.  This is one of the new sets that are available in the 2023 January-April Mini Catalog.  On the left-over piece of Basic White cardstock, the large and small hearts were stamped with Sweet Sorbet ink and punched out with the coordinating punch.  The two hearts are on one stamp and punch out together making it easy for you.  Another small heart was punched from a scrap of the Country Floral Lane DSP.  Overlapping each other, they were all attached to the square using Dimesionals. 

Attach the cross-wise piece to the front of the card making sure you have adhesive only on the half that fits on the left side flap of the card!  After adding this, line up the corners of the square and attach to it with Dimesionals.

Just one more picture showing the inside of the card.  Before attaching the last Basic White piece, stamp the sentiment and the small heart accent using Sweet Sorbet ink.

Last touches on the card are the 2022-2024 In Color Matte Decorative Dots.  They come in two sizes and different shades of the same colors - so cool!  I used a large size in the 2nd darkest color and two tiny ones in the lightest and darkest colors.  I like the extra contrast they give and really match the hearts on the front of the card perfectly.


OK, are you still with me?  The next card is made exactly the same as the first, except for the stamp set and the DSP used.  The measurements are all the same.

The stamp set and dies are called Playing in the Rain.  The bunny is die-cut from a piece of the Rain or Shine DSP, which makes it so easy.  I did fussy cut the two umbrellas used on this card.  It didn't take but a couple of minutes.

I haven't decided on adding bling.  I know I'll add something, just haven't decided on what yet.  I have some retired "rain drops" from several years ago.  They might be just what I need here.

Here's a quick picture of the inside of this card.  Isn't it cute?  Each of the animals has some glossy areas on their clothes and so do all the umbrellas.  It really adds to the look.  I hated covering up those darling umbrellas though!

Ok, that is definitely enough for today.  Thanks for stopping in to see what's new today.  I feel like I've been typing all afternoon.  Hope you didn't think there was too much information to get through.  It was fun creating these two cards - so similar, but yet so different looking.

Happy stamping and creating,
Sharon

Saturday, January 14, 2023

Pastel Count on Me Card

Hello there!  Back again with another idea for you.  The card I have would make a lovely card to welcome a new baby, but since I have no new babies to welcome, I chose different wording.  I think my friend might like this card since she's like me and loves pastels.  So here we go...

Isn't this just a sweet card?  The design is a mixture of old and new, so feel free to mix up your designs and use whatever you have on hand.  It's an easy fun fold too, so it's a win-win situation as far as I can see.  You could change up the sentiment, cardstock and DSP colors to use this for just about any occasion you please.  I wanted to use the Count on Me stamp set because I've neglected it badly.  You can find the set on page 61 of the Annual Catalog.  There are six different darling images to choose from and five sentiments to coordinate with them.  Of course, you don't have to use the sentiments just because it's a set.  I chose to use a sentiment from the Catch You Later stamp set from last year's catalog.  I had my friend in mind and thought this worked well.

Start with a card base of Pool Party that measures 11" x 4 1/4".  Score it at 1" and 5 1/2".  Next the Hive 3D Embossing Folder was used to give the front some texture.  After that, fold back the 1" part of the card front that you scored.  I added a piece of the Design a Daydream DSP that is a Host pick in the Annual Catalog.  The little piece was a leftover from a different project and measures 3/4" x 4".  It's attached with adhesive.  Then 3 Dimensionals were placed behind the flap to hold it closed to the front of the card.

Next two rectangles were cut using the Stitched So Sweetly dies.  I used the 2nd largest to cut a Blushing Bride layer, and the 3rd largest die to cut a Basic White layer.  On the white layer, the little hugging koalas were stamped near the top using Gray Granite ink.  To balance them, the sentiment was stamped near the bottom with Gray Granite ink also.  I used watercolor pencils to color the koalas and a Blender Pen to lightly blend the colors.

The two die-cut layers were attached together with Dimensionals.  A length of Pool Party Grosgrain Ribbon was wrapped around the two layers and tied into a bow.  The Pool Party Ribbon is new in the January-April Mini Catalog on pages 15 & 87.  This was attached to the card front with Dimensionals also.  

Three Iridescent Rhinestone Basic Jewels were added to the card front for a little bling.  They were a perfect match for the pastel colors used on this card.

Here's the inside of the card.  A piece of Basic White cardstock was cut to 5 1/4" x 4".  I had a skinny 1/4" strip of Blushing Bride in my scraps that I added to the edge of the card.  I thought it was a nice accent both when the card was closed or open.  It's attached with a bit of adhesive.

I used a stamp from the new Country Bouquet set found on page 10 of the January-April Mini Catalog on the inside of the card.  Since I'll be using this card to send a note, I thought the words fit just right.  They are stamped with Gray Granite ink too.

That's it for today's card post.  If you make a card with this fun fold idea, please share your creation with me.  I'd love to see what you're making.  I'm sorry I used so many retired products today, but I know many of you have those exact things I used.  If you don't, please go through your stash of goodies and find something that will work just as well - or maybe even better.  If you don't have rectangle dies of some sort, try circles or ovals.  The sky is the limit when it comes to stamping!

I don't usually push Paper Pumpkin Kits to you, but there is what looks to be an adorable kit coming up next month.  You might want to think about getting a one-time order just for that kit.  It also coordinates with the Playing in the Rain suite of stamps and products that are so cute.  I've just been playing with them and trying to finish a card or two to share with you.  They really are cute!


SUBSCRIPTION INFORMATION

Subscribe to the February Paper Pumpkin Kit between 11 January 2023 and 10 February 2023 by clicking here!

Happy stamping and creating!

Sharon

Tuesday, January 10, 2023

Country Bouquet Happiness

Hello, hello!  Hope you're doing well, and life is running along smoothly.  Seems like we're having some bumps in the road all the time lately.  But I guess that's what life is all about, isn't it?  Today I have a card to share that's pulling all kinds of odds and ends together to make a whole.  I had fun making it and hope you like it.

This is so funny - I didn't realize how Christmas-y this card looked until just now.  All because I took the picture on a green tablecloth.  Go figure...  Anyway, I had fun pulling items together to make this card.

It started with the Country Bouquet stamp set.  This is a new set in the January-April Mini Catalog.  I love this floral heart with its two-step image stamps.  It's great getting all this detail on the heart with just two stamps.  I stamped the flowers and hearts with Real Red ink onto a piece of Very Vanilla cardstock just to get a feel for the stamp.  Then stamped the leaves and stems with Garden Green ink.  I was happy enough with the placement of the images that I decided to use the image for a card.

I had recently gotten the Split Card Textures Dies and wanted to try them out.  You can find them on page 86 and on page 174 in the 2022-2023 Annual Catalog.  I die-cut the side of a top-folded Very Vanilla card with the 'plaid pattern'.  I decided that I preferred the pattern on the other side of the card, so turned the card on its side and then inside out with the die-cut pattern along the top of the card.  With having the back-side of the pattern on the front of the card, you now have much more of a textured feel to the card.  I cut a piece of Real Red cardstock that measured 5 3/8" x 4 1/8" to place inside the card to show through.  It was attached to the left side of the card with Multi Purpose Liquid Glue.

The sentiment is from the Cheerful Basket stamp set in the 2022-2023 Annual Catalog on page 35.  I really like this sentiment and it's sure to be one of my favorites in the coming months.  It's stamped with Real Red ink.  A couple of small hearts from the Country Bouquet set were stamped above the sentiment with the same ink.

At this point, I thought some Wink of Stella would be a nice touch.  It's spattered on over the entire card front.  Unfortunately, it didn't show up as much as I thought it would.  But it still gives it a nice touch when the angle of the light is just right.

The original stamped heart that I had made needed to be fussy cut from the Very Vanilla piece as there are no dies for this set.  The heart was so easy to cut out, so that really wasn't a problem.  It did need something between the card front and the heart to make it stand out more though.  After trying several ideas and promptly rejecting all of them, I ran across a 3/8" Real Red organdy ribbon that's retired.  This seemed to be the perfect match for the card.  It gave the heart some definition but wasn't too 'heavy' for the design.  I put several stripes of adhesive across the back of the heart and 'swooshed' the ribbon back and forth.  This looked much better than a bow.  After getting the ribbon situated the way I liked it, the heart was attached to the card front using Dimensionals.  I thought about adding some sort of embellishment but decided against it.

So that's it for today's post.  This is such a fun Valentine set that really doesn't have to be used for Valentine's Day.  I figured if you changed the colors on this, it could be used any time you needed a card to cheer someone up.  After changing the sentiment, it would work nicely for an anniversary card too.  Just put on your creative thinking cap and get stamping!

Reminder - as if you need reminding - Sale-a-bration is going on right now and things are busy.  Many of you were smart enough to pick up the Dainty Flowers DSP for your first free choice.   I think that's an excellent choice.  I know I'll probably end up using all mine up and need to get some more.   ðŸ˜„

Happy stamping and creating,
Sharon

Wednesday, January 4, 2023

Sneak Peek Hearts

Hello there!  When I got up this morning, I was thinking we ought to consider building an ark.  It was pouring rain and had been raining for several hours.  The creek behind our house was really over the banks - more so than we've seen it since we moved here.  I'm so thankful we live up on a hill, so we don't have to worry about flooding anymore.  If this was going on in Michigan, I'd expect water up to my hips at least.  Thank God that isn't the case anymore!  Wow, the rain is just absolutely crazy right now.  Today's post shares a cute little card featuring the Country Bouquet Bundle shown on pages 9 & 10 in the new Mini Catalog and the pretty coordinating 12" x 12" Country Floral Lane Designer Series Paper.  It's just so sweet.  Hope you like it.

Isn't it cute?  The card starts out with Sweet Sorbet for the base that measures 8 1/2" x 5 1/2".  It's scored at 4 1/4" and folded in half.  Next there's a layer of Basic White that measures 5 1/8" x 3 7/8".  A layer of the sweet Country Floral Lane DSP in Sweet Sorbet with teensy white hearts is next.  It measures 5" x 3 3/4".  This layer is adhered to the Basic White layer to give a very thin frame of white showing all around just to separate the two Sweet Sorbet colors.  Sometimes that skinny little frame is more effective than the larger 1/4" frame.

Before going any further with this design, I spattered this with Wink of Stella.  It's very hard to see this in any of the pictures, but the sparkle it adds is subtle and just right.


Next, I stamped the two hearts with Sweet Sorbet ink and the two leaves with Mint Macaron ink.  They are both punched out with the coordinating Country Bouquet Punch that is part of the bundle. 

I thought a circle shape would look nice under the hearts.  I had a leftover 2 1/2" circle in Mint Macaron from some Christmas cards I made.  Then used the 2nd largest circle from the Stylish Shapes Dies set to cut a stitched circle from Basic White cardstock.  These are just about the same size, so there was no layering here.  Instead, the Mint Macaron circle is offset quite a bit to show it off more.  They are attached together in the overlap area, then attached to the card front with Dimensionals.  The two hearts and leaves were attached to the circles with Dimensionals too.

The sentiments are from the same Country Bouquet bundle.  They were stamped on Basic White with Mint Macaron ink.  The words were fussy-cut instead of using a punch or die-cut.  The first part of the sentiment was attached flat at the top of the card.  The 2nd half of the sentiment was popped up with Dimensionals on the white circle.

The design needed something else.  I tried several ribbons, but they were too much for the design.  I was thinking of using White Baker's Twine, but then I saw the 2022-2024 In Color Baker's Twine assortment.  Oh my, this was just what I needed.  I used two strands of the twine to make the bow.  It's attached to the card front with a Mini Glue Dot.

For bling on this card, I remembered some small red and white tiny hearts from a couple of years ago.  They were the perfect touch and almost the exact size of the hearts on the paper.  When they were added to the card, they were placed right over the existing hearts.  Too cute!

So that's my first Valentine for the year 2023.  My goodness, I'm still trying to remember that we're into another year, and now I'm jumping ahead to Valentine's Day already.  But the Country Bouquet bundle and DSP are darling, and I wanted to make sure you saw it stamped up.  Now I'll have to make something with the set that isn't for Valentine's Day.  I'm sure I can think of something if you give me enough time!  😄 
    
Are you ready?  Tomorrow morning - January 5th - the new Mini Catalog and Sale-a-bration start!   I'm so excited to see what you like.  Let me know what your favorites are, and if I have the sets, I'll try to post a project using them.  Have fun!  If you have any questions concerning any of the products or Sale-a-bration, please contact me.  I'd love to hear your thoughts and opinions.

Happy stamping and creating (and shopping!),
Sharon