Showing posts with label Friendly Hello. Show all posts

Monday, February 21, 2022

Amazing Friendly Hello Card

 Hello there!  Hoping your day is going well.  I've been playing around with the Friendly Hello stamp and Designer Series Paper from Sale-a-bration again.  It amazes me that this is totally free as a bonus when you place a $100 order.  I really can't seem to get enough of this combo! The colors of the paper are so soft and fresh looking that I keep gravitating to them.  Guess I'm ready for spring, and this looks like spring to me.  Today's card is a different Fun Fold that I don't think I've shared here with you yet.  If it's not new to you, just bear with me.  OK?  It's funny that I don't even know what it's called, but I like it anyway.  Let's have some fun with it.

The card is sized to fit into a regular envelope, but it opens out into an 11" wide card.  Impressive, right?  Here's how to make it:  Start with Basic White cardstock that measures 5 1/2" x 11".  This is scored at 1 1/4", 5 1/2", and 9 1/4".  Fold the card in half at the 5 1/2" mark with the fold on the right side.  First fold the top layer back, then the bottom layer gets folded right over this to get the fun layering.  Isn't it pretty?

Next come the layers of paper that give it some character.  They are from the Friendly Hello DSP and I chose two of the Fresh Freesia prints that coordinate so nicely.  The left strip and the right panel are the same print.  They are cut at 1" x 5 1/4" and 3 1/2" x 5 1/4".  The middle print is a splattery, polka-dotty looking strip that is cut 1 1/2" x 5 1/4".  Each of these were attached to the matching fold of the card using adhesive.  

To keep the card closed and all together, a belly band was needed.  First up was the base for the focal image.  I chose to use the Scalloped Contours Die set.  I love the pretty edges and the stitching detail that makes them stand out.  This rectangle measures about 3 3/4" x 2 1/2" and is cut from Basic White cardstock.  It's just the right size to add a few flowers and the sentiment.   The sentiment comes from the Color & Contour stamp set.  The fonts used in this set always makes me feel happy, so it was a good choice.  The words were stamped with Memento Tuxedo Black ink near the top of the layer.

The daisy-like flowers in the Color & Contour set looked like they would go with the DSP, so two of them were stamped on a piece of Basic White cardstock also using Memento Tuxedo Black ink.  This is a two-step stamping flower, so the second stamp used Fresh Freesia ink for stamping onto the flower.  They were then die-cut using the Scalloped Contours Dies.

Before putting those flower stamps away, I inked them up again to stamp inside the card.  Both the outline stamp and the filler stamp were off-stamped before stamping in the card to keep them nice and light. 

When arranging the flowers on the die-cut rectangle, it looked too plain.  The Friendly Hello stamp set has a full spray of tiny leaves and a branch.  This was stamped in an arrangement behind where the flowers would be attached.  To make them a little lighter under the flowers, I used Basic Gray ink this time instead of black.  The flowers were added to this with one attached flat with adhesive, and the second one up on a Dimensional.

For the banding around the card, a piece of Fresh Freesia cardstock was cut to 11" x 1".  This was folded around the card and overlapped in front.  The rectangle focal point was attached over the center of this to cover the overlapped area.  After slipping the band onto the card to check it out, I realized it still needed some extra pizzazz.  Of course, I had forgotten to add any bling!  Oh dear, that's almost unthinkable!!  And this card was crying out for it.  The pretty and versatile 2021-2023 In Color Jewels were a perfect touch.  I used the Fresh Freesia color jewels and added three of them.  So pretty! 

After making this first card, I liked how it turned out so much that I had to make a couple more.  I had seen this retired Painted Season Designer Series Paper just the other day and really liked the colors and prints.  You can see, I made several of these cards to go in my stash.  The cards were so pretty, but really "general" looking.  I figured they could be used for many reasons, so I didn't add any sentiments yet.  

The flowerpot and the dangling flowers were stamped and cut out from the Plentiful Plants stamp set.  The succulents in the pot were just cut from the DSP.  Most of the pieces were just attached with adhesive, but the double succulent right in front was popped up with a Dimensional.  Just see what you can make with some coordinating DSP prints.  Stampin' Up! does all the hard work of making sure everything coordinates.  We just get the fun job and creating with them!

Here's your friendly reminder about Sale-a-Bration.  Yes, next Monday is the last day you can get any of these fabulous free products when you place a qualifying order.  Please don't wait too long to place any last-minute orders.  Don't want you to miss out on these fun and useful products.  If you have any questions, just give me a call.

Thanks for stopping in for another visit today.  Hope you like this fun fold idea and give it a try.  It really is easy when you get those correct scored lines in first thing.  I'll be doing this fold again because I really like it.  And of course, I'll be getting out this gorgeous Friendly Hello DSP to play with again.  I want to use up every little scrap of it I like it so much!  Yup, I'm totally hooked on it!  But that's it for today.  Stay warm and be creative!

Hugs,
Sharon

Wednesday, February 2, 2022

Another Friendly Hello

 Oh my goodness!  I just checked and this will be the 5th card I've shared using the Friendly Hello Bundle.  Hmm, does that give you the idea that I like it - a lot?!  Today's version started out similar to yesterday's card, but quickly took a turn in another direction.  When I started playing with the Friendly Hello DSP that I had cut yesterday, I thought it would become the same card with 2 exceptions - different base color cardstock, and a landscape style instead of portrait.  No biggy.  But as I tried to work with it, nothing wanted to play nice.  So, even though those changes are still there, there are a few extras added in to make it happy.  Let's see what all the changes brought about.

Wow, doesn't even look like I had planned on making the same card at all!  This one starts with a Fresh Freesia card base cut to 8 1/2" x 5 1/2", scored and folded in half.  Like yesterday's card, there is a Basic White layer next, and a layer of Friendly Hello DSP cut to 3 3/4" x 5" attached onto this.  There is also the same 1" x 5" strip of Pool Party and white DSP is attached to the card front.  The ends are not punched but go right to the edge of the layer. 

As an added bonus, the little diamond-detailed strip was added to go across this.  This is from the Delightfully Detailed Laser-Cut Specialty Paper that was retired a couple years ago.  I just have some bits left from it and couldn't throw them away because they're just too pretty as you can see.  I was going to use the white side, but when it was flipped over to add the adhesive, I realized the cream color was a softer look for the card. 

At first, I colored the bird on the DSP just like yesterday, but this one didn't stand out as much for some reason.  I had already stamped, colored with Stampin' Blends, and fussy cut a bird and flowers for another project that had been put on hold while I thought about it.  I held it over the bird on the DSP and realized they were a perfect match.  Now why didn't I know that before?  I also had a couple extra flowers colored and cut out to use as needed.  Well, this was the time they were all needed.  I love how they all work together even with the different tones for coloring that aren't part of the DSP colors.  The bird was colored with Balmy Blue Light & Dark, 2 flowers are Highland Heather Light & Dark, and 2 flowers are Fresh Freesia Light & Dark.  Flower centers are Daffodil Delight, but you can't really tell with the rhinestones over them.

The bird and flowers were all attached to the card front right over the original bird using Dimensionals.  The 2 extra flowers were tucked in a little under the bird's tail.  The focal point here still needed something else.  After looking for some type of delicate greenery to add, I remembered the Christmas Trimmings Die set in the Annual Catalog.  It has a spray of berries that is just what I was looking for.  There are 3 bunches cut from Fresh Freesia cardstock. I tried several green colors and wasn't happy with them.  So now I've got more "table trinkets" laying around for the next card marathon!

The sentiment is from the Celebrating You stamp set that I used yesterday.  Like I said earlier, it covers most sentiment needs other than the fall and winter holidays, so is a good useful and versatile word set to get.  It's stamped on a 1/2" strip of Basic White scrap using Fresh Freesia ink.  The Banners Pick a Punch was used to flag the ends.  It was then attached to the card front using Dimensionals.

Several of the gorgeous Iridescent Rhinestone Jewels were added to the flower centers for a pretty touch of bling.

I wanted the inside to be as pretty as the front, so a 1/4" strip of the lovely Pool Party and white print from the Friendly Hello DSP was attached across the bottom of the Basic White layer.  The strip was just a smidgeon too short, so I flagged one end.  Think it adds a cute touch.  

The sentiment is from the Friendly Hello stamp set.  It's stamped with Memento Tuxedo Black ink off to the left side.  And at the bottom right corner, a small stamp with flower and leaves was stamped in Fresh Freesia ink for the final touch.

Hope you've enjoyed seeing the different way you can use the very same products.  With a change in colors and/or accessories used, the final project can look amazingly different.  Just take one of your stamp sets (or maybe a piece of DSP like I started with) and start playing around with different colors and layouts.  I know we all have our favorite layout ideas, but maybe try something different today. You just might be in for a pleasant surprise and find a new favorite layout idea!  Or maybe get adventurous and try a new fun-fold idea!  The whole premise of this is to have fun creating and have even more fun sharing those creations with your family and friends.

Stay warm my friends and create something beautiful!
Sharon
 

Tuesday, February 1, 2022

Love That Friendly Hello

 Hi there!  So glad you've stopped by for a short read.  Both today and tomorrow, I'll be sharing cards that use the Friendly Hello Stamp Bundle from the 2022 January & February Sale-a-bration brochure.  Yes, I know I've shared something already using this bundle, and I've made several cards that I've popped in the mail for friends that you haven't even seen.  I'm just having trouble putting this bundle down.  Since this is February 1st, that means there are only 28 more days that you can get this for yourself.  When you place a $100 order, you can choose this bundle as your free Sale-a-bration item.  The stamps are both solid and line-art, and there are 3 sentiments that are becoming favorites of mine.   And the Friendly Hello Designer Series Paper is just too wonderful for words.  I hate to get too mushy-mushy, but I really do like these prints and colors.  Just perfect for my taste.  Here's the card for today...

This is my first Easter card for the year.  I wanted to make the DSP the main focus on this card.  The print with the bird would be the perfect piece to use.  I actually cut two pieces of this with the bird front and center.  I'll share the other card tomorrow.

Pool Party cardstock was the card base used here.  It's cut at 8 1/2" x 5 1/2", scored and folded in half.  The next layer is Basic White cut at 5 1/4" x 4".  The layer of Friendly Hello Designer Paper is cut at 5" x 3 3/4". These pieces are all layered together and attached with adhesive for a more streamlined look.

Before layering together, Stampin' Blends were used on the bird very lightly to enhance the color already there.  Pool Party Light, Pale Papaya Light, and Crumb Cake Light were used to make the bird and branch images stand out just a bit more.

These pastel colors put me in mind of spring, so I thought this would make a nice Easter card.  The sentiment is from the Celebrating You set in the January thru June 2022 Mini Catalog on page 65.  That is a wonderful stamp set that has sentiments for everything but the fall and winter holidays.  This is definitely a keeper!  The sentiment was stamped on Basic White cardstock using Shaded Spruce ink.  It was punched out with the Double Oval Punch.  The scalloped oval part of the punch was then used on Pool Party cardstock to provide a nice frame for the sentiment.

There is a 1" strip of the Pool Party and White print from the Friendly Hello DSP added to the lower portion of the card.  It has the ends punched with the Banners Pick a Punch before attaching with adhesive.   This makes a good base for the sentiment focal point. 

Before adding the punched sentiment, it needed some kind of greenery around it.  The new Bough Punch from the January thru June 2022 Mini Catalog on page 26 looked to be the right size.  I punched out two sprigs of the larger one from Soft Succulent cardstock, and two of the smaller ones from Soft Sea Foam.  Though these two colors aren't technically part of the color array in the DSP, I thought they blended nicely with this very soft looking card.  These sprigs were attached between the Basic White oval and the scalloped oval that is Pool Party.  Then the whole sentiment bundle was attached to the card front with Dimensionals.

Of course, the card needed some bling at this point.  The new Iridescent Rhinestone Jewels were my first choice for this pastel card.  The iridescence of the jewels picks up whatever color they are next to.  Some have a peachier look going on and some look more pinkish or lavender.  Just simply gorgeous! Gotta say these are definitely my go-to bling at the moment.

So last thoughts... Don't forget to check out the Friendly Hello Bundle in the January-February Sale-a-Bration brochure.  It's a real winner and so versatile.  I'll have another version of this card tomorrow so you can see how just a few changes will give you an entirely different card.  That is part of what I like about stamping.  Every time you sit down to create something, even when using most of the same products, you can create something totally new and beautiful.  You don't have to own half of the catalog yourself.  (oops, did I say that out loud??)  You can still create lovely projects that are different each time and uniquely you.

Have a happy creative day!
Sharon

Saturday, January 15, 2022

Another Floating Layers Card

Hello friend!   Glad you stopped by today.  We're just staying in waiting for the expected freezing rain and snow that should be coming tonight and tomorrow.  The experts have changed the forecast a few times over the last several days.  We have no idea how normal this is for the area as we weren't here last winter.  It's all going to be an exciting surprise! Just hope we don't lose power.  That's one reason why I'm working on the blog now while I still can!  Today's card is connected to the "floating layers" card I posted last Wednesday.  When I die-cut the layer from the floating layers piece I made last time, there was some left over.  I thought it was too pretty to just throw away, so...

There was just enough of the "floating layers" prepped piece left to die-cut this piece from it.  It was a tight fit to get that die on there, but I love how it turned out.  The die is from the Tasteful Layers Die set, one of my favorites.

Because of the colors on the floating layer piece, I chose Mint Macaron for the card base.  It's cut 8 1/2" x 5 1/2", scored at 4 1/4" and folded in half.  For the building layer, Crumb Cake cardstock was used.  I used a quarter sheet and die-cut it using the largest of the Scalloped Contours Dies to put the pretty lace on the edges.  Then the Stitched Greenery Die was used to make the delicate stitched detail on the layer.  This was attached to the card base using Dimensionals.

The flowers and leaves in the Friendly Hello set seemed to be the right size to use as an accent here.  I stamped the double flowers, the leaves, and the little accent flower on a Basic White cardstock scrap using Memento Tuxedo Black ink.  The coloring was done using Stampin' Blends:  Highland Heather Light & Dark, Mint Macaron Light & Dark, and Daffodil Delight Dark.  After coloring, all the pieces were cut out with Paper Snips.

The next problem was how to incorporate the "floating layer" into the card design.  (Remember, the "floating layer" is made with strips of cardstock attached to a Window sheet then die-cut into a shape.)  I checked all kinds of stamped sentiments and die-cut sentiments too.   I didn't care for anything current, so I plundered my retired stash of die-cut sentiments to find just the right one.  This is from the Well Written Framelits and was just the right size to fit the layer like I envisioned.  Every once in a while, things actually turn out the way I planned.  Woo Hoo!  Basic Black cardstock was used to die-cut the sentiment.  Multi Purpose Liquid Glue was used to attach the sentiment to the "floating  layer".  

Now that all the components were ready to go, it was time to play around with placement.  When I had a layout I liked, the "floating layer" was attached first with Mini Dimensionals placed only under the cardstock strips to hide them.  This was placed on the right side so the large flowers could be arranged to the left side.  The flowers were attached with Dimensionals.  The leaves were tucked underneath and attached with adhesive.  The small flower was tucked under the sentiment layer at the top right as an accent and attached with adhesive.

Now for the bling.  I had planned on using Black Matte Dots, but they seemed kind of heavy for the card.  I tried several rhinestones and pearls and really wasn't impressed with anything.  Then I remembered the Subtle Shimmer Sequins from the Winter Mini Catalog and tried those.  Just the soft, but not too shiny, look I wanted.  So sorry, that's two retired things I used on the card.  Yikes, I'm trying to stick with current items, but you know how it is - sometimes you just can't find what you really want for your creation in your current stash.

Guess that's enough for today's post.  I hope you give that "floating layer" technique a try.  It's really easy and fun.  And it gives a nicely different look to your card.  

Remember that Sale-a-bration is going on right now.  It ends February 28th, but don't wait until the last minute as products do sell out and you can't get them.  I'd hate for you to be disappointed and not be able to get what you'd like for free.

Well, we're still waiting to see what this winter storm is going to be like.   The rain was supposed to have started a couple of hours ago, but everything is still dry.  Hope that means it won't get too bad. While we're waiting, maybe I'll get myself downstairs and see what else I'm inspired to create.  It's always a good time to create and stamp.  Right?

Stay warm and cozy,
Sharon

Monday, January 3, 2022

A Friendly Hello Bundle

Oh, my goodness!  I've been having so much fun with a new Sale-a-bration bundle.  Yes, you heard correctly there.  After you spend $100 in regular merchandise, you can choose to get this bundle.  It has an awesome stamp set with 13 photopolymer stamps to start with that includes 3 sentiments.  And it has a gorgeous 12 x 12 set of Designer Paper that coordinates with it!  They're my sort of colors too - more on the brighter pastel side.  Woo Hoo!!  Can you tell I'm just a little excited? 

Here's the first one I made with both the Friendly Hello stamp set and the Friendly Hello matching Designer Paper.  It's turned out such a bright cheerful green as the main color on the print I used is Granny Apple Green.  It just screams 'spring!' to me.  To make this card, I started with a card base of Garden Green for some contrast.  This was cut 11" x 4 1/4", scored at 5 1/2" and folded in half to make a top fold card.  The layer of DSP is cut 5 1/4" x 4".  It's attached to the card front with adhesive.  I wanted as much of this to show as possible, so I looked for a die that wouldn't be too small for the sentiment.  But it shouldn't cover the whole card front either.  The die from the Tasteful Labels Dies was just the right size and a pretty shape with a little outline detailing too.

The hello friend sentiment from the set was stamped with Garden Green ink more to the right side of the label.  That left lots of room on the left side for the pretty flowers that are part of the set too.  These were stamped with Garden Green ink onto a scrap of Basic White cardstock.  I also stamped 5 solid leaves with the Garden Green ink on the scrap of white.  

The flowers were just lightly accented with some water and a Water Painter brush to soften the shading lines inside each flower.  It actually makes the centers look like Granny Apple Green.  Who knew...?   

The flowers and leave were all fussy cut because there are no dies or punches.  Surprisingly, it took almost no time at all to cut the 6 pieces.  It was time to position all the pieces around the sentiment.  The flowers were attached only on the edge of the label die-cut.  Several of the leaves were tucked underneath the flowers.  The label and flowers were attached to the card front using Dimensionals.  The last two leaves were attached flat to the card front with adhesive.  This gave the flowers cluster more depth.


Looking to finish off the card front, I added a length of the new 3/4" wide Frayed Ribbon wrapped across the top of the card and tied into a square knot.  There is a bit of extra fraying going on with the ribbon edges on purpose.  I liked the shabby chic look of the fraying. This ribbon is pretty thick though, so I'll probably need to add extra postage when I mail it.

The flower centers looked really bare, so I added some Genial Gems which are found in the 2021-2022 Annual Catalog.  There are some green gems, but they didn't look nice with the greens already going on here.  So I used the Pale Papaya ones instead.  These added just a bit of color without being overpowering.  The two flower centers are the larger gems.  Then I couldn't stop myself and added 3 of the smaller gems to highlight the sentiment.


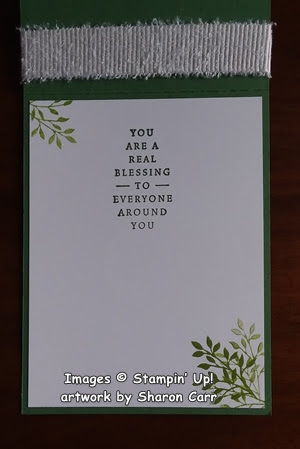
The inside of the card got some special treatment too.  The sentiment is from the new Blessings of Home stamp set.  It is stamped on a layer of Basic White cardstock with Garden Green ink to match the front.

The Friendly Hello stamp set has a leafy branch that I thought would be a good accent.  It was stamped with Granny Apple Green in the top left corner and the opposite bottom right corner.  On the bottom corner, it was stamped once at full strength and then off-stamped two more times to fill it in.  I also like the look of the frayed ribbon wrapping around on the inside of the card.  Just an added benefit.

Thanks for stopping in today to see what's happening.  I'm enjoying playing with the new stamp sets I've already purchased from the 2022 January - June Mini Catalog and the Sale-a-bration bundle I received free.  It's always interesting to see how people interpret using the new sets.  Yes, I've been hanging out at Pinterest to see what others are doing.  It seems to jump-start my own creativity to see what's out there.  If you're like me and need a little push to get going, I hope my ideas will jump-start your creativity!  If there are any questions you have, feel free to contact me.  I'm here to help you be the very best stamper you can be - and have fun doing it!!

Happy creating and stamping!
Sharon