Showing posts with label Autumn Leaves Bundle. Show all posts

Wednesday, November 15, 2023

Another Autumn Leaves Card

Hello!  What a lovely fall day we have going on here.  I'm not sure why we had no trees turn brilliant red last fall, mostly just yellow and brown.  But this year we are graced with wonderful color.  We have four of the most gloriously red trees to enjoy.  Talk about beautiful!  To honor this display of color, I decided to share one more card using the Autumn Leaves set.  I've truly enjoyed creating with this set and the lovely All About Autumn DSP that coordinates with it.  The designs almost create themselves.  So, here's the last one these (until I break down and make another one!)

Don't you love these lovely rich colors together for fall?  I sure do.  Let me tell you how it's made.  Start with a card base of Copper Clay that's cut to 8 1/2" x 5 1/2", scored and folded in half.  Next there is a layer of Crumb Cake cut to 5 1/4" x 4".  I built on this layer before putting it on the card.

Next comes the layer of the Tartan Foil Specialty Paper.  This is an Online Exclusive product and is absolutely gorgeous!  The prints I used on this card are two sides of the same Copper Clay paper.  There are also Lost Lagoon and Pebbled Path coordinating colors and they're all lovely.  A piece was cut 5" x 3 3/4".  Then 1 1/2" were cut from the bottom and flipped to show the white side.  These pieces are attached with adhesive to the Crumb Cake layer.  

A 4 1/4" length of the Natural Wavy Trim was attached where they come together.  Just run adhesive along the seam and adhere the trim.  I was worried that the stickiness of the adhesive would come through the pattern of the trim, but there was no problem.  Trim off the excess from the ends after attaching.

Using the Autumn Leaves Bundle, I stamped the oak leaf in Pretty Peacock and another in Pecan Pie ink.  The leaves that are together were stamped twice (without re-inking) using Copper Clay ink.  All leaves were die-cut using the coordinating dies.   

Using the small single leaf die, cut 3 leaves from Pretty Peacock cardstock and 1 from the Oxidized Copper Specialty Paper.  Two of the veining die were cut from the Oxidized Copper paper and 1 from Pretty Peacock cardstock.  I used these pieces as branches instead of veins.

The sentiment comes from the Autumn Leaves stamp set.  It's stamped with Copper Clay ink onto a Basic White cardstock piece.  It's then die-cut using the coordinating die from the set.  I love the notched corners and stitching on this die for extra interest.

All the leaves and branches (veining pieces) were layered up in a pleasing fashion.  Since there were so many pieces, I didn't use any Dimensionals under them.  The sentiment was placed over these pieces with Dimensionals on the ends to keep it flat.  

This whole layer was attached to the folded Copper Clay card base using Dimensionals.  The Neutrals Adhesive-backed Sequins were added to the card for a little extra bling.  I've been using these sequins on so many cards lately.  They are such a nice addition, especially because they're so flat and don't cause problems when mailing your cards.

The final touch was the double bow of Linen Thread that matches the Wavy Trim.  The bow is attached with a Mini Glue Dot.

I just had to share another photo of this pretty Thanksgiving card.  This photo shows the lovely tone-on-tone look of the Tartan Foil Paper off perfectly.  It truly is very pretty in real life.  You know these photos never do the specialty papers justice!

Don't forget Stampin'Up! has the Annual Sale going on right now.  Trims and ribbons, papers and envelopes, and all sorts of inks and pads are on sale November 14 - 16.  All of the sale items are from the Annual Catalog.  Plus, there are many clearance items to choose from too.  Time to stock up on cardstock and envelopes for sure!

Thanks for shopping with me when you can.  I always appreciate it.  Please use the Host Code at the top of this blog when your order is less than $150.  If it's $150 or more, you receive host rewards instead.  Thank you so much!

Happy stamping and creating,
Sharon

Friday, October 27, 2023

Wild Wheat Autumn Card

Hello there!  Hope you are all doing well on this gorgeous day!  I'm really getting into fall mode here.  Made my first pumpkin pie of the season.  So yummy!  It got me focused on fall themes again, so here we are with another Autum Leaves card.  This time I thought I'd try using Wild Wheat as the base of the card and pair it with the All About Autumn DSP.  Love it!  Wild Wheat is not one of the colors listed to coordinate with this paper, but for this print, I really like the looks.  Hope you do too.

Wow, in the picture it looks like Old Olive for sure.  But take my word for it, it really is Wild Wheat.  It seems to make everything look a little brighter and warmer than Old Olive, and I love how this turned out.  Let's get to the specifics!

Card base is Wild Wheat that measures 8 1/2" x 5 1/2".  It's scored and folded in half.  Next there is a 5 1/4" x 4" layer of Wild Wheat cardstock.  This is die-cut with the large maple leaf and one of the small ones too.  (Keep these for later use.)  I made sure I had room at the bottom for adding my sentiment later.  After die-cutting this layer, it was embossed with the Distressed Tile 3D Embossing Folder found in the Mini Catalog on page 75.  I love the tiled look, but the uneven distressed look really adds so much to the overall look.  After embossing, a Blending Brush and Wild Wheat ink was used on the edges to darken a bit and make the detail really stand out.

The next step was to add the layer of All About Autumm DSP behind the leaves.  For this I chose the print looking down on the colorful forest of trees.  The DSP was trimmed to about 3 3/4" x 4 1/4".  There was no point in covering the whole back of the layer when only a portion of it would actually show.  (Now I've got more to use on another project!)  I thought of attaching it to the card base and the Wild Wheat layer added with Dimensionals above, but changed my mind and attached it to the back of the embossed and die-cut layer.  This way it showed up better than having the shadows darkening it.

The veining for the large leaf was cut from the Oxidized Copper Specialty DSP.  I love the mottled look of this so the veining doesn't smack you in the face.  Used here, it's more subtle than a solid gold or copper paper.

A small maple leaf was die-cut from Cajun Craze cardstock.  This was added slightly off-set over the small maple leaf on the card front using just one Dimensional.  I didn't want to totally cover the DSP, but I also didn't want it to be just the DSP showing like the large one.  So this was a good compromise.  There was also a 4" x 1" strip of Cajun Craze cut for the card.  I had a piece of the DSP left over from another project that measures 3 3/4" x 3/4".  Figured this would make a nice band across the bottom of the card.  I planned on adding the sentiment over this, but you can see I changed my mind on that idea.  This strip was attached to the card front with "green glue" right near the bottom edge.  At this point, the Wild Wheat layer was attached to the card front with Dimensionals.

The inside of the card has a layer of Very Vanilla cardstock that measures 5 1/4" x 4".  This is left plain, but a little Blending Brush and Wild Wheat ink could be added here.  It was attached inside the card with adhesive.  There were two leftover leaves from die-cutting the front layer.  These had a little Wild Wheat ink added to them with a Blending Brush.  The sentiment from the Autumn Leaves sets was added across the large leaf stamped with Cajun Craze ink.  Both the leaves were attached flat to the inner layer.
The sentiment for the card front was inked with a Cajun Craze marker to get just a part of the sentiment.  It's stamped onto a scrap of Very Vanilla cardstock.  I used my Paper Snips to fussy cut around the sentiment.  It's added to the card front with Mini Dimensionals.

To finish the front of the card, the copper ribbon from the Copper & Natural Ribbon Combo Pack was tied into a smallish bow.  It's then attached to the card front with Mini Glue Dots.  

For the bling, three copper sequins were added.  They're from the Neutrals Adhesive-backed Sequins found on page 141 of the Annual Catalog.  These copper sequins have been a must-have embellishment for my autumn cards!

That's it for today.  I keep sneaking in more fall cards and I've been putting off really diving into my Christmas cards.  Since this is basically the end of October (yikes!!), I really need to get motivated on that!  I promise I'll get creating on them very soon!  Come back and see what's happening here and keep me focused on those Christmas cards!

Thanks for stopping in today.  Feel free to leave a comment.  You know I love hearing from you.  If you're placing an order soon, I'd appreciate if you'd consider ordering from me.  And if you do, please use the Host Code at the top of this post.  Thank you so much for your patronage!

Happy stamping and creating,
Sharon

Tuesday, October 24, 2023

Autumn Leaves Twofer

Hello friend!  I've been lured back to play with the Autumn Leaves Bundle again.  I can't seem to get enough of this fabulous bunch of products.  I love the shape and size of the leaves, the sentiments are great, and the DSP is just indescribably gorgeous!  Yes, do you get the feeling that I like this a bit?  The card I made for today started out one color, then I thought maybe it would look better in another color.  So, it turns out that you get to see both.  I'm still fond of both for differing reasons.  Let me know which one you prefer.

For this card, Old Olive cardstock was used for the card base and a layer.  This layer measures 5" x 3 7/8" and is embossed with the Exposed Brick Embossing Folder.  After embossing, I used a Blending Brush and a little Old Olive ink to darker the outer edges lightly.

Next a layer of Very Vanilla layer that measures 5 1/8" x 4" was cut.  This piece also has color added on the edges except this time I used Crumb Cake ink.  After adding the color, the Old Olive layer was attached with "green glue".  Then a 6" length of natural ribbon from the Copper & Natural Ribbon combo was wrapped around and attached to the back.  I thought the natural ribbon was a nice organic touch to this fall card.  Both layers were attached to the folded Old Olive card base using "green glue" also.

A Very Vanilla cardstock piece was die-cut using the smaller tag die in the Autumn Leaves die set.  The edges were darkened slightly with Crumb Cake and the Blending Brush.  Then the sentiment from the Autumn Leaves set was stamped in Old Olive ink.

I've got lots of smallish pieces of the lovely All About Autumn DSP pack.  It was so quick to die-cut the different sizes of leaves from these scraps and also from some Oxidized Copper Specialty Paper.  The veining on the larger leaves was die-cut from the same Oxidized Copper paper.  It was fun playing with all the different leaves to get a layout I liked.  Some leaves are attached flat with adhesive, and some leaves were popped up with Dimensionals.  The sentiment was added over the ribbon with Dimensionals.  

Even though the card already had a ribbon trim, I liked the look of a double Linen Thread bow that was added to the sentiment area.  It's attached with a Mini Glue Dot that's rolled to make it small enough to fit under the knot.  

For bling, I used the Adhesive-backed Speckled Dots in the Copper Clay color.  They seemed to show up nicely and didn't clash with the other bits of copper and gold already on the card.  Very subtle, but still noticeable.

Here is the Pretty Peacock version of the card.  As you can see, I followed the card layout pretty carefully.  There are a few minor changes.

First, the embossing folder used on this card is the Leaf Fall design.  The embossed leaves flow at a diagonal across the card. I thought it went nicely with the gorgeous leaves on the card.

The Very Vanilla layer and label both have a little Crumb Cake added with the Blending Brushes to the edges.  The embossed Peacock layer has a little Pretty Peacock ink blended onto the edges to darken it.

The leaf dies I chose to use are the same on both cards, but the All About Autumn DSP prints were different.  I used Old Olive and Copper Clay on this card and Pretty Peacock and Copper Clay on the other one.  I think all of these colors and prints are simply beautiful and any of them would work with this card design.  

This card also used the Copper Clay Adhesive-backed Speckled Dots.  I think they really stand out beautifully in contrast against the Pretty Peacock background.

FYI - in case you've been waiting for the All About Autumn DSP and the Copper & Natural Ribbon Combo should be coming back in stock at the end of October.  Be patient please!

So that's it for your two versions of this Autumn Leaves fall card design.  Thank you for stopping by to see what's been happening around here.  These cards just bring the scenic beauty I love inside and gives me an opportunity to share it with you.  

Happy stamping and creating,
Sharon

Wednesday, October 4, 2023

More All About Autumn

Hello there.  I've been playing around with the All About Autumn Designer Series Paper again.  I find the prints so interesting that I keep wanting to go back and create with it some more.  And when you add in the Oxidized Copper Specialty Paper - wow!  Let me show you what I made this time.

I wanted lots of rich color along with the metallic look, and this is what resulted.  Aren't the colors fabulous?  They're even more glorious in person.  The card is sitting on my table now and the copper accents are just glowing because of the light shining on it.  Just beautiful!

The card starts with Very Vanilla cardstock that measures 8 1/2" x 5 1/2" that's scored at 4 1/4" and folded in half.  Another piece of Very Vanilla was cut that measures 5 1/4" x 4".  This layer is embossed with the Exposed Brick Embossing Folder to give it a nice rustic texture.  It is attached to the card base using "green glue".   Set this aside for now and let's make these lovely leaves.

Every one of the All About Autumn DSP sheets have a coppery design on the back of them.  The copper is overlaid onto some lovely rich colors like the Copper Clay and Old Olive that I used here.  The Autumn Leaves bundle has a large maple leaf that was used to die-cut one leaf from each color.  The teal-toned leaf is from the Oxidized Copper DSP.  Isn't it gorgeous?  

The die set also has veining for the different leaf sizes in the bundle.  These three leaf veins were die-cut from the other color of paper in the Oxidized Copper DSP pack.  This print is a little more subtle so when die-cut it only leaves a tracery of copper throughout the veins.  The veins are attached to the leaves with adhesive.

The sentiment comes from the Cottage Wreaths set.  I wasn't sure exactly where it would end up on the card, so it's stamped onto a strip of Very Vanilla cardstock that could be placed anywhere.   Pretty Peacock ink was used to stamp it.  The sentiment is just trimmed up to a rectangle shape at this time.

Next, I spent a little time playing around with the placement of the leaves.  I wanted them connected but not overlapped so much you really couldn't see the lovely print.  Plus, there had to be room for the sentiment too.  In the end, each of the leaves are attached with a combination of adhesive and Dimensionals.  The top of each leaf has a couple of Dimensionals underneath to give it depth, but the stem end of each leaf is attached flat to the card front with adhesive.  The sentiment is attached with Mini Dimensionals.

With all the gorgeous look of the leaves, I had to be careful not to overdo the bling on this card.  It shouldn't overpower the fabulous look of the leaves.  Right?  The Brushed Metallic Dots in the copper tone were the perfect addition to the card.  Not too glitzy, but an extra bit of the coppery shine.

Here's just one more quick look of this gorgeous card.  I'm so happy with how it turned out.  It was just what I wanted to create.  Hope you like this card.  It's a simple straightforward card with not a bunch of layers, but I think it's quite elegant and I love it!!

Thanks for stopping by today and sharing a few minutes with me.  I'm so happy I get to share my ideas with you.  Hope you try out this Oxidized Copper DSP.  It really makes this card.  If you have any questions about this card, I'd be happy to answer them.  If you make something similar, let me know how it turns out.  I love to hear from you.

Happy creating and stamping,
Sharon


Friday, September 22, 2023

All About Autumn Simple Card

 Good morning on this beautiful, sunshiny, fall morning!  Oh my goodness.  The weather has been so wonderful I hate to stay inside!  The squirrels around here have been very busy collecting the tiny acorns falling from our trees.  It's been so much fun watching their antics.  They are definitely great entertainment while drinking my coffee this morning!  I had planned on posting another Stars At Night card, but I've been overwhelmed with good feelings about autumn because it's been so gorgeous around here.  So I changed my mind at the very last minute to post these cards instead.  I made them a couple of weeks ago, but since the products were on backorder decided not to post them just yet.  You need to keep checking the site for availability.  I guess all of you liked this collection as much as I did, because it's been backordered for a while.  Let's get to the cards.

I said cards, because I took one sheet of the 6" x 6" DSP and made three cards with a 2" strip left over to make another card.  Isn't this paper design just gorgeous?  I've taken my grandsons to several different pumpkin patches through the years, and this brings back those special memories perfectly.  You know what I mean.  The sunshine and blue skies, the cooler air, the piles of all sizes and shapes and colors of pumpkins.  I always gravitated towards the odd colors and shapes myself.  The boys always thought I was kind of weird in that respect, but they would happily help me find the oddest pumpkins around!  It got to be a contest of who could find the weirdest pumpkins for me!  Ahh, those wonderful memories.  But I digress here.  Let's get back to making our own pumpkin patch.

I started with a card base of what else?  Pumpkin Pie cardstock, of course.  It measures 8 1/2" x 5 1/2" and is scored and folded at 4 1/4".

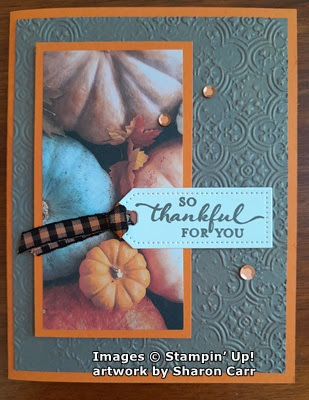
The layer here is Pebbled Path cardstock.  It is cut to 5 1/4" x 4".  It's run through the embossing machine with the new Distressed Tile 3D Embossing Folder.  Doesn't it have wonderful texture?  It's attached to the Pumpkin Pie card base with "green glue".  I have to mention here, the lighting around here is making the Pebbled Path cardstock look much grayer than it is.  The color is really more of a brown than gray to me.  Anyway, it's a beautiful color and perfect for this card.

Next, the pumpkin print from the All About Autumn DSP is cut.  There is a 2" strip cut from the bottom.  Then the remaining DSP is cut into 2" strips also.   This gives you three strips of 2" x 4" and one strip of 2" x 6" for later.  To frame the DSP, I cut a piece of Pumpkin Pie to measure 2 1/4" x 4 1/4".  These are attached together with adhesive then attached to the left side of the card front using Dimensionals.

The sentiment tag was die-cut from Basic White cardstock using the smallest Tailored Tag die.  The wording comes from the new So Sincere stamp set found on page 47 in the Mini Catalog.  Each of the sentiments in this set have different fonts and they cover most of your stamping needs.  The sentiment here is stamped with Pebbled Path ink.

The ribbon is the Black & Very Vanilla ribbon in the Mini Catalog.  I didn't like the vanilla color, but I did like the plaid.  So I used the Pumpkin Pie Dark Blends to color it to match.  About 4" of ribbon was used on each card.  The labels are attached with adhesive on the left side and Dimensionals on the right side to keep it flat.

The inside of the card has a layer of Basic White cardstock.  Two of the Autumn Leaves were stamped in the bottom corner.  Pumpkin Pie ink was used after off-stamping it to get a softer color.  The veins were stamped in with Pebbled Path ink.   I have not decided on a sentiment for inside this card yet.  But when I do, it'll be stamped with Pebbled Path ink to match.

The final touch on the card front were the sequins.  The Neutrals Adhesive-backed Sequins from the main catalog were used.  I chose the orangey-copper color to use here.  I love how they work with the Pumpkin Pie color used on the card.  They have a subtle shine that seemed to enhance the fall colors used here.

Thank you for joining me on this trip to the pumpkin patch.  I hope you enjoyed yourself and consider giving this card a try.  It's very straightforward and almost sleek in design, but the colors and pumpkins give it the warmth of the fall season.  Kick back with a delicious cup of cider and start creating your own pumpkin patch.  Have fun!

Happy stamping and creating,
Sharon

Tuesday, September 12, 2023

All About Autumn in Moody Mauve

Hey there!  I don't know about you, but I am so ready for the weather to cool off a little.  I'd still like some sunny days mind you, but the heat has really been intense this summer and I've had enough.  So let's get on with the lovely, crisp fall weather here!  Trying to make my own fall weather, I've been making more fall cards with the All About Autumn 6" x 6" Designer Series Paper.  It also uses the Autumn Leaves Bundle for all the leaves decorating this focal point.  The Designer Paper is finally back in stock so make sure you order it soon in case it ends up on back-order again.  I've been holding off on posting a couple cards waiting for it to come back in stock, so let's get started with a super gorgeous fall card using Moody Mauve for the main color.  Yes, I know.  That isn't the color I think of for fall, but check this out and you might just change your mind!

Isn't this beautiful?  I just love it!!!  The mix of beiges, mauves, and grays is just fabulous!

Start with the card base of Moody Mauve that measures 11" x 4 1/4" and is scored at 5 1/2".  This makes the card a side fold which is a little different than usual. The middle layer for this card is Crumb Cake.  This measures 5 1/4" x 4".  It brings more definition between the DSP and the card base.  The DSP layer with all these gorgeous fall leaves measures 5" x 3 3/4" and is attached directly to the Crumb Cake with adhesive.  These layers are attached to the folded card base using Dimensionals.

Before I got started on the focal area, a 3" piece of natural ribbon from the Copper & Natural Ribbon Duo was added to the card front with adhesive.  Before attaching, a thread was pulled out from each end until there was about 1/2" fringe.

Now that the base is out of the way, on to the many parts of the focal point.  The sentiment is from the Autumn Leaves stamp set.  It's stamped with Moody Mauve ink onto a piece of Very Vanilla cardstock.  It's punched out with the 1 3/4" Scallop Circle Punch.  The layer behind it is Moody Mauve punched with the 2" Circle Punch.  They are attached using adhesive.

The leaves are a mixture of stamped and die-cut leaves from the set.  I stamped some with Moody Mauve both full strength and stamped off.  These were die-cut using the coordinating die from the set.  There are a couple leaves die-cut from the All About Autumn DSP - mauve with the copper design on them.  The small maple leaves and the larger oak(?) leaves are cut from the Oxidized Copper Specialty Paper.  (So gorgeous!!!)  The Crumb Cake branches are trees from the Horse & Sleigh Dies.  The small open-work stems are from the Darling Details Bundle and cut from Gold Shimmer Paper.  The leaves and branches were all built up and attached to the back of the sentiment layers.  After all the pieces were attached, the sentiment was attached over the ribbon using Dimenisonals.  At this time, the three little open-work stems in the gold shimmer were tucked in underneath the focal point and attached with adhesive.

The inside of the card is Very Vanilla to match the front.  I haven't decided on a sentiment in here yet.  Or I just might write a longer note instead.  We'll see...

The two oak(?) leaves attached in the corner were both die-cut from the same piece of DSP that had been used for the card front.  I added them so you can see both sides because I couldn't decide which way I wanted them to show.  Both of the designs together work out nicely and I like the mix.

Going back to the front of the card, I realized it could use a little more bling.  I guess the gorgeous Oxidized Copper leaves just weren't enough for me.  After trying all my different embellishments, I chose to use the Adhesive-backed Sparkle Gems in the Champagne (gold/copper) tone.  They seem to add enough extra sparkle without being too outrageous.  Yes, I like my glitz, but there is a limit as far as I'm concerned.  Yes, to each person his own tastes are the best.

Thanks so much for stopping in today to see what I have to share with you.  Feel free to leave a comment if you'd like.  It's always good to hear what you're thinking about my ideas.  I did mention that the All About Autumn Designer Series is back in stock.  I know several of you have been waiting patiently, so get it while it's available.  While shopping, check out the Online Exclusives, kits, and Clearance Rack that are available for you.  


And don't forget to look at the October Paper Pumpkin kit that you can pre-order until October 10th.  It looks like it's going to be adorable.  Create sparkling cards filled with warmth and light using the Home for the Holidays Paper Pumpkin Kit! 
Each kit comes with eight cards, four each of two designs, with festive coordinating envelopes. The shimmery details and traditional Christmas colors are sure to help you create cards that bring cheer and joy to any recipient. 
The kit this month also features special glitter glue! What a great way to add some extra twinkly details to your cards. And the best part? Your October Paper Pumpkin Kit will arrive in a beautiful box that coordinates with the theme and design of the cards in this kit. What a great way to bring inspiration to your crafting experience!  Subscribe by 10 October to get this cozy, Christmas village-themed kit!  Remember you can subscribe for just the one month or keep your subscription going until you're ready to take a break.   It's all about the ease of getting a crafting kit each month sent right to your door.  Ask me about information if you're interested.

Happy stamping and creating,
Sharon

Saturday, August 26, 2023

Let's Cool Down With An Autumn Card

Hey there!  Are you as hot as I am?  Whew!   I am so not used to such hot weather.  The heat index was over 100 degrees yesterday and I really didn't want to go out of the house.  What did we do before air conditioning?  Since it's been so hot, I thought it was time to work on more autumn cards to cool off.  The All About Autumn 6" x 6" Designer Paper is just gorgeous and has been begging me to play around with it a little more.  So that's what I did yesterday.

The layout on this style of card is super simple, but it gives just enough of a different fold to make it interesting.  For this style of fold, the Designer Paper really does all the work.  And come on, I know you've got lots of DSP just sitting there waiting on you to come and create.

For this card, I started with a base of Crushed Curry cardstock measuring 8 1/2" x 5 1/2" that is scored in half at 4 1/4".  Then a 1" strip is cut from the front flap of the card.  Easy so far, right?  The All About Autumn DSP is cut at 3" x 6", which is then trimmed down to 5 1/4".  I'm saving those 3/4" x 3" pieces for something down the road.  No idea what yet, but I'll be ready when I figure it out.  The layer of DSP is attached to the card front with adhesive carefully lining up the edges.

While we're cutting DSP, I chose another print that will be a nice accent when the card is closed.  This one is Copper Clay with a copper foil design on it.  Gorgeous, isn't it?  This is trimmed at 3/4" x 5 1/4".  It's attached to the outer edge making sure it lines up with the front layer.

The inside of the card has a piece of Very Vanilla cardstock that measures 3" x 5 1/4" just the same as the front so it's totally hidden when the card is closed.  A piece of Very Vanilla was die-cut with the Autumn Leaves Dies.  I like the notched corners of this die-cut.  Just an added little detail.  The sentiment from the Autumn Leaves set was stamped on this using Copper Clay ink.  The inside sentiment comes from the Cheerful Daisies set.  Love the wording and it fits so well the person I'm making this card for.  It's also stamped with Copper Clay ink.  That's it for the stamping portion.  Quick and simple, right?

The sentiment label is attached to the card front with Dimensionals.  Please make sure you keep the Dimensionals only under the front flap area.  The right edge hangs free.

After trying several different embellishments, the Copper & Natural Ribbon Combo Pack was used.  The copper ribbon really enhances the copper foil trim on that little strip we added.  The Neutral Adhesive-Backed Sequins in the copper tone were the perfect little bit of bling to finish.  

There, isn't that just the easiest card to make?  I liked it so much, I tried it again with a different print.  Have a look...

Now which do you like better?  The Crushed Curry with the maple leaves, or the Copper Clay with the forest path?  I must admit, I can't make up my mind.  The Copper Clay card uses the very same strip of copper foiled DSP as the first and it compliments this look perfectly.  But because of the darker cardstock and DSP used, the look is changed quite dramatically.   The same Copper Adhesive-Backed Sequins were used here and still work nicely too.

I cannot make up my mind on which I like better.  I love the nice clean look of the design.  I'm really not one to add multiple layers and lots of doodads.  This is the kind of card I prefer.  They both just make me happy to look at them.  Hope they will make some "someone else" happy too.

Thought you might want another look at the Copper Clay version of the card.  Nice, huh?  I just love the photography that was used for this designer Paper set.  So detailed and simply gorgeous!  Makes me long for autumn to get here soon.

Just a reminder that there are only a few days left to redeem your Bonus Coupons.  Don't forget them!  And... The September - December Mini Catalog is ready for ordering on September 6th!  I hope you're as excited as I am.  I've been enjoying using these new stamps, dies, and Designer Paper so far.  I'll be needing to get a few (ha ha) more stamps to create my Christmas and other assorted cards.  Oh boy!  

Thanks for stopping by today.  Hope these cards have given you a chance to cool down.  Unless they got you "fired up" to get creating too.  

Happy stamping and creating!
Sharon

Friday, August 18, 2023

Autumn Leaves Again

Hello friends.  Glad to have you back for another look at the new Autumn Leaves stamp and die set in the new Mini Catalog.  If you know me at all, you know I love fall leaves with their many rich, bright colors.  Today's card uses colors that are more muted than I usually use for fall.  I love how these have turned out though and hope you like them too.  The last post really focused on the All About Autumn Designer Paper and the Distressed Gold Specialty paper.  This time the card is focused on the basics - just stamps and ink.  It's a much more subtle card and I love it!

The card starts with Copper Clay for the base.  It measures 8 1/2" x 5 1/2", is scored and folded in half.  This is a perfect color for fall.

Next is a layer of Old Olive cardstock.  It measures 5" x 3 3/4" so there is more of the Copper Clay that shows on the card.  This piece is embossed with the new Distressed Tile 3D Embossing Folder.  The texture is so interesting when it's not a complete image, kind of sketchy.  To make this distressed embossing show up even more, I tried something a little different.  I have the new Metallic Enamel Basics. I chose the copper to use here.  A small dime-size puddle of the copper was squeezed onto a piece of foil and used my fingertip to lightly brush over some of the raised areas.  This gives a nice metallic sheen to some of the areas.  Remember to keep it light so it stays just on the raised areas.  I set this aside to make sure it was dry before putting on my card.  TIP:  In case you're wondering, you could put this on one of your clear blocks, but you need to clean it immediately and thoroughly, so you don't have to scrape off residue.  That's why I now use a bit of foil so I can just throw it away when finished and don't have the clean-up hassle.

The next step was to stamp the three maple leaves.  Copper Clay, Old Olive, and Crumb Cake are the ink colors I used.  One of each color was stamped onto Very Vanilla cardstock.  They were die-cut using the coordinating dies.  After die-cutting, the "thankful" sentiment from the Autumn Leaves set was stamped across the Crumb Cake leaf using Copper Clay ink.  It fit perfectly.  It was time to put the card together.

First a 6 1/2" piece of natural ribbon from the Copper & Natural Ribbon Combo was wrapped around the middle of the embossed layer.  It's attached to the back of the layer with Tear & Tape to really hold it in place.  Dimensionals were added to the layer and then it was attached to the front of the Copper Clay card.  The three leaves were all attached to the card with Dimensionals.  As you can see, sections of the leaves were curled with a bone folder before attaching.  This adds so much more interest and texture to the card.

At this point, I decided to add the "for you" to the card.  I found it in the Textured Floral set.  It's part of a larger stamp, so a Copper Clay marker was used only on the words I wanted.  It was stamped on a skinny strip of Very Vanilla cardstock.  It was still trimmed a little more with Paper Snips to fit nicely.  It has Mini Dimensionals under it and it was tucked in under the leaf.

Wanting to stay with the more subtle coloring of the card, I didn't go with gold or copper accents.  The new Speckled Dots in Copper Clay were added instead.  I love the subtle interest they add to the design.

There you have it.  The 2nd installment using the Autumn Leaves Bundle.  Now that Designer Paper is calling me to come back and play with it.  So off I go to the stamp room to see what else I can create with this lovely collection of stamps, dies, papers, ribbons, and other embellishments.  Yes, I know, I've got to get going on all those Christmas ideas that are rolling around in that brain of mine.   And I've got cards to finish and get in the mail.  Whew, the stamping never ends!  😂  Thanks for stopping by today.  Won't you leave me a comment, so I know you've been here?  It's always lovely to hear from you all.  Or is that y'all?

Happy stamping and creating,
Sharon

Monday, August 14, 2023

Autumn Leaves Sneak Peek

Hello my friends.  What a beautiful day it is today.  Sunny and hot.  Just a beautiful summer day!  Then why am I making a post that's labeled Autumn Leaves?  Just because it's warm and full of sunshine today, does not mean it'll be that way in another month or two.  I have to admit that autumn is my favorite season ever.  All the other seasons have their great qualities and there's many of them.  But carving pumpkins, picking apples and drinking hot cider, cooler weather, and wearing cozy sweaters - how can I resist?  Yes, it's my favorite season, so I'm always looking for new stamps and dsp papers to celebrate this wonderful time of the year.  If you like this season too, you're going to love the possibilities in the new Mini Catalog.  Plus, the catalog has fun holiday products - Halloween, Thanksgiving and Christmas!  It's got it all and you'll love it!  But of course, the first item I ordered from the new mini catalog absolutely had to be fall related.

Isn't this cool?  Love these new leaf stamps and dies and the new DSP is awesome!  I just had to play with them right away.  This is my first project using the new Autumn Leaves Bundle with the new All About Autumn Designer Series Paper.  And that embossing folder used is new too!  Love this so much!  So, let's get down to making this card.

The card base is Copper Clay measuring 8 1/2" x 5 1/2", scored and folded in half.  The layer of Boho Blue cardstock measures 5 1/4" x 3".  This color was chosen because the DSP print used for the leaves has bits of this blue on it even though it's not listed as a coordinating color.  Doing my own thing here.  Before attaching this to the card base, the new Distressed Tile 3D Embossing Folder was used to give it that wonderful texture.  I added little bits of Crumb Cake ink just to some of the detail by touching the tip of my finger to the pad and lightly rubbing over the detail.  Yes, that does give me dirty fingers, but it was more of the antique look I wanted.  Then it's attached to the base over to the left side using "green glue".

I really planned to only use current products on this card, but it just didn't work out that way.  The retired Rectangle Stitched Dies were used to cut a Distressed Gold DSP piece.  This was the perfect size needed.  It was attached to the card front using "green glue".  Then on to those fabulous leaves.  The Autumn Leaves DSP print I chose has a look of stacked books.  I loved the combo of dark colors with mottled images and a slight striping.  This was an interesting look for die-cutting my leaves.

One of the large maple leaves was cut from this paper along with two of the small maple leaves.  The small leaves have texture cut into them from the die, but not the large one.  For this one, the veining was cut from Early Espresso cardstock with a piece of Adhesive Sheets stuck to the back side.   This made it easy to attach to the large leaf.

The sentiment and coordinating die are both from the Autumn Leaves set.  Very Vanilla cardstock was used for the label.  The sentiment was stamped with Copper Clay ink to the center of this.  The sentiment and leaves were all attached to the card front using Dimensionals.  I did a little curling up of the edges of the leaves for more interest.  The back of the leaves has a copper print on vanilla background, so any of it that showed was a nice accent for the card.

The inside of the card is Very Vanilla cut at 5 1/4" x 4".  A 1/2" strip on the same DSP print was cut and attached near the left edge with adhesive to bring the design inside the card.  I had thought of stamping leaves, but I wanted something simpler.

The sentiment is from the same Autumn Leaves set.  It's stamped with Copper Clay ink.  That is actually two sentiments together.  There are three different choices for that bottom part of the sentiment to fit what you might need.

A final look at the card.  For the bling, I tried using the Speckled Dots that are part of this collection.  Because I went with a Boho Blue accent color, the Speckled Dots didn't really go all that well.  I'll have to save those for another project.  😉  I ended up using the Neutrals Adhesive-backed Sequins in the current catalog instead.  I really like this metallic brown color with the design and was happy with this choice.

Hope you enjoyed this first look at one of the new products in the Mini Catalog.  You should have received your copy by now.  If not, please get in touch with me.  Ordering will start on September 6th, so get those wish lists filled out.  I'm sure some of these new items will be perfect for you and you'll want to create with them soon.

Happy stamping and creating,
Sharon