Showing posts with label Changing Leaves Bundle. Show all posts

Monday, February 24, 2025

Focus on Designer Paper

 Hello and welcome.  I've been spending more time focusing on the beautiful landscape prints to create my cards.  The prints are so gorgeous, I want to walk right into them and stay there!  Silly, I know.  But the prints are so special and really need to be the main theme.  So, I have a series of cards for you today.  Two of them feature the Splendid Autumn DSP and the other three I used the retired Meandering Meadows DSP.  There's no point in hanging on to these papers just so I can look at them and enjoy them.  They need to be used and enjoyed by others too.

The first card is a symphony of daisies contrasted with lavender.  It uses one of the prints from the Splendid Autumm DSP.   I just love this card!  And it's so easy to make with the whole focus on the DSP.  I had a piece of this paper that measured 6" x 3".  The width was trimmed down to 5 1/2" to fit the card base.

Highland Heather was used for the card base.  It measures 8 1/2" x 5 1/2" when cut, then was scored and folded in half.  I needed a bit of extra color to define the DSP.  Gorgeous Grape worked great for this. The piece measures 5 1/2" x 3 1/2".
The DSP was attached to this with adhesive and then both were attached to the card base.

The sentiment comes from the set called Hugs for Love.  This set has some of the nicest sayings that I've been using quite often.  This time it's stamped with Gorgeous Grape ink onto a 5/8" wide strip of Basic White.  After stamping the edges are trimmed close and attached with Dimensionals.  There are three of the darkest Purple Adhesive-backed Sequins that are a Sale-a-bration item. 

Like I said, easy peasy.
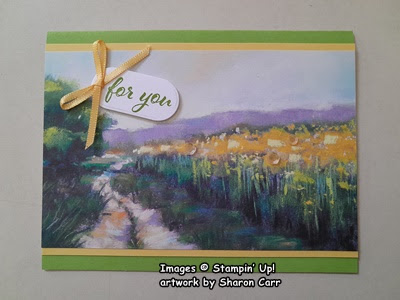
This card is very similar but uses a print from the Meandering Meadow DSP.  The card base is Granny Apple Green the accent color is Daffodil Delight to pick up the colors of the print.  The measurements of the DSP are 5 1/2" x 3 1/2".

I don't remember which stamp set the sentiment comes from - sorry.  Anything like that would do.  It's stamped with Granny Apple Green ink.  A small bow is made from the Daffodil Delight 1/8" ribbon found in the January-April Mini Catalog.  It's attached with a Mini Glue Dot to hold in place.  There are several yellow sequins scattered among the flowers for an accent.

Next up is another print from the Meandering Meadow pack.  Isn't it lovely and tranquil?  The card base for this one is Bubble Bath cardstock.  A quarter sheet of Melon Mambo was used to die-cut the scalloped frame around the print.  For this I used the retired Scalloped Contours Dies set.  I liked the look of the lacy frame behind this scene.  The DSP was trimmed to fit just inside this frame.

The sentiment is from Changing Leaves set and is stamped on Basic White with Melon Mambo ink.  The die for this is also in the Changing Leaves set.  This was attached to the card front with Dimensionals.  Three pink sequins are snuggled in among the flowers to add a little bling.

This design is another from the Meandering Meadow DSP pack.  I have so few pages of these gorgeous prints left over that I'm trying to make the most of each of them.  This one has a card base of Garden Green to match the greens in the print.

The die used on this print is the Celebration Labels Die which is retired.  It's such a pretty shape and has the stitching on the edges that I like, so I bring this one out of retirement every once in a while.  For this card, I backed the DSP with a layer of Basic Beige to give the DSP a little more rigidity.

The sentiment is the same as the 2nd card, and I still don't know which set it came from yet.  I know as soon as this is posted, I'll run across it and be frustrated with myself.  That's what I get for not writing everything down as I'm creating.  BTW, it's stamped with Garden Green ink onto a Lemon Lime Twist cardstock piece.  There is also a Daffodil Delight bow made from ribbon in the current Mini Catalog.  And there are three retired yellow/green sequins scattered in the flowers.

This last card was a little more involved than the others, but I love it!  So worth the few extra steps to make it.  I used Washi Tape across the back of two Countryside Corners dies to hold them together.  Then the DSP print was die-cut.  Keep both the frame and inside piece.  Then with the dies still together, I die-cut Mossy Meadow cardstock twice to make the "frame" thicker.  The inside pieces were put aside for some other project.   Layer the three frames together with "green glue".

The Mossy Meadow cardstock for the card base was cut then scored in half.  Open it up and emboss only the front half.  I used the 3D Basics Embossing Folder with the crosshatch design.

I found that adding the "frame" to the card front first, then tucking in the center flat inside the frame worked best for me.  This way I was able to get the frame pretty well centered on the card front.  

This picture gives you a much better picture of the "frame" being thicker than the center of the design.  This was easier for me to do than adding Dimensionals around the entire "frame" to raise it up.  

After adding the "frame" and center piece, I used the edge of the die to figure the angle to cut the card to match up with the design.  The card was lightly marked with a pencil then cut to match on all four corners.

The butterfly comes from the Beautiful Butterflies Die set.  This was cut from Silver Foil paper.  It's added to the card with a Mini Glue Dot.  

The sentiment and label both come from the Beautiful Butterflies Bundle too.  It's stamped with Gorgeous Grape ink before die-cutting.  The label is attached to the front with Dimensionals.  Two Purple Fine Shimmer Gems in the lightest color were added to the sentiment with another one added to the butterfly for an accent.

The inside of the card has a Basic White layer that's been die-cut with the matching die from the front of the card.  After cutting, a 1/2" strip of the same DSP was attached along one side with the mottled purple side showing.  After attaching, the ends of the DSP were cut to match the white layer.  Then this was attached inside the card with adhesive.

Well friends, I hope there's enough inspiration here to keep you busy for a while.  I hope you try your hand at making any or all of these designs.  And don't stop with the prints I've used, there are so many gorgeous scenic prints to keep you busy for a good long while.

Just a quick reminder that Sale-a-bration ends on February 28th at midnight.  There are so many wonderful items still available to choose from that will get your imagination fired up and humming along.  Feel free to claim me as your demonstrator if you'd like.  Please use the Host Code at the top of the page when you're ordering if your order is less than $150.  Then you want to get Host Rewards for yourself

Thanks so much for stopping by today.  Hope you find time to create something beautiful today.  I've heard that creativity is good for the soul.  I know it makes me happy!

Happy stamping and creating,
Sharon

Friday, December 6, 2024

Another Fun Fold

Hey peeps!  Hope you're staying warm wherever you are.  We've been having overnight freezing the last few nights and it really hasn't warmed up a whole lot during the day.  Brrr!  Even our goldfish pond has been skimmed over with ice the last two days.  What happened to our nice, warm, Southern weather??  We certainly haven't had any around here lately.  Thought I'd freeze my fingers off getting some outside decorations up.  We're not finished yet, but we're waiting for warmer weather next week.  At least, that's what is being predicted.  Fingers crossed!  Anyway, on to the stamping reason for this post.  I found another Fun Fold that I really like and thought I'd make a bunch for different uses.  Well, it's taken me a couple of weeks to get back to working on these, but they are well worth the wait.  I have six cards made with this Fun Fold to share with you, so hang on tight.  We've got a lot of ground to cover here.  First things first - this Fun Fold came from Lisa Freeman.  She is a talented stamper that has a slightly quirky sense of humor.  When I watch her videos, I always find myself chuckling at some silly story she relates.  If you have time, look her up and enjoy yourself.

This is my favorite card of the bunch I made so we'll start with it.  The first order of business is deciding which DSP print to use.  On all of my cards, I used the DSP print that had a scene that spans across 6" to fit the card.  This card uses the Nests in Winter Designer Series Paper which measures 12" x 12".  I cut across the 12" wide paper at 5 1/4" for the height of the card.  Then it's cut in half at 6" to fit this card design.  So, from each piece of scenery print that is 6" x 6" you get one card.  Always cut 3/4" from either the top or bottom of the print, whichever looks better.

When you have your piece that measures 6" wide and 5 1/4" tall, it needs to be cut into sections - 3 1/2", 1/2", and 2".  Make sure you keep these in order.

The card base measures 8 1/2" x 5 1/2.  For this card, I used Copper Clay which matched nicely with the Nests in Winter DSP.  Scoring on the base is at 4 1/4" and 1 7/8".  After scoring, make sure the largest piece (5 1/2" x 4 1/4") is on the right side when you're working on it.

Fold the card base.  Then attach the largest piece of DSP to the front of the folded card.  Make sure you only put adhesive on the fold-back area on the front to attach the DSP so it's loose on the right side.

This picture does a good job of showing both the folds on the card base and also the placement of the 1st piece of DSP.  While the card is open (above pic) attach the little 1/2" piece of DSP just to the left of the score line.  Attach the 2" piece of DSP just to the right of the score line.  Make sure all three pieces of DSP are even on both the top and bottom of the card.

Cut a 2" x 5 1/4" piece of Basic White cardstock for the inner panel.  Stamp a sentiment on this using Copper Clay ink.  Attach inside the card lining up the edges with the other pieces.  This sentiment and the one on front are from the Comforting Thoughts stamp set.  I really like the choice of sentiments available in this set.  

The front sentiment was stamped on Basic White cardstock 1/2" tall using Copper Clay ink.  It was trimmed to 2 3/4".  It's layered onto a piece of Copper Clay that was trimmed tight to fit it.  After layering together, it was attached to the card front using Dimensionals.

A double strand of Linen Thread was tied into a small bow and trimmed.  This was added to the corner of the sentiment with a Mini Glue Dot that was rolled tiny.  

Three of the Adhesive-backed Textured dots were added as an accent.  These dots kept the look more masculine and country in my opinion.

Now on to the rest of these cards.  I'm not going to go into the dimensions for cutting and folding as they are the same as this one.  Just sharing a few highlights of each card.

This design used Melon Mambo cardstock and ink along with the Simply Zinnia DSP.  Big change in the look, isn't it?

I used the same sentiment outside of the card but chose a different sentiment for the inside.  I love these Comforting Thoughts sentiments for any health-related cards I need.  So special.

The pearls on this card are from the Adhesive-backed Pearl Trio.  The plummy-rosy tones of the pearls really blend nicely with the zinnias.

Another zinnia card but using Blackberry Bliss cardstock and ink on this one.

Sticking with the same sentiment for this card.  I've been needing so many of the get-well style of cards lately, so several of these are to replenish that stock.

The gems on this one are different.  These are the Purple Fine Shimmer Gems in the medium purple color.  Think they go nicely here accenting the purple flowers.

I also added a ribbon bow.  It was Fresh Freesia in color which didn't match.  So, I used the Blackberry Bliss Blends in the Light color to darken the ribbon color.  Make sure you let the ribbon dry for a minute or two, so you don't end up with inky fingers!  (Ask me how I know...)
 
This card uses Balmy Blue for the card base and Meandering Meadows 6" x 6" DSP.  Love the look of this wildflower meadow.  And the skies are so gorgeous!  

The sentiment is from the Changing Leaves stamp set.  It was stamped on a 1/2" tall strip of Basic White cardstock using Shaded Spruce ink and trimmed smaller when finished.  The little tag was edged with just a little of the Shaded Spruce ink on the edges.

There are several die-cut leaves tucked in behind the sentiment for interest.  

This time little golden birds from the pack of Adhesive-backed Dragonflies and Birds were used as an accent.  The print looked like it needed the birds flying around instead of gems.

The card base on this one is Moody Mauve.  This gorgeous print is from the Splendid Autumn 6" x 6" DSP.  Love this print!

The sentiment from Changing Leaves is used again.  This time stamped in Moody Mauve ink.  It has a large loopy bow of Linen Thread attached behind the sentiment to accent it.

Sneak Peek Alert!  I tried to stick with the current products, but I just had to use these darling new golden bee accents on this card.  They were the perfect size for flying around this field.  They are NOT adhesive backed, so each one was attached with a Mini Gue Dot to hold them in place.

OK, just one more and I quit!

This is another Balmy Blue card base.  I love it with this Queen Anne's Lace design which is another from the Splendid Autumn DSP pack.

The same sentiment as the last two cards was used here.  It's stamped with Mossy Meadow ink this time.  This one also has the loopy Linen Thread tucked under the tag.

And more bees!!  Can you tell I love these little bees?  Not sure if I'd love them as much if they were real and flying around my head.  But these are just right!

Whew!  I see you stuck it out with me right to the end.  I'm impressed with your determination.  As you can see, this is a wonderful Fun Fold and so easy to make.  Just by changing the color of the card base to match whichever DSP print you want to use; you now have a totally new card to share.  And I'm sure these cards will brighten someone's day!

Wow, that took me a good long while to write out and make sure I had all the products listed that were used.  Of course, you can always use something different with your creations, but I like to give you all the information you might need.  Remember, all the dimensions are listed with the first card.  The rest of the ideas are just frosting on the cake.  Or something like that anyway.  Thanks for spending time with me today.  Hope you enjoyed this new Fun Fold technique.  (At least, it's new to me!)  I'd love to hear/see what you make with this idea.  Keep in touch!

Happy stamping and creating,
Sharon

p.s. Just a note to let you all know that my "piles of stuff" as hubby calls it is now pretty much gone.  Yay!  Wonder how long it will take me until those piles are all over the place again?  😉😂

Thursday, October 31, 2024

Trusting Card with Changing Leaves Embossing

Hello friends!  Happy Friday to you.  Since it's election time this year, we went out and voted early today.  Seems weird not voting on Election Day, but things change, I guess.  I'm having trouble keeping up with all the changes happening, but I'm doing my best.  My card today reminds me of the hope I have that if (when) I trust God, He will always direct my paths.  In these uncertain times, trusting in God is my hope.  Hopefully today's card will remind you of this truth also.

This card is very simple in design, but I think the simplicity draws your attention to the sentiment which is the main point.  My friend Sue was here visiting, and we were stamping.  What a surprise!  (That was dripping with sarcasm in case you missed it.)  Anyway, the You Are Beautiful set is new, and it was just delivered a few days earlier.   Sue wanted to use this sentiment for some cards she had planned.  Since the set was out, I figured I needed to make a card too.  Here's what I came up with for my finished project.  I'd show you her card idea, but it wasn't finished yet.  I don't really know what she has planned for it, but I hope she shares the idea with me when she finishes it.

The first order of business was finding a nice sized die-cut for the sentiment.  I used the 2nd largest rectangle die in the retired So Sentimental die set.  This was cut from Basic White cardstock.  Then the sentiment was stamped on it with Pebbled Path ink.  This ink color was dark, but not as harsh as black ink would have been with the light cardstock I used.  


My card starts with a base of Soft Sea Foam cardstock that measures 8 1/2" x 5 1/2".  It is scored at 4 1/4" and folded in half.  Then a layer of the same cardstock is cut at 5 1/4" x 4".  This layer has the leafy stem in the set stamped randomly over it using Soft Sea Foam ink.  It still looked a little 'flat' to me, so it was embossed with the Changing Leaves Embossing Folder.  I love the impressive detail this adds to the layer.  It really takes it up a notch, doesn't it?  

After embossing, I used a Blending Brush with some Soft Sea Foam ink to add a little more color around the edges.

I checked through all my current ribbons and couldn't find the perfect one.  So, it was time to dig into my retired stash of ribbons and trims.  I found the Metallic Woven Trim in Parakeet Party that seems to be just a darker version of the cardstock I used.   This was wrapped around twice to give me the look I wanted.  Two smaller pieces of Tear & Tape were used on the back side to hold the trim in place.  This layer was attached to the folded card base using Tombow Multi Purpose Liquid Glue to hold the heavily embossed cardstock securely.

The sentiment was layered over the trim off-center.  A little to the right and the bottom to give it a different look.  It was attached with Dimensionals.

The little bit of bling necessitated another visit to my retired stash, but this time in the "bling box".  Oh, the treasures!  I did find something that was the perfect touch.  Several years ago, we had a trim set called Adhesive-Backed Shiny Sequins.  These were a set of four pastel colors that had an iridescent sheen to them.  I just loved these on the card!

That's my simple project for today.  Just a little embossing, die-cutting, ribbon and sequins and you've got it.  Thank you for stopping by today.  I'm so pleased with this finished project.  The embossed background really adds so much to the final card. Looks like I'll have to get this stamp set out again soon to see what else can be made.  This is getting posted much later than I planned.  We had a few trick or treaters come to the door this year and I got to meet a couple of ladies.  How nice that was.  Hope you had fun with some Halloween tricks of your own.  

Happy stamping and creating,
Sharon 

Thursday, August 15, 2024

My Changing Leaves Card Collection

Hello friends!  I've been a little fixated on using the Changing Leaves Bundle.  Guess I've been thinking about autumn and these items work so well for that.  I gave myself a challenge of only using three basic colors and seeing what I can come up with this Bundle.  I'm so pleased with the different looking cards that came from this challenge and I might try this on other stamp and die bundles.  Let's see what I made...

Here is the trio of cards I created for this challenge I gave myself.  I think they all turned out quite different even though the card layers are very similar.  It was interesting working with different styles on each of the cards.  The colors I chose to use on them all are Old Olive, Pumpkin Pie, and Peach Pie.  We'll highlight the information on each card so you can see what was done.
The first card was the idea of a stamped background.  The card base is Very Vanilla that measured 8 1/2" x 5 1/2".  There is a layer of Old Olive cardstock that measured 5 1/4" x 4".  The stamped layer is Very Vanilla that measured 5" x 3 7/8".

The largest leaf clusters were stamped with Peach Pie ink on the vanilla layer.  The next largest leaf cluster was stamped with Old Olive that I stamped off to make a light shade of green.  Lastly, Pumpkin Pie ink was used to stamp the smaller skeleton leaf randomly to fill in open areas. 

An Old Olive Marker was flicked onto this layer to even out the design a bit.  When dry, the layer was attached to the Old Olive layer by using adhesive.  

The die used is from the Everyday Details Die Set and is cut from Very Vanilla cardstock.  The sentiment is from the Everyday Greetings stamp set and is stamped with Old Olive ink.  I thought the sentiment fit perfectly in this die-cut.   It needed some color behind it to make it stand out.  The Old Olive cardstock used measures 3 7/8" x 1 1/2".  They are attached together with adhesive.

The ribbon is an old Pumpkin Pie 1/4" ribbon that was part of a combo pack that's been retired over 5 years now.  Yeah, I know I keep everything, but it was the perfect addition to help balance the colors here.  It's wrapped around the two layers and attached in the back then added to the card base with Dimensionals.  After adding the sentiment with Dimensionals, the bow was attached with a Mini Glue Dot.  At this point, I added one of the skeleton leaves die-cut from Old Olive cardstock.  It's attached with a little adhesive where it tucks under the sentiment.

The bling added here comes from the Adhesive-backed Speckle Dots.  I love these more natural colors.  Three of the olive color gems were used.

The next card I made turned out so different from the first.  I started with a base of Pumpkin Pie.  A layer of Old Olive was cut that measures 5 1/4" x 4".  Then a layer of Very Vanilla was cut that measures 5" x 3 3/4".

The Very Vanilla layer was embossed with the Exposed Brick 3D Embossing Folder.  After embossing, I used a Blending Brush and Pecan Pie ink over it all to expose the design.  Then a Pecan Pie Marker was used to spatter ink over the background.  After drying, it was attached to the Old Olive layer with adhesive and to the card base using Dimensionals.

The large leaf cluster was inked by using Sponge Daubers starting with Pumkin Pie on the tips and Old Olive ink in the center.  This was off-stamped before stamping onto Very Vanilla cardstock.  It was die-cut with the matching die.  The same leaf cluster was die-cut from Old Olive cardstock also.  These two were attached but off-set a little to let the green stand out against the background.  


Then the smaller leaf cluster was stamped onto Very Vanilla using Pumpkin Pie ink and die-cut.  One of the skeleton leaves was die-cut from Old Olive cardstock as an accent.  And a berry branch was die-cut from Pecan Pie.

The sentiment is from the Changing Leaves set.  It's stamped onto a Very Vanilla scrap using Old Olive ink.  It's die-cut with one of the dies from the same bundle.

The large leaves are attached to the card front with adhesive along with the Pumpkin Pie leaves.  The berry branch and the olive skeleton leaf are attached with some rolled up Mini Glue Dots.

Natural Tones Linen Thead (Online Exclusive) was wrapped around my finger three times and attached to the back of the label.  Then the label was attached with Dimensionals.

Three Neutrals Adhesive-backed Sequins in the brownish color are attached to the card to finish.

The last card I made I wanted to be simpler in looks.  There is a Very Vanilla card base, then a layer of Old Olive that measures 5 1/4" x 4".  Next is another layer of Very Vanilla.

I die-cut a 1/4 size piece of computer paper with the 2nd largest circle die from the Stylish Shapes dies.  Using this as a mask, I used a Blending Brush to add Peach Pie ink to the center.

With the mask still in place, I stamped the largest leaf cluster with Pumpkin Pie ink with only the leaf tips showing.  After removing the mask, the Vanilla piece was embossed with the So Swirly Embossing Folder.  This reminded me of swirls of wind on an autumn day.   This was attached to the Old Olive layer with Tombow Liquid Glue, then using Dimensionals attached both pieces to the card base.

Only the three top leaves were stamped on Very Vanilla cardstock using Old Olive ink and were die-cut with the matching die.  The sentiment is from the same stamp set.  It's stamped with Pumpkin Pie ink onto a Very Vanilla strip, then it's die-cut with the matching die.  Just a small bit of Peach Pie ink was blended around the edges to enhance it.

Both the leaves and the sentiment are attached with Dimensionals.  A small Linen Thread bow was attached to the leaf stem using Mini Glue Dots.  

The bling for this card is the same Adhesive-back Speckle Dots in the olive color that were used on the first card.

WHEW!  That's a lot of stamping and a lot of typing too!  I hope these ideas spark your creativity.  Every time you sit down to stamp - even with the same stamp over and over - you always get something new and exciting.  I just love seeing how you get different looks with the same products.  Stamping is never boring!

I hope you've had a chance to redeem your Bonus Days coupons codes.  If not, please don't forget to get that done before the end of the month.  And don't forget about my own extra 50th Wedding Anniversary promotion.  If you spend $50 with me in the month of August, I'll send you a card and a package of embellishments as a way of celebrating with you.  Thank you so much for your patronage!!

Happy stamping and creating,
Sharon 

Monday, August 12, 2024

Nature's Sweetness Meets Changing Leaves

 Hello friends!  Hope you're enjoying your day.  We had rain again last night and more coming tonight and tomorrow.  So that means we have to enjoy the sunshine we have right now!  I really should get some errands taken care of while it's not raining!  But before I go out, I want to get this card posted.  I've had the Nature's Sweetness Designer Series Paper for a while.  My sister loves it so much I thought I needed to get it.  But I haven't gotten around to using it yet.  Then the other day while going through all my current DSP, I thought it would be a good day to use it for my next creation.  I wanted to use two of the prints for my card, but beyond that I had no plan.

I liked the look of Pecan Pie cardstock combined with these two prints.  A piece of Pecan Pie measures 8 1/2" x 5 1/2" and is scored and folded in half for the card base.  Next a piece of the grid-style DSP print was cut to measure 5 1/4" x 4".  A Blending Brush was used with Pecan Pie ink to give the edges a softer look.

In my stash of elements to use later, I had a circle frame cut from Pecan Pie cardstock that would make a nice frame for an image from the DSP.  The frame was made by using two sequential dies from the Stylish Shapes die set lined up to cut the frame.  I used a small piece of washi tape to hold the two dies in place for cutting.  This gives a stitched line close to both the inner and outer circle of the frame for added interest.  Then I ran into a problem.

The inner ring of the frame was a little too small for framing up the image I wanted to use.  After trying a couple of options, I used a larger circle die that is 3 1/2" in diameter to cut around the image.  This would give me a frame of DSP around the frame of cardstock.  

The main image that I was focused on was colored with Stampin' Blends.  Pods - Crumb Cake Light and Dark, Leaves - Old Olive Light and Lemon Lime Twist Dark

This circle of DSP was also edged with a Blending Brush and Pecan Pie ink just like the grid-style DSP layer.  This really tied the images and layers together.

Then I couldn't figure out how to finish it.  After struggling with multiple options and color accents, I finally put it aside for a day or two to give my brain a chance to rethink the whole idea.

I came back two days later and had a revelation.  I'd tried several different greens to add the finishing touch, but I hadn't tried the Wild Wheat color.  It was an interesting look - not a green I had used so far, but it blended well with the Pecan Pie color and all the gold accents from the DSP.  I was on a roll again.

I cut both a single and a double skeleton leaf that are from the Changing Leaves die set from the Wild Wheat cardstock.  There is also a solid leaf cluster in the Changing Leaves set that I cut out.  For some added interest, I used a berry sprig from the same set to cut out a Gold Foil stem.  This is cut into pieces to tuck around the leaves.  At this point, the DSP layer was getting a little flimsy, so a Basic White circle was cut to go behind it.  They're attached together with adhesive.  Then the circles are attached to the left side of the card using Dimensionals.

The sentiment is from the Wonderful Thoughts stamp set.  It's stamped onto a 1/2" x 2" Basic White strip using Pecan Pie ink.  The right end was flagged with Paper Snips, then a Blending Brush with Pecan Pie ink provided contrast to the edges.  This was tucked in flat behind the edge of the circle using adhesive.

As another extra bit of gold on the card, a bow was made from the Gold and Silver Trim Combo Pack.  The leaves are arranged on the Pecan Pie frame and attached with adhesive.  The bow was added with Mini Glue Dots.

The final accent was another bit of gold bling.  The Neutrals Adhesive-backed Sequins have the perfect gold accent here.  It's sort of a matte looking gold so it's different than what has been used already, but a great contrast.  Love all those different touches of gold.

There you go, another card using the Changing Leaves Bunde that can be found in the Online Exclusive section of the Stampin' Up! store.  Make sure you visit this section often.  You can find some really gorgeous items there.   But if that's not your style, there are also many cute and whimsical items too.  Go check it out.

You don't want to miss out on my 50th Anniversary Celebration sale only for my customers.  For any $50 you spend with me, I'll send you a card you can use along with a current embellishment as a thank you.  You'll love what I pick out for you!  Please use the Host Code at the top of my blog post for your order.  Thanks!

Happy stamping and creating,
Sharon

Saturday, August 10, 2024

Rose Gold Changing Leaves

Hello my stamping friends!  Today's card features a retired metallic, the inside of a Paper Pumpkin envelope, a cool hybrid embossing folder and die set.  Sounds like a little bit of everything!  That's how I end up making so many of my cards, a little of this and a little of that until it comes together into something that pleases me.  Let me share this one with you.

This is one of the cards I've made lately using the Changing Leaves Bundle which is a current Online Exclusive.  For some reason when I looked at the set, I saw Petal Pink, Copper Clay, and rose gold metallics for a really elegant look.  I love how all these colors just blend together and make me happy.  Let's make this together.

I started with Petal Pink for the card base.  It measures 8 1/2" x 5 1/2".  It's scored at 4 1/4" and folded in half.

Next is a layer of Copper Clay cardstock.  I love how these two colors work so well together.  Both of them are favorites, so this is perfect for me.  The layer measures 5 1/4" x 4".   Set aside for now.

The next layer is the 4 3/4" x 3 1/2" piece of retired Rose Gold Metallic Paper from a few years back.  I love the warmth the rose gold color gives to the card and works perfectly with these colors.  Using either gold or silver would necessitate using different cardstock colors for the card.  This really would be pretty but wasn't what I was planning on today.  I need to try a color palette in silver, grays, and black just to see how it looks.

As you can tell, I really struggled to keep myself out of the mirror background of the metallic paper when picture taking.  But there's my hands!  Ok, I really got off-topic there.  I embossed the Rose Gold Paper with the Changing Leaves Embossing Folder, but didn't use the cutting die for this layer.  After embossing, it was attached to the Copper Clay layer using Tombow Liquid Glue to hold in place.  Then these layers were added to the folded card base using Dimensionals.

The leaves were all made next. The solid leaf is Petal Pink cardstock that was both cut and embossed with the Hybrid set.  After cutting, a small amount of Copper Clay ink was brushed over this with a Blending Brush.  This really enhanced the detail from the embossing.  The double skeleton leaf is cut from Petal Pink and the single leaf is cut from Copper Clay.  These were not enhanced with any extra color.

When arranging these leaves on the card for placement, they just got lost on the metallic paper.  Looking around for possible additional contrast on the card, I found a scrap piece from a Paper Pumpkin envelope.  Many times, the envelopes have a design inside that I cut out and use for other cards.  This is one of those pieces.  The pinkish-brown woodgrain look has some Petal Pink coloring that seemed to work well with the colors of the card I already used, so why not?  The piece is an odd shape, 3 3/4" long, about 1 1/4" at the top and about 1 5/8" at the bottom.  This was attached with Tombow Liquid Glue about 3/4" from the left edge of the rose gold piece.

The solid leaf was attached flat with adhesive first.  Next the skeleton leaves were attached with touches of the liquid glue on the center spine of the leaves.  

The sentiment also comes from the Changing Leaves stamp set.  It's stamped with Copper Clay ink onto a Basic White strip of cardstock.  It measures 5/8" wide and 3 1/4" long.  After stamping, I used a Blending Brush and Copper Clay ink to add a little color on the edges.

A 1/4" strip of Copper Clay was attached across the card front to anchor the sentiment.  Adhesive was used for this.  Then the sentiment layer was attached over this using Dimensionals.

This gives you an idea of the dilemma of what bling to use.  It seemed that anything with a metallic shine really got lost in the design.  I chose to use the Adhesive-backed Speckled Dots in a Copper Clay color.  They showed up nicely on the mirror finish and matched perfectly the colors I had used.  As you can see on the photo the bling hadn't been added yet.  The design really needed the extra color dots.

Thank you for stopping by again to see what's being created lately.  I tend to skip around the different sets I have, but I'll try to get another card or two made using the versatile Changing Leaves Bundle.  We'll see how that works out.

Don't forget about my 50th Anniversary special going on for any customers this month.  If you purchase $50 worth of merchandise from me before the end of the month, I'll send you a card and a package of embellishments that are current right now.  Please use the Host Code at the top of this blog post.  Thank you!

Happy stamping and creating,
Sharon