Showing posts with label More Than Autumn Bundle. Show all posts

Tuesday, October 8, 2024

Hot Cocoa for Autumn

Hello Friends!  It's good to be back home again.  Wonderful visit catching up with family, but it's good to be home.  On the last post I made I said I had more cards made with the More Than Autumn Bundle that I wanted to share.  So that's what I have for you today.  Don't worry, I will move on to other stamp sets, but right now I've been having fun creating with this.

Isn't this a bright and happy card?  Love the color combo used here.  Definitely cheerful!  Let's start with a Lost Lagoon cardstock base that measures 8 1/2" x 5 1/2".  It's scored and folded in half.

There is a layer of Calypso Coral next.  This measures 5 1/4" x 4".  The So Swirly Embossing Folder was used to give this layer a wonderful swirly background.  It reminds me of a beverage swirling in my cup.  After embossing, the layer is attached to the card base with "green glue".

Next is a print layer from the A Little Latte Designer Series Paper.  This plaid print reminds me of a cozy flannel shirt to stick with the theme.  It measures 5 1/4" x 2" and is attached to the card base with "green glue".  I had a bit of the Lost Lagoon ribbon from a previous catalog left over that works great here.  The ribbon is right around 5" long.  I used adhesive to attach it to the card front lining it up with one of the plaid lines to keep it straight.

The cute mug is cut from another print from the same DSP pack.  It shows a brown liquid in the cup that I was using as hot chocolate for this card.  The stamp set More Than Autumn has a stamp to make a pile of marshmallows that fit perfectly in my cup.  The marshmallows are stamped with Crumb Cake ink and then die-cut with the coordinating die from the set.  They are attached over the top of the cup and then it is attached to the card front with Dimensionals.

The words are from the More Than Autumn set.  The top words are stamped with Lost Lagoon ink on a 1/2" strip of Basic White then trimmed to fit.  It's layered onto a Lost Lagoon strip that measures 5/8" x 2".  This is attached near the top of the card using adhesive.

The 'Hot Cocoa' is stamped with Pecan Pie ink on a 3/4" x 2" strip of Basic White cardstock.  It's layered onto a Lost Lagoon piece that measures 1 1/8" x 2 3/8".  The strip is attached at a slight angle under the cup using Dimensionals.
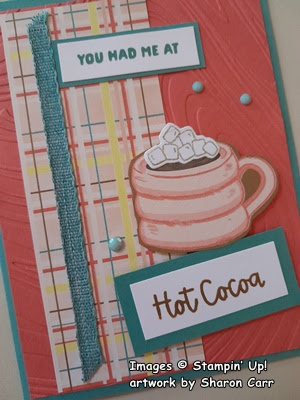
The final addition to the design was the bling of course.  I tried several.  Yes, I seem to have trouble deciding on what embellishments to add to my cards every time!  This time I chose to use the Opaque Faceted Gems in the Pool Party color.  I know there's no Pool Party on the rest of the card, but I loved the contrast here when I tried it.

Wish you were here so we could get comfy with a cup of cocoa and have a long visit.  But this is the closest we can come to that right now.  Just know that I'm thinking of you my friends and appreciate you so much!  Missing you too!

Things got away from me while I was out of town.  Stampin'Up! is having a 3-day sale October 7-9.  Unfortunately, today is already the 8th.  But you can still get 15% off all stamps in the Annual Catalog only.   If you have time, you might want to check your wish list and see if any stamps in the Annual Catalog need to be purchased by tomorrow.  Sorry for the lateness of this notice!

Thank you for sharing some time with me today.  Hope you like this cozy card and give it a try.  Any questions, leave a comment on the bottom or contact me at sharoncarr50@gmail.com.

Happy stamping and creating,
Sharon

Thursday, October 3, 2024

Back again!

Did you miss me?  This past week we've had no power and no internet because of Hurricane Helene.  The week with no power sure makes me appreciate turning on lights when it's dark, hot showers at the end of a rough day, internet access, food, and more. Power came on yesterday and we're rejoicing!  We were discussing how blessed we our with all our modern conveniences that we just take for granted.  I'm sure ready for Thanksgiving this year with a very long list of things I'm thankful for.  But we're not there yet.  It's just barely October, so I should stick to cards that are more fall themed.   The More Than Autumn Bundle that is used here is an Online Exclusive and just awesome!  If you don't have it already, I hope you check it out.  Anyway, there are cards sitting here patiently waiting to get posted.  So, let's get to it!

I was having fun playing with the More Than Autumn Bundle when I got the idea to pair it with some wonderful fall color DSP's.  This card uses both the Earthen Elegance and Nature's Sweetness Designer Series Paper packs.  I love this card in person, but it may be a little dark for you.  Personal Preference.

Start with a Copper Clay cardstock piece that measures 8 1/2" x 5 1/2".  It's scored and folded in half.  To this an interesting print layer from the Earthen Elegance DSP was added.  I love the colors and the look of the carved stylized leaves in this print.  This layer was attached to the Copper Clay base using adhesive.

Next was a layer of Pebbled Path checked print from the Nature's Sweetness DSP pack.  This was a leftover from another project that I thought was a good color blend and the right size for the card design.  This measures 3 3/4" x 2".  This is framed with a layer of Basic Beige cardstock that measures 4" x 2 1/4".  Attach these together with adhesive.  Then attach them to the center of the card front with adhesive.

Making the cup and extra pieces came next.  The cup was stamped onto Very Vanilla cardstock using Pebbled Path ink.  It was colored with Blends before die-cutting.  The cup was colored with Copper Clay Light and Dark, and Ivory.  Some of the Color Lifter was used in the highlight area on the cup.

The whipped cream was stamped with Crumb Cake ink.  Then both images were die-cut with the matching dies.  I also cut "latte" from Pebbled Path and the heart from Copper Clay.  The heart was given a heavy coating of Wink of Stella to accent it.  The word was attached to the middle band of the cup, then the heart added below it.

Both sentiments were stamped on Very Vanilla cardstock.  The top piece measures 2 1/2" x 7/8".  Both Pebbled Path and Copper Clay inks were used to stamp the sentiments from the More Than Autumn set.

A small piece of Very Vanilla was used to stamp the "yum" with Copper Clay ink.  This stamp is from the Ice Cream Swirl set and I thought it went perfectly with the card.  After stamping it was trimmed closer to fit.

The cup and whipped cream were attached to the card front with Dimensionals.  The larger sentiment was attached with adhesive above the whipped cream.  The "yum" was attached near the bottom with adhesive added on the left side and a Mini Dimensional on the right side to keep it flat.

I totally love the look of this card and hope you love it too.  There are more cards ready to share with this same set.  But I won't be sharing anything else for the next several days as we're flying out to Iowa for a family wedding.  But stay tuned and I'll be back by the middle of next week - as long as we have no more crises.  Stay well.

Happy stamping and creating,
Sharon

Wednesday, September 4, 2024

Autumn Latte Card

Hello my friends.  Do you like those autumn specialty beverages?  I love pumpkin spice lattes, chai teas, and spiced cider.  When fall rolls around, I'm ready for some wonderful, tasty beverages.  For this first card I've made using the new More Than Autumn Bundle, I went with a pumpkin spice theme.  Next one?  Who knows.  It'll probably depend on which one I'd like to be drinking at the time!  Grab your favorite autumn beverage and let's make a card.

Doesn't this just make you want to grab a pumpkin spice latte?  Yum.  For this card, I stayed with the basics of Cajun Craze and Very Vanilla with a few other colors thrown in for contrast.

Start with a piece of Cajun Craze cardstock that measures 5 1/2" x 5 1/4".  This is scored so there is a 1" flap on the left side.  

Next a piece of Very Vanilla cardstock is cut to measure 5 1/2" x 4 1/8".  This is embossed with the Distress Tile 3D Embossing Folder.  A Blending Brush and some Crumb Cake ink added a light blending of color over this layer.  The Very Vanilla layer was lined up with the backside of the card.  Adhesive was added to the inside of the card's front flap, then it was folded down to hold the Very Vanilla layer in place.

A 3/4" strip was cut from a print from the Iconic Celebrations 6" x 6" DSP.  The strip was trimmed to measure 5 1/4" to fit the card.  It's attached to the front flap with adhesive for a nice contrast of color and texture.

A piece of the Country Woods Designer Series Paper was cut to 5 1/4" x 3 1/4".  The largest rectangle die from the Everyday Details set was cut from the center of this.  The outer edge was saved for another project and the inner rectangle was used here.  A 4" x 2 1/2" piece of Cajun Craze cardstock was cut to frame this.  The two pieces were attached with adhesive.  Set aside.

A strip of 1/2" Very Vanilla was used to stamp the sentiment with Cajun Craze ink and trimmed to fit after stamping.  The sentiment is from the More Than Autumn Bundle.  A 3" x 3/4" piece of Cajun Craze was cut to frame the sentiment.  Set aside.

A 3/4" x 2 3/4" piece of Early Espresso cardstock was backed with an Adhesive Sheet.  Then it was die-cut with the "Nothing's Better Than" die from the same set.  The rectangle that was previously made was positioned on the card so it and the die-cut sentiment would fit.  The rectangle is attached with Dimensionals.  The backing from the adhesive layer was stripped from the die-cut and then the sentiment was attached above the rectangle.  Adding this adhesive layer is the easiest way to attach these word die-cuts.

A cup was stamped with Early Espresso ink onto Very Vanilla cardstock.  The pumpkin image was added by stamping with Cajun Craze ink.  The cup was colored with Blending Pens - Pool Party Light & Dark and Crumb Cake Light.  The pumpkin was colored in with a Blender Pen just moving the ink that was already there.  The whipped cream was stamped with Crumb Cake ink onto Basic White cardstock.  The Blender Pen softened the edges of the whipped cream before cutting.  Both the cup and the cream were die-cut with matching dies from the set.  Both the cup and cream were attached to the rectangle with Dimensionals.  The sentiment that was done earlier was attached diagonally to it using Dimensionals also.

After trying multiple embellishment ideas, I settled for the Adhesive-backed Swirl Dots that are an Online Exclusive.  They echoed the swirls in the cream and also in the woodgraining.  I liked the subtle coloring for this card too.

The inside of the card has a 5 1/4" x 4" layer of Very Vanilla cardstock.  The sentiment is stamped with Early Espresso ink.  The pumpkins along the bottom are the same as on the cup.  They are stamped with Cajun Craze ink and a Blender Pen is used to soften the color as on the front.  I love how you can still see the detail of the embossed layer when the card is open.

Hope you love this idea and want to try making it too.  You can use many different images to go on the rectangle if you don't have a hankerin' for some latte or cider.  Think flowers or trees for fall.  Use your imagination and have fun trying your ideas.

Just a reminder that the new 2024 September - December Mini Catalog is available for you to shop from right now!  There is an abundance of cute and interesting new products to choose.  Stampin' Up! has your stamping needs covered from now through Halloween and Christmas!  There's just the right item in there for you.  Have fun making your list and dreaming about all the wonderful items you'll be creating in the coming days!  Then go shop!  Don't forget to shop in the Online Exclusive area too.  There are new items that have just been added.  If you'd like to have me for your demonstrator, I'd be happy to help you out.  Please use the Host Code shown at the top of this blog post.  Thank you!

Happy stamping and creating,
Sharon