Showing posts with label Cottage Wreaths. Show all posts

Tuesday, December 12, 2023

Merry Tree Card

Hi there!  Today is the first "quickie" card post.  Let's see how this works...

Stamps - Merriest Trees, Cottage Wreaths
Cardstock - Cherry Cobbler, Garden Green, and Basic White
Ink - Garden Green
Extras - Merriest Trees Dies, A Walk in the Woods DSP, More Dazzle Specialty Paper, Red Glitter Paper (retired), Double Oval Punch, Adhesive Sheets, and Dimensionals

Any questions, just ask!  And let me know what you think of the format.  Is this enough info for you to duplicate if desired?


**************************************
Quick Note - There is FREE SHIPPING on December 14th only.  Plan what you need to order to take advantage of this promotion!  Please use the Host Code shown at the top of the blog page.  Thanks so much!
***************************************

Happy stamping and creating (and cookie baking!),
Sharon


Saturday, December 9, 2023

Cottage Wreath Christmas

Hey there!  I need a break!  I've been in cookie-making mode the last couple of days, and I'm exhausted.  It's time to do a sit-down-and-get-off-my-feet project.  I forgot just how crazy it is to stand all day and rush around to get cookies on and off the baking sheet and in and out of the oven.  I know you probably have no sympathy for me because I'll be enjoying all those cookies, but I'm tired!  So instead of getting back to baking this morning, I'm sitting down to write a blog post.  Sitting, aaahhh!  Today I wanted to share a card using the versatile Cottage Wreath stamp set.  It's been around since last year, and I love it.  The set is so versatile with all the little Halloween, fall, and Christmas bitty accents that are part of the set. That means you can use it over and over and still make it look new depending on what you put with it.  To me, that is a great investment in a stamp bundle that I love to use.

First of all, I love this layout with something along the left side to make the card look asymmetrical.  That is a pleasing look to me.  Secondly, I love the wreaths.  So, this card makes me doubly happy when I look at it.  If you like it too, come create along with me.  Start with a Thick Basic White cardstock base of 8 1/2" x 5 1/2", scored and folded in half. 

The first layer is Pretty Peacock cardstock that measures 5 1/4" x 4".  Then a layer of Basic White is cut to measure 5" x 3 3/4".  This piece is embossed with the Distressed Tile Embossing Folder.  Don't you love all the detail this makes?  And it shows off so nicely.   Attach the white layer onto the Pretty Peacock layer with adhesive.  

A strip of Joy of Christmas Designer Series Paper is attached near the left edge of the white paper with just a small white edge peeking around it.  This one is a rather dark print, so I added only a 1" strip to the card.  At this point, I attached these layers to the card base using Dimensionals.

The leafy wreath was stamped on Basic White cardstock using Garden Green ink.  I tried Old Olive first, and it didn't look right to me, so I made another in the Garden Green.  This is not one of the coordinating colors listed on the DSP package, but it seemed to look better to me.

After stamping, the wreath was die-cut using the coordinating die.  It was centered and then attached to the card front using Dimenisonals.

The accent bow is die-cut from the Pretty Peacock color choice from the Soft Shimmer Specialty Paper in the Annual Catalog.  This paper has such a pretty, soft shimmer in real life.  It seemed to be the perfect choice here.  It's been attached to the wreath with a Mini Glue Dot in the center.

The sentiment is from the Brightest Glow stamp set.  It is stamped with Pretty Peacock ink on a strip about 1" wide.  The sentiment is die-cut using the coordinating die from the Labels Aglow die set.  Don't you love the pretty detail on this die?

After stamping and die-cutting the sentiment, it was attached over the wreath using Dimensionals just where it layers over the wreath.

The inside of the card has a sentiment from the Brightest Glow stamp set.  It's stamped with Pretty Peacock ink.

There are two leafy branches that match the branches in the wreath stamped as an accent.  A few tiny evergreen sprigs are tucked in.  They are stamped with Pretty Peacock ink.

There is a sprinkling of retired tiny Real Red Rhinestones added to the front of the card.  I think they added just the right touch, even though they are retired.  (Why do they keep retiring some of my favorite accent pieces???)

Hope you like this simple Christmas card.  I tend to like the more clean and simple style so that's what you usually see here.  Every once in a while, I get a little crazy with the design and you get something over the top.  But basically, you get basic straight forward card ideas from me.  Hope you like this style of card too and are looking forward to more posts.

The new Mini Catalogs will be mailing out soon.  If you'd like one sent to you, please let me know, so I can do that for you.  And Sale-a-bration is coming back in January for two months.  Definitely something to look forward to.  I've seen the freebies, and there's some really cool items in there you'll want to get.  Remember to let me know if you need a catalog or anything else that I can help you with.  That's what I'm here to do - help you with your stamping questions.  Thanks for your loyalty over the years.  I appreciate you and all you do.

Happy stamping and creating,
Sharon

Wednesday, October 4, 2023

More All About Autumn

Hello there.  I've been playing around with the All About Autumn Designer Series Paper again.  I find the prints so interesting that I keep wanting to go back and create with it some more.  And when you add in the Oxidized Copper Specialty Paper - wow!  Let me show you what I made this time.

I wanted lots of rich color along with the metallic look, and this is what resulted.  Aren't the colors fabulous?  They're even more glorious in person.  The card is sitting on my table now and the copper accents are just glowing because of the light shining on it.  Just beautiful!

The card starts with Very Vanilla cardstock that measures 8 1/2" x 5 1/2" that's scored at 4 1/4" and folded in half.  Another piece of Very Vanilla was cut that measures 5 1/4" x 4".  This layer is embossed with the Exposed Brick Embossing Folder to give it a nice rustic texture.  It is attached to the card base using "green glue".   Set this aside for now and let's make these lovely leaves.

Every one of the All About Autumn DSP sheets have a coppery design on the back of them.  The copper is overlaid onto some lovely rich colors like the Copper Clay and Old Olive that I used here.  The Autumn Leaves bundle has a large maple leaf that was used to die-cut one leaf from each color.  The teal-toned leaf is from the Oxidized Copper DSP.  Isn't it gorgeous?  

The die set also has veining for the different leaf sizes in the bundle.  These three leaf veins were die-cut from the other color of paper in the Oxidized Copper DSP pack.  This print is a little more subtle so when die-cut it only leaves a tracery of copper throughout the veins.  The veins are attached to the leaves with adhesive.

The sentiment comes from the Cottage Wreaths set.  I wasn't sure exactly where it would end up on the card, so it's stamped onto a strip of Very Vanilla cardstock that could be placed anywhere.   Pretty Peacock ink was used to stamp it.  The sentiment is just trimmed up to a rectangle shape at this time.

Next, I spent a little time playing around with the placement of the leaves.  I wanted them connected but not overlapped so much you really couldn't see the lovely print.  Plus, there had to be room for the sentiment too.  In the end, each of the leaves are attached with a combination of adhesive and Dimensionals.  The top of each leaf has a couple of Dimensionals underneath to give it depth, but the stem end of each leaf is attached flat to the card front with adhesive.  The sentiment is attached with Mini Dimensionals.

With all the gorgeous look of the leaves, I had to be careful not to overdo the bling on this card.  It shouldn't overpower the fabulous look of the leaves.  Right?  The Brushed Metallic Dots in the copper tone were the perfect addition to the card.  Not too glitzy, but an extra bit of the coppery shine.

Here's just one more quick look of this gorgeous card.  I'm so happy with how it turned out.  It was just what I wanted to create.  Hope you like this card.  It's a simple straightforward card with not a bunch of layers, but I think it's quite elegant and I love it!!

Thanks for stopping by today and sharing a few minutes with me.  I'm so happy I get to share my ideas with you.  Hope you try out this Oxidized Copper DSP.  It really makes this card.  If you have any questions about this card, I'd be happy to answer them.  If you make something similar, let me know how it turns out.  I love to hear from you.

Happy creating and stamping,
Sharon


Thursday, May 4, 2023

Fracture Technique

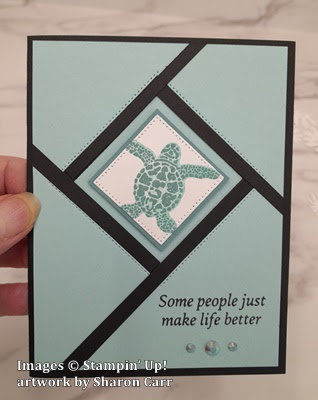
Hi there!  Hope you're doing well today.  I was browsing around on YouTube and found an absolutely cool technique on the Robins Roost channel.  I had to sit down and try to replicate it right away before I forgot how to do it.  While making the card, I might have changed up things a little bit, but it's pretty spot-on.  You might have seen this idea already, but if you haven't, hope you like it.  

This is my version of Robin's card.  Don't you just love how it looks to be cut into all these sections?  I thought it would be very hard to make, but oh my.  Once you know the tricks it's easy peasy to do.

Start out with two pieces of cardstock that are cut to measure 4" x 5 1/4".  I used Basic Black and Pool Party cardstock for these pieces.  Next I used two of the Stylish Shapes dies.  The 2nd largest square die was used to cut the Pool Party.  Line up the sides and top to be about equal and cut.


Sorry, different color cardstock here.  I forgot to take this picture to show the action.  The next step is to line up the two cardstock pieces that were cut placing the Basic Black behind the die-cut color piece.  Carefully line up the middle square die onto the Basic Black piece.  At this point I added a bit of Washi Tape to hold it in place.  Die-cut this square.  Set aside the extra black square piece.

On the back of the color piece, add adhesive.  I added Multi Purpose Liquid Glue here to give it a little wiggle room when adjusting the pieces to line up.  If you need to do any trimming of the black that might show on the front side, do it now.  If it's just a minute edge, it won't show later with the Basic Black card base behind it.

On the backside of the Basic Black piece, add a small line of Multi Purpose Glue around the die-cut square.  Attach the extra die-cut Pool Party piece to cover the square hole.


The next step is to cut the little strips of Basic Black.  The video suggested to cut Basic Black strips 1/4" wide.  For me, I thought it was a little too wide for my taste, so I cut mine at 3/16".  The piece of Basic Black I was using to cut these from was about 5" long.  

Attach the strips over the black inner layer.  I started at the top and attached a strip down to the right.  Then started at the side of the black strip you just laid down and went towards the bottom left.  Then the strip from the bottom angled towards the top left off to the side.  Lastly the strip from the left side to the top.  I used just a tiny bead of Multi Purpose Glue along the strips to attach.  Kind of watch how long you need the strips to be, so you don't waste adhesive where it's not needed.  Plus it's very messy having glue where you don't need it!  For this step, one of those Silicone Craft Sheets (page 138) are a great tool to use!!

You probably didn't need this picture to see the next step, but here it is anyway.  Trim off the excess strips along all four sides.   This is showing the front of the card ready to finish.

At this point, I stamped the sentiment on the bottom right section of the card.  I chose a sentiment from The Cottage Wreaths set (page 39) for this card.  It's stamped with Memento Tuxedo Black ink.

Using the Stylish Shapes Dies again, I cut a Basic White piece from the 2nd smallest sized die.  On this piece, the smaller tortoise from the Sea Turtle set (page 108) was stamped.  I used Lost Lagoon ink on the detailed stamp, then used Pool Party to stamp the backside of the stamp right over it.  I love how these turned out on that tiny square.  

I could have cut down that last Basic Black die-cut piece for layering but chose to use Lost Lagoon cardstock instead.  The white square is 1 1/2" x 1 1/2".  To give just a tiny frame, I cut the Lost Lagoon at 1 5/8" x 1 5/8".  They are attached together then attached in the center of the squares with Dimenisonals to make it really stand out.

There is a Basic White cardstock piece added inside the card.  It measures 4" x 5 1/4".  A 1/4" strip of Pool Party was added to the bottom of this piece to bring the color inside the card too.

For embellishments, three of the Iridescent Pastel Gems were added.  I really like how these add a pop of glam to the card.

Here is the first version of this card that I made.  It follows the original concept I saw which used the new color, Lemon Lolly and the new stamp set, Cheerful Daisies (page 111).  I love the pop of color using Lemon Lolly and Basic Black.

This card also uses a Wonderful Thoughts (page 41) sentiment stamped in black.

Did you notice there is a small layer of black behind the white square?  It really makes the white layer stand out more.

Also, small gold pearls from the Festive Pearls (page 140) were used for the accent on this card.

I just couldn't resist doing one of these cards in Fresh Freesia too.  Didn't it turn out nice?  Changes on this card include using Wink of Stella on the daisy.  Really.  You can't see it in any of the photos I did, so you have to take my word for it.

On this card, the Iridescent Rhinestone Basic Jewels were used.  They always look lovely with the purple-y shades on cards.

Okay, that's it for today's message.  Hope you like this new technique.  At least it was new to me!  It really is very striking when you see it in person.  But it isn't a hard card to make.  Awesome!  That's what I look for - a card that has a wow factor but doesn't take me hours to create.  Give it a try.  If you run into any problems, give me a call and we'll work through it.

If you would like to place an order to get any of these new products from the catalog or just need to stock up on cardstock or accessories, please use the Host Code shown at the top of this post.  It is very appreciated.

Happy stamping and creating,
Sharon

Friday, December 16, 2022

Cottage Wreath Christmas

Hello all!  I have to know, does the weather affect your frame of mind?  I never thought it made all that much of a difference to me.  But the last week or two opened my eyes to how much it really does make a difference.  We've been having cold and dreary, rainy days every single day for over a week, and it really started to get to me.  Today I woke up to sunshine and blue skies and my attitude has changed immensely!  All of a sudden, I have inspiration to get things done and energy to do it!  So let's get started with sharing a Christmas card.  This might be the last Christmas card I share as it's getting so close to Christmas.  I just got my pre-order delivered with all the new products I ordered from the new mini catalog that goes live on January 5th.  If you haven't gotten your catalog in the mail yet, let me know so I can check on it's whereabouts.  I'm so excited to sit down and play with the fun things that came in that box.  I guess Christmas came early for me!!  But back to this last Christmas card...

It's not only Christmas themed, but a fun fold card too!  That makes it just about perfect in my book.  The card starts out with two quarter pieces of Mint Macaron cardstock that measure 5 1/2" x 4 1/4".  These are the front and back panels of the finished card.  Also cut a piece of Mint Macaron cardstock that measures 5" x 1 1/2" for layering later.

A Basic White piece comes next.  This measures 5 1/4" x 11".  It's scored at 1 3/4", 3 1/2", 7 1/2", and 9 1/4".  Fold the two outer score lines to the back and fold the two inner score lines in towards the center.  This gives you almost a gatefold card that doesn't meet in the middle.  Are you with me so far?  Correction:  Thanks Kathy for finding the mistake I made in measuring.  These figures should now be correct.

I think from this picture you should be able to tell where the folds are and how they're folded.

There are two pieces of the Splendid Day Designer Series Paper that are cut next.  I used the Soft Seafoam and Basic White pearlized print for this. They measure 5 1/4" x 4" and 4 3/4" x 1 1/4".  The larger DSP piece gets attached to one of the Mint Macaron quarter pieces for the front panel using adhesive.  The smaller piece is attached to the smaller Mint Macaron strip.  

There is a Shaded Spruce layer cut that measures 4 1/2" x 3 1/2".   A Basic White piece measuring 3 1/4" x 4 1/4" is cut for the stamped images.  The leafy wreath from Cottage Wreaths stamp set found on page 59 was stamped on this using Mint Macaron ink.  Over this, multiple evergreen stems were stamped with Shaded Spruce ink to fill it in nicely.  

Shaded Spruce ink was also used to stamp the sentiment along the bottom.  The sentiment comes from the Peace to You stamp set found on page 41 of the July - December Mini Catalog.  Another sentiment from the set was used to stamp inside the scored and folded card as shown.  

Putting the card together, start with the back Mint Macaron panel.  Centering the folded white panel, attach it to the Mint Macaron in the center.  Using adhesive only on the left folded panel, attach it to the back of the front Mint Macaron and DSP piece.  This should be lined up with the back panel, so you only see a card front and no extra edges peeking out.  The skinny strip of DSP should be attached to the skinny Mint Macaron strip with adhesive.  This is attached to the folded panel on the front right side of the card.  Check above photo for placement.

The stamped white cardstock piece was attached to the Shaded Spruce piece using adhesive.  This was attached to the card front using Dimensionals.  A retired sheer white/ iridescent ribbon was tied into a bow and attached to the card front between the wreath and sentiment using Mini Glue Dots.  An assortment of small green iridescent Seasonal Sequins were scattered around the wreath to give it some sparkle.

Hope you like this card idea.  If you have questions about this fun fold and how it's put together, just call and I'll be happy to help.  If you're totally done making your Christmas cards, start thinking about using this fun fold to make some cute birthday, or even Valentine cards.  Oh my goodness!!   Did I really just mention Valentine's Day?  I didn't mean to jump ahead of myself so far.  I'm not thinking that far ahead myself yet.  I've still got Christmas cookies to make and gifts to buy and decorating to do!  Oh my!  So it's time I leave you and get back to work on my lists.

Until next time, keep at those Christmas cards.  Get them finished and in the mail.  Your family and friends will love getting them so it's all worth it!

Happy stamping and creating,
Sharon

Sunday, August 14, 2022

Cottage Wreath Double Header

Wishing you all a wonderful Sunday today.  I had made a card a few days ago and didn't get around to posting it.  Since then, I've made another card using the same stamps, dies, and Designer Paper.  So today I figured I'd get them both posted so you can compare and contrast.  It always surprises me when I can use the same products and change the colors and layout and two (or more) cards end up looking nothing at all alike.  That's the idea I'd like to share with you today.  Since both cards are pretty straight forward, instead of lots of info, I'll just give you the basic information.  OK?

The stamps used on both cards are the Country Wreath set with the Country Wreaths Dies set.

1st card starts with a base of Crushed Curry that measures 8 1/2" x 5 1/2", scored and folded in half.  The first layer is Mossy Meadow at 5 1/4" x 4".  A layer of Gingham Cottage DSP that measures 5" x 3 3/4" is added to the Mossy Meadow using adhesive.  A color for the DSP print is not llisted, but I believe it's So Saffron.

A layer of Very Vanilla cardstock is cut to 3 1/4" x 2 3/4".  This piece is used portrait style with the longer part up and down.  The leafy wreath is stamped on this using Soft Suede ink that has been off-stamped first to keep it a fairly soft color tone.

This is layered onto a piece of 3" x 3 1/2" Kraft cardstock using adhesive.  After layering, you can add it to the card front with Dimensionals.

The cluster of oak leaves in the set were stamped with Old Olive, Pumpkin Pie, Crushed Curry, and Cajun Craze ink to give me an assortment of fall leaves.  The bow was stamped with Mossy Meadow ink.  The acorns were inked with Cajun Craze and Crumb Cake.  After everything was stamped, they were die-cut using the coordinating dies.   

The sentiment was stamped with Mossy Meadow ink onto a 1/2" strip of Very Vanilla.  It has an end punched with the Banner Pick a Punch.  A piece of the Kraft cardstock backs it and is also punched with the Banner Pick a Punch.    It's attached flat to the card front with adhesive.

The leaves are layered up with Mini Glue Dots and/or adhesive onto the wreath with the bow added on also.  Acorns are added both to the bow and the sentiment.  Extra leaves are scattered on the bottom corner of the card.

I don't always show you the inside of my cards, but I really love how this one turned out.  Partial wreaths are stamped both on top and bottom diagonal corners.  I kept it light just like the front.  Instead of layering leaves onto them, I just stamped some leaves with the same colors on each of them.  Really like how this adds to the card!

No extra bling was added to this card.  I liked it just as is!


This is the second version of the Cottage Wreath with Gingham Cottage DSP.  Totally different look.

This starts with a base of Basic White Thick cardstock cut at 8 1/2" x 5 1/2", scored and folded in half.  There is a 4" x 5 1/4" layer of Basic White that's embossed with the Timber 3D embossing folder.  A 2" x 5 1/4" layer of the Gingham Cottage DSP gray plaid is attached to this with adhesive.  The layer is then attached to the card base with Dimensionals.

Instead of stamping a wreath this time, the larger open wreath is cut from Basic Gray cardstock, and the smaller wreath is cut from Smoky Slate.  They are layered together using Multi Purpose Liquid Glue, then attached to the card front also using the same Liquid Glue.  

There are several leaf sprays each cut from Basic Black and Basic Gray cardstocks.  These are attached to the left side of the wreath and attached with adhesive.  

A bow is die-cut from Silver Foil Specialty Paper.  This one I chose to use is almost a semi-matte silver look.  It's attached over the leaves with a Mini Dimensional.

A spider was stamped on Smoky Slate with Memento Tuxedo Black ink and die-cut with matching die from the set.  A Basic Black marker drew in the web line that the spider is hanging from.  A large Matte Black Dot is centered on the spider body.  Smaller Matte Black Dots are used on the wreath.

Boo was stamped on a skinny Basic White strip.  It was trimmed close and the backed with a Basic Black strip.  It's carefully tucked in under the plaid paper near the bottom.  

There were some extra leaves and a second spider that seem to have ended up inside the card.  I just couldn't let them go to waste, now could I?

There you have it - a twosome of cards using the Cottage Wreath stamp set and Country Wreaths Dies.  The first card is mostly stamping, the second is mostly die-cuts.  And both use the Gingham Cottage Designer Series Paper.  I wasn't too sure about using some of these bold plaids, but so far, I'm having fun with them.  Give them a try and see what you can make with them!


Saturday, July 23, 2022

Sale-a-Bration Card

 Hello there.  Happy to have you back today for another card idea.  I've got to admit, I'm not sure about posting this card today.  I wanted to share an idea using mostly Sale-a-Bration items making up the card.  That part was easy.  The problem comes because of Sale-a-Bration items that have already sold out and are no longer available.  One of the three items used to make this card are already gone.  Yikes!   I've gone back and forth arguing with myself and finally decided to go for it.  I know some of you may already have some of the things I'm sharing on this card, and that's great.  If you can't get it anymore, check your stash and get creative.  Use something else that you already have.  It could end up even better than what I've made!!  Here we go...

First off, let me list the three items from the Sale-a-Bration brochure that I used on this card.  Pool Party and Soft Sea Foam Card and Envelopes - love these, but alas they are already gone.  You could easily use the Soft Sea Foam cardstock in place of this.  Amazing Phrasing - love these sentiments. They're kind of funky and fun with a really "loose" font. And the Rings of Love 12" x 12" Designer Series Paper - still available!!!  Thank goodness that isn't sold out too, because my Tree Rings Hybrid Embossing Folder and Die-Cuts are on their way here.  I want to die-cut some of that cute paper that matches the tree rings die.  So much fun!  But, back to my card today.  

The card started with one of the Soft Sea Foam cards for the base.  The choice of the "birds and branches" print from the Rings of Love DSP was easy because the bitty birds are adorable, and the little leaves are also Soft Sea Foam so are a wonderful match.  The DSP measures 4" x 3".  Soft Suede cardstock was cut to layer behind it, and it measures 4 1/4" x 3 1/4".  They were attached together with adhesive.  Then attached to the card front slightly over to the left side using Dimensionals.

Next was the sentiment from the Amazing Phrasing set.  This was stamped onto a strip of Basic White cardstock approximately 5/8" wide with Night of Navy ink to match the birds.  It's layered onto a 7/8" strip of Soft Suede cardstock.  Before layering together, the right edge of each was flagged with the Banner Pick A Punch.  This was attached to the card front using Dimensionals too.

The little bits of leaves are from the Cottage Wreaths stamp set and die bundle.  I wanted just a few bits of greenery added, and really had a problem with which colors to use.  I ended up with two sprigs of Evening Evergreen and one of Crumb Cake.  There's also a branch stamped with Soft Suede ink on white then die-cut.  
It looked like it needed something added where the leaves all attached to the sentiment layer.  I decided on the Brushed Metallic Dots to stay with the more subtle color scheme.

Lastly, I still had several sprigs die-cut but not used on the front of the card.  Didn't want to waste anything, so three were attached inside the card in the bottom corner.

I apologize profusely that I'm using an item that you can't get anymore.  How frustrating for me when planning these ideas, and for you too if you want to get these items.  So sorry.  But like I mentioned before - check your stash and improvise!!  This is just another chance to get creative.

If you'll be ordering before the end of the month, please use the Host Code shown on the blog post page.  I really appreciate your ordering through me!!  You're the BEST!  Try to stay cool with this hot weather.  We've got 97 degrees today, so I'm staying inside in the air conditioning and stamping my little heart out!

Happy stamping and creating!
Sharon