Showing posts with label Valentine. Show all posts

Friday, February 14, 2025

One Last Valentine

Hello friends,  I had made this card a week or so ago, but I never got around to posting it.  You know how life gets in the way sometimes?  So, after all my cards were in the mail, I figured I wouldn't be showing off this card.  But after giving it way too much thought and waffling back and forth, I figured why not?  So here it is.  The last Valentine of the season.  Hope you like it.  There are aspects of the card that I want to translate into another card in the near future.  So, if you're so-o-o-o done with Valentines, just skip over this post and ignore this poor little card if you must.

See?  There's just so many good things going on with the card, I think it deserves a showing.

When sending out my Valentine cards, I realized that over half of them were either a majority of Fresh Freesia or Highland Heather.  That really surprised me.  And as you can see, this one is a mix of Fresh Freesia and Petunia Pop.

Let's start with the base which is Fresh Freesia cardstock.  This was stamped with a stamp from Hearts of Elegance and Fresh Freesia ink in an overall pattern.
Then I started die-cutting hearts from both Fresh Freesia and Highland Heather cardstock.  I used the different sized heart dies in the Hearts of Elegance set.  When playing around with the layout, I got rid of the Fresh Freesia hearts and used them for a different project.  They seemed to blend into the background too much.  So, I stuck with the Highland Heather hearts.  The heart with the stitched design in it was darkened even more with a Blending Brush and a little Petunia Pop ink.

The larger heart was speckled with Petunia Pop marker to give it some interest.  That was still too blah, so it was spattered with the Wink of Stella pen to add some pretty shimmer specks.  That worked out well. 

The heart in-between those two sizes die-cut a piece of DSP.  Sorry, I don't remember where it's from and I forgot to write it down.

Next was trying to figure out the layout of all the hearts on the card front.  It still needed something more to define it.  A piece of Vellum was dry embossed with the Eyelet Embossing Folder and laid between the card base and all the hearts.  Viola!  Just was it needed.  

The little sentiment is from the Hugs for Love set which is one of my favorites for cute sentiments.  It's stamped on a small piece of Basic White cardstock using Highland Heather ink.  It's tucked under the hearts and attached with adhesive.

The design still needed a little more contrast to it.  In my punch stash, there is a very small heart punch that was close in shape to the other hearts.  I punched three Basic White hearts and tucked them in amongst the larger hearts.

Lastly, three of the purple Adhesive-backed Sequins in almost a white color were added.  These are one of the Sale-a-bration free items when you spend $60 or more.  Seemed like the perfect ending to this purply Valentine card.  I'll get to work on the other idea I have that will be similar to this card.

Thanks for stopping by to see what's new today.  I promise, this will be the very last Valentine I make for at least another 9 months.

Happy stamping and creating,

Sharon

Friendship Friday - Valentine Cards

 Hello, hello!  And happy Valentine's Day to you all!  It's a beautiful and sunshiny day here.  Of course, it's only 35 degrees.  So that means it's a perfect day if you're staying inside and looking out a window.  😉 That's my take on it.  You might not agree and that's ok too.  Since this is a Friday and it is Valentine's Day, I thought it would be appropriate to share the lovely Valentine cards I received in the mail as of this morning.  There is a wide range of styles that reflect each person that made them.  And I appreciate each and every one.


created by Diane Wallace
In case you can't tell, the hearts and butterflies are die-cut from Red Velvet Paper.  So gorgeous!
Thanks for all the Bible verses you wrote on the back showcasing true love!

created by Shirley Krone
I love all the different embossing that highlighted the design.  And miss that cardstock color!
Thanks for the lovely letter too!!

created by Jean Mazurek
At first, I was taken aback by the snowflakes.  Then I realized with all the snow you were getting in Michigan; it was the perfect backdrop!  Great creating "out of the box".

created by Jan Hollmann
Just love this background of die-cut hearts!  And the die-cut love and larger heart are the perfect additions.  So modern and fun!

created by Sue Fabris
Love that 'lacy' looking layer behind the hearts.  Perfect touch to the bold hearts.  This is so pretty.

created by Barb Eisenman
This fun fold card is so unique and lovely.   All the gold foil paper, gold embossing and the die-cuts on the inside make it so special.

created by Connie Juengel
This card is unusual because of the size.  It's 8 1/2" x 3 1/2".  What a fun size and it fits those three hearts across the front panel just right.


Thank you to all of you that sent cards to me at this time of year.  I sent out so many myself that it's a treat getting something in the mail too.  You all are an absolute blessing from God to me!

Sending all my love and many hugs,
Sharon


Monday, January 27, 2025

Book Binding Fun Fold

Hello, my stamping friends.  I'll let you in on a little secret.  I've been chuckling to myself ever since I made my oldest grandson's Valentine card.  He's very close to 15 and says he way too old for cutesy kittens and bears but doesn't want all the frills, flowers, and hearts of traditional Valentines.  Sooo....  What does he like?  Baseball, but I've made way too many baseball-related cards for both of the boys over the years and I'm so ready to move on to something else.  They just stopped over for a short visit and on the way had to get him some french fries because he was hungry, as usual.  Oh yes, he loves french fries and eats them as often as possible.  And there my idea was born.  Want to see the silly Valentine I made for him?

Like it?  Did it make you smile?  I had so much fun coming up with the idea and then making it.  This is a book binding fun fold card.  It's very easy but just gives you a slightly different card for fun.

The card base starts with Gray Granite cardstock that measures 11" x 4 1/4".  It's scored at 4 1/4" and 5 1/2".  There is some "green glue" used to hold closed the section to the left of the card front.  This gives you the book binding fun fold base.

I love this plaid paper from the Timeless Plaid DSP.  I used the colors that coordinated with this to make my color choices.  The darker gray color is Pebbled Path which is an In Color that I like but haven't used too often.  Don't these colors blend well together even though they are not mentioned on the back of the DSP as coordinating colors?

The Pebbled Path layer was cut at 4" x 4", and the plaid print was cut at 3 3/4" x 3 3/4".  They are attached together with adhesive, then attached to the card front with adhesive also.

There is also a piece of Pebbled Path cut to measure 1" x 4".  This is attached to the book binding area to the left side of the card front using adhesive.

Next came the seagulls.  I wasn't sure which colors I wanted to use, so I made a whole flock of the three different seagulls.  All totaled, there were 15 that were stamped with Memento Tuxedo Black ink then colored with Stampin' Blends.  I used a mixture of Smoky Slate Light & Dark, Gray Granite Light & Dark, Pebbled Path Light, Crumb Cake Light & Dark.  I also used Real Red Light & Dark and Daffodil Delight Light & Dark.  

For the seagulls on this card, Smoky Slate Dark and Gray Granite Light were used on the wings.  After trying several options, the french fries were colored with first just a light layer of Light Crumb Cake, then added a light layer of Light Daffodil Delight over it.  That's about as close as I could come to the color of fries. 

The Basic White layer for the focal point was cut with the Stylish Shapes Dies.  Some pebbly sand was added to this where the seagulls would be standing.  Crumb Cake ink was used for this.  

A frame was added under the white by cutting a piece of Real Red cardstock 2 1/2" x 2 1/2".  They're attached with adhesive.

Next the sentiment sections were stamped on strips of Basic White.  The upper sentiment was stamped with Pebbled Path and the lower sentiment with Real Red ink.  They were trimmed to fit the card.  

The seagull with the biggest mouth has a box of fries tucked in.  A Dimensional was added behind to hold this in place.  Both the seagulls were attached with Mini Dimensionals.  The upper sentiment was attached flat slightly tucking under the upper seagull.  The "fries" sentiment was attached with Dimensionals.  Lastly the whole thing was attached with Dimensionals to the front of the card.

The inside of the card carried on with the theme.  A piece of Basic White was cut at 4" x 4".  This sentiment comes from The Hearts of Elegance Bundle which is an Online Exclusive.  It's stamped in Real Red ink close to the middle of the card.  The heart is die-cut from the Marbled Excellence DSP.  It's attached flat to the layer.  

Pebbly sand is stamped on the bottom left side just like the card front.  This gives the 3rd seagull a place to stand. He's attached with adhesive.  Some seagulls were stamped in the sky with Gray Granite ink.  This whole layer was attached inside the card with adhesive too.

Just to kind of tease my grandson with something just a little girlie, I wrapped a ruffled Real Red Ribbon around the book binding part of the card.  It's tied in a loose knot.  This ribbon has been retired forever, but it seemed to work for the card.  No other bling was used on this card.  I had to let him keep some of his dignity so there was absolutely no adding lots of glitz!

This picture gives you a great look at the fold and how it works.  

Hope this card gives you an idea or two.  It was really fun making this card specifically for this picky grandson of mine.  I hope it makes him smile and think his grandma is a little quirky and has a slightly strange sense of humor.  Gotta stay one step ahead of those teenage boys.  Oh, excuse me, that should read young men.

Did you realize the Friendly Seagulls stamp set I was using is one of the Sale-a-bration items you can earn free right now?  It's one I wasn't sure I wanted, but I'm so happy I got it.  Now that it's in my stash I've got a few more ideas percolating that I want to try.  I hope you get this set too.  It's just plain fun!  And it can be yours with a $60 order right now.  If these silly seagulls aren't your cup of tea, there's plenty more options to choose.

Thanks for stopping by today.  I appreciate you taking the time to see what I've been doing.  If you'd like to place an order, I'd be happy to be your demonstrator.  And please use the current Host Code at the top of this post.  It would be so appreciated!

Happy stamping and creating,
Sharon 

Thursday, January 16, 2025

More Heart Shaped Cards

Hey there.  Are you tired of this stamp set and all the cards being made using it?  Or are you loving it as much as I am??  Today I have three more cards to share with you.  All of them are using parts that I die-cut from the cardstock with all the blended colors the other day.  But each have their own color palette and style.  Hope you are inspired by what you see and try this yourself.

This is the next card that was made with these extra pieces.  This color palette consists mostly of Fresh Freesia and Petunia Pop.  The card base is Petunia Pop and measures 8 1/2" x 5 1/2".  The heart was also die-cut from the same cardstock at this time.  The die comes from the Hearts of Elegance Bundle that is an Online Exclusive.  The 4th largest heart die was used for this.  

The next layer on the card is Basic White.  It measures 5 1/4" x 4".  On top of this is a layer of Fresh Freesia cardstock that measures 5 1/8 x 3 7/8".  I liked the look of just a tiny white border to separate them.

On the Fresh Freesia layer, I stamped one of the word stamps from the new Elements of Text stamp set.  This set is sort of easy to overlook in the Mini Catalog, but well worth looking for it.  It's stamped 5-6 times using Fresh Freesia ink so it's not real noticeable.  On top of this, one of the splatter stamps in the set was stamped randomly.  For this I used Petunia Pop ink but off-stamped it before stamping on the cardstock to get a lighter version of the color. These two layers were attached together and then to the card base using adhesive.

The label tag on the card is from the Greetings of the Season Bundle with Basic White cardstock.  The word 'love' is from the Hearts of Elegance set.  I only used part of the stamp and Petunia Pop ink.

The hearts layered up are the Petunia Pop heart, the inner cut-out from the heart wreaths, and the smallest heart from Hearts of Elegance in Basic White.  The 'xoxo' is also from the Hearts of Elegance set and is stamped with Petunia Pop ink.  The flower is one of the many that were cut from my blended cardstock.  The label tag and the large heart are popped with Dimensionals.

The gem accents on the card are new and they are the Two-Tone Sparkle Gems that are an Online Exclusive item.  These are so pretty and fairly flat to make the card easy to mail.  

Okay, one down.  On to the next.

This time the color palette was changed up to be more of a rosy look.  The card base is Bubble Bath cardstock.  The layer of DSP is next.  It's from the Beautiful Bokeh Designer Series Paper.  It measures 5 1/4" x 4".  This pack of DSP is just beautiful and will make lovely backgrounds on many cards.  It is embossed with the Plaster Painting 3D Embossing Folder before attaching to the card front.  This gives so much gorgeous texture to the card.  It's attached with "green glue".

The label tag is the same one used in the previous card.  The sentiment is from the Hearts of Elegance stamp set and is stamped with Berry Burst ink.

One of the heart wreaths that I had made the other day was used here.  It's attached to the tag with dots of "green glue".  Inside this wreath was added another heart.  It's the 2nd smallest die from the Hearts of Elegance set and was die-cut from the Marbled Elegance DSP.  It's attached to the tag with Mini Dimensionals.  Then the tag was added to the card front with Dimensionals too.

For an accent, the gold ribbon from the Gold & Silver 1/8" Trim pack was used to make a bow. It was added to the tag with Mini Glue Dots to accent the gold on the DSP.

Several of the Adhesive-back Heart Sequins were added to the design.  One was left plain gold; the others were colored with a Melon Mambo Blends for some added color.  Love how this card turned out.

Last card for the day.  Back to the Fresh Freesia and Petunia Pop color palette.  Start with a base of Fresh Freesia.  Add a layer of Petunia Pop that measures 4 3/4" x 3 1/2".  Then cut a layer of Basic White to measure 4 1/2" x 3 1/4".  The white layer is embossed with the Forever Plaid 3D Embossing Folder.  Love the geometric plaid look behind the hearts.  These are layered onto the card base using Dimensionals.

The 4th largest heart die was used again to cut another Petunia Pop heart.  Layered onto this is another of the extra heart wreaths I made a couple days ago.  In the center is a Basic White heart cut with the smallest heart die from the set.  This has the same 'xoxo' stamped with Petunia Pop ink.

The sentiment is from the same Hearts of Elegance set.  It's stamped on a piece of Fresh Freesia cardstock that measures 3/4" x 2 3/4".  Petunia Pop ink was used for stamping.  This is layered onto the card front using Dimensionals.  The layers of hearts are then added slightly overlapping the sentiment.  Dimensionals were used for the hearts also.  

For an accent on this card, I used the lovely Purple Adhesive-backed Sequins.  I love all these pinky-purply colors on the sequins!  So pretty. The sequin pack is one of the free Sale-a-bration items you can choose when you spend $60 or more.  These are really a good bargain.  You'll love them!

Okay.  One last look at all three of these Valentine cards.  The ones with the purple tones are definitely going to my sisters.  They both love purples, so I thought these would work out just right.  Next, I need to make some Valentines for my grandsons who really are getting too old for all this "girlie stuff".  Hope I can come up with something more geared to teen boys.

Lots of new items were used on these three cards.  When you're shopping, make sure you check out the Online Exclusives and Kits, so you don't miss anything.  There's so much new that is added it's hard to keep track of it all.  If you don't have either the new Mini Catalog or the Sale-a-bration brochure, please let me know.  I'd be happy to get one to you.

Thanks for stopping by today and getting immersed in lots of hearts.  Be sure to check in in another day or two to see what I've been stamping up for you.

Happy stamping and creating,
Sharon 
sharoncarr50@gmail.com

Friday, January 10, 2025

Fun Fold Valentines

Hello friends!  Hope you're staying warm and dry.  It's snowing today!  Woo Hoo!  It's not like we get snow too often here in South Carolina, so this is a treat for me.  Especially when I can stay inside and enjoy how pretty it looks.  Just about everything is closed because of the weather - no school, some businesses and doctor's offices are closed, etc.  So yes, I'm sitting by my French doors to the deck and watching the show.  Everything is turning white and I'm thinking I should be sharing Christmas cards instead of Valentine cards.  😀 But not today.  A couple days ago I noticed a YouTube video from Tami White with a darling fun fold.  Her design was for Halloween, but I changed it into Valentine cards.  She has an easy-to-follow video that was a big help.  You can find it here if you are a more visual learner.  I'll share all the dimensions that I used for my cards.  Some of them are a little different from Tami's.

Here are two of the cards made with just a few differences between them to give you an extra idea.  When I saw the fun fold originally, I thought it would be hard to make.  But I was so wrong.  It's very easy to make and is so cute when finished.  I think this is an idea I'll be going back to often.

You can see that the basis of the card is Melon Mambo cardstock and the Marbled Elegance DSP with accents from the Hearts of Elegance stamp and die bundle.  The stamps, dies, and DSP are all in the Online Exclusive section of the SU! online store.  Aren't they just gorgeous with that marbled paper and all the gold accents swirled throughout?  These prints are a beautiful mix of reds and gold - perfect for Valetine cards.

Before you get started, I would suggest that you use a piece of scrap paper the first time you try to make the card.  Once you master it, it's very easy to replicate and you should have no problems.  

Here are the directions for the actual card:  The Melon Mambo card base is 11" x 4 1/4".  It is scored at 2 1/4" and 5 1/2".  On the section with the 2 1/4" score line, measure in 1" at the line and cut out the rectangle shape.  Do this on the other side to match.  This will leave you a flap that is 2 1/2" wide that can fold backwards and forwards.

This picture shows you the outside of the card.  You can see the two 1" x 2 1/4" sections that are cut out.  The card folds on the 5 1/2" score line and the flap stays flat.  When you open the card, the flap swings and you can see the front design on the inside of the card.

There are three pieces of the Marbled Elegance DSP cut for the card.  They measure one at 4" x 5 1/4" and two of them at 4" x 3".  The two smaller pieces are attached to the left flap, both outside the card and inside.  The larger piece is attached to the inside back area.

The layered sentiment areas both outside and inside are the same measurements.
Melon Mambo is 4 1/4" x 2 1/2"  (2)
Brushed Gold is 4 1/8" x 2 3/8"  (1)
Basic White is 4" x 2 21/4"  (2)
(I used Brushed Gold on the outside layers, but not inside the card.  You could use in both places if you wanted.)

The sentiment on the front layer is from the Hearts of Elegance set.  It's stamped with Melon Mambo ink.  The inside sentiment is another of the stamps in this set.  After stamping both sentiments, attach the proper layers together with adhesive.  I used "green glue" as it's easier to manipulate the layer edges with this glue.

Looking back to the third picture, close the card with the flap to the right edge.  Add adhesive to only the squarish flap.  Then line up the top layer's right edge to the edge of the card front over the flap to cover it.  Now the front layer sits across the card front when it's closed but can swing to the inside of the card when it's open. 

For the hearts across the front of the sentiment layer, I used three different heart dies from the Hearts of Elegance set.  The heart on the left is cut from the Marbled Elegance DSP.  This print is the backside of the print I used on the card.  It uses the die with the stitched design in it.  The heart on the right is cut from Basic White cardstock.  It has a trio of flowers stamped across it using a stamp from the Heart Shaped SAB set.  They're stamped with Melon Mambo ink.  The same ink was used with a Blending Brush to add a little color around the edges.  The center heart is the smallest heart die and is cut from Melon Mambo cardstock.  There is a flower die-cut from a marbled print scrap.  It's attached to the heart with a Mini Glue Dot.

The finishing touches were the Brushed Gold Flat Hearts that are also part of this suite in the Online Exclusives section of the store.  Aren't they just the perfect addition to the design?  And they're flat so you don't have to worry about bulky cards going through the mail.

Whew!  Did any of that make sense?  Like I mentioned in the beginning of the post, Tami White made a video giving excellent directions for making these cards.  This one was difficult to just write instructions without lots of visuals.  If you have questions about making this fun fold, please contact me by email at sharoncarr50@gmail.com.

Happy stamping and creating,
Sharon

Saturday, January 4, 2025

Ready for Valentines?

Hello friends, it's getting to be that time of year again where everything is coming up hearts and flowers.  I don't have the flower half on my cards today, but we do have the hearts covered.  I'm working on Valentine card ideas that are super simple to construct as this month our Groovy Grans group at church are putting the cards together for the shut-ins.  Since I'm one of the 'younger' members at 73 years of age, that gives you a general idea of the ages of these lovely ladies.  So simple it is.  This is the first set of cards.  I will be coming up with more ideas in the near future for them to make also.

This first batch of cards is very bold and bright.  Thought they would be cheerful and work for either a man or a woman.  I guess that's my criteria - not too frilly so the men can enjoy them too.

These cards are made with the Hearts of Elegance Bundle and the Marbled Elegance Specialty Designer Series Paper which are all found on the Online Exclusive section of the store instead of in any catalog.  And don't forget those darling Gold Heart Sequins found in that section too.  Really, you don't want to miss browsing there.  Some of the very best goodies can be found in the Online Exclusives section!

To make the cards, I started with Melon Mambo cardstock for the base.  After trying out all the different colors that match the DSP, I decided that Melon Mambo was the best choice for these cards.  This is cut at 11" x 4 1/4" and scored at 5 1/2".  This makes it a top fold card.

The marble-looking print is one of the six choices in the Marbled Elegance DSP.  They are all beautiful, swirled prints so it was a hard choice.  This one won out.  It's cut to measure 5 1/4" x 4".  You can get 6 pieces (enough for 6 cards) all cut from one sheet.  The DSP was attached to the folded Melon Mambo card base using adhesive.

Next was choosing which heart colors to use with this design.  Even though the card base is Melon Mambo, I chose to use Real Red cardstock to cut out the hearts.  Then added some brushed Gold Specialty Paper for the second heart.

Did you notice the lovely, pierced design in the hearts?  One of the heart dies from the set adds the design as it cuts the heart out.  Nice touch.

The hearts are attached on the top half of the card.  The gold heart is attached with adhesive on just the middle section of the heart that is plain.  The Real Red heart is attached over this with three Dimensionals to hold in place.

The sentiment used here is also from the Hearts of Elegance stamp set.  There are seven sentiments in the set including a 'to and from' stamp to make it easy for finding just the sentiment you need.

The label for the sentiment is from the Wildflower Designs Die set.  I love the shape of these for a different look than the usual rectangles or circles that I use.  This size is the smallest in the group and is the perfect size for this card.

The sentiment is stamped in the center of the label using Melon Mambo ink.  I tried one with Real Red and didn't like it with this card.

The sentiment label is attached to the card front with Dimensionals.  It's positioned just a bit below the hearts.

The crowning touch for our Valentine card is more hearts, of course.  Those cute gold Adhesive-backed Heart Sequins were added to the label.  I used two of the larger hearts.  I love that these hearts are totally flat, so you don't have to worry about break-through when your envelope goes through the mail.  That's always so frustrating!

So, what do you think?  Will the ladies be able to put these together easily?  And will these cards brighten the day for the shut-ins that receive them?  If those answers are yes, my mission is accomplished!

Do you like any of these products?  If so, I'd be happy to be your demonstrator if you'd like to order from me.  Don't forget that Sale-a-bration is starting January 7th when you can earn free products.  These products can add to your total and you'll get a freebie!  Remember that the required order total for free items is $60 (or $120 for the higher ticket items).  You might want to consider waiting until January 7th to place your orders!  It's only a few more days, but well worth the wait.

Thanks for stopping by today and getting a quick dose of lots of hearts.  Theres more where that came from, so I better get stamping and get my ideas from my head onto paper.

Happy stamping and creating,
Sharon

Saturday, February 3, 2024

Simply Elegant Card

Hello friends!  Here we are in February and it's already sneaking on by.  I need to slow things down somehow so I can catch up.  It's a gorgeous day and we had the grandsons overnight.  Such fun playing UNO and dominoes with them.   Lots of silliness!  Before they came over yesterday, I was working on another card that could be a Valentine, or wedding/anniversary card.  I think it turned out really nice and elegant looking.  I hope you like this card and give it a try.  Believe me, it's very simple to make but packs a nice wow.

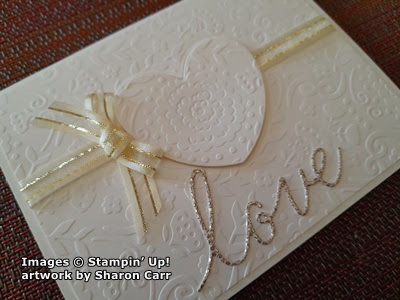
I think Very Vanilla always looks more elegant on cards, but that's my humble opinion.  So that was the starting place.  The card base is Very Vanilla that measures 8 1/2" x 5 1/2".  This is scored and folded in half.  Another piece of Very Vanilla was cut at 4" x 5 1/4".  To give this layer some texture and interest, it is embossed with the Countryside Blossoms Embossing Folder.  I tried to keep the central flower right in the center of the piece.

After embossing, I die-cut the heart out from the center using large heart from the Hooray for Suprises Bundle (pg 36 in Mini Cat).  This open-work die was perfect for seeing where to line up the embossed design inside the heart.

Next, I took a 6 1/2" length of the Gold & Vanilla 3/8" Ribbon and laid this across the front of the card and attached the ends in the back.  This makes the ribbon go across the cut-out heart shape, but it'll be hidden behind the heart.

The entire layer was attached to the folded card base using "green glue".  I wanted to make sure the layer and ribbon stayed in place.  The die-cut heart was centered over the hole and attached with several Dimensionals.  A length of the same ribbon was tied into a small bow then attached right next to the heart using a couple of Mini Glue Dots.  

Lastly was making the sentiment.  The love comes from a Paper Pumpkin add-on called The Love of Spring.  If you're a Paper Pumpkin subscriber, you can order this right now.  If you'd like to become a subscriber even for only a month so you can get this die set, I can help you with that.  Or there is a section on the Online Store where you can sign up.  Gotta tell you, I love this little die set and will probably use it often.

I die-cut the sentiment from a specialty paper called More Dazzle.  This can be found in the Annual Catalog on page 127.  The sparkle of this paper makes a lovely accent.   After die-cutting, I just peeled the backing and attached it to the card.  Easy Peasy!  

Can you believe that's all it takes to make this 'love'-ly card?  It really doesn't get much simpler than this.  Plus, you're getting this elegant card when you're done.  

Hope you liked this simply elegant card today.  Let me know if you try making this either as is or with your own special twist to it.  I love to hear from you!

Just a reminder about the added items available during Sale-a-bration.  If you haven't seen them yet, go to the previous post for the listing. Time is running out, but I bet you already know that.  Let me know if you need help with anything.  I'd be pleased to help you out.

Happy stamping and creating,
Sharon

Saturday, January 27, 2024

Adoring Hearts Valentine

Welcome this cold and rainy afternoon.  Since we're getting closer to the end of January, I've been ramping up the Valentine card making.  I've got all the cards for the church shut-ins ready to be put together by the ladies in the "Groovy Grans" ladies group at church.  This should be really interesting as I've coached only four of the ladies on how to make these cards.  We'll see how the other 25 - 30 ladies manage this.  But I've also got Valentine cards to make for family and friends and that will keep me busy the next week or so.  Because this is my focus now, I have a pretty Valentine that is mostly red and white with a slightly different fold.  Hope this sparks your creativity!

Definitely red and white!  But to make it a little different, the red is Sweet Sorbet so it's just a bit softer than Real Red.  Of course, if you prefer Real Red, by all means make that your color choice.  I just wanted a change of pace after all the Real Red that I used at Christmas. 

I started with a piece of Basic White cardstock that was cut at 8 1/2" x 4 1/4".  This is scored and folded in half.  Another piece of Basic White was cut at 4" x 4".  This was embossed with the new embossing folder that is part of a Sale-a-bration Bundle.  This includes the Softly Sophisticated stamp set to coordinate with it.  Both of these items are terrific either alone or together and a must-have as far as I'm concerned.  After embossing, this piece was attached to the card base with adhesive.  

Moving on to the square addition to the top of the card, the Stylish Shapes dies were used to cut both squares.  The largest size cut the Sweet Sorbet cardstock, and the next smaller size cut the Basic White cardstock.  

The rose from the Adoring Hearts set was stamped with Basic Gray ink to the white square.  It was colored with Stampin' Blends:  Sweet Sorbet Light and Dark for the rose and Lost Lagoon Light and Dark for the leaves and stem.  Touches of Color Lifter on the image to brighten some of the rose petals.  The Lost Lagoon Light Blends was spattered onto the background lightly.

The white layer is attached to the Sweet Sorbet layer using adhesive.  Two strips of Tear & Tape were used on the bottom half of this to attach it to the card base.  From the picture you can see how it's attached.

The die-cut words are from the Love For You die set.  The two word "bubbles" were cut from Sweet Sorbet cardstock.  There were also two hearts from the same set cut at the same time.

The white layer on top of the word "bubbles" is cut from Basic White cardstock.  This has a piece of the Adhesive Sheets added behind the cardstock before die-cutting.  It is so easy to peel the backing off and attach to the word.  The word "much" is attached to the card front using adhesive.  I used "green glue" for this to get a good adhesion.  Certainly didn't want my wording falling off the card!  The "love" was attached using Mini Dimensionals to add more interest.  The two hearts that were already die-cut are attached to the card using Mini Dimensionals.  

The sentiment inside the card is from the Adoring Hearts set and was stamped with Sweet Sorbet ink.  A few teeny tiny hearts from the Love For You stamp set were stamped near the sentiment inside.

There you have it.  I think this card has a lot of wow going on.  Just the pop of color on the white is a wow beginning.  I didn't think the card needed any extra bling, but you're free to add some if desired.  Okay, that's another Valentine made with many more to go!  Have fun trying out this easy fun fold.  It just adds a little bit of fun to the card.

Thanks for stopping by today on this dreary and rainy day.  I'm so ready for the rain to be done already!  Of course, in the middle of summer when it's so dry, I'll be praying for rain.  Never happy, am I?  Hope you're staying warm and dry.  These kinds of days are perfect for staying home and playing in your stamp area.  Don't forget all the wonderful items in the Sale-a-bration brochure.  Pick what you want for free with a purchase of $50 or more and have fun shopping.  Please consider using the Host Code at the top of this blog post.  Let me know if I can help in any way.

Happy stamping and creating,
Sharon

Wednesday, December 27, 2023

Valentines Already?!

Well, I've been told that Christmas is over, and I need to move on and take down all the decorations.  Hmmm.  (grumpy face)  I'm not ready to take all the festive decorations down just yet.  But I can share a card I made today using some new products that will be available on January 4th.  Can't believe another year has pretty much come and gone and it's time to get myself a new calendar.  Really?  2024?  How can that be here already?  Since it is time, I got out some new items that caught my attention to see what I could do with them.  I used the new Adoring Hearts stamp set on page 18 of the new January - April 2024 Mini Catalog.  I liked the images, and the font used for the sentiments was really fun and sort of funky.  I added a Sale-a-bration item to the card to make it special.  Then added an embellishment that is a carryover from the Winter Mini Catalog to pull this card idea together.  Ready to give this one a try?  Let's get started.

I love red roses for Valentine's Day - not that I ever get them mind you!  There's just something so sweet and traditional about them.  Can you pick out all the new products used here?  Just about everything!

The card starts with a base of Basic White that measures 8 1/2" x 5 1/2".  It's scored at 2 1/8" and 4 1/4".  This makes a back-fold card base.  The layer after that is Calypso Coral that is 5 1/4" x 4".  Don't attach together yet.

The DSP is a wonderful Sale-a-bration freebie called Most Adored.  It's a 12" x 12" paper pack that has gold foil designs on one side and pink and red designs on the other side.  Looked perfect for Valentine's Day to me.  There are two pieces of the red plaid design cut.  One is 5 1/4" x 1 1/2" for an accent piece inside the card and one at 5" x 3 3/4" for the front.  (I cut both pieces at the 5 1/4" length and then just trimmed off 1/4" from the front layer.)  The larger piece of DSP was attached to the Calypso Coral layer with adhesive.

A length of Silver and White Sheer Ribbon was wrapped around the two layers and tied into a small bow on the right side.  At this point, I used two strips of Tear & Tape to attach the layers to the fold-back part of the card base.  Make sure your adhesive is only where it attaches on the fold-back area, so it doesn't seal the card closed by accident.

Next the focal piece of Basic White cardstock was die-cut using the Everyday Detail Dies.  You can find these on page 28 of the New Mini Catalog.  I love the clean, bold lines of these new dies!  Very striking and fun to play with, don't you think?  The rose bouquet from the Adoring Hearts set was stamped angled at the top to give me space in the bottom corner for the sentiment.  The roses were stamped with Basic Gray ink.  The sentiment is stamped in Real Red ink.

Coloring the roses, I used Stampin' Blends - Real Red Light and Dark, Shaded Spruce Light and Dark, and Pecan Pie for the stem.

The layer is attached over the ribbon towards the left side of the card front using Dimensionals to give it some definition.  

The sentiment inside the card is also from the Adoring Hearts set.  It's stamped with Real Red ink.

The last bits to finish the card sort of surprised me.  After trying a bunch of different embellishments, I added three of the 2022-2024 In Color Pearls.  The Sweet Sorbet pearls looked really nice with the reds and Calypso Coral layer too.  Who would have guessed?  

I think this card will be perfect for my hubby, not too frilly with clean lines.  I need to pack it away until then, so he won't see it sitting out on my worktable.  Then, the big trick will be to see if I remember it come Valentine's Day and can find it!  

That's all I've got for you today.  Hope you had a very blessed Christmas celebrating the birth Jesus.  We had a few sickies with colds that were keeping their distance.  Other than the fact that I forgot to get out the grandsons' stocking stuffers and I still have them, everything was relaxing and fun.  

If you haven't received your new mini catalog yet, please let me know so another can be sent.  Any questions about ordering and Sale-a-bration, please get in touch with me.  I'd me very happy to help you with anything.  Wishing you a creative new year!  

Happy stamping and creating,
Sharon

Thursday, February 2, 2023

Valentine Cards Anyone?

Hello Friend!  Glad you stopped by today.  I have been busy making cards for the shut-ins here from church.  I think I've found my little niche again.  There are 29 shut-ins this month, so I've been busy with Valentine cards for everyone.  It's interesting to try not to make the cards too mushy and sweet, because honestly I've never met these people.  Usually, I make special cards for family and friends that I try to fit to each person.  Not so much this time around.  I figured it wouldn't make any difference whether I used current or retired products, so the cards are a mixture of both.  It was great even using up some of my stash of DSP that tends to get out of hand.  Of course, you have no idea what I'm talking about, do you?  I mostly used one layout for the cards, then when that DSP ran out, I switched to a different DSP and a different layout for the card.  Hope these cards spark your imagination and you try out the layouts for many different cards.  These are very basic, go-to layouts that work for many different occasions.  Just change up the DSP and stamping and away you go.

Here's an overview of most of the cards that were made.  There were a couple odds and ends from figuring out the DSP I wanted to use, or just playing around with different stamps that ended up being way too time consuming or too frilly for making 29 cards.  Some of these cards are being sent to men, so you know - no flowers and ribbons and lace, etc.

It was interesting trying to find all the different DSP's and stamps that I used.  I wasn't really going to post these cards, so each one of the items was put away after using.  Hence having to find them all again!  Silly me, I really should know better!

This is the idea I planned to use for all 29 cards.  After cutting all the pink Butterfly Bijou DSP into strips that measured 2" x 5 1/2", there wasn't enough of the DSP to make all of the cards. I decided to work with what I had and go on from there.  The circles were cut with the largest Stylish Shapes circle die.  I stamped this Adorable Owls (Sale-a-bration freebie!) stamp on the center of each of them using Memento Tuxedo Black ink.  I also used strips of Basic White cardstock to stamp the sentiment which comes from the new set - Country Bouquet found on pages 9-10 in the January - April Mini Catalog.  The sentiments were die-cut using the new Something Fancy Bundle found on pages 15 & 17 in the same Mini Catalog.  I love the words, fonts, dies, everything about this bundle! 

The owls were all colored with Stampin'Blends in Crumb Cake Light & Dark, Mango Melody Dark, and Old Olive Light for the eyes.  A heart was punched from Polished Pink cardstock to match the layer behind the DSP.  The card base was Blushing Bride.

After coloring nine of those little owls, I needed a break.  They didn't take very long to color, but I was getting bored doing the same thing over and over. So, I decided to just stamp and punch hearts to go on some of the card fronts.  I used the Country Bouquet set for this.  The hearts were stamped with Polished Pink and punched out with the coordinating Country Bouquet punch.  It needed another heart, so I added one that was punched directly from Polished Pink cardstock for some contrast.  The hearts and sentiment were all attached with Mini Dimensionals.

Ok, more done, but this is where I ran out of my DSP that I wanted to use.  On to something else...

Look what I found when I was going through my stamps and DSP stash!  Don't you love it?  There are two different DSP packs used here - the background pieces are from the Ice Cream Corner DSP and the heart is punched from a piece of the Pleased As Punch DSP.  I think these are both from last year, but they could be older.  

I love the heart used with the sentiment from the Sweet Ice Cream set.  And I even dug out my remaining TerraCotta Tile cardstock for the base of the card.  I totally love and miss using this color.  It was one of my forever favorites.  The ink I used for the sentiment is Cinnamon Cider because it goes so well with the "sugar cone" background.  It was punched using the Double Oval Punch that is in the current Annual Catalog.

That's about it for most of the cards that were made.  How did you like the "blast from the past"?  Do you still own some these items?  Or do you purge all the leftovers that you haven't used for awhile?  I'm glad I held onto my things.  It's fun to go through your stash and find just the right item for making the idea that's dancing around in your imagination.  It was also fun planning out these cards for the shut-ins.  This reminds me so much of making the cards to send to the military.  I loved getting together with all you wonderful ladies and doing a lot of visiting while putting the cards together.  My goodness, did we ever make a lot of cards over those ten years!!

Well, thanks for coming back to see what I've been doing lately.  Don't forget there is still one month of Sale-a-bration to take advantage of those freebies.  I know you are a savvy shopper and want to make those dollars spread as far as possible.  Sale-a-bration is a great time to make your purchases to get the added benefits.  Thanks for all you do!  I love hearing from you when you call or write.  You are so special to me!

Happy stamping and creating,
Sharon

Sunday, January 22, 2023

Another Valentine for You

Happy Sunday Friends!  Hope you're staying dry and warm today.  It's raining again and the temps are hovering just below 40!  Oh my goodness, it's chilly here!  At least it isn't snow.  Oops, I probably shouldn't have said that out loud.  😆  It really was nasty going out for church this morning, but it was worth it.  Great service and Paster Schuyler talked about Christian maturity.  Now tell me, who doesn't need to work on that?  I know I do!

Getting back to stamping, I needed to make another valentine or two (or more!), but I wanted to use stamps that weren't strictly for Valentine's Day.  I had fun going through my stash of cards and decided to use the Count on Me stamp set.  It's so cute, but I keep overlooking it for some of the flashier sets.  Time to show it some love!

This little bear is just the sweetest ever.  He's got his back turned and he's carrying a heart.  Doesn't that work for a valentine?  

I started with a card base of Sweet Sorbet measuring 8 1/2" x 5 1/2" that's scored in half and folded.  Next, I chose the heart print from the Country Floral Lane Designer Series Paper found on page 9 of the January-April Mini Catalog.  It measures 5" x 3 3/4.  I added a backing layer of Petal Pink to define it but kept it real skinny.  The Petal Pink layer measures 5 1/8" x 3 7/8".  The two layers are attached together, then attached to the card front with adhesive.  If you use this paper, make sure you pay attention to the direction of the pattern.

The Petal Pink strip with the hearts to accent this layer is the back side of the first print.  It's 1" wide and is attached with adhesive.

Next comes our little bear.  He's stamped with Memento Tuxedo Black ink on a Basic White piece of cardstock.  I colored him with Crumb Cake Blends in the Light tone first and went back to shade with the same color.  After he'd been finished and sitting aside for awhile, I felt he was too blah, so I went back and colored with the Crumb Cake Dark Blends.  It makes all the difference in the world!  I was surprised that he already looked shaded because I had shaded him already with the Light Blends.  Love his soft look!  His heart was colored with Real Red Light and Dark Blends.  The muzzle was colored with Ivory Blends.  When I was happy with his look, he was fussy cut and ready to go on the card.

I was looking for a die to cut a layer for my bear to reside on.  I checked the new Something Fancy Dies.  You can find these on page 17 of the January-April Mini Catalog.  The larger label seemed the perfect size for my little bear.  It's cut from Mossy Meadow cardstock which is one of the colors listed to match the DSP.  I used the smallest label die of the same shape from the set to die-cut some Basic White cardstock.  I stamped one of the sentiments from the coordinating Something Fancy set using Mossy Meadow ink.

The bear was attached to the Mossy Meadow label with Dimensionals.  The stamped label was attached partially underneath the right side of the Mossy Meadow label.  They were both attached to the card front using Dimensionals.  A double bow of 2022-2024 In Color Baker's Twine in the Sweet Sorbet color was attached near the corner of the label by using a Mini Glue Dot.  And another one of those retired Resin Hearts was attached to the sentiment label.

For the inside of the card, I stuck with a more geometric look.  There is a 1/8" strip of Mossy Meadow cardstock added to the bottom of a Basic White layer.  Then a 1/4" strip of Petal Pink was added to the side.  This way the colors from the front are brought inside the card, but it still leaves lots of room for writing your thoughts.

 Hope you're having fun making a few valentines for your favorite people.  It's a great way to let those special people know how much you care about them.  And don't forget to add chocolate - both for you while you're making the card and for your special someone too.  Stamping and chocolate - a perfect pairing!

Happy stamping and creating,
Sharon