Showing posts with label Courage & Faith. Show all posts

Monday, February 17, 2025

Spring Corners Card

Hello friends!  Just a quick post today.  I just got the Spring Corners Bundle delivered over the weekend and just had to sit down to play.  I kind of made it a little hard on myself by setting a couple of parameters to this project.  First of all, I wanted to use one of the Mixed Media Florals Designer Series Paper that I hadn't used yet as a backdrop for this card.  Secondly, I have a small stack of precut scalloped edge rectangle tags that I've been trying to use up.  This is a product that Stampin'Up! sold at one time.  I'm not going to even guess at how many years ago that might have been.  No wonder my hubby thinks I keep way too many retired things for way too many years.  But as I always tell him, "You never know when you might need that very thing."  Just like right now.  So on to making the project.

Here's the finished card.  I followed the guidelines I set for myself, and it turned out very nice.

Start with a card base of Shy Shamrock cardstock.  This time it's 11" x 4 1/4" and is scored in half at 5 1/2" to make a portrait style card.  I decided on this print from the Mixed Media Floral DSP pack for my project. I loved the greens/blues with the pop of peachy coral for the flowers.  It's so cheerful and bright.

The Basic White rectangle measures about 2 1/4" x 4".  The sentiment in the top corner is one of many from the Spring Corners stamp set.  The cross-hatched lines are another stamp from this set.  They are stamped in opposite corners using Memento Tuxedo Black ink.

The center image is from the Courage & Faith stamp set.  I had a difficult time finding an image that would fit into the area nicely.  If I was starting out from scratch and not using this precut piece, I would choose to go a little wider on this piece for ease in working.  But this is what I had, so this is what I used.

The coloring on this was done with Stampin' Blends which are my favorite coloring tool of choice.  The flowers were done with Calypso Coral Light blended in with Dark at the bottom of the petals.  To add just a bit more darkness, Poppy Parade Light was added sparingly.

The leaves started with a layer of Pool Party Light first, with Shy Shamrock Light & Dark added for interest and blended in.


At this time, I realized I needed another layer between the DSP and the cardstock base.  After trying a few choices, I picked Pool Party to use for the layer.  This measures 5 1/4" x 4".  The DSP layer is attached to this with adhesive.

A Pool Party ribbon is wrapped around the layers and tied into a knot.  Then the layers are attached to the card base with Dimensionals.  The finished focal point was added to the front of the card using Dimensionals to pop it up over the ribbon.

There were gems added to the card for a little bit of bling.  These are the Shy Shamrock colored ones from the 2024-2026 In Color Shimmer Gem.  I like how them added a little more color and shine to tie everything together.

I haven't decided what sentiment to use on the inside of the card yet.  There is a Basic White layer cut for it.  And there is a 1/2" strip of the DSP print to go across the bottom to bring the design and colors into the card.

The Spring Corners set is one of the unique stamp and die sets that are available online in the Stampin'Up! store.  There are so many fabulous items there that you won't find in any of our catalogs.  Make sure you find time to peruse all the products available.  The interesting designs in the Mixed Media Floral DSP pack are only available as an Online Exclusive also.  Some of the very best items show up only there.

Don't forget about Sale-a-bration either.  This special yearly sale will be ending on February 28th.  There have been new items added to the Sale-a-bration free items shown in the brochure.   You can choose your favorite free item when your order reaches $60 before tax and shipping.  Please don't delay in getting yours before it's too late.

Thanks for stopping by to visit.  Let me know what you think about the projects I create.  I'd love to hear from you.  Hope you get a little inspired by my projects and want to try them too.  If you run into any problems or have questions, feel free to email me.

Happy stamping and creating,
Sharon
sharoncarr50@gmail.com
  

Wednesday, May 8, 2024

Courage and Faith Card

 Hello my friends!  Things are sunny and quite hot outside today.  If it's this hot in May, what's it going to be like in August?  Sounds like I'll be spending time inside, a lot!  That will give me more time to stamp and create my cards.  That's a good thing, right?  Today's card was made with the new Unbounded Beauty Designer Series Paper as the starting point.  Basically, I had a piece of this print cut already, so I built the whole card around the DSP.  Not a bad way to proceed. 

Isn't this a pretty print with all the differing shades of pink here?  My accent colors are Berry Burst, Bubble Bath, and Basic White.  I think these colors blended together to make a striking looking card.

To start, there is a card base of Berry Burst which measures 8 1/2" x 5 1/2".  This is scored and folded in half as usual.  The pink layer is Bubble Bath cardstock which measures 5 1/4" x 4".  It's attached to the card base with adhesive. On top of this is the layer of Unbounded Beauty DSP that measures 5" x 3 3/4".  This layer is centered on the card front and attached with adhesive.  

Next was deciding what kind of sentiment would work on the card.  I really like the Courage & Faith stamp set and have used it many times so that was my choice.  I haven't used it with the Countryside Corners Die set that would be the perfect shape to fit the sentiment.  I used the 5th largest die to cut a piece of Bubble Bath cardstock.  Then used the 4th largest die to cut a Basic White layer to accent the sentiment.

The sentiment was stamped onto the Bubble Bath layer using Berry Burst ink.  Then the Bubble Bath layer was attached to the center of the Basic White layer using adhesive.  I tried this on the card, but it needed something else to define it.

I had a 1/4" strip of the DSP left over from trimming down the side of the piece.  I thought about layering it with the Bubble Bath, but that wasn't enough.  So, I added a strip of Berry Burst cardstock along with those two and that worked out perfectly.  The three layers are attached about 1 1/2" from the bottom of the DSP.  The layers are all attached with adhesive.

The sentiment layers are then attached over the accent strip with multiple Dimensionals.  This is not centered on the card front, but off to the side.  

For a little added interest, two small butterflies were added to the sentiment layer.  These are a lovely, shimmery cardstock, but I'm not sure where this paper actually came from.  The butterflies were already cut, so not sure what was used whether a punch or die. It matched, so it was used.  Don't you have a container with those little bits of extra goodies floating around that you aren't sure where exactly they came from, but are just what you needed?  Sometimes my container is sort of overflowing, but I can usually find just the perfect piece to use no matter where it originated.

There you have the latest card in my stash to mail out to friends and family.  Hope you like this idea.  I don't know why I never used the Countryside Corners dies for this stamp set before, but this won't be the last time.  The dies fit perfectly with the sentiment and are so pretty framed up with the next size larger die.  Hope you give this a try.

Thank you for sharing some time with me today.  Hope you're doing well and finding time to create.  It's good for mental health, right??

Happy stamping and creating,
Sharon

Saturday, March 23, 2024

Show Off Those Prints!

 Hey!  How are you today?  I've been playing around with ideas to enjoy both sides of your print paper designs.  Most of our designs are beautiful and coordinate both front and back.  It's so hard to choose which side to use to create your project.  I have to admit, there are times when I only like one side of the DSP, so there's not a problem deciding.  But sometimes, it's hard to choose.  And when the prints work so well together, it's a no brainer - use a design that showcases BOTH sides of the paper.  Even though this DSP was a Sale-a-bration item and no longer available, I still like the prints and colors and wanted to use it.  I know you've got some of this tucked away and maybe need an idea for using it.  Right?  Of course, this layout will work for so many other prints that are currently available.  Just use this idea as a jumping off place and have fun creating this idea with any other DSP prints that coordinate on both sides!

I really like the Pool Party and Wild Wheat colors together.  I had trouble deciding which way to fold the Softly Stippled DSP for this card idea as both ways worked quite nicely.  But this is what I chose.  Let's get to the instructions so you can make this idea too.

Start with the designer paper that you want to use so you can find a coordinating color for the card base.  For mine, I chose Wild Wheat as it matches the main print on the DSP that I wanted to use.  This is cut at 8 1/2" x 5 1/2", scored at 4 1/4" and folded in half.

The Softly Stippled DSP measures 6" x 5 1/4".  This is scored at 2" and folded back on itself.  The piece is then attached to the folded Wild Wheat card base with adhesive.

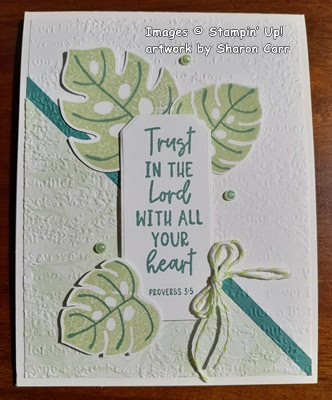
When the front flap is open, there is room for an extra sentiment.  A Basic White cardstock piece was cut to measure 5" x 1 3/4" which will fit on the fold over flap.  One of the Courage & Faith stamps (pg 72 in the 2023-2024 Annual Catalog) was used to add the sentiment.  It's stamped in Wild Wheat ink at the top of the white piece.  To fill in the bottom of this, a small rose from the Stippled Roses (Jan-April 2024 Mini Catalog) was stamped using Pool Party ink.  Before attaching this, there are a few other things that need doing.
The front of the fold over piece has a 3/4" x 5 1/4" piece of the DSP print attached down the center of the flap.  To dress this up, a ribbon was added.  This is a current ribbon combo (with Real Red) in the Annual Catalog.  It's more a neutral color, but I think it blended well.  The ribbon was cut 7 1/4" long to lay across the front and fold and attach on the back about an inch top and bottom.  After attaching the ribbon, the white layer was added using "green glue" to attach in place.  This will help anchor the ribbon in place too.

On the front of the card, a piece of Basic White was cut at 2" x 2 1/2" and a piece of Wild Wheat was cut at 2 1/4" x 2 3/4" to frame the white piece.  The sentiment is from the Biggest Wish stamp set.  The large Hello was stamped with Pool Party ink and the overlapping friend is stamped with Wild Wheat.  These pieces were attached together with adhesive.  Then they were attached to the card front using Dimensionals.  Make sure the Dimensionals stay to the side of this, so it doesn't catch the back when the card is closed.  A spray of leaves from the Stippled Roses dies was cut from Wild Wheat cardstock.  A few leaves were trimmed from this to fit the card better.  It's just tucked in under the sentiment using adhesive to keep in place. 

The inside of the card has a piece of Basic White cardstock cut at 5 1/4" x 4".  A sentiment from Hope & Prayer (pg 72 in A. C.) was added.  This time it's stamped with Memento Tuxedo Black ink.  I love how these two faith-based stamp sets go together.

To add interest, the rose leaves from the Stippled Rose set was stamped with Wild Wheat ink in the bottom corner and the butterflies were stamped with Pool Party ink around the sentiment.

After stamping, the Basic White layer was attached inside the card with adhesive.

I thought a picture from a top angle would help to understand the special fold on this card.  

After looking at the finished card, I thought of the Brushes Brass Butterflies in the Annual Catalog that would be a good addition to this design.  They are small enough to add to the little sentiment tag and would coordinate with the butterflies inside the card.  That's it for this card.  But, I was on a roll with this DSP and tried another card...

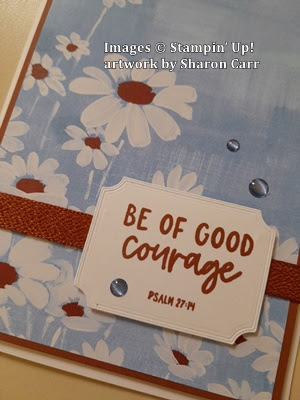
Here's the next card made with this fun fold idea.  Changes to the design are minor.  The card base changed to Pebbled Path and a different DSP print from this paper pack was used.  A retired Calypso Coral ribbon was used this time.  

The same sentiment set as the first card was used with Calypso Coral and Pebbled Path inks instead, and the sentiment layer was changed to Calypso Coral cardstock.

The accents on this card are the 2023-2025 In Color Dots.  I added one of the Pebble Path Dots on each of the sentiment areas.

Hmmm, which DSP duo should I use to make the next card?  Any ideas or suggestions?

Hope you enjoyed this interesting way to showcase both sides of your DSP that you love.  I'm sure each card will be as unique as the DSP prints that are used.

Happy stamping and creating,
Sharon


Monday, February 5, 2024

Framed Open Window Card

Hello there.  Last week a friend asked me to explain how to do a Framed Open Window card.  After trying to explain it, I figured it would be easier to actually make the cuts for the card and text her the pictures.  That was fine, but I had this card base ready to go and it was just sitting there.  So, today was the day I finished up the card.  I figured I might as well post it in case anyone else doesn't know how to make it.  There are probably other ways to make this, but this is what I have found to work.  Hope it all makes sense to you.

This is where I start making the Framed Open Window card.  This measures 4" x 5 1/4" on the outside edge.  The inner part is die-cut with the 2nd largest die from the Scalloped Contours Die set.  Carefully center this on the layer before cutting.  I used two small pieces of washi tape to hold the die in place.  After die-cutting, the piece was embossed with the Softly Sophisticated Embossing Folder which is part of a free Sale-a-bration item.  I love the delicate design on this embossing folder and have used it very often already.
The next step is to place the die-cut layer onto the folded card base.  For this I used Bubble Bath cardstock.  It's already folded so I have the parameters for placing the white layer.  The 3rd largest Scalloped Contours die is placed inside the window and centered inside the white piece.  This die was also tacked down with washi tape to hold it in place while cutting.

TIP:  Sometimes washi tape can be too sticky to remove easily after using.  To help this, I usually tack it to my jeans 2-3 times to lessen the stickiness.  This helps when removing the tape, so it doesn't rip the cardstock.

After all the die-cutting and embossing is finished, the layer was attached to the Bubble Bath card front using "green" glue.

For finishing my card, I used the Darling Details Bundle found on page 68 in the Annual Catalog.  The large fluffy flower and the daisy-style flower were both stamped with Bubble Bath ink.  First the detailed layer was stamped with the ink full-strength.  Then the solid layer was off-stamped before stamping it over the flower details.  The leaves were stamped with Lost Lagoon ink.  The three-leaf cluster solid stamp was off-stamped first, then the veining was stamped full strength over this.

The tiny flowers which are also part of the set were stamped with Boho Blue and Berry Burst inks.  These colors were off-stamped to keep them a lighter tone to blend with the rest of the card.  Everything was die-cut with the matching dies in the bundle.  

All of the flowers and leaves are positioned on the rim of the opening.  The two larger flowers are attached first using Dimensionals in the center of each flower.  The single leaf is cut apart from the other two.  They are tucked in under the flowers.  The little flowers are tucked around the arrangement and attached with Mini Glue Dots.  

The inside of the card has a 4" x 5 1/4" layer of Basic White cardstock.  The sentiment from the Courage & Faith stamp set was stamped inside the window using Basic Gray ink.

The butterfly comes from the Paper Butterfly Accents in the Mini Catalog.  These are so pretty by themselves, but I decided to add a little color to the outer edges of the wings.  Using a Blender Brush and Berry Burst ink, the color is added very lightly and built up to the intensity that I wanted.  The center stayed white.  It was added to the card front using two Mini Glue Dots in the center.

For the finishing touches, the Iridescent Pearl Basic Jewels were tucked around the floral accent.  Three extra pearls were added to define the butterfly body.  

So, I still have the cut-out pieces from this card.  That will have to be the next project on my to-do list.  Still thinking on what I should make using those pieces.  

Don't forget about all the offerings available now for Sale-a-bration.  Time is fleeting and you don't want to miss out on those fabulous choices.  I've been loving both the Flight & Airy DSP and the Softly Sophisticated stamp and embossing folder bundle.  I tend to grab both of those often when the creating bug hits.  Both are turning into must-have items for me.

Thanks for hanging out with me today.  If you haven't made one of these cards before, you should give this a try.  You can use any shape of die for the window, as long as there are two consecutive sizes that work together.  A really good set of dies for this type of card would be the Stylish Shapes Dies.  Let me know if you try these.

Happy stamping and creating,
Sharon

Wednesday, August 2, 2023

Ideas for Using 6" x 6" DSP

Hello there!  We've had a small break in the heat, so we were doing outdoor work yesterday.  Can't imagine why I'm so sore today!  lol  But it was all necessary, and it looks so much better than before.  That makes it definitely worthwhile.  I need to start out by mentioning here about the Kits Sale going on now at Stampin' Up!  It started today and runs to the end of the month.  I really haven't paid attention to the percentage off on all the kits, but I know that some are 30% off.  Woo hoo!  What a bargain when you get everything needed to make your cards or projects and usually have some basic items left over too.  It's a great way to quickly make some of those cards you need.  There's even a couple kits with Christmas cards or tags so you can get a real jump on the season.  Ok, enough of that.  Let's get on with the stamping.

If you noticed the title of this post, you know we're starting with one 6" x 6" piece of DSP.  I'm using the Hello Irresistible Designer Series Paper which is an Online Exclusive item to make these cards.  Make sure you check these all out when you're online placing an order.  More items are added often, and they are available until they are sold out.  So far, this DSP is still available, and I absolutely love it.  The print I chose to use is Soft Seafoam with leaves and stems printed on them in the same tone.  The print is more obvious in person.  But either way, it's such a soft and pretty color.  

Here are the other two cards that were made from the one sheet of paper.  I'll have the diagram to cut the Designer Paper farther down in the post.  Cutting it this way will utilize almost every single inch of this paper with only a tiny smidgeon left.

While you're looking around at the Online Exclusives, check on the Tropical Leaf stamp and punch.  As you can see, I kind of love these too!  They made creating these cards so easy.  And the tropical feel of them is perfect for these hot and steamy summer days.

Ok, this is the template for cutting your 6" x 6" DSP sheet.  For these cards to work properly, you need a print that is non-directional.  Think about using this template for easily making Christmas cards.  Or maybe a batch of birthday cards.  It all depends on which DSP you decide to use.

Let's start with the cuts.  Make your first cut 2" from the left side. Then cut off 3/4" from the bottom of this piece.  This gives you the piece for the first card.  Next cut off 2" from the top of the remaining piece.  That 4" x 2" piece will be on your second card.  The remaining 4" square piece is cut diagonally.  This will give you the pieces for both cards 3 and 4.

Each of the four cards started with a half sheet of Thick Basic White cardstock that was scored and folded in half.  The next step was to cut four pieces of Basic White cardstock measuring 4" x 5 1/4".  Each of the four pieces of DSP were attached to the four Basic White pieces using 'green glue'.  Make sure the DSP pieces come right out to the edges on the white layer.  

Next, strips of Lost Lagoon were cut at 1/4" wide.  One strip was attached to each white layer right next to the DSP layer using 'green glue'.  It's easier to cut the strips longer than needed, attach them, and then trim.  After attaching these strips, each layer was embossed with the Timeworn Type Embossing Folder to give it all over texture.  Then it was attached to the folded Thick Basic White card base.  'Green glue' was used for attaching this also.  

Now on to the leaves.  Both sizes of leaves were used.   The solid base of the leaves was stamped in Soft Seafoam ink on Basic White cardstock.  The veins in the leaves were stamped with Lost Lagoon ink.  The large leaves were punched with the coordinating punch, and the smaller ones were fussy cut.  These were set aside until the sentiments were ready.

Some of the Countryside Inn Dies were used to cut some Basic White labels.  There were several sentiment sets used including Hope & Prayer, and Courage & Faith.  Sorry I don't remember where the 'amazing' sentiment was taken from.  The sentiments are all stamped with Lost Lagoon ink.  

With all the pieces ready, the assembly started.  The larger leaves were only attached at the base of the leaf so it could be slightly curled up.  Each card had two leaves under a section of the sentiment label and one leaf over it.  The sentiment labels were attached with Dimensionals to give them some depth.

Each of the cards has a double bow made from 2022-2024 In Color Twine in the Parakeet Party color.  About 14" was used for each bow.  The bows were attached with a Mini Glue Dot.

For embellishments, two of the cards have 2022-2024 In Color Pearls in Parakeet Party green.  The other two cards have Lemon-Lime Twist gems from the new Tinsel Gems 4 Pack.  Even though the colors aren't the same, I think the embellishments work very nicely with the Soft Seafoam color.  (It pays to check all your embellishments even when they don't say the same color because you never know how they'll look together.)

Thanks for stopping by to see what's new.  Just a reminder that you need to redeem your Bonus Days coupons this month.  They will expire at the end of the month.  So if you don't use them, it's like money down the drain and we can't have that!  Check out the kits on sale and use all those coupons!  Happy shopping!

Happy stamping and creating,
Sharon

Sunday, June 18, 2023

Use Up Those Scraps!

Hello Friends!  Today's post revolves around using up all those 1" and smaller strips of Designer Series Paper that are left over from trimming it down to fit your cards.  Do you have a whole pile of those like I do?  This is a technique I saw on a video that Wendy Lee made.  Loved it and had to give it a try.  I've done these cards using strips of the Countryside Inn Designer Series Paper, so they are a mix of blue tones.  You could use strips that are the same color tones but different prints like these.  Or spice it up by using a multitude of colors and prints that you like together.  Either way works beautifully, and you use up some of those strips that are too nice to throw away, but you've got way too many of them to manage.

Here's a sampling of the different cards I made with this technique.  As you can see, all the prints are from the Countryside Inn DSP, but not all of the prints are used on each card.  I just laid them out in what I thought was a pleasing fashion and each card ended up a little different.

To make these cards, start with a card base of Thick Basic White cardstock.  It measures 8 1/2" x 5 1/2", scored and folded in half.  The Basic White piece that you'll be using to create the card front measures 5" x 3 3/4".  You will also need a coordinating cardstock that has the same dimensions of 5" x 3 3/4".  For this I used Boho Blue cardstock.  On the Boho Blue cardstock, measure 1 1/2" in from the top left side and place a little mark.  Then measure in 1 1/2" from the bottom right corner and make a mark.  Next you cut diagonally from mark to mark so you have a base to attach all the DSP strips.  In fact, you have two bases the exact same size so you might as well make two cards at the same time!  (Or more if you really get hooked on this idea and need a bunch of cards!)

On one of the Boho Blue pieces, we'll start layering on the strips of DSP.  I found that strips that measured between 1/2" and 1" work best.  As I got into making these cards, I got a little more adventurous in choosing sizes and patterns to make them.  

Hopefully you can see from this picture that the bottom strip will go in first.  If you start at the right corner of the strip at the bottom edge of the Boho cardstock and angle it up so the bottom left edge is slightly above the corner of the Boho cardstock, you will get a really good angle to work with.  On this card I left a small 1/16" or so between each strip so the cardstock shows through.  On more than one of the cards, I forgot to leave the space between them, but it didn't seem to be a problem.  Just follow through on all the strips in the same way.  When all the strips are attached, turn it over and carefully trim off the excess.  Now comes the interesting part.

On my Simply Scored Scoring Tool I've used a marker to draw down a line at the 5 1/2" mark.  This makes it easy to see the correct line on both edges of the cardstock you want to score.  For this, take your White cardstock piece and place the Boho Blue piece with all the strips face-down onto the back of the white and line them up.  Place them down onto the scoring tool with the edge of the Boho Blue following the 5 1/2" mark.  Next use the stylus to score lines in the next three grooves right next to the blue cardstock.  These will show up really nice when turned over to the front of the card.
Here you can see the front of the blue prints with the cardstock brought to the front of the white card.  See how the scored lines enhance the diagonal cut of the card?

At this point, stamp whatever sentiment you want on the right side of the card front.  I used the new Courage & Faith set found on page 72 of the catalog.  I love the four Bible verses that are part of the set along with some sprays of greenery and flowers.  The sentiment was stamped with Misty Moonlight ink that matches some of the blues in the prints I used on the card.

After stamping the sentiment, attach the blue prints layer to the front of the card matching up the diagonal scores and all the edges.  I used "green glue" to attach these together.

To separate the two white layers a little, I added a vellum layer on some of the cards I made.  The vellum measures 5 1/4" x 4".  It's attached flat to the card base.  The focal point layer is attached to the card with Dimensionals.

At this point you could add some bling if you wanted.  For these cards, I decided to forgo any more distractions to the card.  I was worried that adding more would take away from this design.  Now that these cards are finished and in the mail, maybe I need to try this technique using different colors and prints.  Just curious how it would look. 

Thanks for stopping in to see what's going on around here.  Hope you like this idea and give it a try.  It's really not as hard as it looks.  And no two end up exactly the same which makes it fun!

Reminder that the 15% off sale of Designer Series Paper is still going on until the end of June.  The last time I looked, none of the papers were sold out yet, but some of them were showing "low inventory".  Don't wait too much longer if you really want a certain DSP.  Get it while you can.

Happy stamping and creating,
Sharon

Tuesday, May 30, 2023

Courage and Faith Cards

Hello there.  I have to tell you a sad little story.  On Saturday I went out to feed the cute little fish in my pond.  It seemed like there weren't quite as many as usual and there seemed to be no frog's hopping out of the way and hiding.  Hmmm.  It rained all Saturday night and throughout Sunday, so I never went out to feed them.  Monday morning, I went for my usual morning visit with my fish and frogs, but I couldn't find a single one.  I was cleaning out the pond, still no fish.  How could I have killed them all off?  What had I done?  I felt so sad I had to make some brownies to cheer myself up.  Oh yes, and I ate few too.  This morning, Heather came by early and as she pulled into the driveway, she startled a heron that was standing in the pond.  It took off and it was much bigger than it looks like down in the creek which is yards and yards away.  Oh no!  Guess it's been snacking on my fish and frogs and ate them all up.  At least I know what happened, but I'm still not happy about it.  We'll have to figure out how to heron-proof the pond before we buy any more fish, that's for sure!

Ok, that's my sad tale for the day.  Not exactly what you came here for, is it?  So let's move on.  Today I worked on two cards that were needed.  I wanted to use the new Courage & Faith stamp set (page 72) for both of these cards and thought the Fresh as a Daisy Designer Series Paper would be a quick and easy solution.  Here's what I came up with to share with you.

I love this blue and white daisy print and wish I had more.  I cut a 5 1/8" strip through the middle of the sheet.  There was still 4" on the top for some other cards and a strip from the bottom that was left over.  I know those strips of daisies will come in handy soon.  I cut it this way, because I wanted the daisies to be near the top of the cards, but not chopped off at the top.  I almost felt guilty cutting right into the middle of the paper, but it's all good and will get used soon.  The DSP was then cut into three 4" sections.  Each was trimmed down a bit to 3 7/8".  I was playing around trying to decide just how much I wanted off the sides and kept all the tiny strips for later use.
This is the first card I made with this print design and wasn't too sure what I'd come up with.  But I liked the finished one enough to actually make two of these.  After cutting the DSP, I decided to layer it onto the new Copper Clay 2023-2025 In Color cardstock.  This is a gorgeous coppery brown color that I really love.  The measurements for this layer are 5 1/4" x 4".  The DSP is attached directly to this with 'green glue'. 

The sentiment is from the Courage & Faith stamp set.  There are some great Bible verses along with some greenery sprigs that make up the set.  It was one of the earliest items I purchased, and I know I'll use it often.  I like that each sentiment has the place listed where to find it in the Bible too.  I couldn't find a current die set that fit this sentiment.  I rummaged around in my retired sets and found this one in the Tasteful Textures set.  It's die-cut from Basic White cardstock, then the sentiment is stamped with Copper Clay ink.  

To keep it simple, the new Copper Clay 3/8" Textured Ribbon was wrapped around these two layers and attached with Tear & Tape Adhesive (page 138).  This is a quick and easy way to get your ribbon to stick well to the back of your card.  Then the sentiment layer had Dimensionals added along the top and bottom of the die-cut.  This allows the ribbon to slide in between.

To finish off the card, attach the layers to the front of a Basic White card front with Dimensionals.  The card base measures 8 1/2" x 5 1/2" scored in half and folded.  

For the pretty bling, I used three of the 2023-2025 In Color Dots.  This color is Boho Blue.  So lovely.

Now for the other card sample...

Of course, there are a few changes here.  First of all, the card base is the new Boho Blue cardstock that matches nicely with the blues in the DSP.  Again, the layers are attached to the base with Dimenisonals for some extra height.

Still using the Courage & Faith set, I changed up the sentiment, so I could also change the die to fit it.  This is one of the Tailor Made Tags and I think it works very well here.  Don't you love the stitching that defines the tag?  There is a short length of some retired copper ribbon from a couple years ago that's strung through the tag.  The sentiment is still stamped with Copper Clay ink.


Now remember all those bits of DSP that were cut from the sides of the daisy layer for the three cards?  Well, here they are showing their lovely back sides to us.  Since I was trying to see how much I wanted to take off the sides, there were different widths of DSP to play with.  I decided to use all three sizes and attach to the card front in a stair step fashion.  They were all about 5" long, so the extra was trimmed off after adding them to the card.

To finish the card, the tag was attached to the front with Dimensionals.  I didn't add any bling on this card.  It seemed too much with the three strips of DSP that were added already.  But of course, you could always add some if you wanted.

Thanks for stopping by today to see what's new.  So sorry you had to listen to me vent about my fish and frogs disappearing, but I really am upset about them being gone.

Heads Up ladies!  Did someone say sale???  Stampin'Up! is having a Designer Series Paper sale during the month of June.  You can save 15% off on any and all of the DSP's shown on pages 129 - 132.  How awesome is that!?  I know I'll be getting another package of the Fresh as a Daisy DSP.  And maybe a few other besides!  Love those sales!

Happy stamping and creating,
Sharon

Saturday, May 27, 2023

Boho Blue Medley

Happy Saturday.  Hope you're having a good day and maybe doing some Memorial Day celebrating.  I thought I'd get a post in today while I still could.  I've been fretting about which one of these cards to focus on, but really couldn't decide.  They all use the same colors and DSP and embossing folder and dies, but all have a slightly different twist to them.  This morning I got the brilliant solution to just share them all in this post and give just a small bit of information on each one instead of a long dissertation on each.  Hope you like this approach today, as it will give you ideas to use when looking at a piece of Designer Paper and not sure where to go with it.  Ok, let's dig in.

My idea started with the thought of using a 3 1/2" wide strip of Countryside Inn Designer Series Paper (page 129) and cutting a segment as needed for my project.  For the first card made, I cut the DSP at 3 1/2" to make it a square.  Basic White Thick is used for the base.  It's cut at 10 1/4" x 4 1/4", scored at 5 1/2".  The 3/4" piece that was cut off the front was attached to the bottom of the inside of the card for as extra layer.  A layer of Basic White 4 1/2" x 4" was embossed with one of the Basic 3D embossing folders (Online Exclusives), then layered onto the card base.  Changed my mind about the layout and trimmed down the DSP to 3" wide and attached it to the base.  The 1/2" I cut off was turned on its side and attached to the bottom of the inside of the card that shows.
Now for the fun part.  The Timeless Arrangements Bundle (page 67) is so much fun to create with!!  I was die-cutting the different layers of leaves with Night of Navy, Misty Moonlight, Boho Blue, Balmy Blue and Silver Foil.  I had a small pile of pieces to choose from when putting these cards together.  I started by stamping a sentiment from Inked & Tiled set (page 95) with Misty Moonlight ink onto a Basic White 1" strip.  I trimmed it to fit my design, then laid different pieces behind it until I had something pleasing to my eye.  Each piece was attached with adhesive then the whole piece was attached to the card front with adhesive.  One card done, on to the next.

First the minor changes.  The added Misty Moonlight layer was cut to 5" x 4" and run through the embossing machine with the same cross-hatch design used above.  Then 1" was cut from the bottom end.  Both of these pieces were attached to the folded 8 1/2" x 5 1/2" Basic White card base.  The DSP was again cut to 3 1/2" x 3 1/2" but not attached to the card front yet.

The sentiment is from the Timeless Arrangements set.  It's stamped with Night of Navy ink onto a 5/8" x 3 1/4" strip of Basic White.  Then again, I played around arranging the bits and pieces die-cut from the same bundle.  All the colors but the Balmy Blue were used here.  As you can see, several pieces were also stamped in Night of Navy ink on white, smudged with a little Wink of Stella and die-cut.   This gives another dimension and texture to the die-cut pieces.

The pieces were all attached behind the sentiment strip.  Then this all was attached flat to the DSP layer with adhesive.  Then the DSP was attached to the card front using Dimensionals.

Two clear Rhinestone Basic Jewels were added to the sentiment strip.  Some small flowers die-cut from the Sentimental Park die set were added to the design.  They are attached with Mini Glue Dots.

I wanted to add some of the Boho Blue Ribbon but didn't want a bulky bow or knot.  So instead, a 3 1/2" piece of ribbon was cut and attached over the bottom piece of Misty Moonlight cardstock using adhesive.  Another texture without the bulk.  Ok, another one finished.  On to the last design.

Same Basic White card base and same Misty Moonlight layer as before.  The Misty Moonlight was not embossed this time.  The DSP layer is also the same 3 1/2" x 3 1/2" size but was turned over so the back side could show.  It is framed with a 3 5/8" x 3 5/8" Basic White layer to break up all the blue.  The white layer is attached to the card front with Dimensionals.

The sentiment I wanted to use for this card is from the new Courage & Faith set on page 72.  I really like the sentiment/Bible verses in this set.  It's stamped on Basic White with Misty Moonlight ink.  It's die-cut with one of the rectangles in the Timeless Arrangements Bundle.  I like the slightly different look to the stitching lines on these and they're great sizes to fit a sentiment.

After die-cutting the sentiment, the layers of greenery were attached with adhesive.  This time only the Balmy Blue and Night of Navy pieces were chosen.  This gives it a cleaner look than the last one.  The sentiment was attached with Dimensionals and the greenery is not attached at the top, just on the sentiment layer.  

At this point I realized I had forgotten to add the ribbon knot to the front of the card.  I pried up the edges and tucked the ribbon in behind the Misty Moonlight cardstock.  That's definitely the hard way to do it!  It was a little loose, so a Mini Glue Dot was tucked under the knot to hold it in place.

To finish it off, three clear Rhinestone Basic Jewels were added to the design.  

By now, I'm assuming you noticed that all the cards basically have the same layout.  But the look is quite different with the layering and pieces used.  I'm definitely a huge fan of the Timeless Arrangements Bundle and all the coordinating pieces that go with it.  If you love blues, you'll love the Countryside Inn DSP.  It's so pretty.  And don't think this can only be done with blues, because the sky is the limit with color combos.  I've already used the stamps and dies with greens, and I've got ideas dancing around in my head with fall colors too.  Yes, this is a total must-have in my book!

If you have any questions about these projects that I didn't cover, please get in touch with me.  I'd love to hear from you and help you out.   Thank you for sharing your time with me and my ramblings.  Enjoy the rest of your holiday weekend.  Make sure you take time to think about all the soldiers through the years who have given their lives for our country.  And don't forget all those who have served in the Armed Forces and are dealing with the aftermath of war. We are truly blessed to live in this country even though there are many problems going on at the moment.  Keep our country in your prayers.

Happy stamping and creating,
Sharon