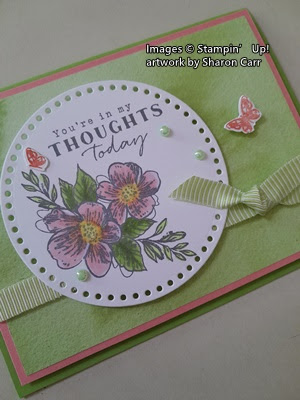
Showing posts with label Everyday Details. Show all posts

Monday, February 10, 2025

Heart Shaped with Lavender

Here it is February 10th already.  I need to get the rest of my cards is the mail and quit making any more valentine cards.  I just couldn't resist trying out another card using the Heart Shaped Bundle though.  The pieces of this stamp set are fabulous, and I'll be using this set throughout the year for so many reasons.   Why quit using hearts when Valentine's Day is over?  

This is so weird trying to type a post without the cards sitting right here in front of me.  I just put them in the mail, so I'll be going off the pictures for all the info.  Hopefully I can remember exactly what I did and used.  

If you look closely at these two cards, you might notice that the heart wreath on the left has a lot more of the greens showing, and the heart on the right has more tones of purple/rose and also beige.  These were die-cut from different prints in the Perennial Lavender Designer Series Paper set which made a lovely difference when putting the cards together.  Let's start from scratch.

This design starts with a base of Crumb Cake cardstock that measures 8 1/2" x 5 1/2" that's scored and folded in half.  The DSP print was chosen next.  I love this delicate print of lavender on a beige-y background.  To frame the print and make it stand out, I chose to use Gorgeous Grape cardstock.  The print and Gorgeous Grape layers were attached together with adhesive.  Then they were attached to the folded card base using adhesive again.

The circle die is from the Deckled Circles and cut a piece of Basic White cardstock.  To frame this, I cut a circle from Gorgeous Grape cardstock using the largest circle die in the Everyday Details set.  This showed off the deckled edge of the white layer and also has the pretty circle dot edge itself.  Love the contrast on these.  So pretty together.


In the center of the white circle, the heart wreath from the Heart Shaped set is stamped with Gorgeous Grape ink as a base for the die-cut wreath.  Next the prints were chosen for cutting the wreaths.  The print for this one has lots of shades of purple from the lavender shown on it.  The beige-y background also shows up here.  After die-cutting, I used dots of "green glue" along the center stem to attach to the white layer.  And the two layers of circle were adhered together also.

A flower die from the Heart Shaped set was used to cut Gorgeous Grape and Highland Heather flowers.  Also, one of the flowers is die-cut from a scrap of the Perennial Lavender DSP to get three different purple flowers.  A butterfly was cut from that same print as the flower.  

The flowers and butterfly were all attached with Mini Glue Dots.  Then the circle layers were attached to the card front with Dimensionals.

The inside of the card is a layer of Basic White.  The heart wreath from the set is stamped with Highland Heather ink.  Then the sentiment from the Hearts of Elegance set was stamped over this using Gorgeous Grape ink.

A very skinny strip of Gorgeous Grape cardstock was added along the bottom edge to bring more of the purple color inside the card.  Then it's attached inside the card with adhesive.

Here's more of a close-up of the wreath using a different DSP print.  You can tell this print has more green in it and gives a slightly different look.

On this card, everything is put together the same way.  About the only other difference is this butterfly is cut from the flip side of the background print used on the card.  This is a bit darker than the previous card.

For the gems on both cards, I chose to add the Iridescent Foil Gems as these have little flecks of lavender shine every once in a while.  The smaller size gems fit atop each flower just right.

The butterflies seemed to need just a bit more bling.  So, they each received a trio of the small Rhinestone Basic Jewels along their bodies for a little glitz and glamour.

I totally forgot to mention the sentiments on the card fronts.  They are another stamp from the Heart Shaped set.  And that lovely little label is one of the dies in the set.  Don't you love that sentiment?  It covers so many different things.  It's stamped with Gorgeous Grape ink onto Basic White cardstock, then die cut.  They are attached with several Mini Dimensionals to pop it up.  And that's it.  These cards are being used for Valentines, but with that sentiment could be used for so many other reasons.


Oh, my goodness!  I almost forgot!!  I need to remind you that the Heart Shaped Bundle is a Sale-a-bration free item choice when you purchase $120 or more.  This set is so worth every penny.  I use it so often I tend to forget that it's not a regular catalog item.  Forgive me, please.  And if you're looking for a demonstrator, I'd love that opportunity.

Thanks for stopping by today to see what's new around here.  I love the look of these cards.  They remind me of one of my grandmothers who was just so delicate, and prim and proper.  This seems to have a sort of an old-fashion vibe to the card in my humble opinion, and I just love it.  Hope you do too!  Make sure you find time for yourself to create and have fun.  Especially with friends!!

Happy stamping and creating,
Sharon

Friday, February 7, 2025

Another Side Box Fun Fold Card

 Hey there!  Hope you're having a great day today.  Wouldn't you know it?  As soon as I gave up on making more of the fun fold cards that I shared yesterday, I went downstairs today and quickly put together another one with some of those leftover parts.  I was just stuck on the stamp set I wanted to use.  Once that idea changed, finishing it was a breeze.  So, what did I actually end up making?  So glad you asked!

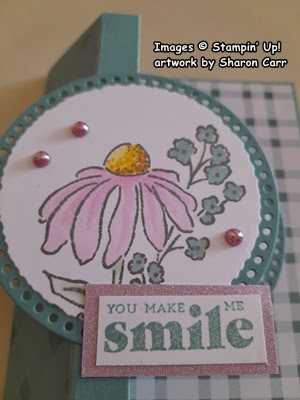
Didn't this work out nicely?  I love the mix of Bubble Bath with the Lost Lagoon.  As you can see, the basic card is totally identical to the Friendly Seagulls I posted yesterday.  I had cut two of everything at the time because I was planning on making two seagulls cards the same.  But plans change, you know?  I decided I wanted to try something else instead.

I won't go over the directions for the card base again here.  Please check yesterday's post for the dimensions and directions.

Today the Mixed Florals set came to mind and I checked to see how the stamp would fit on the Deckled Circle die-cut.  Enough of the design fit to make it work.  The stamp was inked up with Pebbled Path ink to give the design a slightly softer color.


The images were colored with Stampin' Blends:  Bubble Bath Light & Dark, Lost Lagoon Light, Daffodil Delight Light & Dark, Copper Clay Light, and Soft Seafoam Light & Dark.

Because the image was so small it only took about 10 minutes or so to color.  After coloring it was attached to the Lost Lagoon Everyday Details circle die-cut using adhesive.

It was attached to the card base the same way as before by carefully marking the size of the circle on that 1/2" strip with a pencil.  Then adding Tear & Tape within that space.  Peel off the backing on the tape and attach the circles so they are in the center of the card front.

The sentiment comes from the Hugs For Love stamp set.  It's stamped on a Basic White strip that is about 5/8" wide and is stamped with Lost Lagoon ink.  It's carefully trimmed on the sides to fit.  A small piece of In Color Glimmer Specialty Paper in the Bubble Bath color was used to frame the sentiment.  The piece measures 7/8" x 1 7/8".  Guess it pays to hang on to all those skinny strips.  You never know when you'll need just that little bit.  This has two Mini Glue Dots on the top left area of the label to adhere to the circle.

The circles inside the card match the front ones in size and color.  The sentiment I chose for this is from the Grateful Blessing stamp set.  This will be a perfect "just because" card to send out to a friend or family member.  It's stamped with Lost Lagoon ink to match.  

There was a small flower left over from a huge batch of valentines that I made.  I added it here with a Mini Glue Dot.  I liked that little pop of pink inside the card.

I tried several different gems for that little touch of glitz.  I was surprised that these little pearls were such a good match!  They are the Adhesive-backed Pearl Trio.  I thought they would be too big and purply for the card, but I really like them.

Thank you for coming by today.  Hope you enjoyed another look at this cute Left Side Box Fun Fold card.  Whew!  That's a mouthful.  But I just love how cute this little fun fold is when you want to send a special card.  Hope you give this fun fold a try.  It's not as hard as it looks.  I always try the measurements and scoring out on a piece of computer paper to get the hang of what I'm trying to make.  I am absolutely, definitely not an engineer! 

There's only several more weeks to go until Sale-a-bration will be over and done.  Did you see that a good number of new items have been added to the freebie list?  Don't miss out on something you've been wanting and wait til it's too late.  I'd be happy to be your demonstrator if you're looking for one.  Be sure to use the new Host Code at the top of the page.

Happy stamping and creating,
Sharon

Wednesday, September 4, 2024

Autumn Latte Card

Hello my friends.  Do you like those autumn specialty beverages?  I love pumpkin spice lattes, chai teas, and spiced cider.  When fall rolls around, I'm ready for some wonderful, tasty beverages.  For this first card I've made using the new More Than Autumn Bundle, I went with a pumpkin spice theme.  Next one?  Who knows.  It'll probably depend on which one I'd like to be drinking at the time!  Grab your favorite autumn beverage and let's make a card.

Doesn't this just make you want to grab a pumpkin spice latte?  Yum.  For this card, I stayed with the basics of Cajun Craze and Very Vanilla with a few other colors thrown in for contrast.

Start with a piece of Cajun Craze cardstock that measures 5 1/2" x 5 1/4".  This is scored so there is a 1" flap on the left side.  

Next a piece of Very Vanilla cardstock is cut to measure 5 1/2" x 4 1/8".  This is embossed with the Distress Tile 3D Embossing Folder.  A Blending Brush and some Crumb Cake ink added a light blending of color over this layer.  The Very Vanilla layer was lined up with the backside of the card.  Adhesive was added to the inside of the card's front flap, then it was folded down to hold the Very Vanilla layer in place.

A 3/4" strip was cut from a print from the Iconic Celebrations 6" x 6" DSP.  The strip was trimmed to measure 5 1/4" to fit the card.  It's attached to the front flap with adhesive for a nice contrast of color and texture.

A piece of the Country Woods Designer Series Paper was cut to 5 1/4" x 3 1/4".  The largest rectangle die from the Everyday Details set was cut from the center of this.  The outer edge was saved for another project and the inner rectangle was used here.  A 4" x 2 1/2" piece of Cajun Craze cardstock was cut to frame this.  The two pieces were attached with adhesive.  Set aside.

A strip of 1/2" Very Vanilla was used to stamp the sentiment with Cajun Craze ink and trimmed to fit after stamping.  The sentiment is from the More Than Autumn Bundle.  A 3" x 3/4" piece of Cajun Craze was cut to frame the sentiment.  Set aside.

A 3/4" x 2 3/4" piece of Early Espresso cardstock was backed with an Adhesive Sheet.  Then it was die-cut with the "Nothing's Better Than" die from the same set.  The rectangle that was previously made was positioned on the card so it and the die-cut sentiment would fit.  The rectangle is attached with Dimensionals.  The backing from the adhesive layer was stripped from the die-cut and then the sentiment was attached above the rectangle.  Adding this adhesive layer is the easiest way to attach these word die-cuts.

A cup was stamped with Early Espresso ink onto Very Vanilla cardstock.  The pumpkin image was added by stamping with Cajun Craze ink.  The cup was colored with Blending Pens - Pool Party Light & Dark and Crumb Cake Light.  The pumpkin was colored in with a Blender Pen just moving the ink that was already there.  The whipped cream was stamped with Crumb Cake ink onto Basic White cardstock.  The Blender Pen softened the edges of the whipped cream before cutting.  Both the cup and the cream were die-cut with matching dies from the set.  Both the cup and cream were attached to the rectangle with Dimensionals.  The sentiment that was done earlier was attached diagonally to it using Dimensionals also.

After trying multiple embellishment ideas, I settled for the Adhesive-backed Swirl Dots that are an Online Exclusive.  They echoed the swirls in the cream and also in the woodgraining.  I liked the subtle coloring for this card too.

The inside of the card has a 5 1/4" x 4" layer of Very Vanilla cardstock.  The sentiment is stamped with Early Espresso ink.  The pumpkins along the bottom are the same as on the cup.  They are stamped with Cajun Craze ink and a Blender Pen is used to soften the color as on the front.  I love how you can still see the detail of the embossed layer when the card is open.

Hope you love this idea and want to try making it too.  You can use many different images to go on the rectangle if you don't have a hankerin' for some latte or cider.  Think flowers or trees for fall.  Use your imagination and have fun trying your ideas.

Just a reminder that the new 2024 September - December Mini Catalog is available for you to shop from right now!  There is an abundance of cute and interesting new products to choose.  Stampin' Up! has your stamping needs covered from now through Halloween and Christmas!  There's just the right item in there for you.  Have fun making your list and dreaming about all the wonderful items you'll be creating in the coming days!  Then go shop!  Don't forget to shop in the Online Exclusive area too.  There are new items that have just been added.  If you'd like to have me for your demonstrator, I'd be happy to help you out.  Please use the Host Code shown at the top of this blog post.  Thank you!

Happy stamping and creating,
Sharon 
Tuesday, April 23, 2024

Window-Style Card Collection

Hello my stamping friends!  Hope you're enjoying your spring and getting a few things done outside.  I guess the outdoor vistas inspired me to make this series of cards.  My sister, Connie, also shared a couple of window-style cards with me a couple weeks ago when I saw her.  That was my starting place, but you'd never know it from the looks of my cards compared to hers.  Anyway, I have five cards to share with you today.  They all have the same premise of looking through a window to the great outdoors. 

This is the collection that I ended up making.  As you can see, there are lots of different colors used and several sets of dies used too.  Four of the cards use the Meandering Meadow DSP but one uses the new Thoughtful Journey DSP that is coming in the new Annual Catalog.  Both of these paper sets have the most gorgeous water-color style of designs you can imagine.  I love them!  And they are so easy to use to create interesting cards for any occasion.

The first card I'm sharing is the last card I made.  It uses the new Thoughtful Journey DSP along with the Everyday Details Dies.  To make the card, start with a card base of Mossy Meadow cardstock that measures 8 1/2" x 5 1/2".  It's scored at 4 1/4" and folded in half.

Next comes a layer of Basic Beige cardstock.  What?  Yes, this is the newest color that's now part of the neutral basics line-up.  Love this color!  (You can order this May 1st).  This layer measures 5 1/4" x 4".  The largest Everyday Details die is used to cut a window on the left side of this layer.  Don't you love the dotted frame around the window?  Of course, keep the cutout piece for use another time.

The DSP is a piece of 6" x 6" that is cut in half.  The top and bottom of this piece is trimmed a little to hide behind the Basic Beige layer.  It's attached behind the window area with adhesive.  

I left a little extra room on the right side of the beige layer to add a ribbon accent.  After trying several different ribbons, I came across an Old Olive twine that seemed to be the perfect accent.  It's wrapped around twice and tied into a bow.  After this is added, the layers are attached to the center of the card front using Dimensionals.

The sentiment is from the Perennial Postage set.  It's stamped with Memento Tuxedo Black onto a 5/8" strip of Basic Beige cardstock.  After trimming the ends to fit, a little bit of Mossy Meadow ink is added to the edges of this using a Blending Brush.  The sentiment is attached to the card front using Dimensionals.  

Ok, that's the last card of the batch that I made and it's also the most involved.  Let's move on to the rest of the collection of cards to see what catches your fancy.

I was looking to make several get well type of cards.  Seems like there are a lot of surgeries going on among my friends, so I was looking for something bright and cheerful.  This is a cheerful and super quick card to make.  

Start with a card base of Daffodil Delight.  A layer of Garden Green cardstock is cut to 4 3/4" x 3 1/2". Next a layer is cut with the Deckled Rectangle dies from the Meandering Meadows DSP.  This piece measures just under 3" wide, so you can get two of these from one piece of DSP.  The print is attached to the green layer with adhesive.  Then this is attached to the folded card base using Dimensionals.

The sentiment is from the new Unbounded Love stamp set.  It was a perfect sentiment for the card.  It's stamped with Garden Green ink onto a 1/2" strip of Basic White cardstock.  The end is trimmed with the Banners Pick a Punch.  Then it's attached with Mini Dimenisonals.  To finish, three dragonflies from the Birds and Dragonflies accents that are an Online Exclusive item were added.  Thought they looked nice with the scenery.

This next card uses the other half on the DSP sheet from the last card.  The card base for this one is Crushed Curry.  There is a layer of Basic White next that measures 5 1/8" x 3 7/8".  The largest square die from the Stylish Shapes die set is used to cut a window this time.  The DSP is trimmed to fit top and bottom of the card, then attached behind the window with adhesive.

The sentiment for this card uses one from Perennial Postage stamp set.  It's stamped with Garden Green ink onto the bottom area.   

The accents on the card are Brushed Brass Butterflies that will still be available in the new Annual Catalog.  There is also a double piece of twine tied into a bow added to the corner of the design.  The color is Cherry Cobbler and was retired several years ago.  I liked how it picked up the color of the reddish flowers.

This card uses another of the Meandering Meadows prints.  It's cut with one of the Everyday Details Dies that shows all the dots around the print as an accent.  

The card base is Starry Sky cardstock that is retiring soon.  This is the only card that has a landscape fold.  The layer used on it is Bubble Bath.  The sentiment from Unbounded Love is used again on the card.  It's stamped with Starry Sky ink.

The DSP layer is attached with Dimensionals.  This makes the die-cut edge show up nicely.  The bow is made from Bubble Bath ribbon from the Sheer Ribbon Combo Pack.  It's attached with two Mini Glue Dots.

The last card uses the back-side of the previous card's print.  The card base is Blueberry Bushel this time.  There is a layer of Basic White that I used the new Eyelet 3D Embossing Folder.  I think this is a pretty background texture that will be very versatile.  The rectangle window is cut with one of the Everday Details dies.  The DSP is attached behind this using adhesive.  I have to admit, once I got the DSP trimmed to fit, I wasn't sure which side was up anymore.  So, if it doesn't look right to you, it's all my fault!

Before attaching the layer to the card base, the same Bubble Bath ribbon was used to wrap around the side of the layer and tied into a knot.  Then the layer was attached with Dimensionals. 

The sentiment is from the Perennial Postage set again.  It's stamped with Blueberry Bushel ink onto a Basic White piece.  It's die-cut with the smallest rectangle die from the Everyday Details dies.  It's attached with Dimensionals.

And that's it.  Five cards using the same window style layout with a scenery print DSP with it.  I needed a number of get-well cards, and I think these cards will fit nicely.  As I made each card, I was thinking about the person it's going to and trying to fit their style with the cards I made.  I hope the cards will underscore that I care about each person and hope things improve for them.  It's a perk to be able to make similar cards but tailor them to fit each person.  That's one of the things I love about stamping and card making!

Are you watching the calendar?  It's just about time for the new Annual Catalog to be available.  I still have a few things (lol) I'd like to get.  I've been working on my wish list.  Have you?

Happy stamping and creating,
Sharon 

Tuesday, April 16, 2024

Thoughtful Expressions Card

Hello there!  Hope you had a lovely weekend.  We had fabulous weather while visiting in North Carolina and came home to hot weather here too.  These jumps in temperatures and heavy pollen count are really playing havoc with my allergies and sinus issues.  Whew - drippy eyes and noses just aren't a whole lot of fun. So, what can a person do?  Today it was stay inside and create another card.  The colors aren't really my usual style, but I'm trying to expand my creative horizons and use brighter colors.  I used one of the awesome dies in the Everyday Details set for the focal part of the card.  I love those circles with the dot cut-outs surrounding them.  So different and very interesting in my opinion.

Granny Apple Green and Calypso Coral together are usually a little bright for my taste, but I think they work well together here and create a nice, cheery combination.  I wanted this card to have the look of summer, and I think I succeeded.

The card starts with a base of Granny Apple Green cardstock that measures 8 1/2" x 5 1/2".  This is scored at 4 1/4" and folded in half.

Next is a layer of 5 1/4" x 4" of Calypso Coral cardstock.  Attached to this is a 5" x 3 3/4" piece of the Delightful Floral Designer Series Paper.  This is a water-color wash type of print and so versatile.  The variations of greens on this print are a perfect backdrop for any type of florals, and I thought it would be great for this card.

A retired ribbon in Lemon Lime Twist color was wrapped around the two pieces and tied in a loose knot to the right side.  Then these layers were attached to the card base using a number of Dimensionals.

The Basic White cardstock piece was die-cut with the largest circle die in the Everyday Details Die set.  Doesn't the open-work design really stand out nicely?  I love it!  Two stamps from the Thoughtful Expressions stamp set were stamped onto the Basic White circle.  The sentiment was stamped across the top with Basic Gray ink.  The floral image was stamped to the left and curving around the bottom of the circle.  It is also stamped with Basic Gray ink to give both the image and sentiment a softer look.

Stampin' Blends were used to color in the images:
Flowers - Flirty Flamingo Light and Dark colored on first with a bit of Calypso Coral Light over this to deepen the flower color
Centers - Lemon Lolly Light and Dark
Large Leaves - Granny Apple Green Light and Dark
Small Leaves - Lemon Lime Twist Light and Dark

The stamped circle was added to the card front by using Dimensionals.  Make sure the ribbon knot snugs up next to the edge of the circle.

Three of the Parakeet Party 2022-2024 In Color Pearls were added to the card.  I love how they blend in nicely with the other greens used here.  (They are retiring at the end of the month, so order them now if you want them.)

Two butterflies from the Painted Lavender stamp set were stamped with Calypso Coral ink onto a Basic White scrap.  They are die-cut using the matching die in the Perennial Lavender bundle.  The tiny one is attached with a Mini Glue Dot.  The larger butterfly is attached with a half of a Mini Dimensional to fit underneath it without showing.

This will make a very general style of card that fits many occasions.  And of course, you can change colors on the design to fit your desires.

Thank you for visiting my blog post today.  I'm so happy when you stop by.  Feel free to leave me a message and let me know what you think about my projects.  I love to get feedback.  It always helps me to improve my card designs.

Have you had a chance to peruse the new Annual Catalog?   Oh, my, the wonderful goodies that are in there!  My wish list is growing every time I look through there.  If you haven't yet received your catalog from me, please contact me and I'll get one out to you asap.  Ordering from the new Annual Catalog starts May 1st.  If you'd like to order but you need help, get in touch with me and I'd be happy to help any way I can.

Happy stamping and creating,
Sharon
sharoncarr50@gmail.com

Friday, February 23, 2024

Easter Lily Card

Hello all!  Glad to see you stopping by for a minute or two.  I really liked the new Easter Lilies Bundle in the Jan - April 2024 Mini Catalog.  It was one of the first sets I purchased, but it's taken me a while to try my hand at using this bundle.  I seem to struggle making these 3D flowers each time they come out with a new one.  But I'm so happy with the way this one turned out.  I think with all the color and print going on, the lily is very subtle but lovely.  What do you think?

Since the lily is pretty big, I didn't want it to be really bold.  Maybe I'll head in that direction next time but I'm really more of a softer-toned person.  I thought the translucent prints of the Delightful Floral DSP would make a lovely backdrop for my lily.  This gorgeous Designer Paper is an Online Exclusive item.  It's really worth the look to find it.  Here's how I made the card.

I started with a piece of the Delightful Floral DSP that measures 3 3/4" x 5".  The greenery on this print seemed like a good background here.  For this card I wanted the DSP edges to be roughed up or distressed a little.  I used the cutting edge of my Paper Snips to run against the edges of the paper.  Then two of the corners were also curled in on itself showing the soft Pool Party on the back.

This was attached to a Basic White layer by using adhesive.  The white layer measures 5 1/4" x 4".  Then the layers were attached to a folded piece of Soft Sea Foam cardstock that measures 8 1/2" x 5 1/2" for the base.  Dimensionals were used to attach it this time.

Now let's make the lily.  There are three dies to make the lily petals.  They have all this wonderful detail in them.  I tried something a little different on this.  I set the dies on the ink pad lightly before die-cutting the white petals.  Hmmm, didn't work like I'd hoped, so don't bother with that idea anymore.  If you look closely, you'll see some areas without detail that have smudges of Soft Sea Foam ink on them.  I liked this, so still used these pieces.  The stamens were die-cut from a small piece of Lemon Lolly cardstock.  The tips were colored with a Daffodil Delight Blends Dark marker.  The two leaves were cut from Soft Sea Foam cardstock.

Since the ink didn't show up in the detail cuts like I'd hoped, I used a Blender Pen with Soft Sea Foam ink to color along each of the detail lines.  I wanted a very light color on the details that made it look like a plain white lily.  The leaves were colored with a Blender Pen and Garden Green ink lightly on the detail lines with small touches of Pretty Peacock ink.  After adding the lines, I used a Water Pen and smoothed out the lines a little.  This made the leaves nice and pliable for shaping also.


The lily petals are curled back with a bone folder to get more natural looking petals.  The centers of the two and three petal pieces are held together with adhesive.  Then attached to the card base with one Dimensional in the center back.  The stamens were attached only at the bottom of them to the flower center area.  Then the last petal was attached over the stamen ends using a Dimensional.  

The two leaves were tucked in under the lily and attached only at the bottom end, so they have some movement.   A couple of Mini Glue Dots were used to attach each of these leaves. 

The sentiment for the card is from the Easter Lilies set.  First I die-cut a Basic White rectangle from the Everyday Details Bundle.  The smallest rectangle has tiny stitching dots instead of the larger piercings on the larger dies.  This one was the perfect size for the sentiment.  The sentiment was stamped with Pretty Peacock ink to tie in with the DSP colors.  The sentiment was attached to the card base with Dimensionals.


The inside of the card pulls in the colors of the DSP also.  The Basic White cardstock piece measures 3 3/8" x 4 1/2".  The sentiment is from the Easter Lilies set and is stamped with Pretty Peacock ink.  

The two palm branches are from the same set.  They are stamped with Soft Sea Foam ink.  The white is layered onto a Pool Party cardstock piece measuring 5 1/4" x 4".  It's attached with adhesive.  Then it's attached to the inside of the card with adhesive also.

Back to the front of the card, the last item was deciding what form of bling will be used.  I thought about using something with Pretty Peacock, but I wasn't impressed.  Then I remembered these Glossy Dots Assortment.  Perfect.  The yellow gems accented the stamens on the lily and also brought out the yellow tones on the leaves.  It seems a really good match with this lighter toned lily.

Hope you enjoyed this post.  I'm happy to share what I learn as I try new things.  I was very disappointed that I couldn't 'stamp' with my dies, but now I know it doesn't work too well.  I just might try it again sometime and see if I can't get better results.

This really is a beautiful Easter lily set.  I've always loved lilies - Star Gazer lilies to be exact.  Maybe that will be my next attempt with this set!

Just a reminder (as if that's needed) that the Sale-a-bration sale is in its last days.  If you've still got your mind on an item and you've been putting it off, it's pretty much a now or never situation.  There are still some wonderful items to choose for free.  Hope you don't miss out.  If you don't have a demonstrator, I would love to be yours.  Feel free to contact me with questions.

Happy stamping and creating,
Sharon
sharoncarr50@gmail.com
 

Tuesday, February 13, 2024

Painted Lavender Bouquet

Hello, hello.  I can't believe the sun is finally shining again after several rainy days in a row.  I've had more than enough rain this winter.  Of course, in the middle of a dry, hot summer I'll be praying for some of that rain, won't I?  And instead of whining about the excessive rain, I should be thankful it wasn't all snow!!  Seems like we're still adjusting to things down here, but certainly loving it.  Thinking ahead to spring, I was ready to make a card with the Painted Lavender Bundle.  These pieces make a up a bouquet in no time at all.  

I haven't made a gatefold card in awhile, so that was my plan.  For a summery feel, I chose a card base of Garden Green.  This measures 8 1/2" x 5 1/2", and it's scored at 2 1/8" and 6 3/8".  Folding these two sides in should give you a nice gatefold card as your base.

There are two pieces of Soft Sea Foam cut to layer onto the sides.  These measure 2" x 5 1/4".  To add some interest to these panels, they were embossed with the Softly Sophisticated Embossing Folder which is one of the Sale-a-bration items.  I love the delicate design on this embossing folder.  Can't tell you how many times I've used it already!  After embossing, the panels were attached to the card front using "green glue" making sure they lined up top and bottom.

Next, the Basic White panel was die-cut with the Perennial Postage dies.  I used the 2nd largest die, but it was still too wide for what I wanted to do.  Taking the largest die, I placed it over my die-cut piece and lined up the postage edge cutting off about 1/2" from one side.  This worked out pretty well.  I used two bits of washi tape to hold it in place while cutting.  A second piece was cut and left the full size to go inside the card for the sentiment.

On the trimmed down die-cut piece, first there is some Soft Sea Foam ink that is added to the center of the white using a Blending Brush.   The leafy stem was stamped with Garden Green ink in this area of the card at least twice and several times using 2nd and 3rd generation stamping to fill in a bouquet shape.  This gives a good base for all the die-cut stems that are coming next.

The die with the two flower stems was used to die-cut most of the pieces.  Stems were cut from Gorgeous Grape and Fresh Freesia cardstock.  There were also a set of stems cut from the Soft Shimmer 12" x 12" Specialty Paper in the Bubble Bath color.  A smaller die was used to cut stems from Highland Heather cardstock.   A Granny Apple Green Blender Pen was used to color the stems in-between the flowers.  

They were layered up in this order: 2 Gorgeous Grape stems, 2 Fresh Freesia stems, 2 Bubble Bath Shimmer stems, and the one Highland Heather stem last.  They were all staggered as they were added so they weren't lined up like soldiers. The stems were attached only on the bottom two-thirds of each stem using "green glue".  This kept the tips of the flowers looser and more natural looking.  After all the flowers were added, the stem ends that were off the card were given a trim with Paper Snips.

Butterflies from the Painted Lavender set were stamped with Gorgeous Grape ink on Basic White cardstock.  They were die-cut with the matching dies from the set and attached with Mini Dimensionals.  The sentiment from Darling Details was stamped with Gorgeous Grape ink onto a Basic White strip.  The smallest Perennial Postage die was used to cut it out.  

The left half of the lavender bouquet label has two strips of Tear & Tape added to the length.  Then it's attached to the center of the card front.  Make sure there is no adhesive on the right side of the label, or it will be glued closed.   And you don't want that!  The birthday label is attached with Dimensionals under the left side only so it's free on the right edge.


The 2nd die-cut label has a faint blush of Soft Sea Foam ink added to the center with a Blending Brush.  Now it's ready to stamp.  I used a sentiment from Everyday Details stamp set.  It is stamped with Gorgeous Grape ink.  Those butterflies that were used earlier are now stamped inside the card with Highland Heather ink, so they are lighter than the sentiment.  The layer is attached in the center of the card with "green glue".
The final touches on the card are the Purple Fine Shimmer Gems.  These are so pretty and there are three different colors of purple in this set.  I used one of each of the colors on my card.  They all matched with the multiple purples I used for the lavender stems.  Can you find them tucked in the design?  There is also a double bow made from Linen Thread.  It's attached with a Mini Glue Dot.

That's my first attempt at creating with the Painted Lavender set.  It's kind of funny that there's almost no stamping on the card, but still a lot going on.  I'll have to try stamping those gorgeous lavender stems the next time around.

Thanks for stopping in to see what's new.  If you're looking for a demonstrator, I'd love to fill the position.  Don't forget the month of February is almost half over so that means Sale-a-bration is almost over too.  I don't want you to miss out on one of the fun Sale-a-bration items for you to earn free.  If you don't know how that works, feel free to contact me.  I'd love to help.  

Hope you enjoyed and were maybe inspired to give this idea a try.  It was fun creating with all of these purple shades on one card, and I love how they look together here.   Today was definitely a creatively fun day!

Have fun stamping and creating,
Sharon