Monday, March 29, 2021

Sympathy Butterfly Card

 Oh my, time is slipping away on me again.  After a long day of painting shelves for closets and holding boards for my hubby to screw things together, it seems I only crash each night.  I thought I'd get so much done stamping-wise and posting on my blog, but alas that has not been the case at all.  I needed to make a sympathy card  2 weeks ago and got it off in the mail right away.  It's a good thing I remembered to take a picture before it slid into the envelope!  Now I've finally got the time to post it!

I wanted to use one of the beautiful new butterflies from the Butterfly Bijou 6" x 6" Designer Papers.  They are all so pretty I'm finding I want to add them to everything!  This one makes the perfect focal point as a reminder of new life in Christ after our earthly death.  Just like a butterfly, we will be transformed and made new again.  How appropriate for a sympathy card.

The base of this card is Bermuda Bay cardstock cut at 8 1/2" x 5 1/2" and folded in half.  The Basic White layer was first cut to 5 1/4" x 4".  Then it was die-cut with the geometric die from Eclectic Layers Dies.  (At least that's what I think the name is!  It was a left-over piece I had on hand.)  


 I've always loved the open cut-work look on a white layer with a pop of color showing thru for a nice contrast.  This time I used Granny Apple Green for this.  It was attached to the back of the white layer, which was then added to the Bermuda Bay card base using Dimensionals.

The sentiment is from the Sale-a-bration set called Heal Your Heart.  I love the sentiments in that set and will probably be using set for a good long while yet.

The butterfly was die-cut from one of the sheets of the Butterfly Bijou DSP using the Brilliant Wings Dies that coordinate.  The die cuts out 6 butterflies at once and then you can add them anywhere you like,  This pretty one has 3 Mini Dimensionals tucked under his body to help him soar.

The rest of the card was kept clean and simple to let the card elements stand on their own.  I thought anything else would detract from the beauty and simplicity.  There you have it.  Today's card is very easy and quick to make, but I love the clean lines of it.  Tell me what you think.  

The end of March is coming up soon.  If you're thinking of placing an order yet this month, I would appreciate it if you would choose me as your demonstrator.  And then be sure to use the Host Code to get your goodie from me for ordering this month as a thank you.  You guys are the very best and I love you all!  Thank you for the lovely cards that you've been sending.  I love them all.  What a blessing you are to me!


Inky hugs,
Sharon


Tuesday, March 23, 2021

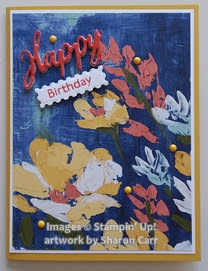
An Artistic Birthday

Looks like it's time to make another birthday card.  I never seem to have enough on hand and I'm always hustling to get one made in time.  This card was made for a very artistic friend so I wanted her birthday card to reflect her style.  I think this fits the bill with the gorgeous Fine Art Floral Designer Paper as the focal point of the card.  

This Designer Paper looks like you could reach out and touch the texture on an oil painting.  All the brush strokes stand out with such depth it's amazing.  In fact my daughter just picked it up and started touching the 'paint'.  Just love this!

I chose to use the Art Gallery stamp set and coordinating die set called Floral Gallery.  Of course these are being sold as a bundle at 10% off right now through June from the January-June Mini Catalog.  I don't know yet whether this set will make it in to the next full Catalog that will be coming out soon.  So if you like the looks of this set, you might want to get it off your wish list and onto an order form!

Ok, let's get to the card recipe.  The card base is Bumblebee cardstock cut at 5 1/2" x 8 1/2" and folded in half.  I added a layer of Basic White cardstock (5 1/4" x 4") to separate the base and the print design.  It gave the look just a bit more definition, and makes the painted flowers just pop.  The DSP layer is 5 1/8" x 3 7/8" so just a little tiny bit of the white layer shows.

I wanted to let the lovely print paper really draw the eye, so I kept everything else very minimal to blend in.  The Word Wishes dies worked out nicely for die-cutting 'happy' from the Poppy Parade cardstock.  I used the Foam Adhesive Sheets placed behind the Poppy Parade cardstock before die-cutting.  This made it so easy to pop up the word to make it really stand out.  I did run this sandwich through the Stampin' Cut and Emboss machine several times to make the word ease out of the die nicely.

The 'happy birthday' sentiment from the Art Gallery set was used to stamp on the Basic White cardstock using a Poppy Parade marker to get just the one word from the sentiment.  This was cut with the die from the Floral Gallery set, then popped up with some Mini Dimensionals.  I thought it went very well with the die-cut 'happy'.  They just seemed to tuck in together.  


Here's a good picture of how the sentiments works together.  
To finish it off, I went back to the retired It's My Party enamel dots in Daffodil Delight.  I tucked 5 of them through-out the card front to make it happy!  Yes, I know they've been retired for a couple years, but I still like them and they just sort of fit with this card.  (Besides, I knew where they were and haven't found the rhinestones yet!)

That's it for today's entry.  Hope you give this lovely Fine Art Floral Designer Paper a try.  It truly is gorgeous with the textural look of an oil painting.  Each and every one of the 'painted' designs are so pretty.  It was really hard to decide which one to use first!  

If you are thinking of ordering yet this month, please consider using me for your demonstrator.  And if you use this month's Host Code, I'll be sending all my lovely customers a little goodie in the mail as a thanks.  You all are a real treasure to me.

Happy stamping and many hugs,

Sharon


Saturday, March 20, 2021

Lots of Ice Cream!

 Now who doesn't love ice cream?  There are so many chilly, yummy flavors to choose from.  I can almost taste my favorite Black Cherry Chocolate right now.  Mmmmm, my goodness!  Oops, a little drool there.  Sorry!  We do have ice cream today, but not the kind you can eat.  It's still very yummy though!  Last night I was playing with the Sweet Ice Cream Bundle and had trouble deciding just how I wanted the card to be put together.  So... I have a whole scoopful of goodness to share with you.

Ok, this is the first yummyliscious batch of cards.  They focused more on the Rococo Rose and Blackberry Bliss color additions.  The base of all the cards is Basic White cardstock.  I used the speckle stamp from the Sweet Ice Cream stamp set on the white to give the idea of sprinkles on the ice cream.  For 4 of the cards I used Rococo Rose off-stamped for the speckles, and on the last one I went a little crazy and tried a mix of Purple Posy and off-stamped Blackberry Bliss just to try something different.   Pretty!

The first layer of Designer Paper on each card is the Oh So Ombre DSP that was one of the Sale-a-bration freebies.  Since I haven't been stamping much the last month or so, I seem to have a bit left-over.  Oops!  This seemed like a good time to use some it up.  It's just too pretty to leave lying around.  Guess I needed to show it some love.

The next layer was the yummy Ice Cream Corner DSP.  Each of the designs of this packet of papers is just as delicious as the next one.  It was so hard to decide which of the designs I wanted to use!

And here is the next batch of ice cream cone goodness.  As you can see, just by changing up the Oh So Ombre DSP to the Bermuda Bay side and also the colors of ink, they tend to look quite different.  It's still the same Basic White cardstock for the base of the cards, with just a switch-up using Pool Party ink for the speckles.  That alone seemed to soften the look of the cards a lot.  

On some of the cards I switched the ice cream cone DSP to the back side that has the multi-color sprinkles on it.  Wow, big change with that look!

All of the cards used the 'thank you' sentiment from the Sweet Ice Cream stamp set.  The set has 7 different sentiments, 4 with larger fonts and 3 with sort of add-on sayings.  I used the 'you're so cool' sentiment on some of the cards.  All of the sentiments from the 1st batch of cards were stamped using Blackberry Bliss ink, and the 2nd batch used Bermuda Bay.  

The cones were punched from Bumblebee cardstock and the ice cream was punched from 2 different prints of the Ice Cream Corner DSP.  Didn't I tell you these papers were just as yummy as can be?  The punching was done with the coordinating Ice Cream Cone Builder Punch.  You can get the stamp set and the punch together right now as a bundle and save yourself 10%.  When you're getting a discount from buying bundles, that seems to be a win-win situation to me.   

Here's a closer look at just two of the cards.  It really does a good job of showing more of the detail of the Ice Cream Corner Designer Papers.  They really are just lip smacking scrumptious!


Hope you like these ideas for a yummy summertime treat.  Can't you almost see the drips of the ice cream and feel the creaminess on your tongue?  Yep, I think I'm ready for some summer weather and fun!  I'm looking forward to sharing some ice cream cones with my grandsons.  That should be happening soon!  

Thank you so much to those of you who have been purchasing from me this month.  It is so very appreciated!  If you haven't placed an order and would like to, please choose me as your demonstrator and use my March Host Code.  I'll be sending everyone that orders from me in March a little goodie as a thank you.  You people are just wonderful!  God bless you!

Happy stamping and many inky hugs,

Sharon


Thursday, March 4, 2021

Blended Birthday Butterfly

 After I made the butterfly card from the last post, I knew I needed to play around with this set again.  This time I actually stamped the 6 butterflies that come all together on one large stamp.  They are stamped with Memento Tuxedo Black ink onto Basic White cardstock.  This would have been an excellent time to use a Stamp-a-ratus as just one corner of the stamp was giving me fits.  Finally, I just decided to go with this one and quit fretting about it.  I was able to get 5 really good images for my Hostess Club ladies, but mine... hmmm, not so much.   Sometimes you just have to go with the flow or drive yourself a little crazy.

Oh my, getting a good look at this picture on my computer makes me wonder what I was thinking.  All the little speckles that look perfect in person seem to look a little smudgey.  Oh, maybe that just might be my computer screen, silly me!  Ok, back to this lovely butterfly creation.  Have you been using the Blending Brushes yet?  If not, you really needed to start playing with them.  The outer parts of the wings were softly colored in with Pool Party.  Then I went back in with Pretty Peacock ink to darken the center near the body.  I played around with adding a bit of Pretty Peacock Blender Pens right next to the body and a bit on the wings.  Then I added some Smoky Slate Blender Pens on the body.  It got just a bit too dark, so stroked on a tiny bit of the Color Lifter along the right edge of the body to give it more definition.  Yes!  Just the look I wanted.  Almost...

I thought the butterfly needed to shimmer in the light, so I stroked on some Wink of Stella to the outside of the wings and lightly brushed in to the center.  Just Gorgeous!
With the butterfly being so ethereal, the background needed to be as light as a breath of spring.  Back to the Blending Brushes!  I used Daffodil Delight along the diagonal, next was Pool Party.  Lastly was the Pretty Peacock to darken the opposite corners.  I find it interesting how you can use bright or intense colors, and by using a light touch you can achieve something as bright and airy as this background.  
It did need some extra interest though.  I speckled the background with Basic Black marker, but it just wasn't enough.  After wishing I had some sort of bling embellishments that weren't all packed away, thought of adding more Wink of Stella.  Spattered that on all over the background. The look is very subtle until the light hits it just right and then WOW! 

The sentiments were stamped from the Butterfly Wishes stamp set onto Basic White cardstock.  I used the Pretty Peacock ink for the sentiments both inside and out.  The Double Oval Punch was used for the sentiment layer and the Basic Black layer too.

Since I had already stamped those 6 butterflies and die-cut them, I figured I might as well grab another one for the inside of the card.  This little one was colored with the Blending Brushes and Daffodil Delight ink.  To add a bit more color, I used the Daffodil Delight Dark Blender Pen on just a few sections of the wings.
To continue with the look from the card front, I used the Blending Brushes with Pool Party and Pretty Peacock inks around the lower edges.  Oh, I'm so loving both the Butterfly Brilliance Bundle, the Blending Brushes, and of course, my Wink of Stella.  For me this card has all my favorite things!

That's it for today y'all.  Hope you give these fun products a try very soon.  And I hope you love them as much as I do!  If you would like to place an order with me this month, please use my lucky shamrock Host Code.  I've got an idea for something special to share with everyone that places an order with me in the month of March.  A big thank you to all that placed an order last month.  I hope you enjoy your little Ladybug Trinkets.  They are so adorable and add a whimsical touch to your creations.

Thank you for stopping in today to see what's new.  We'll be packing up the moving truck on Saturday and driving to our new home on Sunday.  Whew! I was beginning to wonder if I'd be stamping on the little coffee table in the living room for the foreseeable future.  But it's finally, really happening and we're so excited.  Worn out, but definitely excited for this new adventure in our lives.  Look out grandkids - here we come!

Happy stamping with love,
Sharon

If you're interested in the Butterfly Brilliance Bundle and all the other lovely items in this suite, check out the flyers below: