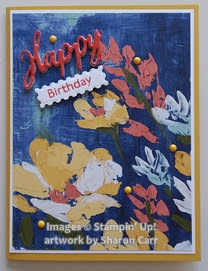
Looks like it's time to make another birthday card. I never seem to have enough on hand and I'm always hustling to get one made in time. This card was made for a very artistic friend so I wanted her birthday card to reflect her style. I think this fits the bill with the gorgeous Fine Art Floral Designer Paper as the focal point of the card.
This Designer Paper looks like you could reach out and touch the texture on an oil painting. All the brush strokes stand out with such depth it's amazing. In fact my daughter just picked it up and started touching the 'paint'. Just love this!
I chose to use the Art Gallery stamp set and coordinating die set called Floral Gallery. Of course these are being sold as a bundle at 10% off right now through June from the January-June Mini Catalog. I don't know yet whether this set will make it in to the next full Catalog that will be coming out soon. So if you like the looks of this set, you might want to get it off your wish list and onto an order form!
Ok, let's get to the card recipe. The card base is Bumblebee cardstock cut at 5 1/2" x 8 1/2" and folded in half. I added a layer of Basic White cardstock (5 1/4" x 4") to separate the base and the print design. It gave the look just a bit more definition, and makes the painted flowers just pop. The DSP layer is 5 1/8" x 3 7/8" so just a little tiny bit of the white layer shows.
I wanted to let the lovely print paper really draw the eye, so I kept everything else very minimal to blend in. The Word Wishes dies worked out nicely for die-cutting 'happy' from the Poppy Parade cardstock. I used the Foam Adhesive Sheets placed behind the Poppy Parade cardstock before die-cutting. This made it so easy to pop up the word to make it really stand out. I did run this sandwich through the Stampin' Cut and Emboss machine several times to make the word ease out of the die nicely.
The 'happy birthday' sentiment from the Art Gallery set was used to stamp on the Basic White cardstock using a Poppy Parade marker to get just the one word from the sentiment. This was cut with the die from the Floral Gallery set, then popped up with some Mini Dimensionals. I thought it went very well with the die-cut 'happy'. They just seemed to tuck in together.
Here's a good picture of how the sentiments works together.
To finish it off, I went back to the retired It's My Party enamel dots in Daffodil Delight. I tucked 5 of them through-out the card front to make it happy! Yes, I know they've been retired for a couple years, but I still like them and they just sort of fit with this card. (Besides, I knew where they were and haven't found the rhinestones yet!)
That's it for today's entry. Hope you give this lovely Fine Art Floral Designer Paper a try. It truly is gorgeous with the textural look of an oil painting. Each and every one of the 'painted' designs are so pretty. It was really hard to decide which one to use first!
If you are thinking of ordering yet this month, please consider using me for your demonstrator. And if you use this month's Host Code, I'll be sending all my lovely customers a little goodie in the mail as a thanks. You all are a real treasure to me.
Happy stamping and many hugs,


No comments:
Post a Comment