Hello!! It's so good to be here getting another post ready for you. It's a beautiful sunny day today which is very welcome after gray skies and rain the last two days. I just ate my lunch on the deck watching the goldfish in our little pond. Ahhh, summer! Because of the sunshine, this morning I thought I'd make a card that's full of warm bright colors. But I wanted to make something that I haven't made in a while. Thinking about card ideas, I remembered a One Sheet Wonder card my friend Sue and I made last November. That was so much fun and was truly one of my favorite Christmas cards I sent out last year. Guess it was time to give the idea an update with new stamps and a new color too. I'm so happy with how this turned out.
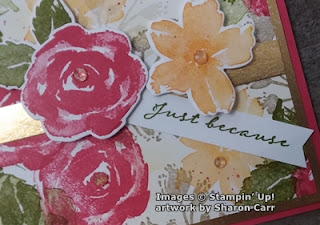
Here's one of the four cards that I made from the One Sheet Wonder design. I started out with one sheet of Basic White cardstock. My stamp set of choice for this was the new True Beauty stamp set and the coordinating die set Organic Beauty Dies. This is the first time I've used the set, so it was totally new to me. Exciting! I just love the rush of trying out a new set and seeing what kind of creation appears.
The list of colors used is: Sweet Sorbet (new In Color!), Old Olive, Mango Melody, and Crumb Cake.
This picture gives you a great idea of how to stamp out the different areas. The first color used was Sweet Sorbet with the lovely rose stamp. The three roses in the middle were stamped first. Next two roses were stamped in from each corner. Then there are four more roses (or partial roses) stamped on the middle of the edges.
Next, the double leaves are stamped using Old Olive ink. The three roses in the middle have a set of leaves between each rose. The double roses have one set of leaves between them. Lastly the edge roses have either one or two sets of leaves depending on space.
The branch thing was stamped next with Crumb Cake ink. I didn't ink the stem at all so it could be tucked in by the roses easily. Most times it was stamped twice in an area without reinking in between stamping. This fills it in a little more.
The wide-open flower from the set was stamped in the open areas using Mango Melody ink. In a larger area, this was also stamped twice without reinking. It just depends on the amount of open space you're dealing with. While doing all this stamping, I stamped four of each rose, leaves, and open flower on a piece of Basic White. These were all die-cut with the coordinating dies for use later when putting the card together. There are also some speckles of Sweet Sorbet ink that are scattered throughout the design. I used the speckle stamp from the Forever Fern set for this.
The 'just because' sentiment from the True Beauty set is one of my favorites. It's perfect for those times when you just want to stay in touch with someone. It is stamped with Old Olive ink on 1/2" strips of Basic White that are left over when trimming the cardstock down for layering. I save these so I always have some on hand when I need them. The right end of each was finished with the Banner Pick A Punch.
Putting the cards together, I trimmed the large Basic White sheet I stamped on to make pieces that are 5" x 3 3/4". These pieces were layered onto Gold Foil pieces that were cut at 5 1/4" x 4". A 1/2" strip of the Gold Foil was attached across the middle of each card. The die-cut rose, leaves, and open flower were arranged around the sentiment. The sentiment strip was attached with adhesive. Then the other pieces were all attached with Dimensionals.
The last step was choosing what kind of bling would enhance these cards. I have a good number of the Genial Gems left over and thought they'd look nice here. I used the peachy toned ones. A larger gem was added to the centers of the flowers, and if needed, a smaller gem or two were tucked in around the design.
I didn't take pictures of the inside of the card, but I wanted to tell you what I did. When I was trimming off the excess on the stamped design, I saved the strips and layered them inside the cards on the Basic White layer for writing on. That is a fun addition to carry your design into the inside of your card. I still have a few strips left over, but I think they're headed for the trash can. I can only hold on to so much stuff to use later. At least, that's what my hubby keeps telling me! 😁
Now that you've seen what I've made, try this idea out with different stamps, or maybe these stamps but with different colors. I made a set of four cards using Balmy Blue, Highland Heather, and Mint Macaron. Wow, totally different look!! It's amazing what a color change can do to the total look of a design. Give it a try! Thanks for stopping by. Hope you've gotten warmed up with these hot colors. Guess I'll have to make do with my sunshiny colors, because it's already overcast again with more rain forecast. Oh well, enjoy it while you can I guess!
Happy stamping and creating,
Sharon


.jpg)
This is a lovely method to use your stamps in a little different way. It reminds me of the Masterboard projects in Take Ten (still missing that magazine!). The cards are beautiful.
ReplyDeleteI miss that magazine too. So many ideas to feast the eyes on.
Delete