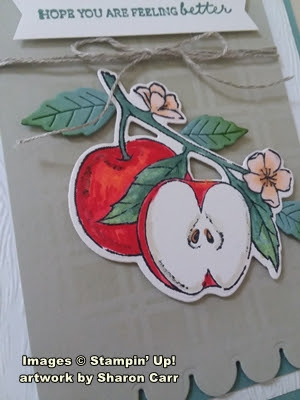
Welcome friends! Glad to have you stop by to see what's new. Since Stampin'Up! has the Perfect Partners promotion going on right now, I couldn't resist making a card using one of the new coordinating die and stamp sets. I hadn't gotten the Apple Harvest set yet, because let's face it - there were no matching dies. But there are now, and I had to order it! Going to the apple orchard and picking apples is an outing that happens for our family most every year at this time. So of course, I needed to make a card featuring apples. I've been playing with it and really like the first card made. It's just a little different than a regular card with a little fun fold added on. Hope you like it too!
I stayed with a clean, crisp look for the card because it reminds me of biting into one of those crisp, tart apples! The card base is only a quarter sheet of Soft Succulent cardstock. There is a piece of Basic White that measures 5 1/4" x 4" next. This piece was embossed with the Timber 3D Embossing Folder found on page 177 of the Annual Catalog. After embossing, I used a Blending Brush and Sahara Sand ink to lightly bring color onto the edges. It was then attached to the Soft Succulent layer with Tombow Multi Purpose Liquid Glue.
The next layer is Sahara Sand that measures 9 1/2" x 3 1/4". It's scored at 4 3/4" and folded in half. There is a scalloped edge die that's part of the Apple Blossom dies. This was used to die-cut a scallop edge across the front of the folded card layer. A 1/4" strip of Soft Succulent was attached along the inside of the bottom edge for contrast.
Can you see the faint check look added to this? I used the Blending Brush and Sahara Sand ink again to add ink through the Artistic Mix Decorative Masks. I kept the brushed ink in the center area of the piece and left the edges clean. I love the subtle windowpane check you get doing this! After adding the background, the folded card was attached to the center of the card base using adhesive
Then it's time to start making the apples. They are stamped onto Shimmery White cardstock using Memento Tuxedo Black ink. The apples are colored in with a mix of Stampin' Blends:
apples - Poppy Parade Light & Dark, Mango Melody Light for a highlight, and on the cut apple - Crumb Cake Light to give it contour
seeds - Soft Suede Light
leaves - Soft Succulent Light & Dark, and Granny Apple Green Light.
flowers - Petal Pink Light & Dark with a touch of Crumb Cake Light in the centers
After all the coloring was finished, the apples were die-cut. The die set also has detailed leaves which I cut 3 from Soft Succulent cardstock. A little Granny Apple Green ink was brushed on the tip of these.
The sentiment I chose is also from the Apple Harvest set. It's stamped with Soft Succulent ink onto a 1/2" strip of Shimmery White cardstock. The ends were trimmed up with the Banner Pick a Punch. It was attached to the top area of the card front using Dimensionals.
Linen thread was wrapped three times around the front flap of the card. It was tied off in a pretty bow and trimmed.
Then the apples are the last item to go on the card front. They're attached with Dimensionals at an angle to fit nicely. The three extra leaves ae tucked in around the apples and also attached with Dimensionals. I considered adding some blling, of course, but I like it just the way it is. So that's it for this simple card. I'm happy with the clean look and simple lines. But with the extras like embossing and the brushed windowpane check, it isn't at all boring. Hope you enjoyed this idea.
Be sure to stop in again to see what I've been creating. You never know just what you might find. I keep thinking I'll get started on some Christmas cards soon, but then I get sidetracked with something else. Is there anything you'd like to see? Give me a shout out and I'll see if I can accommodate you.
Happy stamping and creating!
Sharon


.jpg)
No comments:
Post a Comment