Hello friend! Still feels like fall is in the air, so I'm going to stick with my fall themed cards today. Did you happen to get the Aspen Tree Dies at the end of Sale-a-Bration? I did and I'm so impressed with them. They are still available in the July-December Mini Catalog on page 46. You can get them alone or as a bundle with the Perched in a Tree stamp set. Right now, I'm just focusing on the dies alone. I've fooled around making a few cards with the dies and I love them to pieces! So many different ways of working with them. I think I need to share a few ideas that I've come up with myself, and others that I've CASed and changed up a bit. Either way, I love the look of the tree trunks against whatever background you choose to use. The various possibilities just boggle the mind.
Thursday, October 6, 2022
Aspen Trees Card
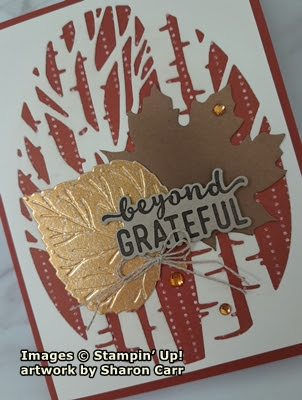
This is the first card I made with the dies only that I'd like to share with you. Doesn't this card speak autumn days to you? I love the colors together.
For this card, I started with Very Vanilla cardstock that measured 5 1/4" x 4" that I die-cut the oval tree trunk image from. This gave me just a small amount of space on all four sides for the die to fit. After die-cutting, I lightly brushed Crumb Cake ink with a Blending Brush just on the tree trunks to give all the detail cuts more definition.
The dotted striped DSP behind the tree trunks is from the Rustic Harvest DSP that I've been using a lot lately. All the prints are so rich in color and design, it's almost hard to decide what to use first! I cut this piece just a wee bit smaller than the Very Vanilla layer so I wouldn't have to worry about it peeking out behind when layering together. I attached them together with Multi Purpose Liquid Glue. Then they were attached flat to a folded card base of Cajun Craze that measured 8 1/2" x 5 1/2".
The die set has two leaf dies that I believe are aspen leaves. I chose the larger one to die-cut some gold foil cardstock. Can you see all the fabulous detail of veining that's right in the die? It really shows up beautifully on the gold.
I wanted to use the Leaf Label and Amber Gems on this card for an accent. The Leaf Labels are made of kraft paper, so they don't match Crumb Cake cardstock too well. To change up the color a little, I used a Blending Brush and Early Espresso ink to darken the center of the maple leaf some. This added some contrast to the Crumb Cake that I used on the sentiment.
The sentiment comes from the Charming Sentiment set, and I used the Sentiment Silhouettes dies that coordinate with it. They're found on page 38 in the Annual Catalog. It is stamped with Early Espresso ink onto Crumb Cake cardstock and then die-cut. What a nice way to add a sentiment without lots of cardstock hiding everything around it.
Now it's time to put all the pieces together. The maple leaf was attached first with adhesive. This is over to the right side. Then the gold foil leaf is angled partially over this onto the left side. It's attached with adhesive also. Then the sentiment is popped up over both of them using Dimensionals.
As an accent, I used two strands of Linen Thread to make a small bow. This was tucked in by the stem of the aspen leaf. It was attached with a "rolled" Mini Glue Dot.
Three of the Amber Gems were scattered around the design. Since the maple leaf die-cut is really a label with hole in the top of the leaf, one of the rhinestones landed there to cover it.
That's it for today's card. I love the colors and look of this card. At first, every time I looked at the Aspen Tree Dies, I kept seeing autumn ideas in my head. But I'll be sharing a card soon that is definitely Not Autumn themed at all! Stay tuned for the next installment of the Aspen Tree Dies!
Thanks for stopping by again. Please leave a comment to let me know what you think of the card. I always appreciate hearing from you. Thank you for all of the orders that have been coming in. You ladies are all so wonderful and I love each and every one of you! Thank you!
Happy stamping and creating,
Sharon
Subscribe to:
Post Comments (Atom)
-
Hello my friends! I feel just a little bit scattered lately. Maybe it's knowing my birthday is right around the corner and that means...
-
Here it is February 10th already. I need to get the rest of my cards is the mail and quit making any more valentine cards. I just couldn...
-
Hello friends. Coming to you from the frozen, but still lovely South Carolina. The temps hit a high of 27 degrees today and there's s...


.jpg)
No comments:
Post a Comment