Hello my friends. Hope you're staying dry on this chilly and wet Saturday. We've gotten a good downpour that started last night and is finally easing off. Then we're supposed to get another 2-3 inches of rain on Tuesday. Whew - maybe we should look into getting that boat we've joked about. Being on a hill sure gives me a feeling of security though. With all the rain, I didn't go anywhere yesterday except down to my craft room. I thought it was time to try out the Thoughtful Moments Hybrid Embossing Folder and Die set. It's one of the new items in the 2024 January - April Mini Catalog that you can order from now. It intrigued me and now it was time to give it a whirl. I've learned a few things by playing with it and thought it'd be a good idea to share these findings with you. So here goes.

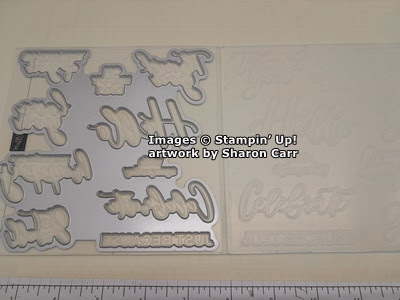
Here is an image of the embossing folder opened up showing how the die fits inside the folder. Let me give you some pointers here. First off, I wanted to see how the embossing folder worked my itself, so I embossed a piece of white cardstock. As far as I was concerned, it was pretty disappointing. Next, I tried to emboss and die-cut together. I used a blue cardstock for this. The words were embossed, but it was quite hard to tell what the words actually were.

The last try was adding Night of Navy ink on the side of the embossing folder that has the SU! logo showing through. The brayer worked quite well, and I didn't get ink all over the place where I didn't want it. Then the die was placed inside the embossing folder. It sort of 'clicks' into place. And lastly a 6" x 6" Balmy Blue cardstock piece was placed inside the embossing folder. It was shut and run through the embossing machine. Here's what I got this time. I love the fine lines of ink outlining the embossed lettering. It really worked out very nicely. Now that I had these pieces made, they needed a card to accent. Right?
Oh, by the way, it's so easy to clean the embossing folder after inking it up. Just hold it under running water in your sink, then dry it off with a soft cloth. Easy peasy. Make sure it's fully dry before using it again with a different color.
I was surprised I didn't have much in the way of DSP choices to match the sentiments I just made. I ended up choosing this daisy print from the Fresh As A Daisy Designer Series Paper. It doesn't quite match, but I thought it worked out well enough. The strip of DSP measures 3" x 5 1/2". I chose a piece of Azure Afternoon cardstock to frame it on the card. This measures 3 1/4" x 5 1/2". They are attached with adhesive, then attached to a folded Basic White cardstock base.
The Double Oval Punch was used to make a scalloped oval in Azure Afternoon cardstock. I thought the sentiment would show up on this fine, but it wasn't quite dark enough as a contrast. I tried the Copper Clay that matched the daisy centers but didn't like that. Instead, I added a Night of Navy smaller oval using the same punch. I really wish I'd used Basic White for making the sentiments instead of Balmy Blue which wanted to fight with almost everything I put with it. Oh well, it's done now.
Some white sequins from the Adhesive-backed Sequins Trio were added for a little bling. These are found in the Annual Catalog. For some reason I'm really gravitating towards the sequins lately. They're a nice addition, but don't add a lot of height to the card for mailing ease.
At this point, I had another piece of the DSP lying on my table and all those other sentiments, so here we go with another one.
The daisy print is cut to 3" x 5". A piece of Azure Afternoon was cut to measure 5 1/4" x 4". To add interest to this layer, it was embossed with the Sale-a-bration freebie Softly Sophisticated Bundle. I absolutely love this embossing folder! It has a delicate dotted design that's a perfect backdrop when you want something subtle and interesting. This was attached to the folded Basic White cardstock base with adhesive. Then the daisy print was attached to the center of this.
One of the Countryside Corners Dies was used to die-cut a piece of Vellum Cardstock that was a little bigger than the sentiment. The Hello was attached to the vellum with Mini Dimensionals. Then use more Mini Dimensionals under the vellum where they're hidden behind the sentiment. This means both the vellum and the sentiment are raised up from the card to highlight them.
Three of the brown sequins from the Neutrals Adhesive-backed Sequins found in the Annual Catalog were added as an accent. They matched nicely with the centers of the daisies.
Hope you enjoyed this mini lesson on using the Thoughtful Moments Hybrid Embossing Folder and Die set and want to give it a try. It really is interesting to work with and gives you another dimension when creating your cards. Just for your information, if you purchase the Thoughtful Moments Hybrid set and the brayer to go along with it, that makes you eligible to receive one of the Sale-a-bration free items! And if you order this from me, you'll get two punch points towards $15 off an order. Just saying... Sale-a-bration goes from January 4 - February 28. Don't put off taking advantage of these freebies while they last!
Happy stamping and creating,


Clearly inking worked well. I like the outlines of the letter as it adds more interest and dimension.
ReplyDeleteYes, it only took three tries to figure it out!! lol
Delete