Hello my 'stuffed' friends. If you're like me, you still feel a little 'stuffed' from your Thanksgiving dinner yesterday. But that's not stopping me from those leftovers today! It was so nice having family share the day with us. I think I told Kathy that the day was filled with family, food, and football. I should have included fun in that mix too. But today I'm back sharing Christmas ideas with you. There's still time to make oodles of cards to share with family and friends. Let's get busy.
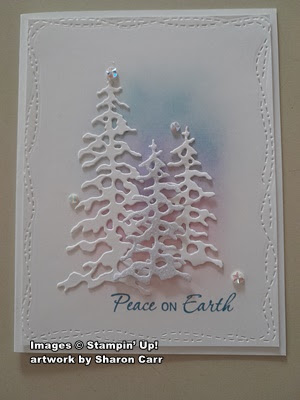
Here's a card that's a little different from my usual Christmas colors, but I totally love the look. I was actually working on a different project and fiddling with color choices for that card trying to find the right mix. When I saw these colors together, I was inspired to switch projects right away and make this card instead. I love pastel colors, and this card really says it all.
For the card, I started with two pieces of Basic White cardstock. One measures 8 1/2" x 5 1/2" and is scored in half for the card base. The second piece measures 5 1/4" x 4". This piece would carry the trees and blended background to elevate the card a little bit.
I was going to use the Deckled Rectangle Dies to finish the edge on this top piece. Instead, I dug out an old die set. Remember the Stitched with Whimsy Dies? This is the largest one and I thought it added just a little fun to this layer.
Using three different Blending Brushes, I added color to the background. Bubble Bath is the first color used near the bottom. Then a band of Fresh Freesia ink was added next. Lastly, the Boho Blue ink was added to the sky area. TIP: when using this dark of a color for the pastel area, I had very little ink left on the brush and kept a very light touch on the brush.
Using the Peaceful Evergreens Dies, the trees were cut. The largest and smallest detail tree dies cut the Basic White trees. The smallest tree die was also used to cut one tree from the pack of Berry Burst, Old Olive, and White Glimmer Specialty Paper. Thought that would make a pretty accent.
The sentiment from the Shepherd's Care stamp set was added along the bottom. It's stamped with Boho Blue ink.
The largest tree was attached with "green glue" dotted on the back. It's attached to the left side and down close to the sentiment. The small Basic White tree was also attached with "green glue" to the right of the card center with a little space between them. The glimmer tree was attached between those two trees. I cut tiny bits of Mini Dimensionals apart to tuck behind thicker areas on the tree. This lifted the tree up just enough to add interest. Do you notice how the glimmer on the tree seems to pick up the colors on the background?
At this time, I used "green glue" again to attach the white layer to the card base. The glue was kept well inside the stitched lines. When the card was put together, the edges look like they are slightly elevated.
One of the ideas I had for embellishing this card, was die-cutting the stars that are part of the die set. I cut several from the glimmer paper that was used for the tree. The stars seemed way too big for these delicate trees. One of the awesome embellishments I tried on this card really stood out and caught my eye. These are the Iridescent Faceted Gems. Wow! They really sparkle and pick up all the colors on this card. Just perfect.
Yay! Another card finished for my Christmas card stash. One of these days, I'll have to sit down and count how many I have finished and how many more I'll need. The countdown is on to get them all finished addressed, and in the mail. Before Christmas would be nice. 😄
There are new stamps, dies, paper, and all kinds of goodies that I've been pre-ordering as a demonstrator. The stack of new items is calling my name and I'm antsy to start playing with them!
When I was thinking over all the blessings that I'm thankful for, you came to mind. My stamping friends have blessed me beyond measure by the kindness, helpfulness, and loyalty you've shown me. And I'm thankful for you stopping by today to see what's been going on in my stamp room. There seems to be way too many stacks of partially finished project ideas that I need to sit down and get serious about finishing. You'd probably have a heart attack if you saw my room. Rick thought he made sure I had enough counterspace to work on, but oh my! I really could use double the space. Of course, then I'd probably fill that up and need even more space. Never enough!! Get stamping!
Happy stamping and creating,
Sharon


.jpg)
What a beautiful card! I love the subtle color and texture.
ReplyDeleteI truly enjoy your blog and appreciate the conversational tone.
Space? I find that the best way to keep me focused to to do the opposite of taking more space - I limit my space to keep me on track, that way I need to finish something in order to go one with another project!
Hi Barb. Thanks for your comments. I'll make it a goal for the next week to focus on the unfinished projects and see how that works out. Wish me luck!
Delete