Hello friends. I've been so busy playing with colors and these Thankful Garden Masks that I haven't gotten around to posting anything. So today I have two cards to share. Each of them uses the "other flowers", not the hydrangea. I'm not sure what kind of flowers they are, but they do come out lovely when using the masks and mixing the colors. Do you like pastels? I tend to gravitate towards pastels when I'm creating for myself, so this is what you get today. Two pastel versions of these pretty flowers. If you prefer brighter and more intense colors, just blend the color on heavier or use darker ink colors. You can make these beautiful flowers in any combination that you'd like to find in your garden.
Of course, my first try with this flower needed to be pink. Very soft and pretty, isn't it? First the flowers are stamped on a piece of Basic White cardstock. I used Memento Tuxedo Black for this.
Next come the masks. I used a bit of Washi Tape to hold the cardstock in place. After placing Mask #1 in place, I drew in the registration marks and used a piece of Washi Tape to hold in place. I started with Pretty in Pink ink and a Blending Brush. Using very little ink, I started blending at the bottom of the flowers and swirled the brush up. I had to check if there was pink on the flowers because it was so light.
With Mask #2, I added a little more of the Pretty in Pink. Then very lightly added a bit of Fresh Freesia ink to change the tone a little bit.
Mask #3 was adding more of the Fresh Freesia ink but still keeping it on the light side.
Mask #4 moves on to the leaves. My first blended layer was Pool Party ink. I thought this kept with the pale flowers. It needed a little green added to the leaves.
The last mask #5 is the details on the leaves. For this I tried the Summer Splash In Color. I really liked how that worked out on the Pool Party base.
Now that all the color has been added, the flowers are die-cut with the matching die. Set aside until we're ready to put together.
The card base is Basic White cardstock. It measures 8 1/2" x 5 1/2" and is scored and folded in half. There is a layer of Pretty in Pink cardstock next. This measures 5 1/4" x 4". It is attached to the folded card base with "green glue".
There is a Basic White layer next. This measures 4 1/2" x 3 1/4". The new Mini Corrugated 3D Embossing Folder is used on this to give it texture. (We used to have a corrugating tool that I used often. I'm sure I'll like this one just as much.)
A length of sheer white and silver-edged ribbon is wrapped around the white layer and tied into a knot on the side. I used "green glue" to attach this layer to the front of the card. I also added a Mini Glue Dot under the knot to hold in place.
The pretty flowers are attached with Dimensionals to the upper part of the white layer. A sentiment from the new Spring Corners stamp set is stamped onto a 1/2" strip of Basic White cardstock with Memento Tuxedo Black ink. The left edge was angled to fit snuggly under the stem. The right end was cut to fit the edge of the card and flagged to finish. This is attached to the card front below the ribbon with Mini Dimensionals.
Three of the clear Rhinestone Basic Jewels were added to the design. This compliments the silver edge on the ribbon nicely.
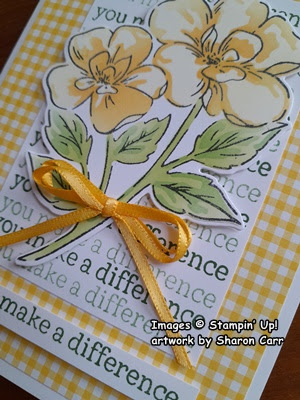
Thee second card is another pastel, but this time a cheerful, sunny yellow color. The flowers were stamped the same with Memento Tuxedo Black ink on Basic White cardstock.
Mask #1 was lightly colored in with a Blending Brush and Lemon Lolly ink.
Mask #2 was another layer of Lemon Lolly ink.
Mask #3 is a layer of Daffodil Delight ink. To change the color a little, I lightly blended on just a touch of Peach Pie ink.
Mask #4 is first a light layer of Lemon Lime Twist with just a smidgeon of Granny Apple Green added at the bottom of each leaf.
Mask #5 is a light layer of Granny Apple Green with just a few touches of Garden Green added.
This was die-cut and set aside.
The card base is Basic White cardstock that measures 8 1/2" x 5 1/2". It's scored and folded in half.
A layer of yellow and white checked paper from the Floral Delight DSP pack was added. It is 5 1/4" x 4" and attached to the base with "green glue".
There is a layer of Basic White cut that measures 4" x 2 3/4".
This sentiment fit from edge to edge on the Basic White piece. The stamp was inked with Garden Green ink then stamped once, moved down and stamped again. Then it was ink, stamp, stamp again, and repeat all the way down the cardstock piece.
This was stamped once more on a 3/8" piece of white to match.
The white layer was attached to the card front with "green glue". The single strip was attached under this with Mini Dimensionals.
The flowers were added to the white layer with Dimensionals.
A double bow was made with the Daffodil Delight 1/8" Ribbon. It's added to the stem and attached with Mini Glue Dots. This is a great addition with all these other yellows.
Up to this point, I haven't decided on which type of bling I want to add. Or maybe it doesn't need anything extra as all. You decide. Hope you like both of these options for these lovely flowers. Now that I've started in with these masks, I don't know how I'll tear myself away.
Have you gotten your fix for the Thankful Garden and it's coordinating set of masks? If not, hang around a bit. Chances are I'll be playing with them again soon.
The new catalogs should be mailed out shortly. How exciting! I always love getting the new catalog in my hands so I can dream and maybe "drool" over it! If you're one of my customers, you should be getting yours in the mail soon. If you don't have a demonstrator yet, I would like to be that person in your life - your stamping coach and friend. Let me know if you have any questions about these projects and the products to make them.
Happy stamping and creating,
Sharon


Beautiful
ReplyDeleteThank you so much for your kind comment!
ReplyDeleteI love these!
ReplyDeleteThank you! So glad you like these cards.
Delete