Hi there! It's been so chilly lately; I can't believe this is the south. I think you guys in Michigan are just as warm as we are. Maybe even a touch warmer! What's going on here?? I was hoping there would be some hot weather to share these ice cream ideas with you, but it's not working out that way. Oh well...
As you can see, I'm getting a little obsessed with this milkshake idea. It's just so fun! Today's card uses a new color - Bubble Bath. What a fun pink color this is. I was surprised that it paired nicely with Moody Mauve. So here we are. Another milkshake, but different.
For my card (the one on top) I used Moody Mauve for the card base that measures 8 1/2" x 5 1/2", scored at 4 1/4" and folded in half. The Bubble Bath layer is cut at 5 1/4" x 4". I didn't attach this to the base until the end in case I needed to start over. Not quite sure what my plan was at this time. There was going to be an ice cream cone for this card, but when putting the pieces together, I changed my mind. I really didn't like the cone with the white grid pieces. So back to the milkshake idea.
This time, the glass was only off-stamped on the detail stamp, not the solid stamp. This made the glass much darker than the first one I made. For this one, two scoops of ice cream were added. The chocolate scoop is stamped with Pecan Pie ink. I think it turned out great. The other scoop was my favorite black cherry ice cream of course. This is stamped with Berry Burst ink.
Both the chocolate and black cherry scoops have some speckles added I used the speckle stamp from the Quiet Meadow stamp set (page 66) with the same color ink. I think it added a slight bit of extra goodness to the ice cream scoops.
The Share A Milkshake die set has this awesome grid die that adds so much to the background. I cut two of them in Basic White Thick cardstock. They were added to the Bubble Bath layer with adhesive. I positioned the milkshake where I wanted it, then realized I really didn't have too much room left for a sentiment. Oops. But not to worry, there are lots of sentiments in my stash that I could choose from. I found this sentiment in the Sweet Citrus stamp set (page 32). I liked the wording, but it was one long stamp that wouldn't fit anywhere. After stamping it on a long strip of Basic White, it was cut to separate the individual words. I didn't try to keep them straight when cutting. It had so much more interest with the slightly different angles. The words are attached flat on the card front with adhesive.
Again, this card has no added bling. It seemed there was enough going on already and anything more added would just be a distraction. I am open for suggestions if you feel it really needs something more. Let me know what you think.
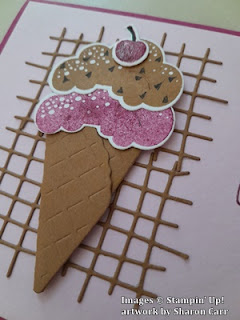
Ok, as you saw in the first picture, Connie made an ice cream cone for her card. Let's talk about that.
Connie cut two of the grid pieces from Pecan Pie cardstock. This carries over the look of the cone. The cone is also cut from Pecan Pie cardstock. It already has score lines for folding like a cone. And it has all that lovely detail embossed right into it!! How cool!
She also used Pecan Pie and Berry Burst inks for her ice cream scoops. An Early Espresso marker made the small chocolate chips.
Cherry Cobbler was used to ink the cherries. Garden Green marker was used to color the stems. She also used Pecan Pie and Cherry Cobbler markers to color the sentiment on the side of the card. A little swish of Wink of Stella over the cherries was the finishing touch.
Hope you like these ideas. Thank you, Connie, for playing along with me. It sure was fun. I'm going to have to move away from the ice cream and milkshakes because I'm going to put on too much weight just playing with them! 😄 I promise the next post will be something besides food. See you soon!
Happy stamping and creating,
Sharon


.jpg)
We've had freeze warnings! But you're still making me want some ice cream ;). I think the grid works wonderfully with these treats.
ReplyDeleteSorry to hear about the cold weather, but ice cream is great any time of the year. Right?
Delete