Hello, hello! Seems like it's been forever since I sat down to write on this blog. Vacations will do that to you, so I've heard. We had such a good time together in North Myrtle Beach, but it's great to be back home. The first half of the week we had heavy rain storms every day and some at night too. But the weather finally settled down and Nathan's team was able to play Friday, Saturday, and Sunday. Some wins, some losses, but the boys played hard and didn't give up. I really don't understand how the organizers just arbitrarily decided to up the team's standing to a higher level of players. It makes it really rough when you're used to playing at one level and now you're against much better players. Oh well, obviously I'm not in charge!
Okay, enough of that. Let's get to the stamping part! I've been playing around with the Inked & Tiled set before vacation and again today. This has been an easy set to use, and I love the finished cards. I think I might run a mini-series on this set so you can get a good idea of some ways to use it.
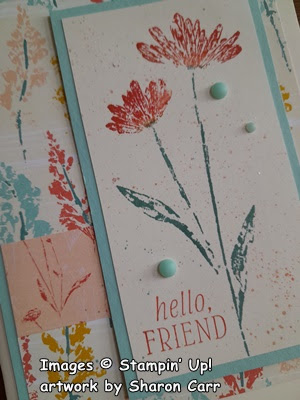
This card was made over a week ago, but I'm still happy with it each time I look at it. It starts with a base of Very Vanilla cardstock measuring 8 1/2" x 5 1/2", scored and folded in half. The DSP is one of the prints from the Inked Botanicals 6" x 6" Designer Series Paper. I used the colors on this paper to decide what to use on my card. This print was cut at 5" x 3 3/4" for this card. Since the DSP is 6" x 6", the extra cut off piece of DSP was attached across the larger piece about 1/3 up from the bottom for a nice contrast.
I originally planned to frame it with a full layer of Pool Party cardstock but changed my mind at the last minute. I liked the asymmetrical look better. The Pool Party was cut at 1 1/2" x 5 1/4" which happened to be a left-over piece from another project. This was attached behind the DSP, then attached to the card base with adhesive.
The Very Vanilla cardstock piece for stamping the focal image measures 2 1/4" x 4 1/4". This seems to be a good size for the floral image. The flowers were inked with a Calypso Coral marker directly onto the stamp, and the stems and leaves were colored with a Lost Lagoon marker. Remember to "huff" on the stamp before stamping. This will help the ink stay wet, so you get a good print. The sentiment was also stamped on the Very Vanilla with Calypso Coral ink using one of the sentiments from the Inked & Tiled stamp set.
It all seemed sort of boring at this point, so I grabbed those markers again and spattered the background with both colors. Then added an extra spattering using Wink of Stella which adds a slight touch of glimmer to it.
This layer was then added to the card front using Dimenisonals. Almost finished now. I wanted to add just another bit of accent. I almost added some Brushed Butterflies which looked nice. But I went with some Ombre Matte Decorative Dots instead. I liked the added pop of the Pool Party dots to accentuate the card.
Hope you like the card idea. Like I said, I've been having fun with this set and plan on making another post or two using it. At first, I didn't think I needed another floral stamp set, but I'm so glad I picked this one up. I think the images look like pressed flowers, so it was different from any other floral I had. Also, there is no die set that coordinates with it, and you know how much I like my bundles!! I've gotten so lazy about cutting out the images, but I've made a card with the image cut out and it really wasn't too hard. So, this seems to be one of my new favorite stamp sets. At least until I get another new one! LOL
Thanks for stopping by today to see what I've been stamping. You never know just what you'll find. If you're planning on ordering, please check on this blog for the current Host Code. I really appreciate you using it when you order online. And don't forget to check out all the Online Exclusives and new kits that are available. There are more showing up next month that are great for a head-start on your Christmas cards. The Clearance Rack is also shown online for you too. If you haven't checked it out in a while, you really should take the time to look around. Always something good out there!
Happy stamping and creating,
Sharon


.jpg)
Lovely! I like the spatter - just the right touch.
ReplyDeleteIt does break up all the open space without being too much. Thanks for your comment, Barb.
Delete