Hello there! We've had a small break in the heat, so we were doing outdoor work yesterday. Can't imagine why I'm so sore today! lol But it was all necessary, and it looks so much better than before. That makes it definitely worthwhile. I need to start out by mentioning here about the Kits Sale going on now at Stampin' Up! It started today and runs to the end of the month. I really haven't paid attention to the percentage off on all the kits, but I know that some are 30% off. Woo hoo! What a bargain when you get everything needed to make your cards or projects and usually have some basic items left over too. It's a great way to quickly make some of those cards you need. There's even a couple kits with Christmas cards or tags so you can get a real jump on the season. Ok, enough of that. Let's get on with the stamping.

If you noticed the title of this post, you know we're starting with one 6" x 6" piece of DSP. I'm using the Hello Irresistible Designer Series Paper which is an Online Exclusive item to make these cards. Make sure you check these all out when you're online placing an order. More items are added often, and they are available until they are sold out. So far, this DSP is still available, and I absolutely love it. The print I chose to use is Soft Seafoam with leaves and stems printed on them in the same tone. The print is more obvious in person. But either way, it's such a soft and pretty color.
Here are the other two cards that were made from the one sheet of paper. I'll have the diagram to cut the Designer Paper farther down in the post. Cutting it this way will utilize almost every single inch of this paper with only a tiny smidgeon left.
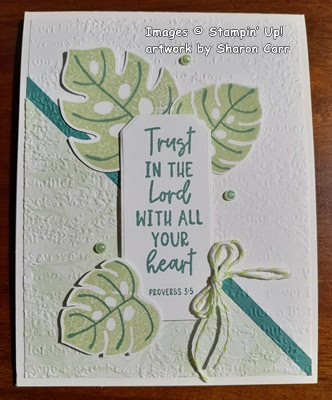
While you're looking around at the Online Exclusives, check on the Tropical Leaf stamp and punch. As you can see, I kind of love these too! They made creating these cards so easy. And the tropical feel of them is perfect for these hot and steamy summer days.
Ok, this is the template for cutting your 6" x 6" DSP sheet. For these cards to work properly, you need a print that is non-directional. Think about using this template for easily making Christmas cards. Or maybe a batch of birthday cards. It all depends on which DSP you decide to use.
Let's start with the cuts. Make your first cut 2" from the left side. Then cut off 3/4" from the bottom of this piece. This gives you the piece for the first card. Next cut off 2" from the top of the remaining piece. That 4" x 2" piece will be on your second card. The remaining 4" square piece is cut diagonally. This will give you the pieces for both cards 3 and 4.
Each of the four cards started with a half sheet of Thick Basic White cardstock that was scored and folded in half. The next step was to cut four pieces of Basic White cardstock measuring 4" x 5 1/4". Each of the four pieces of DSP were attached to the four Basic White pieces using 'green glue'. Make sure the DSP pieces come right out to the edges on the white layer.
Next, strips of Lost Lagoon were cut at 1/4" wide. One strip was attached to each white layer right next to the DSP layer using 'green glue'. It's easier to cut the strips longer than needed, attach them, and then trim. After attaching these strips, each layer was embossed with the Timeworn Type Embossing Folder to give it all over texture. Then it was attached to the folded Thick Basic White card base. 'Green glue' was used for attaching this also.
Now on to the leaves. Both sizes of leaves were used. The solid base of the leaves was stamped in Soft Seafoam ink on Basic White cardstock. The veins in the leaves were stamped with Lost Lagoon ink. The large leaves were punched with the coordinating punch, and the smaller ones were fussy cut. These were set aside until the sentiments were ready.
Some of the Countryside Inn Dies were used to cut some Basic White labels. There were several sentiment sets used including Hope & Prayer, and Courage & Faith. Sorry I don't remember where the 'amazing' sentiment was taken from. The sentiments are all stamped with Lost Lagoon ink.
With all the pieces ready, the assembly started. The larger leaves were only attached at the base of the leaf so it could be slightly curled up. Each card had two leaves under a section of the sentiment label and one leaf over it. The sentiment labels were attached with Dimensionals to give them some depth.
Each of the cards has a double bow made from 2022-2024 In Color Twine in the Parakeet Party color. About 14" was used for each bow. The bows were attached with a Mini Glue Dot.
For embellishments, two of the cards have 2022-2024 In Color Pearls in Parakeet Party green. The other two cards have Lemon-Lime Twist gems from the new Tinsel Gems 4 Pack. Even though the colors aren't the same, I think the embellishments work very nicely with the Soft Seafoam color. (It pays to check all your embellishments even when they don't say the same color because you never know how they'll look together.)
Thanks for stopping by to see what's new. Just a reminder that you need to redeem your Bonus Days coupons this month. They will expire at the end of the month. So if you don't use them, it's like money down the drain and we can't have that! Check out the kits on sale and use all those coupons! Happy shopping!
Happy stamping and creating,


This paper is beautiful and I do my best to use every bit - I like this idea! The color combination is lovely and the texture adds so much dimension.
ReplyDeleteThanks Barb. I guess I've been on a texture kick lately. I love it when the card has layers and you can 'feel' it.
DeleteExactly!
DeleteThe texture really brings it all together.
ReplyDelete