Hey friends! Are you ready to get a serious start on those Christmas cards? I feel like I've been on an exciting and exhausting card marathon the last few days. Whew boy! Was it ever fun! I've got so many new things to share with you. Today is the start of a series of cards made with the new Joy of Noel stamp and die set. This first one is a pretty straight forward card made in shades of red and green. Just what you'd expect at Christmas time. We'll see where we go from there. Come on, let's create!
See, pretty basic but it does have a few extras to make it special. There are a few layers, and as I look at it now, there are many variations that are already floating about in my brain. This card starts with a Shaded Spruce base that's 8 1/2" x 5 1/2", then scored and folded in half.
Next is a layer of the Joy of Christmas Designer Paper. This print is a mottled mix of Real Red and Cherry Cobbler that's cut to measure 5 1/4" x 4". It's not attached to the card base just yet.
Another one of the prints in the DSP is this lovely water-color-y look of leaves. I just fell in love with this print along with several other water-color prints in this paper pack. You have to see them! They almost look like painted vellum layers that are so sheer. Just gorgeous! This print was cut to measure 2" x 5 1/4".
There are a couple other layers also cut at this time. A Basic White layer that measures 5 1/4" x 2 1/2". And a strip of the silver More Dazzle 6" x 6" Specialty Paper. It measures 5 1/4" x 3/4". This may be just a small strip, but it really packs a wallop of glitz!
These three layers were attached together with adhesive. Then they were attached to the red DSP with adhesive. If there are any uneven edges, now is the time to trim them straight. Afterwards, attach them to the Shaded Spruce card base. Everything is layered flat on the card.
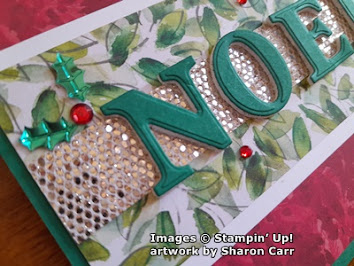
Now on to making the NOEL. I backed a piece of Shaded Spruce with Foam Adhesive Sheets found on page 138 in the Annual Catalog. Both pieces measured 2 1/4" square. After attaching together, the piece was die-cut with the Joy of Noel Dies. Can you see the wonderful texture the die leaves on each letter? It's almost like another layer of green cardstock there. The backing was simply peeled from each letter, and they were placed on the More Dazzle strip in the center. Easy Peasy.
Several Loose Holly Gems and Sequins were added to finish the design. The top left and bottom right corners each have two holly leaves and a larger red gem. There are a few of the smaller red gems tucked in around the design to finish. These shiny leaves and gems make the perfect accent.
There you have it. It's a pretty traditional style of Christmas card with the usual red and green colors, but I love the little extras that make it stand out like the awesome Joy of Christmas DSP, the More Dazzle Specialty Paper, the die-cut letters, and lastly the little sequins and gems to finish. I don't know about you, but I love Christmas time whether you go traditional or more modern or even eclectic. It just makes me happy.
Now, for something else that really makes me happy - the new September -December Mini Catalog is live and ready for business! Woo Hoo! I'm sure you've been waiting for the time to order and it's here now. Let's go shopping. I have to admit, I added another order for myself this morning. I just couldn't resist! And make sure you check out the Online Exclusives, the new Kit that's available, 5 new Designer Paper packs, and the Clearance Rack too. Lots of new and old items available right now! If you do order, I'd appreciate it if you would use the Host Code shown at the top of the blog post. Thank you so much. Come back to see the next installment using the Joy of Noel Bundle. I think you'll like it.
Happy stamping and creating,
Sharon


.jpg)
The holly bling is so pretty - and I like the dimension on those letters.
ReplyDeleteI agree. That holly and gem bling are just so Christmas-y.
Delete