Happy Saturday! What a perfect day for sleeping in, so I did! It was a rough night of no sleeping last night, and I really needed a few hours of sleep this morning. Do you have no-sleep nights like this? It sure messes up my day. But the time wasn't wasted. While I was awake, I watched a video by Connie Stewart that showcased this fun fold. Thought it would be a great way to play with some new stamps and dies. I finished a card during the middle of the night. Since I was sleep-deprived, we'll hope this card is ok. Let me know what you think of it.
I have just gotten the Tiny Christmas Trees Die in the mail yesterday, so why not use it right away? I thought I'd keep it fairly simple, but then kept adding a little bit here and there until this card appeared.
It starts with a basic 8 1/2" x 5 1/2" card base using Garden Green cardstock. It's scored at 4 1/4" and folded in half. Next 3 pieces of Very Vanilla were cut to measure 5 1/4" x 4". One is for the front of the card and the other two are for the inside of the card. Taking one of them, I die-cut the trees over the entire card front. A little Garden Green ink was blended onto the edges with a Blending Brush. I kept this as light as possible.
This is backed with a layer of Gold Foil Specialty Paper that's cut to measure 5 1/8" x 3 7/8". It makes the gold just barely smaller than the die-cut piece, but still covers all the trees. It's a little tricky, but once I got the measurements down, it was a piece of cake. I used "green glue" between the rows of trees to hold the gold paper in place. Six Dimensionals were used to attach this to the card front.
The tags were cut with the Tailored Tags Die set. The two middle sizes of the fancier tag were used. The smaller one cut Very Vanilla and the next size up cut the Garden Green tag. The vanilla tag was stamped with the single tree in the Forever Forest set. It's stamped in Garden Green ink. Then it's stamped two more times without re-inking to make the shadowy trees at the sides. These two tags were put together at an angle with a small amount of adhesive.
On two 1/2" strips of Very Vanilla, the Merry from the Christmas Classics stamp set was stamped, once in Garden Green and once in Real Red. These were punched with a 1/4" circle punch and layered over the two tags. A red ribbon from the Real Red and Burlap Ribbon Combo was used to add a pretty bow. Dimensionals were used to attach the green tag and Mini Dimensionals are under the ends of both of the merry tags to hold in place.
The inside has the two extra vanilla pieces stamped on with Garden Green ink. The left side has the row of trees from Forever Forest. The right side has a sentiment from Wishes All Around. They are attached to the inside with adhesive.
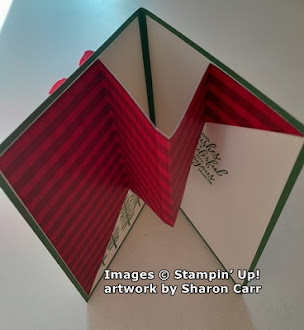
Now for the fun fold part. A piece of red plaid from the Joy of Christmas Designer Series Paper was cut to measure 5 1/4" x 8". It was then cut diagonally from bottom left to top right. This gives you two pieces to make two different cards. Because I used a plaid design, the second half got flipped around and both cards can be made the same. Starting at the wider side, this piece is scored at 2", 4", and 6".
Both the left and right sections are attached to the inside of the card and the center sections are v'd out. Here's a good picture of the opened card. Just something a little different to share with your family and friends for the holidays.
As you can see from the picture, I missed the mark when scoring one of the lines. Make sure you pay attention to the measurements better than I did! Did I mention sleep-deprived? I guess this is what happens when you don't get any sleep! Not so good!!
Thanks for stopping by today. I know a lot of my Michigan friends are stamping and creating at an all-day crop today. Miss all of you so much. Hope you're having fun today sharing all your ideas with each other.
If you're wanting to order any of these items, please consider using the Host Code shown at the top of this post. It is so much appreciated! And leave a comment if you can. I love hearing from you!
Happy stamping and creating,
Sharon


.jpg)
No comments:
Post a Comment