Showing posts with label Christmas Classics Bundle. Show all posts

Friday, December 22, 2023

Musical Christmas Classics

Hello again.  Just 3 more days until Christmas.  Woo Hoo!!   Boy has it ever crept up on me this year.  Today I have one last Christmas card to share with you.   I couldn't resist one last card that's beautiful and so easy to make.  Just in case you're going to visit, one of these cards and a plate of goodies would be a lovely hostess gift.

Stamps:  Christmas Classics

Cardstock:  Very Vanilla, Pecan Pie

Ink:  Pecan Pie

Dies:  Stylish Shapes Dies

Embossing Folder:  Merry Melody

Extras:  Festive Pearls in gold, Adhesive-backed Star Trinkets, Gold and Vanilla ribbon that is from several years ago, Mini Glue Dots, and Dimensionals

The embossed music staff really shows up nicely to go with the words of the song "God Rest Ye Merry Gentlemen".  Seems like this song has been playing in my head for the last few days.  It's a good thing I like the song.

Just another picture for you because I think the card deserves a 2nd look.  

Hope you have all your cards finished and in the mail.  For some reason I always leave one or two cards until the end that need a long letter included.  One of these years I'll learn to do those cards first and get it out of the way, so I don't need to stress over it.

My daughter has been here making cookies with me today.  A couple of the recipes need to chill overnight, so we'll get those two finished up tomorrow.  Whew!  We did get a batch of pimento cheese spread made today too.  I was never a fan of this until a new 'southern' friend shared her recipe with me.  It's so yummy, but it makes a huge batch.  So, Heather took some with her to a party tonight.  Hope they love it as much as we do!

Christmas Blessings to you and your family,
Sharon


Wednesday, November 29, 2023

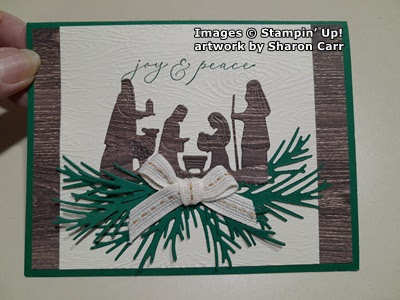
Night Divine Nativity Card

Hello, hello!  Are you staying warm?  Oh my goodness, it's cold here.  It's been getting below freezing the last two days, and I'm so not prepared for that!  This isn't why we moved to the south.  We thought we'd get away from the cold.  I know, most of you are already dealing with that kind of weather and maybe some snow too.   So, I shouldn't complain.  Well, maybe just a little now and then.  😄  I'm still working on making my cards for Christmas.  I keep planning to use the Night Divine Bundle, but then I end up grabbing some different stamp set.  Well, today is the day.  I saw a similar card using this set that I thought was on Pinterest.  It totally intrigued me.  I went back to get the person's name that made it to give her credit, but I couldn't find it anywhere.  I must have seen it somewhere else.  If you've seen this idea, please let me know so I can credit her here.

The major idea that I copied was using wood-grain paper for the layering.  I love the realistic grained look for this die-cut!  I'll be honest and tell you I rummaged through all my wood-grained paper, and I have a lot.  I was looking for the heaviest graining I could find.  Needless to say, this is a retired DSP.  But you can use any wood-grained paper you have that you like.  Also, this card uses 4 different stamp bundles to get the look I wanted.  That doesn't mean you need to go out and buy everything I used.  I'm sure you have stamps that fit the look just fine.  The big item that's really necessary is the Night Divine Bundle.

My card starts with a card base of Shaded Spruce cardstock that measures 8 1/2" x 5 1/2".  It's scored and folded in half.  Next is a layer of my wood-grained DSP.  It measures 5 1/4" x 4".  Before attaching this to the card base, die-cut the image using the Night Divine dies and set aside.  Attach the layer to the card base using adhesive.  What was die-cut from the middle will not show once the card is put together.

The next layer is Very Vanilla that measures 4 1/4" x 4".  This has a sentiment from the Night Divine set.  It's stamped with Shaded Spruce ink about 3/4" from the top of the layer.  This was embossed with the Timber 3D Embossing Folder (page 169).  I like how this look matches with the wood-grained layer and looks a little rustic.  After embossing, attach this to the card front using adhesive.  The top and bottom should fit right over the wood-grained DSP with it showing only on the sides.

At this time, attach the die-cut piece with adhesive.  Place the bottom edge of the die-cut about 1 3/8" from the bottom edge of the layer. This makes it a little higher than middle of the card.  

Next a double evergreen die from the Joy Of Noel Bundle was used to cut five branch sets from Shaded Spruce cardstock.  Two of them are attached to the left side overlapping them.  Then two of them were turned over to the backside and attached to the right side to match.  The last double branch was cut off at the stem to make it fit on the card.  This picture shows how everything is layered together.

The bow I made uses the Pecan Pie Center Stripe ribbon that's in the Mini Catalog.  I tried the Gold and Vanilla Satin Edge ribbon in the Annual Catalog, but it didn't fit as nicely with the rustic look of the card.  After making the ribbon, it's attached over the evergreen branches with two Mini Glue Dots to hold in place.

The inside of the card is finished with a layer of Very Vanilla.  It measures 4 7/8" x 3 5/8".  I wanted more of the Shaded Spruce showing on the edges so it's cut smaller than usual.

The sentiment is from the Wishes All Around stamp set.  It's stamped in Shaded Spruce.  This has turned out to be one of my go-to sentiments this Christmas season.

The evergreen branches on the left are from the Christmas Classics set.  They are stamped multiple times to give it a fuller look.  These are also stamped with Shaded Spruce ink.

Now I need a little help here.  I've been debating about adding a few of the tiny gold Festive Pearls in the Annual Catalog.  Or maybe one of the gold Star Trinkets in the Mini Catalog?  Does the gold accent work on this?  Does it even need anything else, or should I leave it as is?  Help!  A little input would be appreciated.

Ready for some big information?  The retiring list for the Mini Catalog is available now.  Yes, it's that time already.  So, if there are any items in the Mini Catalog that you were debating about getting, time is running out.  You know how fast some items sell out!   So, make your choices now.  Click on the label to take you directly to the retired list.


If you are ordering, please consider using the Host Code at the top of this blog post.  It would be very appreciated.  Thanks for sharing some time with me today.   It's always pleasant to hear back from you and find out whether you like what I've made each day.  You make me want to create and share with you!

Happy stamping and creating,
Sharon

Sunday, November 5, 2023

Christmas Classics Updated

Hello friends!  My goodness!  Here it is Sunday again already.  Where does the time fly?  It was a busy week and obviously I didn't get much of anything done.  I did do a little stamping, but not any posting.  Sorry for the long wait since the last post.  I do have a pretty Christmas card for you today though.  The colors are Moody Mauve and Pretty Peacock - not quite traditional colors, but I think this turned out quite nicely.

This card used little bits of several different specialty papers that came together perfectly.  I started with a piece of the All About Autumm 6" x 6" Specialty Paper.  It was back in stock at that time, so I felt free to use it.  I had a piece that was 4 1/8" x 3" left over and that's what the card was made around.  This is such a pretty print with the copper detailing all over it.  It has a nice baroque feel to the design and would look wonderful as an ornament, but that's not what I'm doing today.

Picking out the card colors from the paper, I chose to use Moody Mauve and Pretty Peacock.  The card base is Moody Mauve that measures 8 1/2" x 5 1/2" scored and folded in half.

A piece of Pretty Peacock cardstock was cut to frame the All About Autumn DSP piece.  It measures 4 1/4" x 3 1/8" to give it just a tiny frame to offset the pretty paper.  These are attached together with adhesive and then attached to the card front using Dimensionals.  Now for all the extras.

Using the large frame die from the Christmas Classics Bundle, the frame for the sentiment was die-cut from the Pretty Peacock paper in the Soft Shimmer Paper Combo Pack.  You can find this in the Annual Catalog on page 127.  This is very easy to overlook but is so pretty!  The frame with the open-work holly and leaves with the berries is really lovely with that very subtle shimmer.  

The sentiment label from this set was die-cut from Basic White.  The label is stamped with a sentiment from Christmas Classics in Pretty Peacock ink.  This is attached flat to the frame we just made.

Using an open-work leaf spray from the same set, three were die-cut from the Oxidized Copper Specialty Paper found in the Mini Catalog.  When cutting, two were cut from the mottled copper, and one was cut from the paper with the Peacock color running through it.  Two of these leaf sprays were attached under the frame with the last one on top of the frame.   This was all attached to the front of the card using adhesive.

The holly branch and berries were also from this same set.  The holly was stamped with Pretty Peacock ink and colored in with the Pretty Peacock Light Blends.  The berries were stamped with Moody Mauve ink.  These were all die-cut with the coordinating dies.  I used Mini Glue Dots to attach each of these pieces to the sentiment area.

The inside of the card has a layer of Basic White cardstock.  The sentiment is one that I like a lot from the Wishes All Around stamp set.  Pretty Peacock ink was used to stamp it.  

When die-cutting the leaf sprays to accent the front of the card, I tried a couple in plain copper that were from a retired pack.  I thought it was too bold for the look I was going for, but it seemed to accent the inside of the card just right.  It's attached with adhesive to the left of the sentiment.

Here's one last look at the finished card.  This time I used no extra bling on the card.  I thought it was pretty enough just as it was.  What do you think?  Does it need any more added to it?  With the metallic accents on the DSP along with the leaf sprays, I was happy as is.  Of course, I'm always open to options when it comes to adding extra bling!

Thanks for sharing a bit of time with me today.  I'm having fun thinking outside the box when choosing my Christmas colors lately.  Don't worry though, the navy cards will be showing up again soon.  That seems to be my stand-by color for Christmas.  Have a very blessed day!

Happy stamping and creating,
Sharon 

Saturday, October 21, 2023

Christmas Tag Fun Fold Card

Happy Saturday!  What a perfect day for sleeping in, so I did!  It was a rough night of no sleeping last night, and I really needed a few hours of sleep this morning.  Do you have no-sleep nights like this?  It sure messes up my day.  But the time wasn't wasted.  While I was awake, I watched a video by Connie Stewart that showcased this fun fold.  Thought it would be a great way to play with some new stamps and dies.  I finished a card during the middle of the night.  Since I was sleep-deprived, we'll hope this card is ok.   Let me know what you think of it. 

I have just gotten the Tiny Christmas Trees Die in the mail yesterday, so why not use it right away? I thought I'd keep it fairly simple, but then kept adding a little bit here and there until this card appeared.

It starts with a basic 8 1/2" x 5 1/2" card base using Garden Green cardstock.  It's scored at 4 1/4" and folded in half.  Next 3 pieces of Very Vanilla were cut to measure 5 1/4" x 4".  One is for the front of the card and the other two are for the inside of the card.  Taking one of them, I die-cut the trees over the entire card front.  A little Garden Green ink was blended onto the edges with a Blending Brush.  I kept this as light as possible.

This is backed with a layer of Gold Foil Specialty Paper that's cut to measure 5 1/8" x 3 7/8".  It makes the gold just barely smaller than the die-cut piece, but still covers all the trees.  It's a little tricky, but once I got the measurements down, it was a piece of cake.  I used "green glue" between the rows of trees to hold the gold paper in place.  Six Dimensionals were used to attach this to the card front.

The tags were cut with the Tailored Tags Die set.  The two middle sizes of the fancier tag were used.  The smaller one cut Very Vanilla and the next size up cut the Garden Green tag.  The vanilla tag was stamped with the single tree in the Forever Forest set.  It's stamped in Garden Green ink.  Then it's stamped two more times without re-inking to make the shadowy trees at the sides.  These two tags were put together at an angle with a small amount of adhesive.

On two 1/2" strips of Very Vanilla, the Merry from the Christmas Classics stamp set was stamped, once in Garden Green and once in Real Red.  These were punched with a 1/4" circle punch and layered over the two tags.  A red ribbon from the Real Red and Burlap Ribbon Combo was used to add a pretty bow.  Dimensionals were used to attach the green tag and Mini Dimensionals are under the ends of both of the merry tags to hold in place.

The inside has the two extra vanilla pieces stamped on with Garden Green ink.  The left side has the row of trees from Forever Forest.  The right side has a sentiment from Wishes All Around.  They are attached to the inside with adhesive.

Now for the fun fold part.  A piece of red plaid from the Joy of Christmas Designer Series Paper was cut to measure 5 1/4" x 8".  It was then cut diagonally from bottom left to top right.  This gives you two pieces to make two different cards.  Because I used a plaid design, the second half got flipped around and both cards can be made the same.  Starting at the wider side, this piece is scored at 2", 4", and 6".  

Both the left and right sections are attached to the inside of the card and the center sections are v'd out.  Here's a good picture of the opened card.  Just something a little different to share with your family and friends for the holidays.

As you can see from the picture, I missed the mark when scoring one of the lines.  Make sure you pay attention to the measurements better than I did!  Did I mention sleep-deprived?  I guess this is what happens when you don't get any sleep!  Not so good!!

Thanks for stopping by today.  I know a lot of my Michigan friends are stamping and creating at an all-day crop today.  Miss all of you so much.  Hope you're having fun today sharing all your ideas with each other.

If you're wanting to order any of these items, please consider using the Host Code shown at the top of this post.  It is so much appreciated!  And leave a comment if you can.  I love hearing from you!

Happy stamping and creating,
Sharon

Monday, October 2, 2023

Magical Meadow Christmas

Hello friends!  Here it is another week gone and another month too.  Can you believe it's already into October?  Where have the months gone?  This means the holidays are coming up fast and furious.  I need to get serious about making these cards!  Today's card is something I envisioned before I even ordered this wonderful stamp bundle - the Magical Meadow.  Yes, this really does portray a magical meadow of possibilities.  I've done this card as a Christmas card, but with a quick change of colors I think it would be a gorgeous fall card.  I'll have to give that a try when I have time.  For now, let's just focus on the Christmas theme.

I totally love navy and white for Christmas card colors but have already done several with those colors.  It was time to use other colors even though I was sticking with a monochromatic color scheme.  I debated about purple or Pretty Peacock.  As you can see, Pretty Peacock won out.  I'm so happy with how the card turned out.  If you'd like to make one too, I'd be happy to share the instructions with you.

Start with a half piece of Thick Basic White that's scored at 4 1/4" and folded in half.  There is a layer of Pretty Peacock next.  This is cut at 4" x 5 1/4".  Then a layer of Basic White that measures 3 3/4" x 5".  Let's work with the white layer first before putting them together.

Using Pretty Peacock ink and a Blending Brush, add a soft background color from the bottom left up and out.  This fades out with about 1/4 of the cardstock having no ink on it at all.  Keep the color very light but add a little more in the bottom corner.  This picture is a little deceiving as the color added is a little darker than it shows.  

There are several greenery stamps in the Magical Meadow set.  I used two of them.  First I stamped the largest stamp (with the tiny berries) coming up from the corner using Lost Lagoon ink.  Another partial one was stamped angled to the side.

Then switching stamps to the smaller leafy one, this was stamped with Pretty Peacock ink.  It was stamped between the two Lost Lagoon branches.  Then it was stamped two more times with only part of the stamp on the card to fill it in somewhat.

There are also 4 extra greenery dies in the matching set that do not have a coordinating stamp.  Two of these were used on the card.  The leaf and berry branch was used to die-cut the truly fabulous Snowflake Magic Specialty Designer Paper twice.  I love how the snowflake design just gives highlights to the leaves and you can't really see the design at all.  The one on the left was fully used.  It's attached with adhesive.  The same branch on the right is cut down to fit the area.

To add a little sparkle, the evergreen type of branch was die-cut once from the More Dazzle Specialty DSP.  It was big enough that it was cut apart and made to look like there were two branches.  They were attached to the card front with adhesive.

At this point, a 7" strip of Silver and White Sheer Ribbon was attached across near the bottom of this layer.  It's attached in the back with a bit of Tear & Tape to hold it in place.  A Mini Glue Dot is placed under the area that the bow will be attached. 

Then the white layer is attached to the Pretty Peacock layer with adhesive.  This is then attached to the folded card base using Dimensionals.

The sentiment is from the Christmas Classics set.  First the Christmas was stamped on Basic White, then the merry was tucked in closely on top of it.  The sentiment was die-cut with the Deckled Rectangle Dies.  

To enhance the edge, the Blending Brush that I used earlier was lightly flicked on the edges.  This not only brought out the lovely edges, but it also helps the sentiment to stand out from the white card front.  Then it's attached with Dimensionals.

A bow was made from the same ribbon.  I actually needed two Mini Glue Dots to make the bow feel secure.  The pretty silver edging on the ribbon is so nice and delicate, a great addition for this card.

Lastly, there was a need for a little more bling.  The Adhesive-backed Glitter Sequins were the perfect choice.  The color fit in perfectly with the card and I love the glittery sequins.  As a plus, they're fairly flat for ease in mailing - no extra postage!  Hooray!

In many aspects this is a simple card just a few layers, a few stamps and some ribbon.  But I think it sure packs a wow.  I sure hope you give this monochromatic style of card a try.  I love the serene look of using just one color family but differing shades to give it depth.

Thank you for stopping in today so I could share this card idea with you.  If you're shopping, please use the Host Code at the top of the post.  I'd truly appreciate it.  There's so much going on at the Stampin' Up! website for you to peruse.  You'll find great Online Exclusive items that you won't find in either catalog, so don't forget to check it out.  As always, I love hearing from you.  If I can help you with your stamping needs, please let me know.

Happy stamping and creating,
Sharon

Friday, September 1, 2023

Christmas Classics

Hello there.  I finally got around to working with the new Christmas Classics Bundle yesterday.  I just wasn't sure what I wanted to do with it, so I put it off until now.  Do you ever get something new and absolutely love it, but are stumped for an idea to sort of "break the ice"? It seems like that first try out of a new set is always the hardest for me.  Yes, there are some projects you'll never see.  Can't imagine why!  😂😉  My sister Connie sent me a package in the mail with lots of goodies in it.  One of the items was a retired bit of DSP named Delightful Daisy.  I don't know if you remember it, but it was always one of my favorites.  As soon as I saw the knitted DSP print, I knew what I wanted to make using the Christmas Classics Bundle.  Isn't it funny how a small thing will spark a new idea that you've been struggling and fretting over?  So here's the card...

So weird how the camera really accentuates one color and seem to change it and make it stand out.  On this picture the band of DSP looks more of a greyed green than in real life.  Oh well, I'm sticking with this idea anyway.

Start with a card base of Mossy Meadow that measures 8 1/2" x 5 1/2", scored and folded in half.  The 1 3/4" strip of DSP is layered across this attaching it with adhesive.  If you want more of a contrast between the DSP and card base, attach a 2" strip of Very Vanilla cardstock between the two pieces.

The die-cut greenery layer is from the Christmas Classics die set.  It's die-cut from Old Olive cardstock.  Run the die back and forth an extra time to make sure all the detail pieces just pop out.  There is a square die that fits in the piece just perfectly.  It's used to die-cut the Very Vanilla cardstock.  Two of the holly branches from the same set were stamped with Mossy Meadow ink and die-cut also.

The sentiment is from the Christmas Classics set and is my favorite.  It's stamped with Mossy Meadow ink.  The little design in the corners is from the same set.  They are stamped with Moody Mauve.  The three holly berries are also stamped with Moody Mauve and then die-cut.  The holly branches were colored with Old Olive Blends.

The two holly branches were attached behind the Very Vanilla sentiment piece.  The three holly berries were attached on top of this using a Mini Glue Dot behind each of them.  The Very Vanilla layer was attached to the Old Olive detail layer using adhesive.

The detailed Old Olive layer was attached to the card front using Dimensionals to hold it up.  This way the details really show up nicely because of the shadows.

For an accent, a double bow was made from the Metallic Woven Ribbon in Parakeet Party.  About 15" of ribbon was used to make the bow.  I really like the hint of shine from the Metallic Ribbon.  A couple of Mini Glue Dots were used to attached it to the card front.

As an added accent, a single one of the Festive Pearls was used in each corner of the sentiment layer.  A quick swipe of Wink of Stella was used on each of the holly berries to finish.

I love the idea of mixing the old and new together.  We all have retired items that we don't want to part with so it's worth the time and effort to incorporate them into our new projects.  Plus, this means I have one more card made for my Christmas stash.  This has given me a few more ideas for using this wonderful Christmas stamp set too.  You'll have to come back to see what I make next.

The countdown is happening.  Today is September 1st already!  Where has the summer gone?  But with September comes the new Mini Catalog.  Only a few more days to wait.  The 6th is the day you can start ordering from the new Mini Catalog.  Hope you've got your Wish List started.

Happy stamping and creating,
Sharon