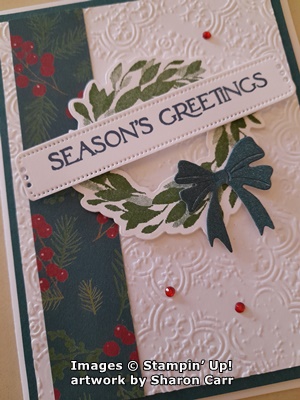
Hey there! I need a break! I've been in cookie-making mode the last couple of days, and I'm exhausted. It's time to do a sit-down-and-get-off-my-feet project. I forgot just how crazy it is to stand all day and rush around to get cookies on and off the baking sheet and in and out of the oven. I know you probably have no sympathy for me because I'll be enjoying all those cookies, but I'm tired! So instead of getting back to baking this morning, I'm sitting down to write a blog post. Sitting, aaahhh! Today I wanted to share a card using the versatile Cottage Wreath stamp set. It's been around since last year, and I love it. The set is so versatile with all the little Halloween, fall, and Christmas bitty accents that are part of the set. That means you can use it over and over and still make it look new depending on what you put with it. To me, that is a great investment in a stamp bundle that I love to use.
Saturday, December 9, 2023
Cottage Wreath Christmas
First of all, I love this layout with something along the left side to make the card look asymmetrical. That is a pleasing look to me. Secondly, I love the wreaths. So, this card makes me doubly happy when I look at it. If you like it too, come create along with me. Start with a Thick Basic White cardstock base of 8 1/2" x 5 1/2", scored and folded in half.
The first layer is Pretty Peacock cardstock that measures 5 1/4" x 4". Then a layer of Basic White is cut to measure 5" x 3 3/4". This piece is embossed with the Distressed Tile Embossing Folder. Don't you love all the detail this makes? And it shows off so nicely. Attach the white layer onto the Pretty Peacock layer with adhesive.
A strip of Joy of Christmas Designer Series Paper is attached near the left edge of the white paper with just a small white edge peeking around it. This one is a rather dark print, so I added only a 1" strip to the card. At this point, I attached these layers to the card base using Dimensionals.
The leafy wreath was stamped on Basic White cardstock using Garden Green ink. I tried Old Olive first, and it didn't look right to me, so I made another in the Garden Green. This is not one of the coordinating colors listed on the DSP package, but it seemed to look better to me.
After stamping, the wreath was die-cut using the coordinating die. It was centered and then attached to the card front using Dimenisonals.
The accent bow is die-cut from the Pretty Peacock color choice from the Soft Shimmer Specialty Paper in the Annual Catalog. This paper has such a pretty, soft shimmer in real life. It seemed to be the perfect choice here. It's been attached to the wreath with a Mini Glue Dot in the center.
The sentiment is from the Brightest Glow stamp set. It is stamped with Pretty Peacock ink on a strip about 1" wide. The sentiment is die-cut using the coordinating die from the Labels Aglow die set. Don't you love the pretty detail on this die?
After stamping and die-cutting the sentiment, it was attached over the wreath using Dimensionals just where it layers over the wreath.
The inside of the card has a sentiment from the Brightest Glow stamp set. It's stamped with Pretty Peacock ink.
There are two leafy branches that match the branches in the wreath stamped as an accent. A few tiny evergreen sprigs are tucked in. They are stamped with Pretty Peacock ink.
There is a sprinkling of retired tiny Real Red Rhinestones added to the front of the card. I think they added just the right touch, even though they are retired. (Why do they keep retiring some of my favorite accent pieces???)
Hope you like this simple Christmas card. I tend to like the more clean and simple style so that's what you usually see here. Every once in a while, I get a little crazy with the design and you get something over the top. But basically, you get basic straight forward card ideas from me. Hope you like this style of card too and are looking forward to more posts.
The new Mini Catalogs will be mailing out soon. If you'd like one sent to you, please let me know, so I can do that for you. And Sale-a-bration is coming back in January for two months. Definitely something to look forward to. I've seen the freebies, and there's some really cool items in there you'll want to get. Remember to let me know if you need a catalog or anything else that I can help you with. That's what I'm here to do - help you with your stamping questions. Thanks for your loyalty over the years. I appreciate you and all you do.
Happy stamping and creating,
Sharon
Subscribe to:
Post Comments (Atom)
-
Hello my friends! I feel just a little bit scattered lately. Maybe it's knowing my birthday is right around the corner and that means...
-
Here it is February 10th already. I need to get the rest of my cards is the mail and quit making any more valentine cards. I just couldn...
-
Hi there! Hope you're doing well today. I was browsing around on YouTube and found an absolutely cool technique on the Robins Roost ch...


No comments:
Post a Comment