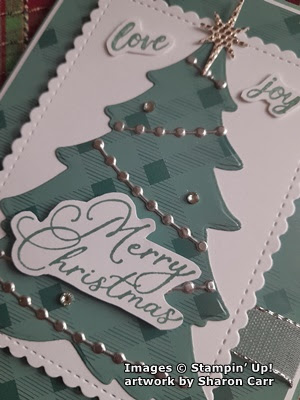
Hey there! Have you been dealing with lots of rain lately? We sure have. There were 1 3/4 inches that fell just yesterday alone. So glad we don't have to worry about flooding anymore! And after two days of rain, I woke up to sunshine and blue skies this morning. What a pleasant surprise. It's gotten me invigorated to get on with the card sending. All the cards for the shut-ins from church down here have been made. This morning was time for adding the inserts, getting them in the envelopes, adding postage, and mailing them. I'm finished except for going to the Post Office to mail them. Seems like the mailman doesn't like picking up 26 cards all at once. Oh well, at least it's a nice day for running errands! Now that those are all taken care of, it's back to making my own cards. Today I have a card to share made with the Merriest Trees die set. I didn't stamp the tree at all (just sentiments), but I did die-cut the different elements to make this one.
Monday, December 11, 2023
Merriest Trees Card
I keep looking at the finished card and wondering if it's too busy. It's got a lot more going on than what I normally make. What do you think? The card starts with a half sheet of Lost Lagoon measuring 8 1/2" x 5 1/2". It's scored and folded in half.
The first layer is Basic White that measures 4 1/8" x 5 3/8". This is a very skinny layer behind the next layer which is the Tartan Foil Specialty Paper that is an Online Exclusive only. This paper is so pretty, and I thought it would make a great focal point for the card. The layer is cut at 5 1/4" x 4". It's wrapped with a piece of Silver and White Sheer Ribbon that is attached to the back. After adding the ribbon, attach the DSP to the Basic White layer with adhesive. These get attached to the card base with adhesive also.
The love and joy are a stamp in the Merriest Trees set. They were stamped with Lost Lagoon ink and fussy-cut apart to place on either side of the tree. They are attached with segments of Mini Dimensionals.
The Merry Christmas comes from the Stars At Night set. It's also stamped with Lost Lagoon ink and fussy-cut.
The silver trim on the tree is part of the same set we've been focusing on. It's cut from Silver Foil. It was backed a section of Adhesive Sheet before die-cutting. This made it so easy to just peel and stick the trim where I wanted it to be. After the trim was added, the sentiment was placed over this with Dimensionals.
One of the star dies from the Stars At Night Bundle was die-cut from the More Dazzle Specialty Paper. I thought it was a nice sparkly addition to the design.
This is where I might have gone a little overboard on the additions. Three little clear Rhinestone Basic Jewels were added to the tree for decoration. Too much? Tell me what you think.
I was making changes to my design all along the way. The tree was going to be the backside of the DSP which has a white background with different plaid. It looked too white against the white layer, so it turned into the darker side of the paper. With the darkness of the tree, I struggled to figure out how to brighten it. That's how I think I over did it. Ah yes, another work in progress.
Thanks for stopping in to see what's new. I've been stamping up a storm of Christmas cards and I'm running out of time to share them all. I might do the blog posts a little different for the next week or two. If I just share a card or two using the same set or DSP without all the directions it would go much quicker. Besides, most of these cards are pretty straightforward and don't need lots of details. What do you think? More cards and less talk for the next two weeks? Or stay as it is and post every 2-3 days? I can do it either way. Or maybe a mix of the two plans? Give me some input here. I'm running out of time.
Be sure to shop the Online Exclusives and the Clearance Rack for interesting gift ideas for your crafty friends. If you'd like to get a gift certificate from me for a friend, give me a call and I'll make one up special for you and put it in the mail. Hope to hear from you soon.
Happy stamping and creating,
Sharon
Subscribe to:
Post Comments (Atom)
-
Hello my friends! I feel just a little bit scattered lately. Maybe it's knowing my birthday is right around the corner and that means...
-
Here it is February 10th already. I need to get the rest of my cards is the mail and quit making any more valentine cards. I just couldn...
-
Hi there! Hope you're doing well today. I was browsing around on YouTube and found an absolutely cool technique on the Robins Roost ch...


I definitely don't think the card is over done or too busy. It is beautiful. Love the special touches all over - makes it come together perfectly. As I can't do any cards this season (other than what I got done this year before I hurt my arm) I would love more samples and can usually figure out directions (or I can ask you)! My choice is without directions, maybe just colors you used so we can see more samples you've done.
ReplyDeleteThanks for your input Connie. I always appreciate hearing from you!! Love you!
Delete