Wednesday, July 31, 2024

Golden Greenery Christmas Card

Hello friends!  Are you ready to jump into making those lovely Christmas cards?  I know we're still in July and are months ahead of schedule, but can you ever get those Christmas cards made to soon?  Hmmm, nope, I don't think so.  Today's card features the gorgeous new Online Exclusive Golden Greenery Bundle with the coordinating Season of Green and Gold DSP and the Graceful Greenery Vellum.  Oh my, so gorgeous!  Each one of the items are very nice on their own but put them together and you have sheer perfection.  At least, I think so.  Either green and gold or navy and silver are my go-to Christmas colors, so this collection which features different greens with touches of gold throughout really appeals to me.  Let's check out this first card made with these new products.

This card really showcases one of the beautiful Season of Green and Gold Designer Series Paper designs.  Isn't it really gorgeous?  The card base is Mossy Meadow which is one of the coordinating colors of this DSP.  The Mossy Meadow cardstock is cut at 8 1/2" x 5 1/2" then scored and folded in half.

This design of DSP was cut across the 12" x 12" paper at 5 1/4".  Then three strips of cardstock were cut from this at 1 1/4" wide.  I used Tombow MultiPurpose Glue to attach the strips in order of cutting to the card front.  To make it easier for even placement, I added a very small touch of adhesive to the center of each piece so they could be spaced apart correctly.  Then I carefully lifted one strip off and used the "green glue" to attach the strip properly.  Then picked up the next strip and continued on.  This tends to keep the pieces lined up while adding the "green glue" on each piece and attaching to the card front. 

Next, a 3/8" strip of Mossy Meadow cardstock is attached across the card front with "green glue".  I debated about using either Old Olive or Garden Green for a contrast color, but for this card I preferred sticking with the one color.  Usually when I am creating with this card sketch, I tend to use a slightly wider piece of cardstock - 1/2" to 3/4".  But this is what I chose to use this time. 

The sentiment label is die-cut from Basic Beige cardstock using the 3rd largest circle die from the Stylish Dies set.  The shape and size always work nicely for this card sketch.   The sentiment is from the Greetings of the Season stamp set.  This one fit on the label nicely and is stamped with Mossy Meadow ink.

The evergreen branches are actually the printed Vellum DSP.  Aren't they perfect?  Two pieces of the vellum were die cut with the coordinating die set.  The smaller piece was an edge cut so not all of the branches were there.  It is attached to the side of the circle with adhesive.  The branches just follow the angle of the sentiment.  The larger branches were attached right over this and covered the edge of branch that wasn't there.

This was turned over and a good number of Dimensionals and Mini Dimensionals were added to hold it all together and lift it from the card base.  It was attached to the card front about 1/2" or so from the right side.

A trio of the Neutrals Adhesive-backed Sequins in gold was attached to the bottom of the label.  I curved them to follow the lines of the label.

The inside of the card was finished to match the card front.  A piece of Basic Beige was cut to measure 5 1/4" x 4".  Another sentiment from the Greetings of the Season was chosen for the card.  It's stamped with Mossy Meadow ink.

I had another length of the 3/8" Mossy Meadow cardstock that would work.  I added it across the bottom using "green glue" and needed to trim just a smidgeon from one of the edges, so it fit.  Then I decided a 1/4" scrap strip of Basic Beige would fit right inside of that.  So, it was trimmed to fit and attached over the Mossy Meadow strip using "green glue".  I like the addition of these strips inside the card.  They just bring in a little more texture and interest.

Hope you enjoy this card idea.  I love the greens with the gold touches very much.  Seems so very elegant.  Of course you can use this card layout for many different reasons.  Just get out all that DSP you're hoarding and use this card sketch to make your next masterpiece.

Thanks for stopping in today.  Hope to see you again soon.

Happy stamping and creating,
Sharon

Saturday, July 27, 2024

Bronze Anniversary Card

Hello there.  It's been a while since I posted, and I apologize for that.   But I have a simply beautiful anniversary card for you today.  Of course, when you change up the sentiment, you could use this for so many other occasions.  It's an absolutely beautiful fall card.

These are just such rich and beautiful colors.  The base of the card starts with Copper Clay cardstock.  It measures 8 1/2" x 5 1/2".  It's scored and folded in half.

Up next is a layer of Bronze Metallic Specialty Paper that is retired.  I think any bronze or even copper-toned paper would be lovely.  The layer measures 5 3/8" x 4 1/8".  

A layer of the beautiful Nests of Winter Designer Series Paper that is an Online Exclusive is next.  It measures 5" x 3 7/8".  This is attached to the center of the bronze layer using adhesive.  These layers are then attached to the folded Copper Clay card base using adhesive for this too.  

An 11" length of Copper Clay Ribbon from last year's catalog was cut.  I know many of you purchased this and probably have some left, so let's use it!  The ribbon is wrapped around the entire front flap of the card.  The ends are attached on the front where they will be hidden.  I used pieces of Tear & Tape to hold them there.

The sentiment is on a Countryside Corners die.  It's cut from Basic White cardstock.  The sentiment is from the Layers of Beauty stamp set and is stamped in Copper Clay ink.  Like I mentioned before, just about any sentiment could be used here to fit your need.  

The oak leaves surrounding the label are from the Encircled in Nature Bundle.  I really liked the look of the bronzy leaves with the autumn looking pussy willows in the background.

The sentiment label is attached to the card front popped up on Dimensionals.  Three retired, amber-colored rhinestones were added to finish.

I love how this card turned out and I'll be happy to get it sent out next month.  I have an extra bonus for you.  My sister also made a card with most of these same components.  Thought you'd like to see what she made.

She has the same cardstock layers but changed the orientation of the card.  Instead of just using a few branches, she created a full wreath with these bronzy leaves.  She used a Basic White wreath from the Encircled in Nature Bundle as a base for the leaves.

Connie also used a sentiment from the Layers of Beauty stamp set, but you could use anything that fits onto the small banner that she tucked into the wreath.  There are three gems tucked around the wreath as accents and a small copper ribbon was tied into an accent bow and attached with a Mini Glue Dot.

There you have it.  Two designs that are very similar.  Hope this gives you an idea of how to alter ideas you see that catch your eye.  You can make things exactly the same, or just make a few minor changes and come up with something different that you love.  It's all about the creativity!

Only a couple more days of the Bonus Days sale going on.  That's over and done with at the end of the month.  Some items that were out of stock have become available again.  Don't miss out on anything!

Thanks for stopping by today.  And thank you so much for being patient with me.

Happy stamping and creating,
Sharon

Friday, July 19, 2024

Another Winterly Tree Tops Card

Today I have a card for you that started out as one of the make & take projects Stampin' Up! had for this new stamp collection, Winterly Tree Tops.  It will be available in the new Mini Catalog that will be coming out soon.  I have to admit I really didn't care for the project - it just wasn't me.  Everyone has their own tastes in favorite color combos and design layouts, etc.  This project simply wasn't a favorite for me.  So, I took some of the components that I already had cut to make the project and made my own project instead.  This one might not be one of your favorites, but that doesn't mean you can't take parts of the card design and change them into something you prefer.  Here's my take on the project.  What will you make with this idea?

This project starts with the Mossy Meadow cardstock base.  For a previous project we made, we were told to keep the Basic Gray discard piece that was die-cut from the pine branch frame used for that card.  I didn't care for how the piece was used, so I did my own design with it.  The Basic White piece was cut to measure 5" x 3 5/8".  The Basic Gray discarded piece was attached onto this using Tombow Liquid Glue.  This makes it sort of a reverse design with the background in front and the white pine branches recessed into the design.

A 6 1/4" length of Black & White Checked Ribbon was attached around the layers a bit little below halfway and attached in the back.  All the design elements rest on this.  After adding the ribbon, the layers are added to the folded card base using the same Tombow Liquid Glue.

The bird comes from the coordinating Nests of Winter Designer Series Paper.  It's die-cut using the Winterly Tree Tops die set.  Isn't it wonderful when you can die-cut images right from the DSP, so everything matches up nicely?  It sure makes it easy on us!

The die set also has a couple of small pine branches too.  I cut out several from Basic White cardstock, but it looked like I needed another color in the design.  I tried adding Mossy Meadow pine branches, but I didn't really like that.  Next, I tried some silver branches from the Silver Foil Sheets.  What a perfect addition.  The shine of the silver brightens up the whole card!  The branches are attached behind the bird using adhesive.  Then the cluster was attached to the card over the band of ribbon on the front using Dimensionals.

The sentiment is from the new Greetings of the Season Bundle.  It is stamped on a label cut from one of the label dies that are part of the bundle.  It's stamped using Cherry Cobbler ink, then trimmed down on the bottom edge.  This is tucked up right next to the ribbon going across the card.  A bow made from the same ribbon is attached to the ribbon using Mini Glue Dots to hold in place.  

The bling used for this card is from the Cherry Cobbler & Pearl Adhesive-backed Berries.  I thought they carried the design of the berries the bird is holding to the entire front of the card.

The inside of the card has a layer of Basic White cardstock that measures 5 1/4" x 4".  On this another sentiment from the Greetings of the Season stamp set was stamped with Cherry Cobbler ink.  The extra white and silver pine branches that I die-cut earlier are added in the corner to finish.

Just a reminder that there is just over a week left of Stampin' Up! Bonus Days!  You don't want to miss out on this sale.  For every $50 you spend on merchandise from the catalog or On-Line Exclusives, you will receive a code in your email that is worth $5 off to be redeemed in August.  That's a win for you.  Just don't lose the code(s) that are sent to your email.  No one else has access to them but you, so if you lose it you lose out on the savings.  Have fun shopping.  I know I have!

Happy stamping and creating,
Sharon

Wednesday, July 10, 2024

New Winterly Tree Tops Bundle is Gorgeous!

 Hello Friends!  I just have to give you a sneak peek to a lovely stamp and die bundle along with the gorgeous new DSP that coordinates with it!!  This will get you in the mood for Christmas, but that's not the only season it covers.  The images and sentiments are generic enough to work all year long.  This is a new collection that will be coming in the fall mini catalog soon.  Demonstrators were able to create with these this month to get a feel for them and come up with ideas.  The name of the bundle is called Winterly Tree Top, and the DSP is called Nests of Winter.  You can use all these items together, but they work just as well separately.  Stampin'Up! gave us instructions to make several projects and today I want to focus on one of them.  First, I'll share what my version of the first project was, then share the original project.  I think you'll love both versions!  On to the new Winterly Tree Tops!

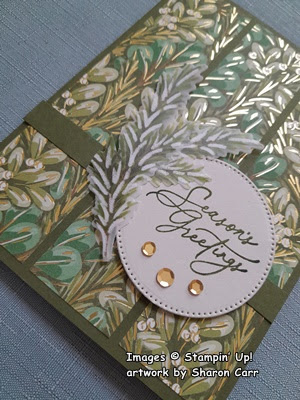
Here is my version of the project.  This one has a Christmas feel to it with the Cherry Cobbler colors and the evergreen branches added to the design.  This layout is the same as the original project and is a good one to use anytime.  The dimensions are:
Cherry Cobbler - 8 1/2" x 5 1/2", folded in half
Gray Granite - 3 1/4" x 4"
Basic White - 3/4" x 3 3/4"

The main focal point of the birds come from one of the sheets of the Nests of Winter DSP that have birds that can be die-cut using the coordinating dies in the bundle.  Don't you love it when you've got these beautiful images you can use, and you don't even have to fussy cut them out!!  I know there are some of you that hate fussy cutting anything, so this is made for you.  How exciting, and it makes the creating so much faster.

After die-cutting the birds, I used another die from the set to cut four of the pine branches from Mossy Meadow cardstock as an accent for the card.

All of the design pieces would be built up of the Gray Granite cardstock piece, so I was using that to measure the placement of the pine branches.  They are attached behind the birds and attached with multiple Mini Glue Dots to hold in place.  When they were positioned how I liked, multiple Mini Dimensionals were added behind to hold everything in place and raise it up from the Gray Granite layer.

The sentiment is from the Winterly Tree Tops stamp set.  I love this sentiment and I've been using it on other projects already.  (Check back to one of the pear cards that it was used on.)  The sentiment is stamped with Cherry Cobbler to match.  Then the label is attached to the top of the Gray Granite layer overlapping on each end of the label.  It's attached with adhesive.

The Gray Granite layer is attached to the folded Cherry Cobbler card base using Dimensionals.  I was going to attach it flat, but it looks so much better with the Dimensionals.

The gems added to the design are from the Cherry Cobbler & Pearl Adhesive-backed Berries that are part of this collection.  Can you see the Cherry Cobbler dots are added to the berries?  The semi-clear dots are then added to the background.  The clear dots have just a hint of the Cherry Cobbler color to them which is a nice touch.

OK, that's my version of the original card that was part of the projects.  Let's see the differences.

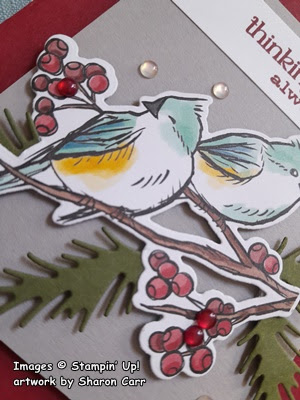
The card base is Blackberry Bliss with the next layer of Crumb Cake.  Don't these changes already make a huge difference in the overall look?  This card makes me think more of fall with the warmer colors.

The birds and a few 'pussywillow' type branches are stamped with Memento Tuxedo Black ink onto Basic White cardstock.  The images are colored with Stampin' Blends.
Birds - Ivory Blends with Color Lifter to add highlights
Branches and beaks - Bronze Blends
Berries - Cherry Cobbler Blends with Color Lifter at the top of the berries

For this card, the sentiment is stamped with Mossy Meadow ink.  The strip of Basic White cardstock is about 5/8" wide.  

The card is put together the same with the sentiment on flat, the birds popped up with Dimensionals, and the whole Crumb Cake layer is popped up with Dimensionals also.

The gems were a surprise to me.  I know you can color rhinestones and pearls, but I never thought to color the Flat Adhesive-backed Pearls.  They have a lovely iridescent look to them that I never thought to try coloring.  These pearls are colored with the Bronze Blends and this gives the pearls a wonderful warm look to them.  Perfect for this card.  I'll have to remember this idea.

Well, there you have two ideas to get you started when you get the new Winterly Tree Tops Bundle in September.  It's definitely worth the wait and you're going to love the possibilities.

Thanks for checking in today.  Hope you like these two versions of basically the same card.  This is a great way plan your cardmaking when you're in a creative slump, and we all have them!  Find a layout you like and see how you can do your new version of it.  I've already got some ideas for this layout using the Cheerful Daisies and also the Magnolia Mood sets.  We'll have to see how they turn out.

Bonus Days are still going on through the end of July.  For every $50 you spend, Stampin' Up! will send you a coupon code for $5 off to use in August.  Don't you love those sales?!

Happy stamping and creating,
Sharon

Monday, July 8, 2024

Wintery In The Grove Card

 Hello Friends!  It seems like forever since we have gotten together on a new post.  I'm still struggling to get over the pneumonia, but it seems to be a losing battle some days.  A few cards I've made in the last two weeks have been very simple without lots of extra layers and whatever on them.  Since my mind has been in such a muddle, intricate designs and fun folds seem to be beyond me.  And with all the coughing, I've found coloring has been a challenge.  But I did want to visit with you, so here we go.

To make this card, there are two items it is imperative to use - the In The Grove die set and the Thoughtful Journey 6" x 6" Designer Series Paper pack.  With these two items, you can quickly put together some absolutely stunning cards with very little time expended.

First, I started with the Basic White Thick cardstock for the top layer.  Everything worked backwards from this.  It measured 3 7/8" x 5".  The birch tree die was placed in the center of this and run through the die cut machine two or three times to make sure the detail was fully cut.

Placing the die over several prints in the Thoughtful Journey DSP pack to get an idea of how they would look, I chose the colors and design of this one.  It was cut to fit behind the die without any edges showing.  I think it's about 1/8" smaller than the white layer.  The two layers are attached together with adhesive.

The card base is a half sheet of Misty Moonlight, scored and folded in half.  It picks out the Misty Moonlight shades in the sky.  The layers are attached with Dimensionals to make it stand out more.

A small bunny from the same die set was cut from a scrap of Basic White Thick cardstock.  It's tucked in behind the bottom and attached with adhesive.

The sentiment I used is from the Country Flowers stamp set.  It's stamped onto a 5/8" strip of Basic White cardstock using Misty Moonlight ink to match.  The ends were flagged to finish it off.  Then it was attached with Dimensionals to elevate it.

The finishing touch is the trio of the new Iridescent Faceted Gems scattered onto the design.  I wasn't sure if I'd like these, but they are absolutely gorgeous.  They tend to pick up any color they are on and really add some lovely sparkle.

If you like this idea, but these aren't your favorite colors, just take a peek through you DSP prints that have a wonderful watercolor feel to them.  I'm sure you can find multiple prints to choose from that suit you just fine.  I'd love to see what you've created!

Just a quick reminder that BONUS DAYS are going on this month.  For every $50 you spend, Stampin'Up! will give you a $5 coupon to be used in August.  Make sure your email info is up to date as your coupon with be sent directly to your inbox.  And don't lose those coupons!!  No one else has those numbers but you!  If you'd like to use me as your demonstrator, feel free to list me as your demonstrator.  You can use the Host Code at the top of this post also.  You are so greatly appreciated.

Happy stamping and creating,
Sharon