Hello and welcome. I've been spending more time focusing on the beautiful landscape prints to create my cards. The prints are so gorgeous, I want to walk right into them and stay there! Silly, I know. But the prints are so special and really need to be the main theme. So, I have a series of cards for you today. Two of them feature the Splendid Autumn DSP and the other three I used the retired Meandering Meadows DSP. There's no point in hanging on to these papers just so I can look at them and enjoy them. They need to be used and enjoyed by others too.

The first card is a symphony of daisies contrasted with lavender. It uses one of the prints from the Splendid Autumm DSP. I just love this card! And it's so easy to make with the whole focus on the DSP. I had a piece of this paper that measured 6" x 3". The width was trimmed down to 5 1/2" to fit the card base.
Highland Heather was used for the card base. It measures 8 1/2" x 5 1/2" when cut, then was scored and folded in half. I needed a bit of extra color to define the DSP. Gorgeous Grape worked great for this. The piece measures 5 1/2" x 3 1/2".
The DSP was attached to this with adhesive and then both were attached to the card base.

The sentiment comes from the set called Hugs for Love. This set has some of the nicest sayings that I've been using quite often. This time it's stamped with Gorgeous Grape ink onto a 5/8" wide strip of Basic White. After stamping the edges are trimmed close and attached with Dimensionals. There are three of the darkest Purple Adhesive-backed Sequins that are a Sale-a-bration item.
Like I said, easy peasy.
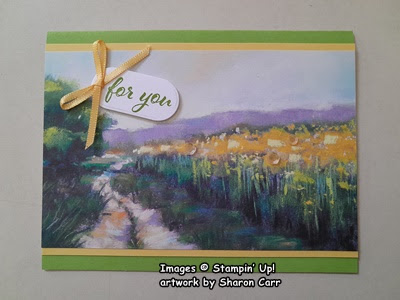
This card is very similar but uses a print from the Meandering Meadow DSP. The card base is Granny Apple Green the accent color is Daffodil Delight to pick up the colors of the print. The measurements of the DSP are 5 1/2" x 3 1/2".
I don't remember which stamp set the sentiment comes from - sorry. Anything like that would do. It's stamped with Granny Apple Green ink. A small bow is made from the Daffodil Delight 1/8" ribbon found in the January-April Mini Catalog. It's attached with a Mini Glue Dot to hold in place. There are several yellow sequins scattered among the flowers for an accent.

Next up is another print from the Meandering Meadow pack. Isn't it lovely and tranquil? The card base for this one is Bubble Bath cardstock. A quarter sheet of Melon Mambo was used to die-cut the scalloped frame around the print. For this I used the retired Scalloped Contours Dies set. I liked the look of the lacy frame behind this scene. The DSP was trimmed to fit just inside this frame.
The sentiment is from Changing Leaves set and is stamped on Basic White with Melon Mambo ink. The die for this is also in the Changing Leaves set. This was attached to the card front with Dimensionals. Three pink sequins are snuggled in among the flowers to add a little bling.

This design is another from the Meandering Meadow DSP pack. I have so few pages of these gorgeous prints left over that I'm trying to make the most of each of them. This one has a card base of Garden Green to match the greens in the print.
The die used on this print is the Celebration Labels Die which is retired. It's such a pretty shape and has the stitching on the edges that I like, so I bring this one out of retirement every once in a while. For this card, I backed the DSP with a layer of Basic Beige to give the DSP a little more rigidity.
The sentiment is the same as the 2nd card, and I still don't know which set it came from yet. I know as soon as this is posted, I'll run across it and be frustrated with myself. That's what I get for not writing everything down as I'm creating. BTW, it's stamped with Garden Green ink onto a Lemon Lime Twist cardstock piece. There is also a Daffodil Delight bow made from ribbon in the current Mini Catalog. And there are three retired yellow/green sequins scattered in the flowers.

This last card was a little more involved than the others, but I love it! So worth the few extra steps to make it. I used Washi Tape across the back of two Countryside Corners dies to hold them together. Then the DSP print was die-cut. Keep both the frame and inside piece. Then with the dies still together, I die-cut Mossy Meadow cardstock twice to make the "frame" thicker. The inside pieces were put aside for some other project. Layer the three frames together with "green glue".
The Mossy Meadow cardstock for the card base was cut then scored in half. Open it up and emboss only the front half. I used the 3D Basics Embossing Folder with the crosshatch design.
I found that adding the "frame" to the card front first, then tucking in the center flat inside the frame worked best for me. This way I was able to get the frame pretty well centered on the card front.

This picture gives you a much better picture of the "frame" being thicker than the center of the design. This was easier for me to do than adding Dimensionals around the entire "frame" to raise it up.
After adding the "frame" and center piece, I used the edge of the die to figure the angle to cut the card to match up with the design. The card was lightly marked with a pencil then cut to match on all four corners.
The butterfly comes from the Beautiful Butterflies Die set. This was cut from Silver Foil paper. It's added to the card with a Mini Glue Dot.
The sentiment and label both come from the Beautiful Butterflies Bundle too. It's stamped with Gorgeous Grape ink before die-cutting. The label is attached to the front with Dimensionals. Two Purple Fine Shimmer Gems in the lightest color were added to the sentiment with another one added to the butterfly for an accent.

The inside of the card has a Basic White layer that's been die-cut with the matching die from the front of the card. After cutting, a 1/2" strip of the same DSP was attached along one side with the mottled purple side showing. After attaching, the ends of the DSP were cut to match the white layer. Then this was attached inside the card with adhesive.
Well friends, I hope there's enough inspiration here to keep you busy for a while. I hope you try your hand at making any or all of these designs. And don't stop with the prints I've used, there are so many gorgeous scenic prints to keep you busy for a good long while.
Just a quick reminder that Sale-a-bration ends on February 28th at midnight. There are so many wonderful items still available to choose from that will get your imagination fired up and humming along. Feel free to claim me as your demonstrator if you'd like. Please use the Host Code at the top of the page when you're ordering if your order is less than $150. Then you want to get Host Rewards for yourself
Thanks so much for stopping by today. Hope you find time to create something beautiful today. I've heard that creativity is good for the soul. I know it makes me happy!
Happy stamping and creating,
Sharon


I love the octagonal card with the raised frame - it's a lovely way to highlight that beautiful paper.
ReplyDeleteThanks Barb. I agree with you about that raised frame idea. It's really eye-catching.
Delete