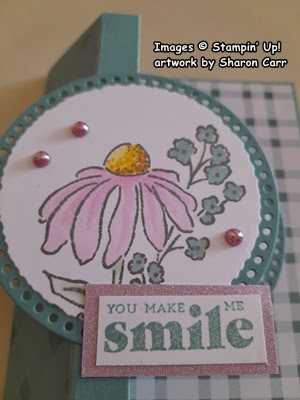
Showing posts with label Hugs for Love. Show all posts

Monday, February 24, 2025

Focus on Designer Paper

 Hello and welcome.  I've been spending more time focusing on the beautiful landscape prints to create my cards.  The prints are so gorgeous, I want to walk right into them and stay there!  Silly, I know.  But the prints are so special and really need to be the main theme.  So, I have a series of cards for you today.  Two of them feature the Splendid Autumn DSP and the other three I used the retired Meandering Meadows DSP.  There's no point in hanging on to these papers just so I can look at them and enjoy them.  They need to be used and enjoyed by others too.

The first card is a symphony of daisies contrasted with lavender.  It uses one of the prints from the Splendid Autumm DSP.   I just love this card!  And it's so easy to make with the whole focus on the DSP.  I had a piece of this paper that measured 6" x 3".  The width was trimmed down to 5 1/2" to fit the card base.

Highland Heather was used for the card base.  It measures 8 1/2" x 5 1/2" when cut, then was scored and folded in half.  I needed a bit of extra color to define the DSP.  Gorgeous Grape worked great for this. The piece measures 5 1/2" x 3 1/2".
The DSP was attached to this with adhesive and then both were attached to the card base.

The sentiment comes from the set called Hugs for Love.  This set has some of the nicest sayings that I've been using quite often.  This time it's stamped with Gorgeous Grape ink onto a 5/8" wide strip of Basic White.  After stamping the edges are trimmed close and attached with Dimensionals.  There are three of the darkest Purple Adhesive-backed Sequins that are a Sale-a-bration item. 

Like I said, easy peasy.
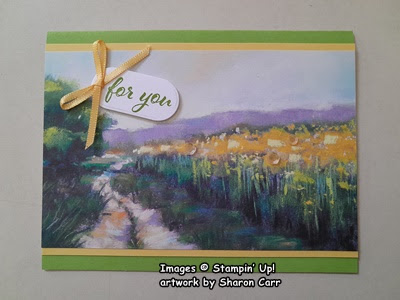
This card is very similar but uses a print from the Meandering Meadow DSP.  The card base is Granny Apple Green the accent color is Daffodil Delight to pick up the colors of the print.  The measurements of the DSP are 5 1/2" x 3 1/2".

I don't remember which stamp set the sentiment comes from - sorry.  Anything like that would do.  It's stamped with Granny Apple Green ink.  A small bow is made from the Daffodil Delight 1/8" ribbon found in the January-April Mini Catalog.  It's attached with a Mini Glue Dot to hold in place.  There are several yellow sequins scattered among the flowers for an accent.

Next up is another print from the Meandering Meadow pack.  Isn't it lovely and tranquil?  The card base for this one is Bubble Bath cardstock.  A quarter sheet of Melon Mambo was used to die-cut the scalloped frame around the print.  For this I used the retired Scalloped Contours Dies set.  I liked the look of the lacy frame behind this scene.  The DSP was trimmed to fit just inside this frame.

The sentiment is from Changing Leaves set and is stamped on Basic White with Melon Mambo ink.  The die for this is also in the Changing Leaves set.  This was attached to the card front with Dimensionals.  Three pink sequins are snuggled in among the flowers to add a little bling.

This design is another from the Meandering Meadow DSP pack.  I have so few pages of these gorgeous prints left over that I'm trying to make the most of each of them.  This one has a card base of Garden Green to match the greens in the print.

The die used on this print is the Celebration Labels Die which is retired.  It's such a pretty shape and has the stitching on the edges that I like, so I bring this one out of retirement every once in a while.  For this card, I backed the DSP with a layer of Basic Beige to give the DSP a little more rigidity.

The sentiment is the same as the 2nd card, and I still don't know which set it came from yet.  I know as soon as this is posted, I'll run across it and be frustrated with myself.  That's what I get for not writing everything down as I'm creating.  BTW, it's stamped with Garden Green ink onto a Lemon Lime Twist cardstock piece.  There is also a Daffodil Delight bow made from ribbon in the current Mini Catalog.  And there are three retired yellow/green sequins scattered in the flowers.

This last card was a little more involved than the others, but I love it!  So worth the few extra steps to make it.  I used Washi Tape across the back of two Countryside Corners dies to hold them together.  Then the DSP print was die-cut.  Keep both the frame and inside piece.  Then with the dies still together, I die-cut Mossy Meadow cardstock twice to make the "frame" thicker.  The inside pieces were put aside for some other project.   Layer the three frames together with "green glue".

The Mossy Meadow cardstock for the card base was cut then scored in half.  Open it up and emboss only the front half.  I used the 3D Basics Embossing Folder with the crosshatch design.

I found that adding the "frame" to the card front first, then tucking in the center flat inside the frame worked best for me.  This way I was able to get the frame pretty well centered on the card front.  

This picture gives you a much better picture of the "frame" being thicker than the center of the design.  This was easier for me to do than adding Dimensionals around the entire "frame" to raise it up.  

After adding the "frame" and center piece, I used the edge of the die to figure the angle to cut the card to match up with the design.  The card was lightly marked with a pencil then cut to match on all four corners.

The butterfly comes from the Beautiful Butterflies Die set.  This was cut from Silver Foil paper.  It's added to the card with a Mini Glue Dot.  

The sentiment and label both come from the Beautiful Butterflies Bundle too.  It's stamped with Gorgeous Grape ink before die-cutting.  The label is attached to the front with Dimensionals.  Two Purple Fine Shimmer Gems in the lightest color were added to the sentiment with another one added to the butterfly for an accent.

The inside of the card has a Basic White layer that's been die-cut with the matching die from the front of the card.  After cutting, a 1/2" strip of the same DSP was attached along one side with the mottled purple side showing.  After attaching, the ends of the DSP were cut to match the white layer.  Then this was attached inside the card with adhesive.

Well friends, I hope there's enough inspiration here to keep you busy for a while.  I hope you try your hand at making any or all of these designs.  And don't stop with the prints I've used, there are so many gorgeous scenic prints to keep you busy for a good long while.

Just a quick reminder that Sale-a-bration ends on February 28th at midnight.  There are so many wonderful items still available to choose from that will get your imagination fired up and humming along.  Feel free to claim me as your demonstrator if you'd like.  Please use the Host Code at the top of the page when you're ordering if your order is less than $150.  Then you want to get Host Rewards for yourself

Thanks so much for stopping by today.  Hope you find time to create something beautiful today.  I've heard that creativity is good for the soul.  I know it makes me happy!

Happy stamping and creating,
Sharon

Friday, February 14, 2025

One Last Valentine

Hello friends,  I had made this card a week or so ago, but I never got around to posting it.  You know how life gets in the way sometimes?  So, after all my cards were in the mail, I figured I wouldn't be showing off this card.  But after giving it way too much thought and waffling back and forth, I figured why not?  So here it is.  The last Valentine of the season.  Hope you like it.  There are aspects of the card that I want to translate into another card in the near future.  So, if you're so-o-o-o done with Valentines, just skip over this post and ignore this poor little card if you must.

See?  There's just so many good things going on with the card, I think it deserves a showing.

When sending out my Valentine cards, I realized that over half of them were either a majority of Fresh Freesia or Highland Heather.  That really surprised me.  And as you can see, this one is a mix of Fresh Freesia and Petunia Pop.

Let's start with the base which is Fresh Freesia cardstock.  This was stamped with a stamp from Hearts of Elegance and Fresh Freesia ink in an overall pattern.
Then I started die-cutting hearts from both Fresh Freesia and Highland Heather cardstock.  I used the different sized heart dies in the Hearts of Elegance set.  When playing around with the layout, I got rid of the Fresh Freesia hearts and used them for a different project.  They seemed to blend into the background too much.  So, I stuck with the Highland Heather hearts.  The heart with the stitched design in it was darkened even more with a Blending Brush and a little Petunia Pop ink.

The larger heart was speckled with Petunia Pop marker to give it some interest.  That was still too blah, so it was spattered with the Wink of Stella pen to add some pretty shimmer specks.  That worked out well. 

The heart in-between those two sizes die-cut a piece of DSP.  Sorry, I don't remember where it's from and I forgot to write it down.

Next was trying to figure out the layout of all the hearts on the card front.  It still needed something more to define it.  A piece of Vellum was dry embossed with the Eyelet Embossing Folder and laid between the card base and all the hearts.  Viola!  Just was it needed.  

The little sentiment is from the Hugs for Love set which is one of my favorites for cute sentiments.  It's stamped on a small piece of Basic White cardstock using Highland Heather ink.  It's tucked under the hearts and attached with adhesive.

The design still needed a little more contrast to it.  In my punch stash, there is a very small heart punch that was close in shape to the other hearts.  I punched three Basic White hearts and tucked them in amongst the larger hearts.

Lastly, three of the purple Adhesive-backed Sequins in almost a white color were added.  These are one of the Sale-a-bration free items when you spend $60 or more.  Seemed like the perfect ending to this purply Valentine card.  I'll get to work on the other idea I have that will be similar to this card.

Thanks for stopping by to see what's new today.  I promise, this will be the very last Valentine I make for at least another 9 months.

Happy stamping and creating,

Sharon

Friday, February 7, 2025

Another Side Box Fun Fold Card

 Hey there!  Hope you're having a great day today.  Wouldn't you know it?  As soon as I gave up on making more of the fun fold cards that I shared yesterday, I went downstairs today and quickly put together another one with some of those leftover parts.  I was just stuck on the stamp set I wanted to use.  Once that idea changed, finishing it was a breeze.  So, what did I actually end up making?  So glad you asked!

Didn't this work out nicely?  I love the mix of Bubble Bath with the Lost Lagoon.  As you can see, the basic card is totally identical to the Friendly Seagulls I posted yesterday.  I had cut two of everything at the time because I was planning on making two seagulls cards the same.  But plans change, you know?  I decided I wanted to try something else instead.

I won't go over the directions for the card base again here.  Please check yesterday's post for the dimensions and directions.

Today the Mixed Florals set came to mind and I checked to see how the stamp would fit on the Deckled Circle die-cut.  Enough of the design fit to make it work.  The stamp was inked up with Pebbled Path ink to give the design a slightly softer color.


The images were colored with Stampin' Blends:  Bubble Bath Light & Dark, Lost Lagoon Light, Daffodil Delight Light & Dark, Copper Clay Light, and Soft Seafoam Light & Dark.

Because the image was so small it only took about 10 minutes or so to color.  After coloring it was attached to the Lost Lagoon Everyday Details circle die-cut using adhesive.

It was attached to the card base the same way as before by carefully marking the size of the circle on that 1/2" strip with a pencil.  Then adding Tear & Tape within that space.  Peel off the backing on the tape and attach the circles so they are in the center of the card front.

The sentiment comes from the Hugs For Love stamp set.  It's stamped on a Basic White strip that is about 5/8" wide and is stamped with Lost Lagoon ink.  It's carefully trimmed on the sides to fit.  A small piece of In Color Glimmer Specialty Paper in the Bubble Bath color was used to frame the sentiment.  The piece measures 7/8" x 1 7/8".  Guess it pays to hang on to all those skinny strips.  You never know when you'll need just that little bit.  This has two Mini Glue Dots on the top left area of the label to adhere to the circle.

The circles inside the card match the front ones in size and color.  The sentiment I chose for this is from the Grateful Blessing stamp set.  This will be a perfect "just because" card to send out to a friend or family member.  It's stamped with Lost Lagoon ink to match.  

There was a small flower left over from a huge batch of valentines that I made.  I added it here with a Mini Glue Dot.  I liked that little pop of pink inside the card.

I tried several different gems for that little touch of glitz.  I was surprised that these little pearls were such a good match!  They are the Adhesive-backed Pearl Trio.  I thought they would be too big and purply for the card, but I really like them.

Thank you for coming by today.  Hope you enjoyed another look at this cute Left Side Box Fun Fold card.  Whew!  That's a mouthful.  But I just love how cute this little fun fold is when you want to send a special card.  Hope you give this fun fold a try.  It's not as hard as it looks.  I always try the measurements and scoring out on a piece of computer paper to get the hang of what I'm trying to make.  I am absolutely, definitely not an engineer! 

There's only several more weeks to go until Sale-a-bration will be over and done.  Did you see that a good number of new items have been added to the freebie list?  Don't miss out on something you've been wanting and wait til it's too late.  I'd be happy to be your demonstrator if you're looking for one.  Be sure to use the new Host Code at the top of the page.

Happy stamping and creating,
Sharon

Thursday, February 6, 2025

Fun Fold Card Ideas

Hello friends.  I've been working on a new-to-me fun fold idea.  The first one I made just flew together with ease.  I wanted to share at least two ideas with the fun fold, so I started making the second one.  That was a real struggle, not looking the way I envisioned at all.  So on to the third card.  Hmmm, that's still sitting on my desk alongside the second try.  Ok, let's try the fourth card and see what happens.  And yes!  It worked and I'm happy with it.  Who knew it would be so hard to make two cards that were based on the same basic idea, but with enough changes that they didn't look like the very same card.  Part of my problem was wanting to stay with the same die-cut shapes.  As soon as I scratched that idea today, the card came together with no problem.  At least I have two ideas for you.

This is called a Left Side-Box Fun Fold.  This first picture shows you the card as it would look coming out of the envelope.  Cute right there, but it gets even better as you'll see.  They are so cool standing up and showing off.  Wish you could see this in person.

The materials for this card are Lost Lagoon cardstock, Basic White cardstock, and some of the Tartan Foil Specialty DSP in the Lost Lagoon color.  I thought this color would be a good backdrop for these Friendly Seagulls that are a cool pick during Sale-a-bration.  Isn't this just fun?

Start with a 8 1/2" x 5 1/2" piece of Lost Lagoon.  This is scored at 1/2", 2 1/8", 2 5/8", and 4 1/4".  Fold along these score lines inward to make the box.  Make sure you use a bone folder on the creases to make them sharp.   Open this up and lay flat to attach the two smaller pieces of DSP on the outside. 

Cut DSP 5 3/8" x 3 5/8" for one piece and cut two pieces at 5 3/8" x 1 1/2".  The two smaller pieces are attached to the matching areas on the "box".  The larger piece is for the inside of the card.  For this card, these two prints are the two sides of the same piece of DSP.

I used "green glue" for attaching the DSP to make sure I had enough time to get the pieces totally even top and bottom.  I didn't attach the inside piece of DSP until the "box" was put together.

While the card is lying flat with the DSP showing, add a strip of Tear & Tape to the 1/2" scored area at the side edge.  Fold into the box shape to make sure it all fits correctly.  Then open again and take off the backing on the tape.  Fold the 1/2" area in, then fold in on the 2 5/8" score line so the edge of the card lands right near the center score line.  Make sure it's adhered well.  Then add the larger piece of DSP to the inside of the card.  Are you with me so far?

Now it's time to make the focal piece and the inner sentiment areas.  I chose to use the Everyday Details Dies to make the two Lost Lagoon layers.  The Deckled Circles Dies fit in nicely so that's what was used here to die-cut two Basic White focal areas.  

On the front piece, a light area of Lost Lagoon was added with a Blending Brush to the sky area.  And a small amount of Crumb Cake was added to the sandy area with another Blending Brush.

The seagulls were stamped with Memento Tuxedo Black ink on Basic White cardstock.  Color was added with Stampin' Blends:  Daffodil Delight Dark, Gray Granite Light & Dark.  The birds were fussy cut and placement was decided.

The sentiment is from the Friendly Seagulls and was stamped with Memento Tuxedo Black ink.  The pebbly sand was stamped lightly and randomly with Crumb Cake ink.  The seagulls were attach using a Mini Glue Dot on the feet and Dimensionals on the body.

For the inside of the card, I used a sentiment from the Latte Love stamp set (which is a Last Chance item).  This is stamped with Memento Tuxedo Black ink.  There is both the Lost Lagoon and Crumb Cake ink lightly blended onto this piece just like the front.  Just a few of the pebbly sand pieces were added.  The school of fish was stamped to the side in black, then colored with Lost Lagoon Blends.  Several more fish were stamped onto a scrap of the Tartan Plaid DSP and cut out to use on the card front.

To put the card together, close the card with the box lying flat.  I held the front circles in place in the center of the card and used a pencil to lightly mark behind the circle onto the 1/2" strip.  Add a strip of Tear & Tape inside these marks.  Remove backing and lay the circles onto the tape on the card front.  When you open the card, the box will form, and the circles will stand out.  Next attach the inner circles to hide behind the front so they aren't visible when the card is closed.

The last step for this card was adding the Pebbles in the sand.  And don't forget the fish that were fussy cut and tucked in his mouth.  He's guarding his stash of fish down by his feet.

Ok, I did say there was another card with the same Left Side Box fun fold.  This one took several days, but you tell me what you think.

For this card, Petal Pink was the card base color.  The pink striped print paper is from the Wildflower Birthday DSP that is just so pretty and girlie.  I paired it with Basic White and Calypso Coral cardstocks.

Instead of the circles for the focal point, I went with heart dies from the Hearts of Elegance Bundle.  I love all those sizes of hearts to play with.  The third largest heart cut two Calypso Coral hearts.  The fourth largest cut two Basic White hearts. The smallest heart die cut one each of Petal Pink and Calypso Coral.  There's a tiny heart punched from a mini punch from my retired stash.  The flower was die-cut using the Country Birdhouse dies.

The card is put together in the same way as the first card with all the sizes and scoring measurements the same.

The sentiments both outside and inside the card are from the Hugs for Love stamp set.  If you haven't noticed, I just love the sentiments in this set!  Both sentiments were stamped with Calypso Coral ink.  The hearts on the card front were attached the same way with a strip of Tear & Tape on the 1/2" box fold.  

The extra small hearts were attached inside the card where they peek out when the card is closed.  I'm still debating whether I want to go back and add a few more of the tiny punched hearts for accents.

Lastly are the gems that were added.  These are the pink ones from the 2024-2026 In Color Shimmer Gems.  Aren't they pretty?  They're not quite the exact shade of pink, but they blend so nicely.

Well, that's it.  Now I've got to figure out what to do with the piles of partial card pieces that are sitting on my table.  Who knows just where those pieces will end up next?!

Thanks for sharing your time with me today.  I look forward to sharing another creation or two with you soon.  If you'd like to place an order, I would be happy to be your demonstrator.  If you'd like to order, please consider using the Host Code shown at the top of this blog.  Thanks so much for your kindness.  And please go ahead and post a comment and let me know what you think about this new-to-me fun fold.

Happy stamping and creating,
Sharon

Sunday, February 2, 2025

Delightful Hugs Card

Well, here we are.  It's Sunday again and good heavens, it's already February.  January was rough with all the respiratory infections and the forever cough.  But I'm believing that we are beyond that now.  All that freezing weather we had should have killed off all those nasty germs, and now we can get on with life again.  Sounds like a good plan to me!

Today's card is a bright and cheerful everyday kind of card that use several items from the Delightful Wishes Bundle and the coordinating Designer Series Paper called Floral Delight DSP.  I love the bright yellows for spring.  It just makes me happy!  

See?  Isn't it a happy little card?  Just what someone needs to brighten these long dreary days of winter.

I started with a card base of Old Olive to pick up the greens in the DSP print.  This is cut to measure 8 1/2" x 5 1/2" then scored and folded in half.  I wanted some texture added, so a 5 1/4" x 4" piece of Old Ollive was cut.  Then it's embossed with the Dashing Designs 3D Embossing Folder which is found in the Annual Catalog.  This gives such an interesting and random background design with dashes and dots.  The two layers were attached with "green glue".  

Choosing which designs of the Floral Delight DSP was next.  I chose one floral and another design with dots and dashes to mimic the embossing.  These two pieces happen to be back-to-back.  The floral piece measures 3" x 2 1/4", and the other is 3 1/2" x 2".  Both pieces are backed with Daffodil Delight cardstock.  These measurements are - 3 1/4" x 2 1/2" and 3 3/4" x 2 1/4".  The DSP pieces are attached to the layers with adhesive.  These sections were both attached to the card front to form a sort of 'L' shape and were attached with "green glue".

The sentiment came next.  This one is from the Hugs for Love Bundle in the current Mini Catalog.  I love this sentiment so much and have used it multiple times already.  This time it is stamped with Pecan Pie ink onto Basic White cardstock.  It is cut with a die from the Stylish Shapes Dies.  This one is the 4th largest in size.

I didn't have my Daffodil Delight ribbon yet, so I grabbed a retired ribbon for the accent.  I cut about 6" and folded in half to form this loop.  I attached it to the back of the circle with adhesive.  Then Dimensionals were placed on the back to pop it up on the card design.  When the card was totally finished, I wish I had placed it about 1/2" lower on the card.  I tried to take it off and reposition after the card was finished, but it started ripping.  That was the sign I needed to tell me to leave it alone and just deal with it as is!

The 2-step flower in the set was stamped several times to add to the design and then die-cut.  The colors used for this were Daffodil Delight and Crushed Curry.  There were also a few leaves stamped with Old Olive ink and die-cut for the design.  

After playing with the flowers and leaves, I decided to die-cut a few flowers from Daffodil Delight cardstock using the single flower from the Heart Shaped set.  These were a perfect size and accent to the pieces I had already stamped.

Most of the flowers and leaves were attached flat using Mini Glue Dots.  The one larger flower was attached with one Dimensional in the center.  

For an embellishment, I used the golden tone gems from the Low Profile Dots.  These were placed in the center of the die-cut Daffodil Delight flowers with an extra one popped near the bottom of the design.

I forgot to take a picture of the inside.  Oops.  I used a sentiment from the Hope You Know set.  It's stamped on Basic White cardstock using Pecan Pie ink.  A couple of flowers and leaves were stamped on the inside of the card for an accent.  And a 1/2" strip of the same dotted DSP was attached to the bottom of the white layer.  This really bring the design into the inside of the card to match.

I hope you are ordering your favorite Sale-a-bration items when you place your orders.  It's so much fun opening that box and seeing your new treasures to create with and some of them even free!  Woo hoo!  There are only a few more weeks to take advantage of Sale-a-bration so don't put it off too long.  Thanks for hanging out with me for a while today.  Hope you liked the idea and are inspired to get out those stamps and dies and create!

Happy stamping and creating,
Sharon 
sharoncarr50@gmail.com

Wednesday, January 8, 2025

New Heart Shaped Set

Hello friends.  Back again using a new product from Stampin'Up! that I'm really loving - the Heart Shaped Bundle.  It is so easy to create using this bundle.  I thought today's card would be a simple straight-forward card using just one set.  Well, when I got around to actually making the card from my thoughts, it turns out I used a few extra die sets and another stamp set too.  Seems like it's hard to focus on just one set when there's so many possibilities out there that I can use!  Sometimes you've just got to get everything out on your desk, make a big mess, and create.  At least that's how I tend to work.  So, let's see the card made with the new Heart Shaped Bundle (that is a Sale-a-bration freebie!!) and a few other goodies that I have on hand.

I wanted a bright sunny card to send out in January when all seems dreary and gray.  This certainly accomplished that!  I mentioned that this uses a stamp and die bundle that is one of the Sale-a-bration items.  When you purchase at least $120 of products, you can choose this bundle.  You'll find you will use it throughout the year, and not just for Valentines Day.  This is going to be a very versatile set!

To make this card, I started with a bright Daffodil Delight card base that measures 8 1/2" x 5 1/2".  It's scored and folded in half.

The Designer Series Paper used here is from the new Floral Delight DSP that's in the new Jan - April 2025 Mini Catalog.  This paper is beautiful and it's part of the Delightful Wishes Suite that I'll be featuring soon.  For this card, the yellow geometric print measures 5 1/4" x 4".  I was going to leave it plain, but decided to add the Stitched Whimsy Die (ret) to add a little interest around the edges.  After cutting, it was attached to the folded Daffodil Delight card base.

The next step is cutting the white circle layer.  I used the 2nd largest circle die in the Stylish Shapes Die set.  I wanted the heart wreath to slightly hang over the edges.  

The wreath stamp in the Heart Shaped set was used to stamp a Daffodil Delight wreath on the white circle.  I actually stamped it twice - once about 1/8" off center to the left and then again to the right.  This gave me a much fuller base to attach the die-cut wreath.

The wreath was die-cut from Old Olive cardstock.  There are also a couple of small leaves die-cut at the same time.  Touches of adhesive around the wreath were used to hold it in place.

Next, the flowers were die-cut from Daffodil Delight cardstock.  The two larger ones are from this same set, but the smaller one is from the Country Birdhouse Die set.  

The sentiment comes from the Heart Shaped set too.  It's such a tiny little thing that it fits tucked in just about anywhere. The little banner die is from the Nested Essentials die (ret).  The sentiment is stamped with Old Olive ink.

The ribbon is another item in the Delightful Wishes Suite but can be purchased separately.  The color of the ribbon is Daffodil Delight and it's 1/8" wide.  A bow was made from this and attached to the circle with a Mini Glue Dot that was rolled to make it tiny.  

The sentiment was attached in the middle of the heart using adhesive only on the left side.  The right edge is curled up a little and has no adhesive on it.  The flowers were clustered between the bow and the sentiment.  They're attached with a Mini Glue Dot under each.  

As the finishing touch, some Rhinestone Basic Jewels were added to the center of each flower.

Oops, I almost forgot the inside of the card.  Can't do that!

The design was carried inside to match the front.  The same wreath stamp was used to stamp onto a Basic White layer.  It's stamped with Daffodil Delight ink.

The sentiment is from a set called Hugs for Love.  This is another new set in the Jan - April 2025 Mini Catalog.  It's stamped inside the heart using Old Olive ink.  So cute - love this sentiment!

I had so much fun making this card that I ended up making five of them.  These will really brighten the days of the ladies that receive them this month.  Just a little sunshine in their mailbox.  

That's it for this non-Valentine card using hearts.  What can you create with this?  I'd love to hear your ideas.

Reminder that there are so many new things going on right now - new Jan-April 2025 Mini Catalog, Sale-a-bration, new Online Exclusive items, and new kits in the Stampin'Up! store just waiting for you!  What a fabulous time of year!!  This sure makes those winter blues slip away.

Don't forget that the Sale-a-bration requirements have changed this year.  The minimum required is $60 for Level 1 items and $120 for Level 2 items.  The Heart Shaped Bundle is a Level 2 item and is definitely worth every penny!  If I can help you with any ordering or information, please ask.  I'd love to be of service.

Happy stamping and creating,
Sharon