Hello my friends! I'm back today with another card using the fabulous Extraordinary Flora Washi Tape. I'd never really been a huge fan of washi tape, but I'm certainly loving this one! You simply need to give this a try, and you'll love it too. Today I added in the Everyday Arches Dies into the mix and it's a winner as far as I'm concerned. Come play along with me!

My first task was to find a DSP print with a soft subtle color that enhanced the colors in the washi tape flowers. I decided that the Beautiful Bokeh 6" x 6" DSP had a gorgeous, spattered design with a combination of blues and lavenders would be a perfect backdrop for the flowers.
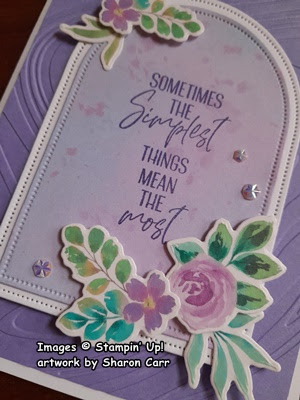
The 5th largest of the Everyday Arches die set was used to cut the DSP. Then the 4th largest die was used to cut a Basic White arch to layer under the DSP arch. That little bit of white really pops the whole design.
Before layering together, a sentiment was stamped in the center of the arched DSP. The sentiment is from the You Are Remarkable stamp set. Gorgeous Grape ink was used to stamp the sentiment. The darker ink made it easier to read but wasn't as harsh as using black ink for the sentiment.

Next, I decided on a Basic White card base. This was cut at 8 1/2" x 5 1/2", then scored at 4 1/4" and folded in half.
Several colors of cardstock were considered for the background layer, but Highland Heather cardstock really looked the nicest. This was cut to measure 5 1/4" x 4". It needed some sort of texture or design on this layer to give it more interest.
I check my stash of embossing folders to see what I liked. The design of the So Swirly Embossing Folder for a background looked interesting, so the Highland Heather was embossed with this.
After embossing, the Highland Heather layer was attached to the Basic White card base. Because of the embossing, I used Tombow MultiPurpose Liquid Glue to attach these together.
Now comes the fun part of the card. In my post yesterday, I discussed how to attach the Extraordinary Flora Washi Tape to a 3 1/2" strip of Basic White cardstock or Vellum. I think the Washi Tape would also look nice on Very Vanilla cardstock or even a pale cardstock like Petal Pink or Soft Seafoam which I'd like to try. Anyway, for this card, I used the Washi Tape attached to Basic White cardstock. Then it was die-cut with the large die that cuts all the pieces at the same time.
The design has a larger cluster of flowers and greenery attached to the bottom right corner. Two of the pieces are attached with Dimensionals with the leaf cluster tucked in under the rose. The same goes for the smaller cluster near the top of the design. The larger flower/leaf piece is attached with a Dimensional. The smaller leaf cluster is tucked in under it.
The whole arched design is then attached to the card base with Dimensionals to give it lift.

Last look at this pretty card. Oops, I almost forgot to mention the bling used here! I can't forget that now, can I? The Iridescent Faceted Gems looked perfect on this card. The gems picked up all the lovely colors of the flower accents and really enhanced them. Perfect.
This card turned out so pretty. And the best part is that it's really quick and easy to make. Once you make a pile of these Washi Tape flowers, it's so easy to just pick and choose which of the many flowers and leaves you want to use. I wonder just how many flowers you can get from one roll of that Washi Tape? Guess I'll never know because I keep using them almost as quick as I make them! This card is just the 2nd in what will be a long line of cards made with these Extraordinary Flora Washi Tape flowers.
Hope you are inspired to try out these Washi Tape flowers too. I'm thinking you're going to fall in love with these pretty pieces. I have to remember to try out the stamp set and color my own flowers too. That will be a whole 'nother stamping experience.
If you have time tomorrow, July 1st, go check out all the new stamps, dies, DSP, and other goodies that will be available in the Online Exclusive part of the SU! store. Oh, my goodness gracious! You're going to be in awe of all the wonderful goodies that will be available for you! There are so many new and fabulous items coming up and I need to get crackin' on creating with them. Stay tuned to see what's coming next.
Happy stamping and creating,
Sharon
sharoncarr50@gmail.com


