Showing posts with label Everyday Arches Bundle. Show all posts

Monday, August 10, 2026

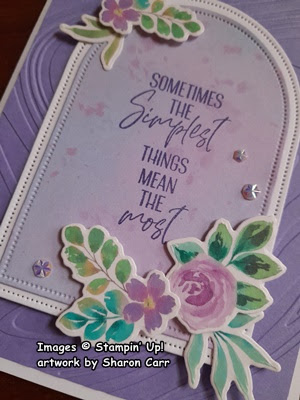
Forever Florals with Arches

Hello stamping friends!  It's back to school time here already.  I keep thinking this summer was so short and hot we really didn't do anything.  But that doesn't make any difference.  School started this past week anyway, and football season is underway.  Normally I really wouldn't care much for football.  I hate to admit it's the one sport that really never made a whole lot of sense to me.  But since my youngest grandson is playing again this year, I'm trying to figure it out.  Wish me luck in this venture!!  That said, it is time for another post sharing what I've been stamping lately.  I've been playing with the Everyday Arches dies on different projects lately.  The shape is easy to work with and can be used in different ways on my projects.  Today's card starts with the arch shape and pairs it with the Forever Florals stamps and dies to create a soft card that makes me smile.  I think anyone would be happy to receive this card in their mailbox.

The base for the card is the lovely Hydrangea Hue which is one of my all-time favorites.  A layer of the denim-looking print in the Paper Medley Designer Series Paper was cut to match.   The measurements are 3 7/8" x 5 1/8".  There needed to be a little more definition between this layer and the card base.  

A layer of 2026-2028 In Color Pearlized Specialty Paper was added.  This measures 4" x 5 1/4".  This creates a very skinny frame around the denim print that shines nicely when the light hits it just right.  It's surprising just how much this skinny layer adds to the overall design.  (If I would have been thinking ahead, I would have die-cut a smaller layer from the inside of this pearlized paper to use later on another project.)

The layers were all attached together with adhesive between them.  This keeps them flat and the rest of the card stands out more.

Next was die-cutting the Basic White arched layer.  The 5th largest Everyday Arches die was used for this.  After cutting, one of the sentiments in the Forever Florals set was stamped near the top with Hydrangea Hue ink.  I really like the four sentiments included in the set and have used them often.

The Forever Florals die set has two different sizes of just tiny flower dies.  Both sizes were used to die-cut Basic White cardstock.  Then they were used again with 2026-2028 In Color Pearlized Specialty Paper to cut several pieces.  There is also a multi-leaf stem in the die set.  This was used to die-cut 3 stems in Peaceful Pine and 2 cut from Soft Sea Foam cardstocks.  All these pieces were arranged and adhered to the bottom of the arch.

The arch was placed onto the card base, but it looked too plain.  It just needed something to break up the large amount of background.  The Lily of the Valley set has a die that makes this pretty trellis look.  It's die-cut from Basic White Thick cardstock.  After cutting, it was attached as shown flat onto the card front.  The arch was added to this using Dimensionals to hold in place.

A few of the 2026-2028 In Color Butterflies in Hydrangea Hue were scattered on the design for a little extra interest.

That's it for today's card.  Seems like I ended up pulling in bits of different sets to create this card.  Sometimes you just need something a little extra to make a design work.  Hope you give this idea a try.  This Hydrangea Hue color makes up into such pretty cards.

It's still August and Stampin'Up! still has its selected cardstock and Designer Series Paper sale going on.  Visit the store to see what is on sale.  Getting ready for Christmas card making, I just ordered several 12" x 12" Two-Tone Cardstock colors that were on sale.  Can hardly wait to get started on some of the ideas I have rolling around in this brain of mine.

Happy stamping and creating,
Sharon

Tuesday, August 4, 2026

Violets Fun Fold Idea

Hello friends.  I've been flitting around making cards for so many people having shoulder, knee, hip replacements lately.  Are we becoming a country of bionic people??  There is definitely a rash of them going on.  Why is everyone scheduling them now?  Something going on that I don't know about?  I have no idea, but it's been keeping me busy making and sending out cards.  I've been trying to send a card that reflects that person as much as possible, so they've all been one-of-a-kind.  One of the cards used the Framed Violets set and turned out really pretty so I thought I'd share it with you.

Because I wanted to use the Violets Dreams Designer Series Paper, the first order of business was to find an image the I could die-cut from the pretty prints.  The 5th largest die from the Everyday Arches die set was used to cut the image.  From this, the colors on the card were chosen.

The card base is Fresh Freesia that measures 8 1/2" x 5 1/2".  It's scored at 2 1/8" and 4 1/4" to make the z-fold.

I chose the back side of the print which is a lovely soft stripe as the inner layer.  This measures 5 1/4" x 4".  It's attached with adhesive on the inside of the card.

Couldn't really find a print I wanted for the front fold-back section.  I ended up using this checked vellum print from the Berry Botanical Vellum that was a previous Product of the Month from a couple of months back.  I'm so glad I had some of this left, because it's the perfect contrast for the rest of the card.  It measures 1 7/8" x 5 1/4" and is attached with adhesive.

Two pieces of Basic White cardstock were die-cut with the 4th largest die from the Everyday Arches set.  One of them was used to back the DSP print that was already cut and one was saved for the inside of the card.

One of the white pieces and the DSP print piece were adhered together with adhesive.  Then they were positioned on the card front.  Dimensionals were used to attach this.  Make sure they are added only to the left side of the arch so there is no problem opening the card.

The sentiment chosen for the card is from the Prayers & Promises stamp set.  This simple sentiment was stamped on a 1/2" strip of Basic White cardstock.  Petunia Pop ink was used for this because it's a little darker than the Fresh Freesia, but it still blends nicely with the colors.  Then the edges were trimmed with paper snips to finish.  The final length is 2 1/2" long and it's attached with Dimensionals.

A Fresh Freesia 1/4" Satin Ribbon was tied into a bow and attached near the top of the front layers with Mini Glue Dots.

So far, I don't think this design needs any bling added.  I may change my mind when I write a note inside and I'm ready to mail it.  What do you think?  Any suggestions?

Back to the inside of the card.  Using the 2nd white arched piece I cut, another of the sentiments in the Prayers & Promises was stamped on this.  Petunia Pop ink was used again for this sentiment.

In the bottom corner of this white layer, a single violet was stamped as an accent.  This time I did use Fresh Freesia because it is a little lighter.

After the stamping, the layer was attached inside the card, making sure it won't show.   

TIP - Put adhesive on the back of this layer.  Open the card with the top flap folded back.  This way you can easily see the edge.  Lay the sentiment layer over this face down and line up the edges.  Then close the card.  The inside layer will be attached in just the right place.

One last look.  I just love the soft colors and the fun fold on this card.  Because the main image was die-cut from a DSP print, this card was made in no time at all.  Still pretty, but so easy to make up several of these for when needed.

FYI - Have you heard that Stampin'Up! is having a sale on selected Designer Series Papers and Cardstock?  This is going on August 4th - 31st.  You can click here to see what's available.  There are even some Two-Tone Cardstocks in the sale!  Stock up on some of your favorites or use this opportunity to try something new!

Another piece of information for you - there is a new Product of the Month also.  Check here to see how pretty this is!  It's going to be perfect for some of my fall-themed cards.  I'm sure you'll love it too!

Happy stamping and creating,
Sharon


Monday, October 13, 2025

Elegant Pine Snowflakes Card

Hello, my stamping friends.  Have you gotten a head start on your Christmas cards yet? I've only made a few of them so far, but I was thinking ahead to the cards I'll need for the shut-ins come December.  I know I have lots of time yet and Thanksgiving cards to make, but it's never too early to plan Christmas cards.  Right?  I have to tell you that I'm in love with the Elegant Pine Snowflakes DSP.  It's different and I think the colors and prints are all fabulous.  Especially the DSP prints that are on the dark backgrounds.  Truly scrumptious!  So, the card I'm sharing today needed to be easy to make but look eye-catching and very Christmas-y.


The card turned out a dark, rich blend of colors that were chosen to match the print.  I started with a base of Cherry Cobbler that measures 8 1/2" x 5 1/2".  It's scored at 4 1/4" and folded in half to make a landscape style card.

Next is a layer of the Shaded Spruce cardstock that measures 5 1/4" x 4".  

There is a layer of the Elegant Pine Snowflakes Designer Paper cut to 5" x 3 3/4".  This DSP can only be found in the Online Exclusive section in the store.  It's definitely worth it to spend the time looking for it! This layer is attached to the Shaded Spruce layer with adhesive.  Then both of these layers are attached to the folded card base with adhesive also. 

Next the Everyday Arches Dies were used to cut the sentiment pieces.  The 2nd smallest die cut a piece of Basic White cardstock.  The 3rd smallest die cut a piece of Cherry Cobbler cardstock.

On the white piece, a small snowflake cluster from the Snowy Delights stamp set was stamped with Soft Sea Foam ink towards the curved end.  Then the sentiment - Joy to the World - was stamped with Cherry Cobbler ink right over the snowflakes.

The white layer was attached to the Cherry Cobbler layer with adhesive.  Then both layers were attached to the card front with Dimensionals to make it stand out more. 

I made a mistake.  I thought the ribbon I used on this card was from this year.  Unfortunately, it must be retired from last year.  Oops.  It's Cherry Cobbler with gold edging and it worked here.  So, I guess this means go through your stash and fine something that works!  It's attached with a Mini Glue Dot to hold in place.  

The glittery dots are a fun addition here.  They are from the Traditional Sparkling Sequins that are found in the Sept-Dec Mini Catalog.  I've used the green ones here and the red ones on another one of these cards.  I think I prefer the green ones that tend to show up a little better.

TIP:  I considered a gold bow and gold gems of some kind for the bling.  I think the gold would be very elegant!

So far, the inside is a layer of Basic White with a 1/2" strip of the DSP along the bottom edge.  I just haven't decided on the wording I want to use yet.  That will come later as needed.

Well, there you have it.  Just a nice, quick, and simple card if you're doing multiples for Christmas.  Of course, you'll want those fabulous show-stopper cards for special people, but these work out well when you've got stacks of cards you need to mail out and you're running out of time to get them done.

Thanks for stopping by to see what's new around here.  There will be both Thanksgiving and Christmas cards coming in the near future.  I've got lots of ideas in my head.  I just need to get downstairs and get the creating part done.

Happy stamping and creating,
Sharon

Monday, June 30, 2025

Washi Tape and Arches

Hello my friends!  I'm back today with another card using the fabulous Extraordinary Flora Washi Tape.  I'd never really been a huge fan of washi tape, but I'm certainly loving this one!  You simply need to give this a try, and you'll love it too.   Today I added in the Everyday Arches Dies into the mix and it's a winner as far as I'm concerned.  Come play along with me!

My first task was to find a DSP print with a soft subtle color that enhanced the colors in the washi tape flowers.  I decided that the Beautiful Bokeh 6" x 6" DSP had a gorgeous, spattered design with a combination of blues and lavenders would be a perfect backdrop for the flowers.

The 5th largest of the Everyday Arches die set was used to cut the DSP.  Then the 4th largest die was used to cut a Basic White arch to layer under the DSP arch.  That little bit of white really pops the whole design.

Before layering together, a sentiment was stamped in the center of the arched DSP.  The sentiment is from the You Are Remarkable stamp set.  Gorgeous Grape ink was used to stamp the sentiment.  The darker ink made it easier to read but wasn't as harsh as using black ink for the sentiment.
Next, I decided on a Basic White card base.  This was cut at 8 1/2" x 5 1/2", then scored at 4 1/4" and folded in half.

Several colors of cardstock were considered for the background layer, but Highland Heather cardstock really looked the nicest.  This was cut to measure 5 1/4" x 4".  It needed some sort of texture or design on this layer to give it more interest.  

I check my stash of embossing folders to see what I liked.   The design of the So Swirly Embossing Folder for a background looked interesting, so the Highland Heather was embossed with this.

After embossing, the Highland Heather layer was attached to the Basic White card base.  Because of the embossing, I used Tombow MultiPurpose  Liquid Glue to attach these together.

Now comes the fun part of the card.  In my post yesterday, I discussed how to attach the Extraordinary Flora Washi Tape to a 3 1/2" strip of Basic White cardstock or Vellum.  I think the Washi Tape would also look nice on Very Vanilla cardstock or even a pale cardstock like Petal Pink or Soft Seafoam which I'd like to try.  Anyway, for this card, I used the Washi Tape attached to Basic White cardstock.  Then it was die-cut with the large die that cuts all the pieces at the same time.

The design has a larger cluster of flowers and greenery attached to the bottom right corner.  Two of the pieces are attached with Dimensionals with the leaf cluster tucked in under the rose.  The same goes for the smaller cluster near the top of the design.  The larger flower/leaf piece is attached with a Dimensional.  The smaller leaf cluster is tucked in under it.

The whole arched design is then attached to the card base with Dimensionals to give it lift.

Last look at this pretty card.  Oops, I almost forgot to mention the bling used here!  I can't forget that now, can I?  The Iridescent Faceted Gems looked perfect on this card.  The gems picked up all the lovely colors of the flower accents and really enhanced them.  Perfect.

This card turned out so pretty.  And the best part is that it's really quick and easy to make.  Once you make a pile of these Washi Tape flowers, it's so easy to just pick and choose which of the many flowers and leaves you want to use.  I wonder just how many flowers you can get from one roll of that Washi Tape?  Guess I'll never know because I keep using them almost as quick as I make them!  This card is just the 2nd in what will be a long line of cards made with these Extraordinary Flora Washi Tape flowers.

Hope you are inspired to try out these Washi Tape flowers too.  I'm thinking you're going to fall in love with these pretty pieces.  I have to remember to try out the stamp set and color my own flowers too.  That will be a whole 'nother stamping experience.

If you have time tomorrow, July 1st, go check out all the new stamps, dies, DSP, and other goodies that will be available in the Online Exclusive part of the SU! store.  Oh, my goodness gracious!  You're going to be in awe of all the wonderful goodies that will be available for you!  There are so many new and fabulous items coming up and I need to get crackin' on creating with them.  Stay tuned to see what's coming next.

Happy stamping and creating,
Sharon
sharoncarr50@gmail.com

Friday, April 18, 2025

Three Panel Arch Fun Fold Card

Hello friends!  Yes, I know it's almost Easter and kind of late to be sharing an Easter card, but I just made it, and I really, really want to share it.  I've seen several versions on these cards and was determined to figure out how to make this.  I'll tell you how I ended up making this card, but it's not quite like anyone else's videos that I looked at.   Everyone seemed to have their own take on how to make these.  So, you can do like I did and immerse yourself into half a dozen videos and then just go for it.

Here is the finished front of the card all folded up nicely and ready to put in the envelope.  Let me give you a list of pieces to die-cut and have ready to put together when needed.

Blackberry Bliss cardstock:
cut 3 - largest Everyday Arches Dies
cut 1 - large & 2 small butterfly bodies from Beautiful Butterflies
cut 1 - piece 3 1/2" x 8 1/2" score @ 4" & 8"
cut 1 - piece 3 1/2" x 4"

Basic White cardstock:
cut 1 - 2nd largest arch die
cut 1 - 3rd largest arch die
cut 1 - 6th largest rectangle Textured Notes Dies.

Fresh Freesia cardstock:
cut 1 - 2nd largest arch die

DSP:
cut 1 - 3rd largest arch die
cut 1 - large and 2 small butterflies

Silver Cardstock: cut 1 cross

Here' the card fully opened.  We'll work on one panel at a time.  Start first with the two Blackberry Bliss rectangles.  Fold on the scored lines to make a Z fold.  On the 1/2" section on the end, attach the plain cardstock piece to the front of this making sure not to go over the scored line.  Add adhesive to the 1/2" section and attach the other piece to create a 12" long strip with scores at 4" and 8".  When this is accordion-folded closed, if you have a small amount extra, just trim it off.  It was about 1/16" too long on my card.

For the front panel, you need the smaller white arch.  On this, you'll stamp the sentiment from the Everyday Arches stamp set.  This is stamped to fit in the arched area with Blackberry Bliss ink.  

Next the palm leaf frame from the Faith Collection was stamped with Garden Green ink in the center.  After die-cutting the silver cross, I placed the detailed cross die over it and from the back side, used my bone folder to rub and apply pressure.  This gives you a subtle woodgrain look without cutting it.  Set this panel aside along with the cross for a few minutes.

On the middle panel, layer the DSP print arch onto the Fresh Freesia arch using adhesive.  Line all the edges up carefully.

Then layer these onto the Blackberry Bliss arch with adhesive. 

The sentiment is from a retired set and is stamped with Blackberry Bliss ink.  You could use whatever sentiment works here.  This is attached about in the center of this panel.

I chose to use the back side of the butterfly die-cuts here. The butterfly bodies are attached to the wing sections with adhesive.  Then the two butterflies are attached to the panel using adhesive also.  Set aside.

The largest white arch is last.  It has a sentiment from the same retired Easter set that is stamped with Blackberry Bliss ink.

The white panel is attached to the last Blackberry Bliss panel by using adhesive.

The large butterfly body is attached to the butterfly.  Then it's attached to the panel very close to the bottom, so I'd have a little bit of space to sign the card.  Make sure the wing tip doesn't go past the score line and cause problems.

Now let's put it together.  Lay out the 3 1/2" x 12" strip flat to start.  On the first panel of the strip, add adhesive about 1/4" in from the 4 edges.  Line up the arched panel so it's flat at the bottom and centered on the two sides.

Fold that panel back and out of the way.  It will be behind the middle panel so you can make sure this gets lined up well when attaching.  Add adhesive inside the strip where this next panel will go just like you did the front panel.  Then line up your middle arched panel onto the card making sure the bottom is flat and the arch matches up with the one behind it.

Attach adhesive on the last section and line up the last panel.  Before pressing down heavily, close the card to make sure the last panel lines up too.

Finishing touches:  The cross is attached to the front panel.  I used Dimensionals for this.  

The purple gems are another retired product.  They matched the Blackberry Bliss cardstock so nicely I couldn't resist using them!

That's it for this fun fold Easter card.  Now that I've made this version of the Three Panel Arch Fun Fold Card, I'm going to have to try out a few different versions, especially a birthday card, I think.  Wouldn't that be cute?  I plan on getting back with you about those cards soon.  This type of fun fold really looks harder than it is to make.  Once you've got all the elements die-cut and ready to go, it just takes another 10 minutes to put together.  And that's it for the Three Panel Arch Fun Fold Card.  Whew!  What a mouthful!

Have you signed up for the rewards program yet?  Make sure you do that before you place another order.  I don't want you missing out on any of the rewards available to you.

Thanks for taking time out this weekend amid all the busy-ness of Easter to see what I've been stamping lately.  I appreciate you so much!

Have a blessed Easter,
Sharon

Monday, April 7, 2025

Easy Cross Easter Card

Hello friends.  I don't know if you've seen all the variations of the cross card that is very popular right now.  I've tried 3 of them and wasn't crazy happy about any of them.  Then I saw a video by Terri Gaines that was different.  Instead of having a pop-up cross, she just has the cross on a fold on the card front.  So easy and I love that it stands up nice and straight with no propping at all.  Yay!  And the icing on the cake was the number of samples she made using different DSP prints!  Wow.  I think there were at least eight of them!  To check out her ideas, go to CreatewithTerriGaines.com    No, I didn't copy any of them completely but chose my own papers and had fun.  You should give this one a try too.

Here's the finished card.  I love it!  To make it, I started with an 8 1/2" x 5 1/2" piece of Daffodil Delight cardstock.  It is scored at 1 1/4" and 4 1/4".  You need another piece of the same Daffodil Delight cardstock that measures 3 3/4" x 1 1/4".

The DSP is from the Floral Delight DSP pack.  The olive print has two pieces cut for the base of the card.  These measure 2 3/4" x 5 1/4" and another at 4" x 5 1/4".

The print I used for the cross portion of the card measures 1 1/8" x 5 3/8" for the vertical section and 1 1/8" x 3 5/8 for the cross piece.

Starting with the card base, fold the card in half, and then fold the flap open.  On the front left section and the inside of the card right section, attach the DSP pieces that were cut for the card base.

Now, the DSP gets attached to the cross parts.  The longer one is attached to the folded back part of the card front.  The short piece is attached to the extra piece of Daffodil Delight that was cut.  After attaching the DSP to these pieces, close the card and lay the cross piece over the cross.  You want the right edge to line up with the right edge of the back of the card.  Attach together at the overlap.  I lightly marked with a pencil the area for the adhesive.

The stems and flowers are from the Linked Together Bundle.  There are two sizes of stems.  I cut one of the longer stems and three of the shorter stems out of Old Olive cardstock.  They are attached to the cross with adhesive.  

Then at least five of the flowers were die-cut from Basic White cardstock.   I only used five on my card, but Terri used six on her cards.  Your choice.  There are many other die sets that have stems and flowers that would work.  Just look to see what you have on hand.  I added the flowers with adhesive also. 

The sentiment is from the Storybook Friends stamp set.  For a banner, I cut the 2nd smallest die in the Countryside Corners Bundle from Basic White cardstock.  The greeting is stamped with Old Olive ink way over on the left side of the die-cut.  The right side of the banner is attached behind the cross.  Make sure this doesn't hang over the outside edge of the card.  We want to make sure this card fits into a regular envelope.  

Inside each of the flowers a Rhinestone Basic Jewel was added.  I really wanted a yellow gem, so before adding them, I colored them with the Daffodil Delight Blender Dark Pen to get a nice soft yellow color.  The gems fit inside the tiny hole in the center of each flower perfectly.


To finish the inside of the card, I cut a piece of Basic White at 2 3/4" x 5 1/4".  This is attached inside after stamping a sentiment with Old Olive ink.  This is an old, retired wood stamp, but it's perfect and I'll hang onto it forever.

On the other side, I added an arched die-cut made from the Everyday Arches Dies.  The shape reminded me of the opening to the empty tomb on Easter morning.  This is the 3rd smallest die. The sentiment is not SU!, and unfortunately the stamp is so old that the company doesn't exist anymore.  What a shame.  Make sure this is added to the left side, so it doesn't show when the card is closed.

Just a last close-up look at the cross.  I can't wait to try this again using a woodgrain DSP for the cross.  Wouldn't that be a terrific look?

I hope you give this card idea a try.  It's a very special card for Easter when you want to send something more than a plain card.

Thanks for stopping by to see what's going on over here.  Right now, everything looks a bright Granny Apple Green outside.  It was so dry, but we've had a good steady rain today and all the greenery and flowers are happy again.  It's so wet out there and that means it's a good day to stay inside and create!  Yay, stamping weather!!

If you run into any problems or have questions while making this card, feel free to text me at 313-407-0750 or email me at sharoncarr50@gmail.com.  I'd be happy to help you if I can.

Happy stamping and creating,
Sharon

Thursday, March 6, 2025

All New Black and White Beauty

Hello friends!  Life has been going along at quite a fast clip, but unfortunately, I've been moving much slower.  Here it is March 6th already and this is only my first post of the month.  So sorry for the tardiness.  I keep trying to post on a regular basis.  Obviously, sometimes I do better than others.  Today's card features black and white in a gorgeous card that I used as a thank you card.  Just changing the sentiments would open the possibilities tremendously.  In case you can't tell once you read the post, I just received an order from Stampin'Up!  All of these new products can be found in the Online Exclusives section of the SU! store.  Seems like I used a bit of each of the new products that arrived.  Let's get to creating this card with all my new toys.

I wish you could hold this card in your hands and see the touches of sparkle that really contrast with the black and white.  Just lovely!

I started with the new Botanical Textures Designer Series Paper.  Choose a print that both sides coordinate well together.  This print piece measures 5 1/2" x 4".  About 1/4" was ripped from the bottom edge to give it a more organic feel.  

The next step uses another new product called Everday Arches dies.  These are so much fun to use.  For this project, I used the 3rd smallest die to cut a piece of Basic White cardstock.  Then I used the 5th smallest die to cut an opening in the piece of DSP we have ready.  This was placed as close to the middle as possible.  The die-cut piece is turned over and this is the darker layer behind the white on the card.  

I was thinking that the card would need some greenery stems of some kind to frame the arched layers.  Since I was already die-cutting, I figured I'd cut the two leafy branches I needed now.  The leafy branch die is from the Mixed Florals Dies.  One branch is cut from Basic Black cardstock.  The other one is cut from Black Glitter Paper that was from last Halloween.  This was a lovely addition for the design as it added another dimension to the blacks already part of the design.

The card base of Basic Black was cut.  It measures 8 1/2" x 5 1/2" that is scored at 4 1/4" and folded in half.  The large piece of DSP was attached to the black card base using adhesive.

The sentiment stamped on the smaller arched piece is another new one called You Are Remarkable.  Love the sentiment and the mixed fonts used here.  It's stamped using Memento Tuxedo Black ink to the center of the arch.

Before layering this onto the darker arch, a piece of Black Glittered Ribbon was wrapped around and tied into a knot on the right side.  Even though you can see only a small bit of the ribbon, it added to the overall look of the card.  

The white layer is attached to the darker layer with Dimensionals.  The Basic Black leafy die-cut is attached to the card base with adhesive.  The bottom part of the stem curves under where the arches will fit.

Next the glitter leafy stem is partially attached to the back of the arches with the upper part curving over the arches.  This is all attached to the card base using Dimensionals.  The arch nicely fits over the opening from where it was cut.  It's attached with multiple Dimensionals to keep it even.

The inside carries on the black and white theme.  The Basic White layer measures 5 1/4" x 4".  The sentiment is from the new Textured Notes stamp set.  I like how this font coordinates with the front.  It's stamped with Memento Tuxedo Black ink.

The greenery on the bottom corner is also from this same set.  Don't the leaves coordinate nicely with the look of the DSP print?  The stamp was inked then off-stamped before stamping onto the cardstock.  This gives it a softer look.

Last step is figuring out what type of bling to add to the design.  I love the simplicity and sparkle of the Basic Rhinestone Jewels for this design.  It blends in nicely with the Black Glitter Paper and the glittered ribbon.

That's it.  The design is done, and I love the elegant card sitting in front of me.

Thanks so much for joining me today.  Hope you give this idea a try.  I probably went a little overboard with all my new goodies showing up on one card, but they all just blended together so nicely!  I just couldn't help trying them all out as soon as possible!!  Don't forget that you can find them in the Online Exclusives section of the store.

Thank you for all the orders that came through during Sale-a-bration.  I appreciate each and every one of them.  You guys are the very best!

Stay tuned for all the new changes coming to Stampin'Up!  Host orders and using host codes will be totally stopped in mid-April and the new rewards program will be going into effect.  I think you'll love getting a reward every time you place at least a $20 order.  These rewards can be redeemed with your following order, or you can accumulate them to be used on a future order.  Your choice.  I think this will work out well for all of us.  Please remember to choose me as your demonstrator.  😃 Thank You!

Happy stamping and creating,
Sharon

Wednesday, February 26, 2025

Toadstool Gardens DSP is Leaving

 Hello, my stamping friends.  I don't know about you, but mushrooms are not my favorite food.  In fact, I can't stand them.  Yuck!  But, this Toadstool Gardens DSP that is a Sale-a-bration item is another story.  The colors on the prints are so cute and happy.  They just make me want to smile.  What's not to love about this?  There's only one problem that I can see.  It won't be around for you to get after the end of February.  That's it, folks!  So, before it's time to put away, I wanted to share one of the cards I made using this paper.  The card also showcases the Everyday Arches die set that's available as an Online Exclusive item.  The lovely arched dies are a fun change-of-pace from all the rectangles and circles.  Just something different to use to play and create.

I chose to make an easy fun fold card that showcases two of the prints available in the pack.  Fresh Freesia cardstock was used for the card base.  It measures 7" x 5 1/2".  Then it's scored at 4 1/4" and on the score line.

Next comes the Toadstool Gardens DSP.  The cute little print on the card front measures 5 1/4" x 2 1/2".  After cutting, this was attached to the front flap with "green glue".

There is an inner layer of Basic White cut that measures 5 1/4" x 4".  And an inner piece of DSP that measures 5 1/4" x 1 1/2".  

The striped DSP strip is attached to the Basic White cardstock piece.  It's lined up carefully on the right edge so none of the white shows.

The sentiment is found in my favorite set, Hugs for Love.  This is stamped with Fresh Freesia ink onto the white section of the layer.  Then it's attached inside of the card with "green glue".  Make sure the top and bottom edges match up with the front layer.

As you can see, I fussy cut three different mushrooms from another one of the print pages.  They don't exactly match the front DSP images, but they fit in ok.  They're all attached to the bottom of the white layer using "green glue".

Now, let's go back to finish up the front of the card.  I liked the idea of the front flap being one of the arch die-cuts.  The 5th smallest die was used to cut a Basic White piece for the sentiment layer.

The sentiment used here is from the Softly Said stamp set.  It's stamped with Fresh Freesia ink.  I like how it filled up most of the space on this layer.  

I tried several different ribbons, twines, trims etc. to add to the layer, but most of the ribbons just melted into the background and didn't give the card a striking look.  Then I tried this black & white checked ribbon.  It was thin enough and packed just the pow the card needed.  A length is wrapped around the arch and tied in a small knot in the center.  I don't usually tack down my ribbons.  I like them loose.  But this time, the ribbon really needed to stay exactly where it was.  A Mini Glue Dot was tucked under the knot of the front and another one tucked in the middle of the ribbon in the back.

Carefully place Dimensionals under the layer only on the left side that will attach to the card front flap.  (I marked the backside of the flap lightly with a pencil to give me an idea where I wanted the Dimensionals)  The curved right edge comes to almost the right edge of the card when closed. 

The last step is adding the pretty gems.  These are the 2024-2026 In Color Shimmer Gems.  I thought they were the perfect accent.

There you go.  This is such a quick and cute fun fold.  Any shape would probably work for the label on the front.  Just find one that fits your sentiment or special images you want to add to the front.

So that's it for the Toadstool Gardens DSP.  I'll be using it more myself as I've made it a goal this year to start using my stash of DSP because I keep buying more!  If the prints weren't so doggone cute, I wouldn't be having such a problem of way too much DSP on hand.  Such a problem - having too much of a good thing.

Thank you again for spending time with me.  Hope you enjoyed this idea and will give it a try.  I'd love to hear which DSP you used to make your creation.  The possibilities are pretty much endless once you get started.  That's one of the lovely creative aspects of stamping.  You find an idea you like and start making changes to it to make it your own idea!

Happy stamping and creating,

Sharon