Hello friends. Today I've got a whole pile of cards to share with you. It all started with a Basic Template using a piece of 6" x 6" DSP to cut all the main pieces. My template I used is very basic and can be cut either way, depending on the direction of the print and what you want to do with it. First, I want to show you a picture of the 5 cards that are made from one 6" x 6" piece. Then we'll get into the cutting and details to make these cards.
The DSP that was used for these cards is maybe my favorite print in the Floral Charm DSP pack that is part of the Charming Day collection. The roses are a pretty soft color with Night of Navy and Pretty Peacock leaves. It's just yummy. Of course, when I create with the other prints in the set, I fall in love with the other designs too. Guess this DSP pack is definitely my favorite at this point!
Anyway, can you see how just a small amount of this print can go a long way? It's so pretty even when you've only got a 1 1/2" x 3 1/2" piece!
Let's get to the Basic Template that I used.
Sorry, this isn't all fancy like other people can make it. When I'm working out a design, I just make a sketch and add dimensions for it. That's it. But you can see exactly what you need and how to cut. Want to give it a try?
The first card up is using the top left piece of the Basic Template. This measures 3" x 3 1/2". I decided to use Fresh Freesia for the card base even though that's not one of the colors that are recommended for this. I just liked how it looked, so that was my choice.
The DSP is framed with a piece of Night of Navy cardstock that measures 3 1/4" x 3 3/4". It's attached to the base with Dimensionals.
The sentiment is from the Charming Day set and is stamped onto a Basic White circle using Night of Navy ink. It is die-cut with the Stylish Shapes Dies. It's backed with the next largest circle cut from Night of Navy cardstock. The circles are attached together with adhesive. Then they are added to the card with adhesive where they overlap the DSP and Dimensionals on the right side to keep it flat.
A sheer white ribbon with silver edges was cut in half and then both pieces were tied into a pretty bow. A trio of Purple Fine Shimmer Gems in the plummy color were added to finish the design.
Next up is one of the two left side pieces of the Template that measure 1 1/2" x 3 1/2". This time the card base is Bubble Bath.
A 2 1/4" x 4 1/4" piece of Berry Burst was cut for an accent. About 1/2" was ripped from the right edge. Then it was embossed with the Distressed Tile Embossing Folder to give it extra interest. This was attached about 1/2" up from the bottom of the card using Tombow Liquid Glue (green glue).
Next a piece of Night of Navy was cut to frame the DSP. This measures 1 3/4" x 3 3/4". They are attached together with adhesive. Then they're attached flat to the card base right over the Berry Burst layer. I used "green glue" again for this layer.
The sentiment for this card is from the Unbounded Love set. It's stamped with Night of Navy ink onto a circle cut from the smallest circle die in the Stylish Shapes Dies. It's backed with the next largest circle from the same die set. This is attached over the corner of the DSP using both adhesive and Dimensionals so it lays flat on the card.
I happened to have a small open leaf die-cut leftover from a precious project that was in Shaded Spruce. This was tucked in slightly under the Berry Burst layer for some added interest.
There are three gems from the 2021-2023 In Color Dots that are added to the card. They were originally supposed to match with Moody Mauve, but I loved the look on this card.
This card uses the 2nd small piece of DSP from the left side of the template. I'll confess, I had quite a time making this card and I'm not sure I got it right. If anyone has any suggestions, I'm open to hearing them!
This card started with a lovely die-cut from the Charming Day set. It's cut in Berry Burst so I thought it would go with this idea.
The card has a base of Pretty Peacock cardstock. The DSP has a layer of Night of Navy framing it that measures 3 3/3" x 1 3/4". It's attached near the bottom of the card front using Dimensionals.
The berry die-cut has some Mini Dimensionals under some of the wider areas to give it lift. Then part of one of the flowers is tucked under the DSP and some leaves are brought forward on the design.
The sentiment used here is from the Perfectly Pears stamp set. The die used to cut the label is from the same set. It's stamped with Night of Navy ink. There are Mini Dimensionals behind this to elevate it to match the rest.
Three of the Pecan Pie & Clear Ribboned Adhesive-backed Dots are added to the design to finish it.
The fourth design features the piece of DSP from the top right of the Basic Template. This piece measures 2 1/2" x 4". The layering piece is Night of Navy cardstock that measures 2 5/8" x 4 1/8". The pieces are attached with adhesive.
The card base for this design is Bubble Bath cardstock. The two layers are attached to this with Dimensionals.
There is a die-cut of Pretty Peacock leaves added to the bottom left corner. It's attached with dots of "green glue" on some of the leaves to hold in place.
There is an open rose die in the same set that was used to cut this Berry Burst rose. It's attached over the leaves with several Mini Dimensionals.
The sentiment is from the Perfectly Pears stamp set. It's stamped onto a small label that's cut from the same set. After stamping, it's attached flat to the card front with adhesive.
There are three of the Pecan Pie & Clear Ribboned Adhesive-backed Dots added as a pretty accent.
This one might be my favorite card of the batch. At least for now!
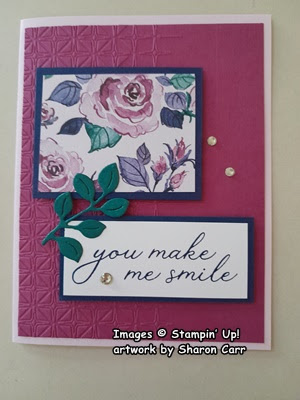
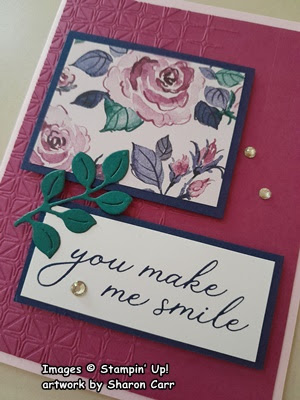
This is the last card of the batch. It uses the DSP piece from the bottom right-hand corner.
The card base is Bubble Bath again. There is a layer of Berry Burst that measures 5 1/4" x 4". To add some interest to the layer, I used the Glass & Garden Embossing Folder for texture. I like how subtle this is, but it does make a difference.
The sentiment is from the Sweet Blooms stamp set. It's stamped with Night of Navy ink onto a 1 1/4" x 3" strip of Basic White cardstock. It's framed with a layer of Night of Navy cardstock.
The DSP piece is layered with Night of Navy cardstock. This piece and the sentiment label are positioned on the card front. Both pieces are attached with Dimensionals.
There is another leafy sprig from the Charming Day set added here. It's die-cut from Pretty Peacock cardstock. It bridges the two pieces and is attached with adhesive under just a few leaves.
The last bits on the card are the Rhinestone Basic Jewels in clear. I thought they were all that was needed.
Ok, you've now seen all five cards that were made from one 6" x 6" piece of the Floral Charm DSP. It was challenging to stick with those five pieces and come up with cards I liked. I found it quite fun to do, so I made another batch of cards using a different DSP. I'm going to share the cards, but I won't be giving you the rundown of all the materials because I didn't write them down. It would probably take me another couple of hours to figure that out, so you'll need to just use the cards as ideas to get your ideas flowing. Let me know what you think of the Basic Template I made and the cards that came out of it. I'd love to hear what you think.
All five cards from one piece.
top left of template
bottom left of template
top right of tamplate
bottom right of template
Hope these ideas all inspired you to try out this template. Or even make a template of your own to use. I keep reminding myself that it's only paper and if I really, really hate it, it can go in the circular file and get recycled!
Have fun with these ideas.
Happy stamping and creating,
Sharon


