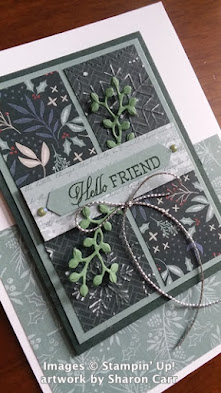
Oh my goodness! It's been a full week since my last post. Hope you haven't given up on me yet! This seems to have been a week when my mojo took a vacation or something. It's definitely been hiding on me. I haven't been happy with cards I've been making, so there's a pile of partial cards, odds and ends, and bits and pieces. But nothing that I'd be happy to share with anyone else. When I was poking through the pile today, I found some unused parts from three other cards, but they were all in the same color family. Soooo... After playing around with them, I finally have a card I feel worthy of sharing. Whew! I was getting a little worried there for awhile!!
The card focuses on the pretty Tidings of Christmas Designer Series Paper and very minimal stamping so it goes together rather quickly - when you know what you're doing anyway!
The card base starts out with an 11" x 4 1/4" piece of Thick White Cardstock which is scored at 5 1/2" and folded in half. A 4" x 3" piece of the Tidings of Christmas DSP is attached on the bottom half of the card front. Even though the paper has Christmas-y prints, I chose to not make this into a card for Christmas, but a general purpose card instead. I just love the colors used together in this DSP, so why not use it for more than just Christmas?
Next the layers of cardstock were cut - Evening Evergreen is 3" x 4", and Soft Succulent is 2 3/4" x 3 3/4". These were layered together using adhesive. Then a smallish piece of the darker print from the Tidings of Christmas DSP was cut to 2 1/2" x 3 1/2". It was then cut in half at the 1 1/4" mark and turned 90 degrees and cut in half again at the 1 3/4" mark. So you end up with four pieces that are 1 1/4" x 1 3/4" if all my math is correct!
When the pieces are laid out again in the square, take two diagonal pieces and flip them to the other side so both of the prints are showing. At this point, I took the two plainer prints and embossed them with the Wintry 3D Embossing Folder that has the snowy swirls. It didn't show up quite as much as I'd hoped, so I remembered doing a little sanding on paper before to let the white core show through. It worked out pretty well, so that's what I went with this time. It's quite subtle, but does show up nicely.
When you have the four DSP pieces ready to go, line them up the way you'd like then attach them. I used Multi Purpose Liquid Glue for this so the pieces could be moved a bit after placement. Then I added Dimensionals behind the layer and attached to the card front.
The sentiment comes from the Welcoming Woods stamp set. It fit perfectly for my purposes. I had a tiny, skinny 3/8" strip of Soft Succulent cardstock in that pile that I took for the words. They just fit and were stamped with Evening Evergreen ink. The ends were punched with the Banners Pick-a-Punch. There was a 3/4" strip of Harvest Meadow DSP in a Soft Succulent print that was just hanging out in that pile of stuff, so I grabbed that too. It was trimmed to 2 5/8" long and the sentiment was attached to it. This was attached to the card front.
In that stash pile, there were also two sprigs of berries, or seeds, or whatever. Unfortunately I don't remember that I used to die-cut them out with. I hate when I can spend an hour trying to figure what I used to make something because I didn't write it all down when I was actually using the dies! And there is no telling just how long those little sprigs had been sitting on my table. So, if you want to copy this, just wing it and use whatever is handy!
I added a single large bow made from Simply Elegant Trim in the silver tone. It's attached with a rolled Mini Glue Dot. That's it. Hope you like it, even though you had to wait whole week for me to finally get it made. Thanks for being so patient with me! You are all the very best and I so miss all of you! When are y'all coming down here for a visit? The door is always open for you!
Happy creating!
Sharon


.jpg)
No comments:
Post a Comment