Oh boy! I'm so excited today. I had seen how to make a portrait-style easel card a couple days ago. It was such a cool idea. I got out some retired products to try making one. You have to understand that I tend to be somewhat challenged when making special folds cards. But it worked out well and was so dog-gone cute, that I made another one right away. Then I thought I'd try a landscape-style version for my ladybug idea that was floating around in my brain. Well... guess I didn't figure too well. It didn't work at all, and I was frustrated to say the least. Tried it this way and that, but it just didn't work. I've played with it the last two days and was about to give up. When, Eureka! It finally dawned on me what I had been doing wrong. And it's such a simple change, duh! Let me show you my cool ladybug card that I finally finished. It makes me so happy just looking at it!

For this card, I started with a base of Granny Apple Green cardstock that is cut at 4 1/4" x 11" and scored at 5 1/2". To determine where the next score line goes in, hold the folded card with the fold to the left side. Score from the left bottom at the fold up to the top right corner to make a diagonal score line. This will get folded in toward the inside of the card to display. I think you can see where the diagonal score line is in this picture quite easily.
The next step is deciding which Designer Paper you want to use. If it has a definite one-way design, be careful when cutting to get it correct. I found it easier to use an all-over design with no distinct direction. The one I chose for this card is from Pattern Party Designer Series Paper which is a Hostess Reward choice in the Annual Catalog. The colors are bright and cheerful on one side, and the flip side is all black and white prints. Awesome prints for so many different occasions, from elegant to cutesy and everything in between.
The green print I chose was cut at 5 1/4" x 4". Then it is cut at a diagonal as shown from bottom left corner to top right corner, so it matches the score line you just made in your card front. This is attached to the card front using adhesive. If you want to use the other half of the DSP print on the other half of the front, go ahead. I just wanted there to be a definite difference between the two sides of the front, so I didn't add it there.
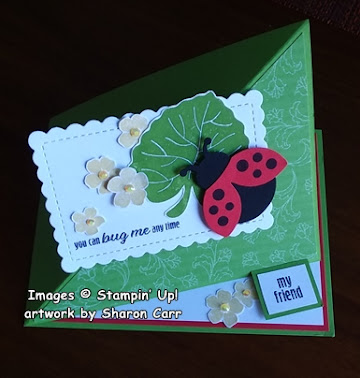
The focal point starts with the 3rd largest rectangle die from the Scalloped Contours die set. The sentiment is from the Hello Ladybug stamp set and was stamped with Memento Tuxedo Black ink.
The ladybug's body was punched from Basic Black cardstock using the Ladybug Builder Punch. The Stamparatus was used to stamp the black dots onto the Poppy Parade cardstock for the wings. To get a real dense black for the dots, it was stamped 2-3 times. When I was happy with the color, the wings were also punched out with the Ladybug Builder Punch. I used just a thin line of Multi-Purpose Liquid Glue right by the neck to attach the wings to the body. This allowed the wing tips to hover above the body and not lay so flat.
The large leaf was stamped with Granny Apple Green ink on Basic White. The set of 3 flowers were stamped twice with So Saffron ink onto white also. Then all these pieces were fussy cut.
The leaf was attached flat to the label using adhesive. The ladybug was popped up onto the leaf using Dimensionals. The flowers were tucked under and around the leaf with only one popped up with a Dimensional.
For the inside of the card, I used a layer of Basic White with another layer of Poppy Parade underneath to bring the red inside the card. A small piece of Basic White was used to stamp the sentiment in Memento Tuxedo Black ink. It was trimmed down to 7/8" x 3/4". It was layered onto a small scrap of Granny Apple Green that was then trimmed down to fit. Two Dimensionals were used behind the sentiment layer to attach it inside the card at an angle. I had two extra flowers left over, so they were tucked in near the sentiment.
Lastly the bling was added. After trying a few different options, the 2021-2023 In Color Jewels were chosen. One of the yellowish-toned jewels was added to the center of each flower on the front. Then I decided the flowers on the inside needed jewels too since the card is displayed open.
That's it for this card-making adventure. Thank goodness it doesn't usually take 3 or 4 days to complete one card! I'd never get anything done that way. But I think it was worth it to figure out how to make this card fold the way I wanted it to be!
Disclaimer - not sure why, but the colors on the pictures are really not correct looking. Tried to take the pics twice and kept coming up with the same color tones. Go by the colors in the directions to get the correct colors.
Here's the original card I made with some of my retired products. I think it just adorable. The penguin is fussy cut from the DSP. I made a 2nd one the same except for cutting out a snowman from the DSP.
Cardstock - Misty Moonlight, Basic White
Ink - Just Jade
DSP - Penguin Playmates - retired
Dies - Scalloped Contours dies
Bling - Iridescent Snowflakes -retired
As you can see, I added extra DSP and Basic White cardstock on the inside to change the look.
Any which way you make these cards, they are just stinkin' cute! Have fun giving this fun fold a try. If you run into problems just ask. I'd be happy to help you figure it out. Hopefully it won't take you as long to figure it out as it took me! ha ha
Thanks for stopping in today. Hope you're inspired to get out there and create. It always makes me feel awesome when I've accomplished something new. It may be a small thing to someone else, but to me it was a small triumph!
Stay warm with all this cold weather blowing in!
Sharon


Really like these!!
ReplyDeleteThey are so much fun to make! As you can see, I couldn't stop at just one!
ReplyDelete