Hi there! Glad you're back for another installment. Just in case you're wondering about that peach festival we were going to, well... We only saw about a third of it and got totally poured on. There was lightening, thunder and just buckets of rain. Good thing we don't melt, because we got back to the car and just sat there dripping. At one point, I wiped a drip off my face and wiped it on my jeans which proved to be useless. My jeans were even wetter than my hand, so there was no wiping it dry! How crazy! I looked and felt just like a drowned rat. So much for that outing! LOL It sure gave us something to laugh about though. Ok, enough of that, let's get stamping! Today's card is quite simple to make, but it has lots of goodies going on to make it fabulous. At least, I think so!

Isn't it pretty? And it's even a quick and easy fun fold card! It all starts with a half sheet of Orchid Oasis cardstock that measures 8 1/2" x 5 1/2". Then it's scored at 2 1/8" and again at 4 1/4" to make a z-fold. Fold it in half as usual, but then fold the top flap back on itself so it lines up with the side fold.
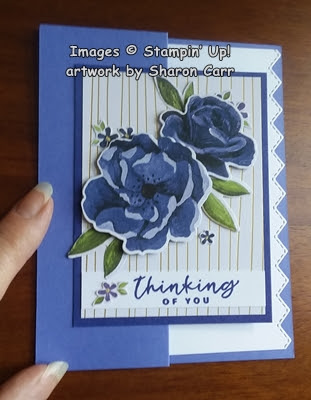
The gold striped layer is one of the free items from Sale-a-Bration. It's 6" x 6". I cut 2" from the bottom to make it 4". Then cut it in half to get two 3" x 4" pieces. I cut a piece of Starry Sky cardstock to 3 1/4" x 4 1/4" to layer the gold striped paper on with adhesive.
Now the fun starts. There is a design in the Hues of Happiness Designer Series Paper that matches up with the Blossoming Happiness Dies which are part of the Happiness Abounds Bundle on page 108-109 of the Annual Catalog. I kind of went a little crazy and die cut two full sheets of these gorgeous roses and leaves. I've been grabbing out flowers whenever needed, but I still have a good size stash left. I saved some of the scraps from around the roses that have these tiny 5-petal flowers and sometimes leaves too. Now I know what it means to 'fussy-cut' something! Woo Boy! It sure was hard to hang onto those tiny flowers, but they really add so much to the finished look.

Now I have the roses, leaves, tiny flowers all set to go, but I needed a sentiment to go with the card. The sentiments in the set are lovely, but not what I wanted to use this time around. The sentiments in the Season of Chic set located on page 99 of the Annual Catalog were just what I was looking for. I stamped the one I chose onto a 1/2" trip of Basic White cardstock using Starry Night ink. It was trimmed to 3" to fit across the gold-lined paper.
It was time to build the focal layer of the card. First the sentiment was added not quite to the bottom edge using adhesive. Next the roses were arranged and attached using Dimensionals. The leaves were tucked in around the roses and attached with adhesive. Then the tiny flowers and leaves were added here and there. They were attached with Mini Glue Dots to make it quick and easy.
This layer was added to the folded card front using adhesive on the left side only. When you lay the card out flat, you can see how the front is attached only on the left half that folds back.
Now comes the cool inside of the card. I was only going to use a quarter sheet of Basic White cardstock and keep it plain. But after thinking about it, I decided to use one of the Basic Borders Dies (page 169 Annual Catalog) to dress up the edge since it showed when the card was closed. I used the stitched zig-zag edge for this. Doesn't it add to the finished look?
The sentiment inside the card is also from the Season of Chic stamp set. It's stamped with Starry Sky ink to match. Because of the little flowers tucked in and around the card, I decided not to use any other bling on the card. The tiny flowers and the gold stripes seemed to be just enough. No point in going overboard on the bling. Unless you just can't help yourself. But that's your choice then, right?
I hope you give this quick and easy fun fold card a try if you haven't made one of these in a while. It's just a little different and a whole lot of fun. Thanks for stopping in again to see what's happening. You never know what you might see and or read! Please use the Host Code shown on the top of my blog page if you're ordering soon. Remember Sale-a-Bration is going on now and that lovely Gold/Silver DSP is one of the freebies. That is one of the most versatile items in Sale-a-Bration brochure. Who can't use more white paper with gold or silver stripes or dots printed on it? Time to start thinking of those Christmas cards which would work so nicely with this paper.
Happy stamping and creating!
Sharon


The touch of gold in the background paper really adds that special touch.
ReplyDeleteYes Barb, just enough without being too much.
Delete