Showing posts with label Happiness Abounds. Show all posts

Wednesday, May 20, 2026

Fun Fun Fold for You

Hey friends!  It seems like it's been forever since I posted anything for you.  It's been a real adventure having the heart surgery and then recovering from it.  Why do the doctors always make it sound like it's no big deal, but it really knocks the stuffing out of you?  It would be helpful to be forewarned that you just can't pick up where you were and get on with life in a day or two.  Today's the first day that I don't feel totally exhausted and in a spacey mind fog.  Hallelujah!  Before I go on, I wanted to give a big thank you to all of you that knew about the surgery and were praying for its success.  I know those prayers made a huge difference for me.  

Okay, let's get on with the card making, shall we?!  Since I made these cards before I went into the hospital and had planned to post them right away, I didn't write down what stamp sets, dies and DSP I used.  So instead of lots of in-depth info, this time around it will be more about the measurements and then you can use the ideas for a jumping off place to create your own masterpieces.   Disclaimer up front:  I was in the mood to use some of my retired DSP to clean up my storage shelves a little.  So, you won't be finding all new stamps and DSP to dazzle you.  Just retired goodies.  Hope that's all right with you.

I love this fun fold because you get to really see and appreciate the gorgeous designer papers that are available.  So often I have trouble cutting into the 12" x 12" sheet because I want to maximize the lovely patterns and don't want a bunch of little strips left over that are hard to use.  For each of the cards I'm sharing today, I started with a print that I liked both front and back together.  That doesn't always work, but I found some prints that I really love together.

First make sure you have the print in the correct orientation if there is a directional print. Cut the DSP to measure 12" x 5 1/2". Then cut a 3/4" strip off on one edge to make it 11 1/4" x 5 1/2".


The next step is the scoring.  Score at:
1", 4", and 7".  This folds up to be a W fold with the short 1" side as the front flap.

Next up was die-cutting the different layers for the front and inside the card.  For the front layers on each on my cards, I used the Branching Out dies.  I love the shape of these and keep going back to them all the time.  The layering cardstock for this card is Petal Pink.  It's cut with the 3rd largest Branching Out die.  The white layer on the front is cut with the 4th largest die in the set.  The inner sentiment layer is cut with the 5th largest die so it can easily tuck behind the larger dies on the front of the card.

The layering on the back inside of the card is just straight cut.  The Basic White measures 2 1/2" x 5" and the Petal Pink layer measures 2 5/8" x 5 1/8".  All of the layers, whether pink or white, were all softened along the edges with Petal Pink ink and a Blending Brush.

For this card, the images and some of the sentiments come from the Happiness Abounds set.  I love how easily these images can be colored with Blender Pens.  The little Fresh Freesia flowers tucked in around the images are from a Forever Florals die.  I like how they add just a little bit of extra color to the design.

The tiny pinky-coral heart embellishments are from a Paper Pumpkin kit from maybe 4-5 years ago.  If I'm honest, it's probably even longer.  Yes, I tend to hang on to things forever.  You never know when they will be the perfect accent you needed to finish the project.

This is the next version of the fun fold I made.  I just love this fruity-floral print on the dark background.  It's so striking!  Alas, it's also retired so it needs to get used to make room for some fresh new ideas.

The layers on this card have all the same measurements as the previous card and used the same Branching Out dies.   The layering on this card uses Secret Sea cardstock.  

Some of the sentiments, along with the pear stamps on this card, are from the Perfectly Pears bundle.  The image on the front was colored with Blending Brushes and ink before being die-cut.  The inner image was colored with Stampin' Blends to get the colors I wanted.

The white layers were all softly colored on the edges with Blending Brushes and Mossy Meadow ink.  They were also spattered with a Mossy Meadow Stampin' Blends.

A little strip of the DSP print was added along the bottom of the back sentiment layer.  That little bit seemed to make a big difference when putting the card together.

Coral gems were added in several places to the card.  These picked up the pretty coral-toned flowers scattered throughout the print.

Do you remember this gorgeous Magnolia DSP?  It's just so lush and stunning that I've been hanging onto it.  I was happy to see I had a complete 6" x 12" piece that I could cut to the correct proportions and use for this card.

Again, the same dimensions and directions for cutting and scoring the DSP.  Also, the same Branching Out dies were used for the front and inner page.  The layering cardstock for the card is back to Petal Pink.  This same color was used in the Stampin' Blends for the flower petals.  The inside of the flower was Light Daffodil Delight.  I totally messed up my Mossy Meadow Blends, so I used the new Peaceful Pine for this.  It's not a great color match, but my replacements have been on backorder for about 2 weeks, and I sort of gave up waiting to finish the card.  Oh well...

This is the last card I made with this fun fold.  Again, the dimensions and directions for scoring are the same for this card as the rest.  The Branching Out dies were the same for this card.

The DSP is something to do with Peonies.  Sorry I have no further details.  

The flowers stamped this time are from the Gallery Blooms stamp set.  Again, just a bit of coloring with Petal Pink Stampin' Blends for the flowers.  Centers are Daffodil Delight Light.  Not sure what I ended up using for the leaves.  Looking at it, I can see both a yellowish green and a more blueish tone used over it.  

I don't know if you noticed, but only the pear card used the stamp set that originally coordinated with the DSP used.  My big take-away from this fun fold post is to find things that coordinate well together.   You don't have to use the same stamp set that originated with the DSP.  Find things that you like together and try something different or unexpected.  Let me know what you try!  I always find it very inspiring seeing (or hearing about) what other people are creating.  Everyone has their own take on projects which inspire the next person.  And on it goes.  And make sure you send out those cards too!  Sometimes I start stockpiling the cards I've made, but that doesn't spread any cheer or encouragement along.  I think that is an important part of being creative - sharing those bits of he'art' with others.

Happy stamping and creating,
Sharon

Tuesday, April 11, 2023

Happiness Abounds WV Fun Fold Card

 Hello Friend,  I'm shocked that I haven't made a single post yet this month.  I have to admit it's been a little bit crazy around here, but really!  That's just way too long to go between postings.  I'm sorry I've been off the grid for two weeks.   I do have a nice fun fold for you today.  I've made a similar card to this before, but I never had a name for the fold before.  So that part is new.  Now about the old.  You know it's time for the new catalog to appear very soon, and that means so many of my favorite products are retiring.  Today's card uses some of those items that I'll miss a lot.  As of this moment, the items I'm sharing with you are still all available.  But I really have no idea how long they will last.  So if what I'm using today is still on your wish list, you might want to get a move on to make sure you can still get them!  That said, let's get to the stamping and creating part.

Here's my WV Fun Fold card for you.  As you can see it folds up to fit in regular envelopes, so there's not a problem looking for a different size.  The card starts with a base that measures 5 1/2" x 11".  This is scored at 1 3/4", 3 1/2", 5 1/4", and 7".  This is for the W fold of the card base.  I used Night of Navy for this piece.  There's also a piece of Night of Navy cardstock that measures 3" x 6" and this is scored at 3".  This will provide the V for the card.

Flirty Flamingo cardstock was used for the layers on the card.  These measure (4) 1 1/2" x 5 1/4", (2) 2 3/4" x 2 3/4", and lastly (1) 3 3/4" x 5 1/4".  For the Hues of Happiness DSP, you need (2) of the small print that measure 1 1/4" x 5", and (2) of the floral print with the navy background that measure 2 1/2" x 2 1/2".  Yes, that's a lot of measuring and cutting, but the card is worth it when you've got it finished.  

As you can see, I used another sheet of this awesome DSP to die-cut the additional floral pieces both for the front design and the inside of the card.  The coordinating Blossoming Happiness dies make it so easy to die-cut these images.

This picture gives you a much better look at the WV aspect of the card.

Two of the 1 1/2" x 5 1/4" pieces and the largest piece of Flirty Flamingo cardstock were all embossed with one of the new Online Exclusive embossing folders - Basics 3D Folders that is a set of three.  Each of these embossing folders give you a totally different look and feel to your project.  I chose the one that sort of looks like an overall floral or starfish design depending on what I put with it.

After embossing these, the Flirty Flamingo layers get attached to the card front.  Panel one - embossed, panels two and three - plain, panel four - embossed, panel five - large embossed.  Still with me??  I attached my panels with Multi Purpose Liquid Glue.  Then the two square panels were attached to the 3" x 6" cardstock piece.

Next the Designer Paper panels were attached to the card front.  The two embossed panels have no DSP.  The two plain panels have the tiny print added to the center of the panel.  The two square panels are attached to the 3" x 6" sections.  

I die-cut the rest of the flowers and leaves on my last piece of Hues of Happiness DSP.  They were perfect for the card.  I chose a large Flirty Flamingo pink flower and a small Pool Party flower along with two of the leaf clusters for the focal point of the card.  I also chose a navy and a yellow flower to use inside the card.  The two flowers on the front were positioned then attached with either adhesive or a Dimensional for some depth.  

For the sentiment layer on the inside of the card, I started with a Basic White panel that measured 2 3/4" x 2 3/4".  The sentiment is from the Charming Sentiments set and is stamped with Night of Navy ink.  It's attached to the center of the back making sure that when the card is closed it doesn't show.  The yellow flower was tucked behind the top of the white panel and the navy one is layered on top of the flower and also over a little bit of the white.  This way it shows when the card is closed and just adds to the design on the front.

To add a little bling, three of the Adhesive-backed Pastel Sequins in the gold tone were attached at the bottom right corner on the back layer of the card.  With all the prints here, they are just a small, subtle addition to the card.

Remember, this mini catalog and the big Annual Catalog are only current through the end of April and that time is quickly approaching.  There are so many items retiring and I know I'll miss many of them.  The Happiness Abounds set and coordinating dies are on the retiring list along with the absolutely lovely Hues of Happiness DSP.  If you're interested, the time is running out quickly and they'll no longer be available.

Thanks for stopping by today.  Again, I apologize for not posting for two weeks.  My life really got away from me.  Just a little bit out of control.  lol  I hope you had a blessed Easter and are enjoying some nice spring weather.  Love to you all!

Happy stamping and creating,
Sharon

Tuesday, December 27, 2022

Happiness Abounds Fun Fold Card

Hello friends!  Yikes!  It's still freezing cold weather around here.  Definitely winter!  So I'm still going to poke my head in the sand, keep stamping flowers, and wish for spring.  What about you?  Are you a warm weather person or do you love the cold weather and play at winter sports?  I used to love downhill skiing, but I gave that up years ago.  Now I have trouble staying warm enough to want to spend much time outside.  But I can stamp in any weather, and that's what I've been doing!  

I still had thoughts of the Hues of Happiness DSP that I used on my last card rolling around in my mind.  I wanted to play with that a little more, so I got out the Happiness Abounds stamp set and went to work.  I actually made a fun fold card for this.  It's not a new fold, but a card layout that I've used before that's nice and simple.  Besides I like the look of it!  So, we're going to use it again here.

The card starts with a Basic White Thick card base that measures 4 1/4" x 9".  This is scored at 5 1/2" so it's a regular size card when finished.  I next started with the Hues of Happiness DSP print that is covered with flowers in a rainbow of colors.  So pretty!  This is cut to 3" x 3 3/4" for the left side.   To contrast, I chose the "painted" backside of another print that has pinks, roses, and yellow/gold brushstrokes.  This piece measures 1 1/2" x 3 3/4" and is for the right side of the card.  Now, I need to be perfectly honest here and tell you I made a mistake in cutting the smaller piece.  You can see I cut it 1/4" too skinny, but I didn't have any more of that paper.  Boo hoo!  Since the card was almost finished by the time I noticed the problem, I went with the paper I did have.  So sorry!

Next, I decided on Melon Mambo for the framing layers.  These were cut to measure 3 1/4" x 4" for the left side, and 1 3/4" x 4" for the right side.  Now would be a good time to attach the layers together and then attach them to your card base to make sure you measured your pieces better than I did!  😁 

I die-cut several flowers from the DSP with the coordinating dies.  I didn't have enough leaves from the DSP, so I stamped the leaves with Granny Apple Green ink and also die-cut them.  The sentiment layer is a die-cut from the Labels Aglow Dies in the July - December Mini Catalog.  (only a few days left to order this!)  It's die-cut from Basic White and I used Melon Mambo ink to stamp the sentiment which is from the Artistically Inked set.  

Then I played around with all the pieces that I had ready.   I was struggling to get it where I liked it because the extra flowers just kept getting lost on the flowered print no matter how I positioned them.  Then I had an ah-ha moment!  I added a layer of vellum over the flower print and voila!  It worked out just as I had hoped.  Some sequins were added to finish off the look.

I had so much fun making this card and my card stash was a little on the low side.  So why not use this same fun fold and make a couple more cards that I needed.  So, here's a few more pictures for ideas on using this fun fold with whatever DSP you have sitting around.

Sentiment - Framed Florets
DSP - Fitting Florets
Die-cut pieces - Framed Florets
Bling - Festive Pearls


Flower stamps - Artistically Inked
Sentiment - Celebrating You
DSP - Expressions in Ink
Gold branches - Tree Rings Hybrid Embossing Folder
Sentiment Label - Labels Aglow Die
Bling - small gold rhinestones

Flowers & Leaves - Artistically Inked
Sentiment - Framed Florets
DSP - Expressions in Ink
Bling - iridescent sequins


Hope you have gotten some inspiration from today's post.  Rethink some of your favorite layouts and recycle them into something fresh and new by using different DSP or stamps.  Even color combos change the look of something that you do all the time.  

Looking forward to making many more posts in the new year!  Hope you'll come back often to see what's been happening here and visit on a regular basis.  Can you believe this year is pretty much over and done with?  In many ways it's been a rough one.  But God is still blessing us every day and God willing, I'll continue to walk with Him in the coming year.  I pray for God to bless you with His love and grace and fill you with His peace in the new year!

Happy stamping and creating,
Sharon

Saturday, December 24, 2022

Hues of Happiness Meets Fancy Flora

Greetings friend!  I hope you're keeping warm wherever you may be.  Today is rather frigid with the temperature reaching only 14 degrees.  Brrrrrr!   That can't be right, can it?!  I don't think this is what I was expecting when we moved down here.  Oh well, guess it feels like Michigan today so I'm right at home!  With the weather being so cold, I've been stamping with flowers and pastels while I pretend spring is right around the corner.  Hope this brightens your day.

Now, doesn't this look like spring?  I love the soft colors with that punch of dark flowers to balance it.  Plus, it's a fun fold card which always makes it special to me.  

The card starts with a Fresh Freesia base that measures 5 1/2" x 6 1/2" and is scored at 2 1/4".  When folded, this makes a regular size card and fits in the envelope with no problem.  There are two other pieces of Fresh Freesia cardstock.  They measure 3 1/4" x 3 1/2" for the side flap and 2 1/2" x 3 3/8" for the inner sentiment.

Next the Fancy Flora Designer Series Paper is cut.  You can see two different prints that look like paint dabs.  These are the two different sides of one paper.  The pieces are cut to 2" x 5 1/4" and 2 1/2" x 3 1/4".

Lastly, the two inside Basic White cardstock pieces were cut.  These measure 4" x 5 1/4" for the back piece.  The smaller sentiment piece measures 2 3/8" x 3 1/4".  This will leave a small frame of Fresh Freesia cardstock around it, and it will fit behind the flap and not show when the card is closed.  Ok, let's start putting this card together.

The first step is to score the 3 1/4" x 3 1/2" Fresh Freesia cardstock piece at 1/2" along the longer side.  Fold this and use a bone folder to give it a really good crease.  Put Tear & Tape on the outside of the fold.  Attach this to the inside edge of the card base as shown in the picture. 

Emboss the large Basic White layer.  I used the Gingham Embossing Folder for my card, but there are other embossing folders that would work nicely too.  This was attached inside the folded card using Tombow Multi Purpose Liquid Glue.  This hides the edge of the flap you glued to the front of the card and gives it a nice finish.

Stamp a sentiment on the smaller white cardstock piece.  I used Night of Navy ink and used a birthday sentiment from the Framed Occasions stamp set.  Attach it to the Fresh Freesia piece, then to the inside of the card using the Tombow Liquid Glue. Make sure that it's tucked behind the flap so it doesn't show.

On to the front of the card.  Attach the larger DSP piece to the outside of the front of the left side of the card using adhesive.  Attach the smaller DSP to the outside of the opposite flap so it shows when everything is closed.
Instead of stamping and coloring flowers for the front, I die-cut two flowers from the Hues of Happiness DSP with the coordinating dies called Blossoming Happiness dies.  I did stamp the different leaves and colored them in with Soft Succulent and Evening Evergreen inks and a Water Painter brush, then die-cut them also.   They were arranged on the card front then attached with Dimensionals.

The birthday sentiment was stamped on Basic White strip with Night of Navy ink.  It is from the Go To Greetings set.  The left end was punched with the Lovely Labels Pick a Punch.  The right end was tucked in under the rose and leaves and attached to the car with adhesive.  Make sure your adhesive doesn't extend past the edge of the flap.

A large Opal Round jewel was attached to the end of the sentient to accent it.  And two extra Opal Rounds were attached just under the flowers at the bottom of the flap.  Simply beautiful.

I loved how this turned out.  The Fancy Flora DSP is just so gorgeous, and I know you'll love it.  It really makes it fun to design your cards just using the colors in the prints.  That print I used almost reminds me of a minty ice cream flavor I get at the beach.  Oh yeah, I'm thinking warm sunny days as I sit here in the cold!

If you haven't received your new Mini Catalog and Sale-a-bration brochure, please let me know.  All of them should have been delivered by now.  Have you had a chance to look through them yet?  I know with Christmas right upon us, it's hard to take the time for yourself.  But I hope you can sit back with your coffee or tea (or maybe a glass of wine?) and enjoy yourself.  It's good to dream a little and get your creative juices flowing!  You don't want them freezing up on you!  LOL

I just want to wish you a very blessed Christmas as we pause in our busy lives to ponder the birth of our Lord and Savior, Jesus Christ.  May He bless you with His mercy and grace.

Merry Christmas!
Sharon

Thursday, July 21, 2022

Hues of Happiness in Blues

Hi there!  Glad you're back for another installment.  Just in case you're wondering about that peach festival we were going to, well...  We only saw about a third of it and got totally poured on.  There was lightening, thunder and just buckets of rain.  Good thing we don't melt, because we got back to the car and just sat there dripping.  At one point, I wiped a drip off my face and wiped it on my jeans which proved to be useless.  My jeans were even wetter than my hand, so there was no wiping it dry!  How crazy!  I looked and felt just like a drowned rat.  So much for that outing! LOL It sure gave us something to laugh about though.  Ok, enough of that, let's get stamping!  Today's card is quite simple to make, but it has lots of goodies going on to make it fabulous.  At least, I think so! 

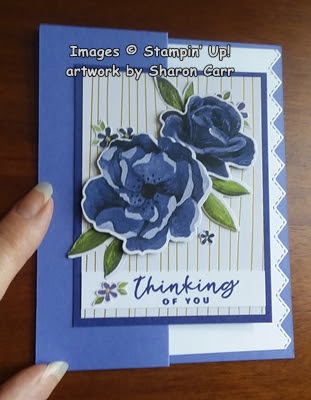
Isn't it pretty?  And it's even a quick and easy fun fold card!  It all starts with a half sheet of Orchid Oasis cardstock that measures 8 1/2" x 5 1/2".  Then it's scored at 2 1/8" and again at 4 1/4" to make a z-fold.  Fold it in half as usual, but then fold the top flap back on itself so it lines up with the side fold.

The gold striped layer is one of the free items from Sale-a-Bration.  It's 6" x 6".  I cut 2" from the bottom to make it 4".  Then cut it in half to get two 3" x 4" pieces.  I cut a piece of Starry Sky cardstock to 3 1/4" x 4 1/4" to layer the gold striped paper on with adhesive.

Now the fun starts.  There is a design in the Hues of Happiness Designer Series Paper that matches up with the Blossoming Happiness Dies which are part of the Happiness Abounds Bundle on page 108-109 of the Annual Catalog.  I kind of went a little crazy and die cut two full sheets of these gorgeous roses and leaves.  I've been grabbing out flowers whenever needed, but I still have a good size stash left.  I saved some of the scraps from around the roses that have these tiny 5-petal flowers and sometimes leaves too.  Now I know what it means to 'fussy-cut' something!  Woo Boy!  It sure was hard to hang onto those tiny flowers, but they really add so much to the finished look.

Now I have the roses, leaves, tiny flowers all set to go, but I needed a sentiment to go with the card.  The sentiments in the set are lovely, but not what I wanted to use this time around.  The sentiments in the Season of Chic set located on page 99 of the Annual Catalog were just what I was looking for.  I stamped the one I chose onto a 1/2" trip of Basic White cardstock using Starry Night ink.  It was trimmed to 3" to fit across the gold-lined paper.

It was time to build the focal layer of the card.  First the sentiment was added not quite to the bottom edge using adhesive.  Next the roses were arranged and attached using Dimensionals.  The leaves were tucked in around the roses and attached with adhesive.  Then the tiny flowers and leaves were added here and there.  They were attached with Mini Glue Dots to make it quick and easy. 


This layer was added to the folded card front using adhesive on the left side only.  When you lay the card out flat, you can see how the front is attached only on the left half that folds back.  

Now comes the cool inside of the card.  I was only going to use a quarter sheet of Basic White cardstock and keep it plain.  But after thinking about it, I decided to use one of the Basic Borders Dies (page 169 Annual Catalog) to dress up the edge since it showed when the card was closed.  I used the stitched zig-zag edge for this.  Doesn't it add to the finished look?

The sentiment inside the card is also from the Season of Chic stamp set.  It's stamped with Starry Sky ink to match.  Because of the little flowers tucked in and around the card, I decided not to use any other bling on the card.  The tiny flowers and the gold stripes seemed to be just enough.  No point in going overboard on the bling.  Unless you just can't help yourself.  But that's your choice then, right?

I hope you give this quick and easy fun fold card a try if you haven't made one of these in a while.  It's just a little different and a whole lot of fun.  Thanks for stopping in again to see what's happening.  You never know what you might see and or read!  Please use the Host Code shown on the top of my blog page if you're ordering soon.  Remember Sale-a-Bration is going on now and that lovely Gold/Silver DSP is one of the freebies.  That is one of the most versatile items in Sale-a-Bration brochure.  Who can't use more white paper with gold or silver stripes or dots printed on it?   Time to start thinking of those Christmas cards which would work so nicely with this paper. 

Happy stamping and creating!
Sharon

Monday, July 11, 2022

Happiness Abounds with Vellum

 Hello Friend!  Back again today with another post comparing and contrasting stamping projects with my sister Connie.  Hope you're not too bored with this type of post showing our two stamping styles using the same products as a starting point.  We really had a great time stamping together last month and I thought you'd enjoy seeing two ideas for each project.  I actually took these with me to Florida planning on posting them while I was down there.  Since we had so many internet connection problems, only one card idea was posted while there.  Now I'm playing catch up with these older project ideas and still trying to get some stamping done that's using some new products too.  So let's get started so I have time to get downstairs and get some playing done too!

This card all started with 'someone's blog post of a similar card using the Happiness Abounds stamp set with White Embossing on Vellum with the coloring on the back.  You'd think I'd know better by now than to forget to write down the post creator's name and blog address for a project I wanted to CASE.  But alas, I did forget and now a month later, I can't find it again!  I'm so sorry that I can't give her credit for a lovely card!!  Anyway, I showed it to Connie when I was there, and we decided to do our own versions of the original card idea.  
The original card had one of the Cup of Tea teacups with the flowers coming out of it.  After I got home, I stamped, colored, and die-cut several teacups, but I couldn't get one I really liked with the flowers.  So I decided to go without.  Here's how I made it...

The card base is Pool Party that's cut at 8 1/2" x 5 1/2", scored and folded in half.  There's a layer of Bermuda Bay that measures 5 1/4" x 4".  On top of that is a Basic White layer that measures 5 1/8" x 3 7/8".  The white layer was die-cut with the interesting background die in the Blossoming Happiness Die set that coordinates with the Happiness Abounds stamp set.  Love how this die cuts a partial design from the layer!  So delicate and pretty.  After die-cutting, the sentiment was added along the bottom edge.  It's from the Simply Succulents stamp set and was stamped with Bermuda Bay ink.  The two layers were attached together and then attached to the Pool Party card base using adhesive.

Three different flowers and two different leaves were all stamped on Vellum with VersaMark ink then sprinkled with White Embossing Powder.  They were heat set with the Heat Tool then colored.  Stampin' Blends were used to color on the back side of each one.  Colors used are Flirty Flamingo, Pale Papaya, Highland Heather, and Granny Apple Green.  When coloring, I colored out of the lines on each one so after die-cutting them, the color showed on the edges, not white.  Each of the pieces were die-cut with the matching dies so it was easy peasy!  They were attached to the card front using Dimensionals in the middle of the two larger flowers and Mini Glue Dots behind the rest, tucking them in around the larger flowers.  Three of the retired Polished Dots were added to the design.  (Sorry about the retired gems.  Thought they were still current!  I'm sure having trouble remembering what is current and what isn't.) Can you see how the die-cut background peeks through the vellum flowers?  Just love that look!

Here's Connie's version of the card.  She used a darker mix of Stampin' Blends for her flowers and a different green too for a bolder color look.  Plus she chose to use a different mix of flowers from the set.  Don't those changes make a really different look?  Don't be afraid to try different color mixes!  We just used what we preferred.  

She also had a retired teacup and saucer that she used.  It was colored very softly with Pool Party Blends to keep with the color scheme.

So, there you have it.  Another compare and contrast version of a card that Connie and I both put our own spin on.  Hope you like the idea of heat embossing on vellum and coloring on the back to get a real pretty and delicate look.  It takes another step or two, but it's well worth it when you see the finished piece.

Thanks for checking in again today.  If you're planning on placing an order, please consider using the Host Code shown in the top right corner on my blog post.  And don't forget that Sale-a-Bration is in full swing right now.  For every $50 order, you can choose from several items to receive free.  And for a $100 order, there are some really great choices too!  Make sure you check out the Sale-a-Bration brochure before you order so you don't miss out on any of these goodies!

Happy stamping and creating!
Sharon

Saturday, May 7, 2022

Mother's Day Wishes

 First of all, I want to wish any of you who are moms a very blessed Mother's Day.  Children are the best gift God has given to us.  Even if some days it just doesn't feel like it.  Come on, I know you've all had days like that when you're pulling your hair out and asking "why?".  But really, those moments are usually few compared to the hugs, laughs, and companionship of our children.  I certainly wouldn't trade either of mine in for another.  Then there's the sons-in-law, or daughters-in-law for some of you. God truly blessed me with a wonderful one.  And lastly, the grandchildren.  Need I say any more?  Grandkids are the very best!!!  Anyway, today's post is for sharing the card made for my daughter.  This is being posted late so she won't see it before it's in her hot little hands.   Don't want to ruin the surprise.

Here it is.  It uses some retired Fine Art DSP, some new Hues of Happiness DSP, and sentiments from two different sets - both current.  It's a fancy fun fold card too!  It took me awhile to get it made, like most of the afternoon!  But it's really worth it.  Just gorgeous!!  This is my version of a card made by JanB in the UK.  Thank you!

It starts with a card base of 11" x 5 1/2".  This is scored at 1 3/4", 3 1/2", 5 1/4", and 7.  The next layer (V-fold) is cut to 6" x 3" and scored at 3".  Then a 2 7/8" x 2 7/8" layer was cut.  I used Merry Merlot for all these layers.

Basic White layers:  2 7/8" x 2 7/8" - cut 2
                                 2 3/4" x 2 3/4" - cut 1
                                 3 3/4" x 5 1/4" - cut 1
                                 1 1/2" x 5 1/4" - cut 4

DSP layers:  design 1 -  1 3/8" x 5 1/8" - cut 2
                     design 2 -  1 3/8" x 5 1/8" - cut 2
                     design 2 -  3 5/8" x 5 1/8" - cut 1
Trust me on all these cuts.  It was a little confusing until I started putting it all together.

First of all, I die-cut the flowers from the Hues of Happiness DSP using the matching dies from the Happiness Abounds Bundle.  The pink shades of color on the flowers looked great with the painted look of the Fine Art DSP.  What a happy coincidence for me.  I ended up using 4 flowers and 7 leaf sets on the card.  

Decide what sentiments you want on the 3 white layers that show.  Make sure your embellishment (flowers) fit around the sentiments with no problem.  I used two sentiments from the Happiness Abounds set and the "Mother's Day" sentiment from the Daffodil Daydream set.  I used Merry Merlot ink for the sentiments.  Each sentiment layer was stamped, layered onto the Merry Merlot cardstock that fit.  Make sure you pay attention to the front and back of the 6" x 3" layer especially.   Then the flowers and leaves were added.  Set these aside.

Now work on the white strips and the DSP that fits on them.  Attach the four strips together.  I used MultiPrupose Liquid Glue to put all the layers together.  Decide how you want them on your card.  I did mine DSP 2 - front, DSP 1 - next fold, DSP 2 -3rd fold, DSP 1 - 4th fold.  On this picture, you can only see the 4th fold and the inside of the card.   The larger piece of DSP 2 goes on the large white layer and is attached to the inside of the back of the card.

Now it's time to add the single sentiment piece to the inside back layer.  Attach it with adhesive keeping it lined up in the middle and straight on both sides.  This is now your guide for adding the 6" x 3" V-fold piece.  Make sure you understand how this will go together before adding any adhesive!!!! 

I used a strip of Tear & Tape on the back very edge of the V-fold piece just where it will attach to the 3rd fold.  I took the covering off the tape for the back of the V and laid it over the back design, lining it up straight.  Then fold the front layer down over it to attach.  Now add one strip of Tear & Tape to the other back edge of the V-fold piece.  Fold in all the layers properly, then take off the covering on the tape and fold down over the 1st flap.

Here is another view showing how the folds and layers all line up.  I truly hope this makes sense.  It was confusing enough making it.  Writing how to put it together was even worse!

The final touch was adding a number of the Pastel Pearls in the pink color.  I thought these blended nicely with all the pink and rose shades.  Three pearls were added on the front panel, two on the middle panel, and one on the very last panel.  This would be quite bulky going through the mail and would absolutely require extra postage.  But it really is lovely, so I guess it's worth it for the right person.  😍

That's it for today.  Thank you for stopping by for a few minutes.  If you want to try this and really get lost, call me.  Or check out JanB - UK who has a blog post on May 8th.  She also has a video, but she was using measurements for the UK.  It was pretty confusing.  But like I said, the card really is gorgeous!  Have a very blessed day.

Happy Mother's Day, my friend,
Sharon

Wednesday, April 20, 2022

More Happiness Abounds

 Hi there!  I mentioned that I'd be back again with another card using the Happiness Abounds stamp and die bundle, and here I am.  Did you get the feeling that this was something I kind of liked?  Well, that's a bit of an understatement.  I thoroughly enjoyed playing with this bundle the other day.  In fact, I'm having trouble pulling myself away from that and try out something else new.  I really need to give all my new stamps some love and attention, right?  But first, let's do just one more with this set.

At first glance, this card looks very similar to what I shared with you yesterday.  There are a few differences that I'll be happy to point out.  Let's start with the card base.  It is Gorgeous Grape to match some of the flowers in the DSP.  It is cut at 11" x 4 1/4", scored at 2 3/4" and 5 1/2".  It's folded in half, then the front is folded back on itself for your fun fold.  Easy peasy.

This card used the same Scalloped Contours Dies as the first two cards I shared but uses the largest die to cut out the Basic White cardstock piece.  Don't you like the pretty scalloped edges?  It sort of reminds me of Battenburg lace. 

The 3" x 4" piece of Hues of Happiness DSP is attached to the center of the white die-cut using adhesive.  For this card, I didn't need to trim it at all like I had to with the first two cards.  

It was time to go through that assortment of die-cut flowers from the DSP.  It's so much fun to just sift through this whole pile of colorful roses to find just the right pieces I needed.  I chose to use a mid-shade of Melon Mambo and a darker shade of Daffodil Delight for the roses.  I also went with the smaller rose sizes too.  Along with those, I chose two leaf clusters to fill in around them.  The yellow rose was attached with adhesive along with one leaf cluster.  The Melon Mambo rose and the other leaf cluster were attached with Dimensionals.

The sentiment is from the Happiness Abounds stamp set.  It's stamped on a skinny Basic White strip about 3/4" in width.  Friends was stamped with Gorgeous Grape ink to match the cardstock.  The right end was flagged then the left end was tucked under the roses.  A Fresh Freesia 3/8" Open Weave Ribbon was tied into a pretty bow, then attached with Mini Glue Dots.  Three of the 2021-2023 In Color Jewels (retiring) in Polished Pink were attached to the card front for some sparkly bling.

The inside of the card has another of the Scalloped Contours die-cuts for the sentiment.  I really liked how this dressed up the card and made it very feminine to match the front.  The ink is Gorgeous Grape to match the cardstock, and the sentiment and small flower are both from the Happiness Abounds set.
From this picture, you can see how the folded-back front layer is only attached to half of the Basic White layer.  I used three strips of Tear & Tape Adhesive just on the left half of the white layer to attach it.  It might have been a little overkill to use three strips, but I always worry that with handling the layer might come loose and I wouldn't want that to happen.

No matter which way you look at this card, it's just so dog-gone pretty.  Now, who should I send this off to?  Which one of my friends just needs to get this card in the mail?  I'll have to think on that for a bit.

Thanks for stopping by again to see what's new over here.  I appreciate your comments, so feel free to make one at the end of this post.  There's still time to purchase the retiring items that are on your list.  Some things are already sold out.  Hopefully what you want is still available.  Don't wait too long to place your order though.  If you need any help, just give me a call.  And please use the Host Code at the top of the post page.  I'd really appreciate it.  Now go get to some creating of your own!  And have FUN!

Happy stamping and creating,
Sharon

Tuesday, April 19, 2022

Sneak Peak Happiness Abounds

Hello friends!  Hope y'all had a very blessed Easter spent with family and friends.  We enjoyed a great day spent with some family, despite the ups and downs we've had lately with my hubby's health.  The doctor tried another procedure today, but it didn't work.  So it's back to deciding the next step for him to take.  We really take our health for granted until there's a problem.  Thanks to all of you that have been keeping him in your prayers.  You are a true blessing to us!  

Now on to the projects I'm sharing with you today.  I think most of you have your new catalogs in your hot little hands already.  These cards are a sneak peek of a new stamp bundle called Happiness Abounds, and a new DSP called Hues of Happiness.  Oh  My  Goodness  This is such a gorgeous new set!  And one of the awesome points of this is that the dies will cut out some of the flowers in the DSP.  Can I just say awesome?!

Here's the Happiness Abounds stamp set and coordinating Blossoming Happiness die set.  And you see all of those lovely flowers and leaves down there?  That's most of just 2 sheets of the Hues of Happiness DSP - one sheet in pinks and yellows, and one in purples and blues.  This is what's left after making 3 cards already!  It's just a gorgeous garden of roses.  The colors are so rich and beautiful.  I'm ready to go out and buy a big bouquet of roses in a glorious rainbow of colors like this!

To maximize the Designer Paper, I cut it into three 4" wide strips.  Then one of the strips was cut at 3" intervals to give me a nice amount to work with.  Looking at the two cards, it's hard to imagine they are made from the same strip of DSP.  A third card that sort of "marries" the two pieces together will be shared with you tomorrow.  

Both of these cards started out with the same idea of using the Scalloped Contours Dies to cut a piece of Basic White cardstock to frame up the DSP.  I used the 2nd largest die for this.  To get the DSP to fit just right, I needed to trim it down to 2 5/8".  This way the tiny stitching lines show all around the edges of the DSP.

The first card started out with a base of Melon Mambo which is one of the colors listed on the DSP.  It's cut to normal A2 size of 8 1/2" x 5 1/2", scored and folded in half.  


The piece of DSP is attached to the die-cut frame using adhesive.  A strip of the White Glittered Ribbon is wrapped around this and attached in the back.  (I'm so happy this ribbon is carrying over to the next catalog!)  This is all attached to the center of the card front using Dimensionals.  

At this point I had fun going through all the die-cut roses to see which ones I'd like on the front of the card.  I chose he largest rose in the Melon Mambo shades, one of the smaller Daffodil Delight flowers, and three of the leaf clusters.  The large rose was attached to the card front with Dimensionals.  Then the leaves and yellow flower were all tucked in underneath the rose.  

A sentiment from the new Sending Smiles stamp set was stamped on a skinny strip of Basic White cardstock using Mellow Moss ink.  This was flagged on the right end, then tucked under the rose also.

A bow made from the White Glitter Ribbon was added to the card with Mini Glue Dots.  I actually added five 2021-2023 In Color Jewels to give it some extra sparkle.  Unfortunately, the jewels are retiring soon, but last I looked, they were still available if you needed a few more of these awesome jewels.

This next card started with a base of Coastal Cabana cardstock cut 8 1/2" x 5 1/2", scored and folded in half.  I added a 1" x 4 1/4" strip of another print from the Hues of Happiness DSP to give a darker anchor to the side of the card.  I think it added a nice touch.  The 3"x 4" DSP piece was trimmed down again to fit the Scalloped Contours die-cut piece and attached with adhesive.  This was layered onto the card front using Dimensionals.

Now for the flowers, I chose one of the Fresh Freesia ones and two leaf clusters.  I also stamped one of the flowers from the Wildflower Path stamp set using Fresh Freesia ink, because I wanted a tinier flower to add.  This was cut out with Paper Snips. 

The sentiment is from the Wildflower Path stamp set also.  It's stamped with Night of Navy ink, then trimmed up close with the Paper Snips.  This was added to the left of the layer with the leaf clusters tucked underneath.  Both of the Fresh Freesia flowers were attached with Dimensionals.

Lastly three of the jewels from the 2021-2023 In Color Jewels were added.  For this card I chose to use the Soft Succulent jewels which blended nicely.

Whew!  What fun that was getting all those flowers die-cut and then playing with them.  I'll have another card tomorrow that starts out somewhat similarly, but has a fun fold added to the mix.  Did I happen to mention just how much I'm enjoying this new Happiness Abounds Bundle and coordinating DSP?  Oh yeah.  It's definitely going to be one of my very favorite things to use in the upcoming catalog.  Whether you use each part of the bundle by itself or put them all together on one card, I think it's all fabulous!  Just saying...

Hope you're as excited as I am about getting your favorite items from the new May 2022-April 2023 Annual Catalog.  There are some really wonderful new ideas, colors, and layouts to get your creative juices flowing and put you in a stamping mood.  I'm looking forward to hearing what's your favorite new item in the catalog!  I'm sure there's going to be something that is just perfect for you. 

If you need to pick up any retiring items from the catalog, please use the Host Code shown in the upper right corner.  Try to get your order in as quickly as possible.  There are a good number of items that are already sold out, but still many more that are available.  Good luck shopping and get them while you still can!!

Happy stamping and creating!
Sharon