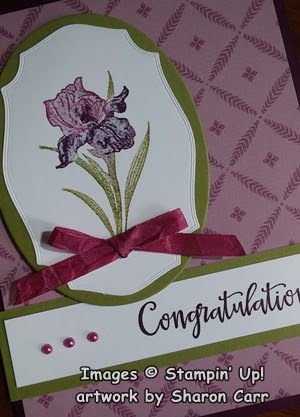
Hey there! I promised I'd be back today with another version of the Wonderful World stamp set and Designer Paper Bundle that Stampin' Up! is offering during Sale-a-Bration this month. When you place a $100 US order, you can get these two items at no extra cost to you. And they are really worth it!! I think sometimes Stampin' Up! saves back some of its very best ideas to offer as freebies during Sale-a-Bration. There are always a good number of items that I can't wait to get my hands on and play with. Right? Hope you've been able to get some "wonderful" items too!
For today's card idea, I took my cues from the DSP print for color and feel of the card. This print gave off a vibe that spoke of vintage wallpaper to me. Maybe you see it differently, but that was my inspiration for the card. Note- there are some retired items used here. If that's a problem, guess you need to quit reading right now. 😏 That said, let's move on. This DSP measures 5 1/4" x 4". It's attached to the folded Blackberry Bliss card with adhesive. The Blackberry Bliss measures 8 1/2" x 5 1/2" that's scored and folded in half.
The iris used is of course from the Wonderful World stamp set. The DistINKtive images in this set are so nicely detailed and easy to work with. For this card, I used markers directly to the stamp, huffed, then stamped onto the Basic White cardstock. Both Rich Razzleberry and Blackberry Bliss markers were used on the flower and an Old Olive marker was used on the stem and leaves. This is a great way to get more than one color on a single detail stamp.
After stamping the iris on the Basic White cardstock, I looked for a die that has a vintage feel to it. I found this one from the retired Tasteful Label Die set. It was the perfect size and shape for the iris. To frame it, I chose the Layering Ovals Die set, which is also retired. It makes a very nice frame of Old Olive cardstock behind the white. These are layered together with adhesive.
The sentiment is from the Peaceful Moments stamp set on page 29 in the Annual Catalog. I love the mixed font look of the set, and wouldn't this be a wonderful anniversary card? It's stamped to the right onto a 3/4" x 4" strip of Basic White cardstock using Blackberry Bliss ink. It's backed with an Old Olive strip that measures 1" x 4 1/4". It's layered together with adhesive, then attached to the card front about 1" up from the bottom edge. This is attached with adhesive too to keep it flat to the surface.
Now it's time to add the iris layers. They are attached with Dimensionals to the left side of the card front and slightly overlap the sentiment layers. I used a Blackberry Bliss Blends to color the 1/4" White Crinkled Seam Binding. It's tied into a sweet bow and added to the iris with Mini Glue Dots. The last little bits are the pearls. They had color added with the same Blackberry Bliss Blends. Then three were attached in a row to the left of the sentient.
There you have it - another card to add to my stash for the next rash of anniversaries. I love having friends that are having anniversaries of 50 years and more! What a testament to love and lots of compromise over all those years! An inspiration to be sure!
Thanks for stopping back again to see what's new. No telling where my next foray into stamping will take me. It's time to go downstairs and have a look around and make a choice for the next card. Hope you'll join me on my stamping journey.
Just a quick reminder that Sale-a-Bration is going on until the end of August. You still have a couple of weeks to cash in on the free items you can get when you spend either $50 or $100 or more. Stampin' Up! has added more choices to the Sale-a-Bration freebies since they were selling out so fast. Click here to see what's been added for you. If you have any questions, please feel free to call and I can place your order for you or walk you through doing it on your own. Remember, if you order is under $150, please use the Host Code shown at the top right of my blog page. It's much appreciated.
Happy stamping and creating!
Sharon


.jpg)
No comments:
Post a Comment