Hello there! Back again with another idea for you. The card I have would make a lovely card to welcome a new baby, but since I have no new babies to welcome, I chose different wording. I think my friend might like this card since she's like me and loves pastels. So here we go...
Isn't this just a sweet card? The design is a mixture of old and new, so feel free to mix up your designs and use whatever you have on hand. It's an easy fun fold too, so it's a win-win situation as far as I can see. You could change up the sentiment, cardstock and DSP colors to use this for just about any occasion you please. I wanted to use the Count on Me stamp set because I've neglected it badly. You can find the set on page 61 of the Annual Catalog. There are six different darling images to choose from and five sentiments to coordinate with them. Of course, you don't have to use the sentiments just because it's a set. I chose to use a sentiment from the Catch You Later stamp set from last year's catalog. I had my friend in mind and thought this worked well.
Start with a card base of Pool Party that measures 11" x 4 1/4". Score it at 1" and 5 1/2". Next the Hive 3D Embossing Folder was used to give the front some texture. After that, fold back the 1" part of the card front that you scored. I added a piece of the Design a Daydream DSP that is a Host pick in the Annual Catalog. The little piece was a leftover from a different project and measures 3/4" x 4". It's attached with adhesive. Then 3 Dimensionals were placed behind the flap to hold it closed to the front of the card.
Next two rectangles were cut using the Stitched So Sweetly dies. I used the 2nd largest to cut a Blushing Bride layer, and the 3rd largest die to cut a Basic White layer. On the white layer, the little hugging koalas were stamped near the top using Gray Granite ink. To balance them, the sentiment was stamped near the bottom with Gray Granite ink also. I used watercolor pencils to color the koalas and a Blender Pen to lightly blend the colors.
The two die-cut layers were attached together with Dimensionals. A length of Pool Party Grosgrain Ribbon was wrapped around the two layers and tied into a bow. The Pool Party Ribbon is new in the January-April Mini Catalog on pages 15 & 87. This was attached to the card front with Dimensionals also.
Three Iridescent Rhinestone Basic Jewels were added to the card front for a little bling. They were a perfect match for the pastel colors used on this card.
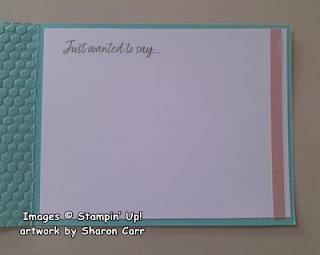
Here's the inside of the card. A piece of Basic White cardstock was cut to 5 1/4" x 4". I had a skinny 1/4" strip of Blushing Bride in my scraps that I added to the edge of the card. I thought it was a nice accent both when the card was closed or open. It's attached with a bit of adhesive.
I used a stamp from the new Country Bouquet set found on page 10 of the January-April Mini Catalog on the inside of the card. Since I'll be using this card to send a note, I thought the words fit just right. They are stamped with Gray Granite ink too.
That's it for today's card post. If you make a card with this fun fold idea, please share your creation with me. I'd love to see what you're making. I'm sorry I used so many retired products today, but I know many of you have those exact things I used. If you don't, please go through your stash of goodies and find something that will work just as well - or maybe even better. If you don't have rectangle dies of some sort, try circles or ovals. The sky is the limit when it comes to stamping!
I don't usually push Paper Pumpkin Kits to you, but there is what looks to be an adorable kit coming up next month. You might want to think about getting a one-time order just for that kit. It also coordinates with the Playing in the Rain suite of stamps and products that are so cute. I've just been playing with them and trying to finish a card or two to share with you. They really are cute!
SUBSCRIPTION
INFORMATION
Subscribe to the February Paper Pumpkin Kit
between 11 January 2023 and 10 February 2023 by
clicking here!
Happy stamping and creating!
Sharon


.jpg)
No comments:
Post a Comment