Hello, hello. Oh, have I got a fun technique and a citrus-y card for you today. I love every part of the Sweet Citrus Bundle that I used here. The stamps and coordinating dies are awesome on their own. But when you add in the embossing folder that matches, woo boy, you're talking Awesome! For this card I used all three components, plus added a few more goodies in with the mix. What a fun project!
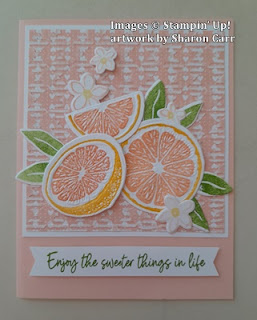
Ta-da! Here it is. Everything on the card is part of the Sweet Citrus Bundle (page 32), except the DSP and embossing folder that was used for the special technique. Don't you just love the colors used here and the background texture that steps it up to the next level? Today I want to focus on the background and cool technique used here. The background is from the retired Country Floral Lane Designer Series Paper that was in the last mini catalog. Yes, it has hearts on it so I wrote it off as Valentine's Day material. But... here I ran it through the Gingham Embossing Folder. The trick is to do a little sanding over the top of the embossed pattern. It really hides the heart striped pattern and makes is into something totally different. The trick is to make sure you sand very lightly so that you don't rip the paper where the embossed edges are getting sanded. I also found that a light circular motion worked the best. Now that you've got that figured out, it's time to give you dimensions and details for making this card yourself.
Start with a Petal Pink card base that measures 8 1/2" x 5 1/2". This is scored at 4 1/4" and folded in half. The Basic White layer measures 4" x 4 1/8". The DSP measures 3 7/8" x 4". It's embossed and sanded. Then it's attached to the Basic White layer. I used 'green glue' so I could maneuver the DSP to fit the white layer with just a skinny frame of white showing evenly all around. This was then attached to the top of the Petal Pink card base. Set aside until you're ready to assemble all the pieces.
The large 3 piece "rind" stamp from the Sweet Citrus set was stamped on a quarter sheet of Basic White cardstock. I used Daffodil Delight ink for the color of the rind and had the stamp and cardstock lined up on the Stamparatus. Lining up the inside of the grapefruit was next. It was stamped with Petal Pink ink for that luscious pink grapefruit color. The die to cut this out was lined up inside the embossing folder. Then the stamped images were lined up over these. Run through the die-cutting machine and there you have three sections of grapefruit. These can also be handled singly by embossing first and then die-cutting the images apart. Both ways work well, just do what you're comfortable with.
Both the triple flower stamp and the single flower were stamped with Petal Pink ink onto Basic White cardstock. The flower centers were stamped with Daffodil Delight ink. Multiple sets of the double leaves were stamped with Granny Apple Green ink. I did off-stamp on this color because it seemed a little too dark for the look I wanted. All the leaves and flowers were die-cut with the coordinating dies for them.
Next is laying out all the pieces on the card base to see how you want to finish the card. I attached one set of leaves under the full half grapefruit with adhesive. Then attached this to the bottom right of the DSP. The leaf was barely going over the edge. Next I added the slice of grapefruit slightly over the 1st image, attaching with Dimensionals. Another set of leaves was tucked in under the 1st grapefruit. The last grapefruit piece was also attached with Dimensionals. Another set of leaves was tucked to the left of this. Three of the flowers were attached with Dimensionals and one with adhesive.
The sentiment comes from the same Sweet Citrus stamp set. It's stamped with full strength Granny Apple Green ink onto a 5/8" strip of Basic White. After stamping, I trimmed the ends a little closer to the sentiment then used the Banners Pick a Punch to flag the ends. This was centered and attached to the front of the card using Dimenisonals.
Since Connie was here stamping with me, I figured you'd want to see her version of the card. As you can see, she used all the same components and colors, but put her spin on it. One of the many things I love about stamping and creating cards is that you can make little changes and get a different card each time. She twisted the card on its side and added a larger layer of the Basic White. She only used two of the large flowers. Connie also made her leaves full strength while I off-stamped. Just little things, but they make a big difference.
Hope you enjoyed this little card idea. Well, it's actually two ideas because there are changes here. Like I said earlier, I'm really lovin' this Sweet Citrus Bundle. It has so much going for it with stamps, dies, and a hybrid embossing folder that matches. Plus, it has some cute sentiments included. What's not to like?
Thanks for stopping by today to see what's happening here. I should have more cards soon that Connie and I created together, but always differently. It's so much fun stamping with friends (or a sister!). Enjoy!
Happy stamping and creating,
Sharon


.jpg)
These are lovely, ladies! The texture truly makes the cards special.
ReplyDeleteThanks, Barb. It really does make both the background and the grapefruits really special. Love the extra textures!
Delete